
Adobe audition dynamic processing настройка
Обновлено: 05.07.2024
The Dynamic Link workflow between Premiere Pro and Adobe Audition gives the user incredible flexibility for tweaking their audio and the amplification that was designed for audio, all the while having a very solid video reference that will contain all the elements as they exist in real time from the Premiere Pro timeline.
So here we have a sequence that I've just created and I'd like to send this to Adobe Audition to do additional editing, mixing, and mastering. So up in the edit menu, I'll choose edit in Adobe Audition, sequence. I'll select the entire sequence, and then I'm going to choose to send the video through Dynamic Link.
Now, previously you would have had to have rendered this out. But thanks to Dynamic Link, this is now a nondestructive, no render workflow. You can set your audio handles. You could choose to render any audio clip effects. Now clip volume keyframe metadata is essential because if you've drawn any volume handles on any of your audio clips, you might want those respected, and Audition will do just that. Go ahead and click okay. It will create a new session for us and open it in Audition so that we can begin working.
So here we are in Audition now, and let's just shuttle ahead. You can see we've got the same thing displayed, and let's play a couple seconds of this. What we give to you for us to play in is like—that's our gift to you. Okay, and just as with Premiere Pro's Mercury Playback engine, if you right click on the video panel here, currently I'm playing back at one-quarter res, but I'm at full resolution when I stop. So this makes it very fast, very efficient when cutting audio to picture in Audition.
Now one of the first things that I like to do is to take all of my like files, meaning all my dialogue, all of my music, and process them all very quickly so that they all have the same peak level. So to do that I'm going to double click on one of these dialogue files, go into my files panel. I'm going to select all of the audio clips, and I'm going to drag them down into this panel here called match loudness. If you don't see that, it's also contained in the window menu.
Under match loudness, now I will be able to see all of the attributes of the various audio files. And in this case, I'm dealing with their peak amplitude. And I want them all to peak around -3.00. So under the match to field down below, I can choose peak amplitude. I'll set the peak to -3.00, go ahead and click run on this. And just like that, now everything is -3.00 and everything has kind of the same—at the same starting point.
Now after I've done all of that, I'll typically start working on the surround mix. And while you may have great capabilities for surround in Premiere Pro, the only limitation is that you're limited to this space. This is where you're going to conduct your 5.1 mixing. And for me, working in this very small environment, it's just not enough. And if I need to edit, I'm confined to this little small square. So once again, this is something that I would do in Audition. So now if we go ahead and select one of our music tracks, if I double click on the surround panner here, I also have this panel docked over to the side.
Now as I move around, not only do you have much more visual detail but you can actually see where the sound and how much of the sound is going to each of the 5.1 channels. Additionally, if I twirl down the automation field here, let's go ahead and show our envelope for angle. This happens to be one of the music tracks. I'm simply going to plot a couple of points here because I want the music to go kind of moving around the surround field, front to back.
Let's go ahead and solo this and watch the surround panner as we've just automated that motion. Okay, now that's quite erratic movement, but you get the idea. You have the ability and total flexibility here for automating your surround mix in a much physically larger environment just to give you more flexibility for getting the best mix possible. Now, of course, we want to send it back to Premiere.
And in this case what I want to do is I want the flexibility to be able to come back to this session, as well. So the first thing, best practice, is to save this. So we'll go ahead and save as. Now, multitrack, export to Adobe Premiere Pro. Now I have the ability to send this back either as stems or as a stereo mono or interleaved multichannel file.
So if I send back stems, I can click export and it will do just that, it'll create new stems. It'll place them in a new track for me, which you can see here. Let's go ahead and make this full screen. And now you can see all the dialogue from the original track one is here in track five. All the dialogue originally on track two is now here on track six and the music, et cetera.
But what if you don't actually need stems? What if really the picture is locked and I'm just doing a final mix? Well, you also have the ability to send interleaved files. So for this case, I'm going to choose mix down to 5.1. Once again it will send over to Premiere Pro in a new track.
Let's go ahead and make this full screen, zoom in a bit. And now on track nine you can see I've got my interleaved multichannel file living inside of Premiere Pro. Now what if I'm watching this, and the picture is fine but there's a small tweak that I want to make to the audio. Even if you closed that session—let's go ahead and close our Audition session—from within Premiere, I don't even need to reestablish the Dynamic Link anymore. I can simply take this interleaved mix. I can choose edit original, the standard Adobe edit original. It will then relaunch the session that created that file and everything, including all of the surround information that I created, is there allowing me to re-edit, re-tweak this and then send it back to Premiere Pro using that same multi-track export to Premiere Pro command.
So I can batch process files for loudness, for peak amplitude. I can analyze the actual audio in question. I could do more advanced surround mixing and automate those surround mixes. And then I have a very easy way to send back individual stems, mono, stereo, or multi-channel files directly back to the Premiere Pro timeline.
Во время записи вокала, одни его части звучат громче других. Всё это происходит по нескольким причинам. Первая – это отдаление и приближение к микрофону вокалиста в процессе пения. Вторая – разница в громкости при пении куплетов и припевов. Обычно припевы получаются более громкими из-за более эмоционального исполнения.
Обработка вокала с помощью инструмента Dynamics Processing
Для устранения разницы в громкости применяются специальные приборы динамической обработки звука, называемые компрессорами.
Рассмотрим процесс обработки вокала инструментом Dynamics Processing программы Adobe Audition 3.0
1. Запустим программу Adobe Audition 3.0 и загрузим наш вокал, выбрав в меню File / Open. На графике волновой формы вокала отчетливо видна разница в громкости на разных участках. Также мы можем увидеть превышение сигналом порога в 0 дБ, что чревато появлением клиппирования.

2. Используем для обработки вокала инструмент Dynamics Processing. Для этого выберем в меню Effects / Amplitude and Compression / Dynamics Processing.

3. Настраиваем плагин. Для этого давайте рассмотрим 4 его вкладки.
Вкладка Graphic используется для прорисовки графика компрессии.
По горизонтальной оси регулируется уровень входного сигнала, а по вертикальной – выходного. Инструмент может быть использован как компрессор, лимитер, экспандер или гейт.
На этой вкладке вы можете добавлять на график дополнительные точки и регулировать их положение по необходимости.

На вкладке Traditional настройки плагина представлены в более привычном виде. Здесь можно настроить порог срабатывания (Threshold), коэффициент компрессии (Ratio) и режим работы плагина для шести точек, а также уровень сигнала на выходе после компрессии.

Вкладка Attack / Release предназначена соответственно для настроек параметров атаки (скорости срабатывания) и восстановления (скорости выключения). Здесь также можно увеличить уровень выходного сигнала.

Вкладка Band Limiting предназначена для выбора диапазона компрессирования с помощью параметров Low Cutoff (отсечение сигнала, который находится ниже заданного порога) и High Cutoff (отсечение сигнала, который находится выше заданного порога).

Для правильной настройки компрессора установите следующие значения: Threshold – 0 дБ, Ratio – 2, Attack – 2-10 мс, Release – 150 мс. Начинайте опускать порог срабатывания (Threshold) пока не почувствуете, что сигнал подвергается обработке. После этого, начинайте подбирать соответствующую степень сжатия с помощью параметра Ratio. Это значение колеблется в пределах 2:1 – 8:1. Большие значения могут сделать вокал сухим и безжизненным. Будьте аккуратны, постоянно сравнивайте обработанный сигнал с необработанным.
Если вы услышите так называемую «накачку» (один из нежелательных артефактов) сигнала в промежутках между фразами, попробуйте увеличить время восстановления или поднять порог срабатывания. Если теряется артикуляция отдельных слов, отрегулируйте атаку.
Я выставил следующие параметры:
Ratio – 3, 98: 1
Attack – 8 мс
Release – 270 мс
Output Gain – 5 дБ
Вы можете увидеть эти параметры на рисунках выше.
4. После выполнения необходимых настроек нажимаем Ок.
Давайте сравним вокал до обработки и после.
Послушаем голос до обработки.

Послушаем голос после обработки
Как видим динамический диапазон стал намного уже. Теперь весь вокал имеет приблизительно одинаковый уровень громкости.
Хочется отметить, что для компрессии вы можете использовать более удобные и привычные для вас компрессоры, например Waves C1, Tube-modeled Compressor программы Adobe Audition и многие другие.

На этом этап обработки вокала с помощью компрессии можно считать завершённым.
В следующей статье поговорим о коррекции вокала с помощью инструмента Melodyne.
The Amplitude And Compression > Amplify effect boosts or attenuates an audio signal. Because the effect operates in real time, you can combine it with other effects in the Effects Rack.
Boost or attenuate individual audio channels.
Moves the channel sliders together.
The Amplitude and Compression > Channel Mixer effect alters the balance of stereo or surround channels. You change the apparent position of sounds, correct mismatched levels, or address phasing issues.

Select the output channel.
Input channel sliders
To mix into the output channel, determine the percentage of the current channels. For a stereo file, for example, an L value of 50 and an R value of 50 results in an output channel that contains equal audio from the current left and right channels.
Inverts a channel’s phase. (To understand this key audio concept, see How sound waves interact.) Inverting all channels causes no perceived difference in sound. Inverting only one channel, however, can greatly change the sound.
The Amplitude and Compression > DeEsser effect removes sibilance, “ess” sounds heard in speech and singing that can distort high frequencies.
The graph reveals the processed frequencies. To see how much audio content exists in the processed range, click the Preview button .
Choose Broadband to uniformly compress all frequencies or Multiband to only compress the sibilance range. Multiband is best for most audio content but slightly increases processing time.
Sets the amplitude above which compression occurs.
Specifies the frequency at which sibilance is most intense. To verify, adjust this setting while playing audio.
Determines the frequency range that triggers the compressor.
To visually adjust Center Frequency and Bandwidth, drag the edges of the selection in the graph.
Output Sibilance Only
Lets you hear detected sibilance. Start playback, and fine-tune settings above.
Shows the compression level of the processed frequencies.
The Amplitude And Compression > Dynamics Processing effect can be used as a compressor, limiter, or expander. As a compressor and limiter, this effect reduces dynamic range, producing consistent volume levels. As an expander, it increases dynamic range by reducing the level of low‑level signals. (With extreme expander settings, you can create a noise gate that totally eliminates noise below a specific amplitude threshold.)

The Dynamics Processing effect can produce subtle changes that you notice only after repeated listening. When applying this effect in the Waveform Editor, use a copy of the original file so you can return to the original audio if necessary.
In the Dynamic Processing Effect , you can view the Level Meter and the Gain Reduction Meter. Level Mete r shows the input level of the audio and Gain Reduction Meter shows how audio signals are compressed or expanded. These meters are visible on the right side of the graph as shown below.
Use the Broadcast Limiter preset to simulate the processed sound of a contemporary radio station.

Dynamics tab
Depicts input level along the horizontal ruler (x‑axis) and the new output level along the vertical ruler (y‑axis). The default graph, with a straight line from the lower left to the upper right, depicts a signal that has been left untouched; every input level has the same output level. Adjusting the graph changes the relationship between input and output levels, altering dynamic range.
For example, if a desirable sonic element occurs around ‑20 dB, you can boost the input signal at that level, but leave everything else unchanged. You can also draw an inverse line (from the upper left to the lower right) that boosts quiet sounds and suppress loud ones.
Adds control point in graph using numerical input and output levels you specify. This method is more precise than clicking the graph to add points.
To numerically adjust an existing control point, right-click it, and choose Edit Point.
Removes selected point from the graph.
Flips the graph, converting compression into expansion, or the other way around.
Note: You can invert a graph only if it has points in the two default corners (‑100, ‑100 and 0, 0) if its output level increases from left to right (that is, each control point must be higher than the one to its left).
Resets the graph to its default state.
Creates smoother, curved transitions between control points, rather than more abrupt, linear transitions. (See About spline curves for graphs.)
Boosts the processed signal.
Settings tab
Provides overall settings.
Addresses transient spikes that can occur at the onset of loud signals that extend beyond the compressor’s Attack Time settings. Extending Look-Ahead Time causes compression to attack before the audio gets loud, ensuring that amplitude never exceeds a certain level. Conversely, reducing Look-Ahead Time is desirable to enhance the impact of percussive music like drum hits.
Completely silences signals that are expanded below a 50-to-1 ratio.
Determines the original input amplitude.
Applies gain to the signal before it enters the Level Detector.
Determines how many milliseconds it takes for the input signal to register a changed amplitude level. For example, if audio suddenly drops 30 dB, the specified attack time passes before the input registers an amplitude change. This avoids erroneous amplitude readings due to temporary changes.
Determines how many milliseconds the current amplitude level is maintained before another amplitude change can register.
Use fast attack and release settings for audio with fast transients, and slower settings for less percussive audio.
Determines levels based on amplitude peaks. This mode is a bit more difficult to use than RMS, because peaks aren’t precisely reflected in the Dynamics graph. However, it can be helpful when audio has loud transient peaks you want to subdue.
Determines levels based on the root-mean-square formula, an averaging method that more closely matches the way people perceive volume. This mode precisely reflects amplitudes in the Dynamics graph. For example, a limiter (flat horizontal line) at ‑10 dB reflects an average RMS amplitude of ‑10 dB.
Amplifies or attenuates the signal depending on the amplitude detected.
Applies gain to the output signal after all dynamics processing.
Determines how many milliseconds it takes for the output signal to reach the specified level. For example, if audio suddenly drops 30 dB, the specified attack time passes before the output level changes.
Determines how many milliseconds the current output level is maintained.
Note: If the sum of Attack and Release times is too short (less than about 30 milliseconds), audible artifacts can be heard. To see good attack and release times for different types of audio content, choose various options from the Presets menu.
Processes all channels equally, preserving the stereo or surround balance. For example, a compressed drum beat on the left channel reduces the right channel level by an equal amount.
Restricts dynamics processing to a specific frequency range.
Is the lowest frequency that dynamics processing affects.
Is the highest frequency that dynamics processing affects.
The Amplitude and Compression > Dynamics Effects consist of four sections. They are Auto Gate, Compressor, Expander, and Limiter. You can individually control each one of the section. The LED and gain reduction meters helps you get the overview about how the audio signal is processed.

The different parameters under Dynamic Effects are as follows:
• Auto Gate: Removes noise below a certain amplitude threshold. The LED meter is green when audio passes through the gate. The meter turns red when there is no audio passing, and yellow during the attack, release, and hold times.
• Compressor: Reduces the dynamic range of the audio signal by attenuating audio that exceeds a specific threshold. The Ratio parameter can be used control the change in dynamic range while Attack and Release parameter changes the temporal behavior. Use the Gain parameter to increase the audio level after compressing the signal. The Gain Reduction meter shows how much the audio level is reduced.
• Expander: Increases the dynamic range of the audio signal by attenuating audio below the specified threshold. The ratio parameter can be used to control the change in dynamic range. The gain reduction meter shows the level of reduction in audio level.
• Limiter: Attenuate audio that exceeds a specified threshold. The meter LED turns on when the signal is limited.
To reduce amplitude by varying amounts over time, choose Fade Envelope ( Effects > Amplitude and Compression ).
In the Waveform Editor panel, click the yellow envelope line to add keyframes, and drag them up or down to change amplitude. To quickly select, reposition, or delete multiple keyframes, see Adjust automation with keyframes.
To create smoother, curved transitions between keyframes, rather than linear transition, select the Spline Curves option. See About spline curves for graphs.
To boost or reduce amplitude over time, choose Gain Envelope ( Effects > Amplitude and Compression ).
In the Waveform Editor panel, click the yellow envelope line to add keyframes, and drag them up or down to change amplitude. To quickly select, reposition, or delete multiple keyframes, see Adjust automation with keyframes.
To create smoother, curved transitions between keyframes, rather than linear transitions, select the Spline Curves option t. See About spline curves for graphs.
The Amplitude And Compression > Hard Limiter effect greatly attenuates audio that rises above a specified threshold. Typically, limiting is applied with an input boost, a technique that increases overall volume while avoiding distortion.

Sets the maximum sample amplitude allowed.
Tip: To avoid clipping when working with 16‑bit audio, set this value to no more than ‑0.3 dB. If you set it even lower, to ‑3 dB, you’ll have a little more clearance for any future edits.
Preamplifies audio before you limit it, making a selection louder without clipping it. As you increase this level, compression increases. Try extreme settings to achieve the loud, high‑impact audio heard in contemporary pop music.
Sets the amount of time (in milliseconds) to attenuate the audio before the loudest peak is hit.
Note: Make sure that the value is at least 5 milliseconds. If this value is too small, audible distortion effects occur.
Sets the time (in milliseconds) for the attenuation to rebound back 12 dB (or roughly the time needed for audio to resume normal volume if a loud peak is encountered). In general, a setting of around 100 (the default) works well and preserves low bass frequencies.
Note: If this value is too large, audio can remain quiet and not resume normal levels for a while.
Links the loudness of all channels together, preserving the stereo or surround balance.
The Amplitude And Compression > Multiband Compressor effect lets you independently compress four different frequency bands. Because each band typically contains unique dynamic content, multiband compression is a powerful tool for audio mastering.
Controls in the Multiband Compressor let you precisely define crossover frequencies and apply band‑specific compression settings. To preview bands in isolation, or Bypass buttons to pass bands through without processing, click Solo buttons. After you fine‑tune individual bands, select Link Band Controls to adjust them globally, and then optimize overall volume with the Output Gain slider and Limiter settings.
To change compression settings over time, use automation lanes in the Multitrack Editor. (See Automating track settings.)

A. Frequency bands B. Crossover markers C. Bypassed band (no processing applied) D. Amplitude scale E. Frequency scale
Sets the crossover frequencies, which determine the width of each band. Either enter specific Low, Midrange, and High frequencies, or drag the crossover markers above the graph.

A. Solo B. Bypass C. Threshold slider D. Input Level meters E. Gain Reduction meters
Let you hear specific frequency bands. Enable one Solo button at a time to hear bands in isolation, or enable multiple buttons to hear two or more bands together.
Bypass individual bands so they pass through without processing.
Alt‑click (Windows) or Option-click (Mac OS) Solo or Bypass buttons to quickly apply a unique setting to one band.
Set the input level at which compression begins. Possible values range from ‑60 to 0 dB. The best setting depends on audio content and musical style. To compress only extreme peaks and retain more dynamic range, try thresholds around 5 dB below the peak input level. To highly compress audio and greatly reduce dynamic range, try settings around 15 dB below the peak input level.
Input Level meters
Measure input amplitude. To reset peak and clip indicators, double‑click the meters.
Gain Reduction meters
Measure amplitude reductions with red meters that extend from top (minimal reduction) to bottom (maximum reduction).
Boosts or cuts amplitude after compression. Possible values range from ‑18 to +18 dB, where 0 is unity gain.
Sets a compression ratio between 1‑to‑1 and 30‑to‑1. For example, a setting of 3.0 outputs 1 dB for every 3-dB increase above the compression threshold. Typical settings range from 2.0 to 5.0; higher settings produce the compressed sound often heard in pop music.
Determines how quickly compression is applied when audio exceeds the threshold. Possible values range from 0 milliseconds to 500 milliseconds. The default, 10 milliseconds, works well for a wide range of audio. Faster settings work better for audio with fast transients, but such settings sound unnatural for less percussive audio.
Determines how quickly compression stops after audio drops below the threshold. Possible values range from 0 milliseconds to 5000 milliseconds. The default, 100 milliseconds, works well for a wide range of audio. Try faster settings for audio with fast transients, and slower settings for less percussive audio.
Boosts or cuts overall output level after compression. Possible values range from ‑18 to +18 dB, where 0 is unity gain. To reset peak and clip indicators, double‑click the meters.
Applies limiting after Output Gain, at the end of the signal path, optimizing overall levels. Specify Threshold, Attack, and Release settings that are less aggressive than similar band‑specific settings. Then specify a Margin setting to determine the absolute ceiling relative to 0 dBFS.
Tip: To create compressed audio, enable the Limiter, and then experiment with high Output Gain settings.
Spectrum On Input
Displays the frequency spectrum of the input signal, rather than the output signal, in the multiband graph. To quickly see the amount of compression applied to each band, toggle this option on and off.
Applies immediate, hard limiting at the current Margin setting. (Deselect this option to apply slower soft limiting, which sounds less compressed but can exceed the Margin setting.)
Note: The maximum Attack time for brickwall limiting is 5 ms.
Link Band Controls
Lets you globally adjust the compression settings for all bands, while retaining relative differences between bands.
To temporarily link band controls, hold down Alt+Shift (Windows) or Option+Shift (Mac OS). To reset a control in all bands, hold down Ctrl+Alt+Shift (Windows) or Command+Option+Shift (Mac OS), and click the control.
This effect requires offline processing. While it is open, you cannot edit the waveform, adjust selections, or move the current-time indicator.
The Amplitude And Compression > Normalize effect lets you set a peak level for a file or selection. When you normalize audio to 100%, you achieve the maximum amplitude that digital audio allows—0 dBFS. If you’re sending audio to a mastering engineer, however, normalize audio to between –3 and –6 dBFS, providing a cushion for further processing.
The Normalize effect amplifies the entire file or selection equally. For example, if the original audio reaches a loud peak of 80% and a quiet low of 20%, normalizing to 100% amplifies the loud peak to 100% and the quiet low to 40%.
To apply RMS normalization, choose Effects > Match Volume. If desired, you can apply that command to only one file. (See Match volume across multiple files.)
Эффект динамической обработки. Может быть использован как компрессор, лимитер или Expander. Как компрессор и лимитер, этот эффект уменьшает динамический диапазон, создавая соответствующий уровень громкости. Как Expander, он увеличивает динамический диапазон за счет снижения уровня сигналов. С экстремальными установками Expander-а, можно полностью устранить шум, уровень которого падает ниже определенного порога амплитуды.
Для того чтобы добавить точку, нажмите левой кнопкой мыши в нужном месте, для того чтобы удалить точку, выберите ее и нажмите клавишу Delete.
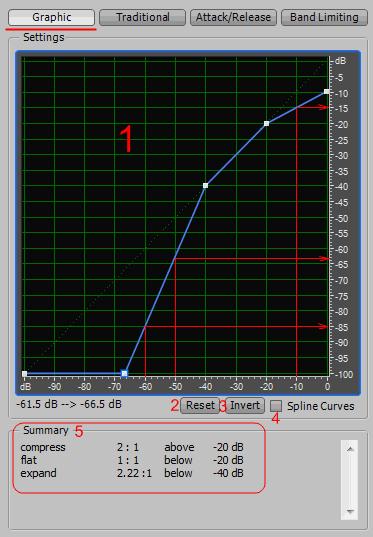
1. Graph — график отражает уровень входного сигнала вдоль горизонтальной линейки (ось х), и новый уровень выходного сигнала вдоль вертикальной линейки (Y-ось) полученный после обработки эффектом. По умолчанию график с линией идущей из нижнего левого угла в правый верхний, изображает сигнал который останется нетронутым. Настройте график, изменяя тем самым динамический диапазон;
Например, вы можете поднять все данные уровень которых около -20 дБ, оставляя все остальное без изменений. Вы можете также инвертировать линию (линия от верхнего левого до нижнего правого), которая будет резко увеличить низкую амплитуду, при этом существенно подавляя высокую амплитуду (то есть, все тихие звуки будут громче, а все громкие звуки будут тише).
2. Reset — сбросить все точки графика.
3. Invert — инвертировать график. Вы можете инвертировать график, если только точки в двух углах со значениями по умолчанию (-100, -100, 0, 0), и если уровень выходного сигнала увеличивается слева направо;
4. Spline Curves — плавный график;
5. Summary — сумма точек.
Traditional
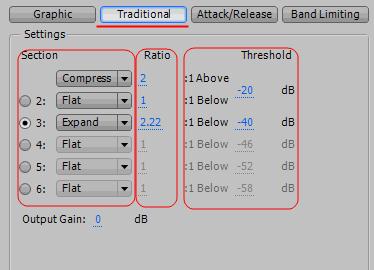
Нажмите Traditional чтобы указать коэффициенты и пороги в более традиционном режиме. Вы можете выбрать Compress, Flat, или Expand в шести разделах, каждый со своими собственными значениями Ratio и Threshold.
Примечание: Пороговые параметры должны уменьшаться по мере продвижения вниз по списку.
Output Gain — восстановление амплитуды после прохождения обработки.
Attack/Release
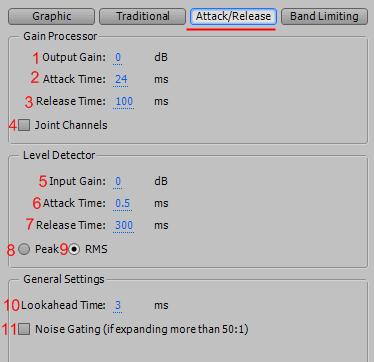
1. Output Gain — усиление выходного сигнала. Это последний шаг при обработке;
2. Attack Time — определяет время в миллисекундах, время получения полного воздействия на сигнал при превышении порога;
3. Release Time — время прекращения сжатия после опускания уровня ниже порогового значения (восстановление сигнала).
Если сумма атаки и спада является слишком короткой (менее 30 мс), могут возникнуть звуковые эффекты такие как вибрирующий шум, он может быть услышан на частоте около 1000 Гц.
4. Joint Channels — используются чтобы компрессировать оба канала вместе на одинаковую сумму (при этом сохраняя стерео-центр картины);
5. Input Gain — усиление входного сигнала (до эффекта);
6. Attack Time — определяет время в миллисекундах, время получения полного воздействия на сигнал при превышении порога;
7. Release Time — определяет как долго конец предыдущего выходного уровня достигнет определенного выходной громкости;
8. Peak mode — это метод толкования графика, который немного устаревший и немного сложнее в использовании, чем RMS. Это эквивалентно двойному значению RMS (например, — 20 дБ в режиме RMS равно -40 дБ в режиме Peak);
RMS mode — является методом толкования графика, который больше соответствует громкости которую вы слышите. Данный метод заставляет выходной сигнал быть точной амплитудой RMS, определенной в графике;
Lookahead Time — помогает с острыми пиками, которые могут возникнуть в начале громкого сигнала и могут выходить за пределы настроек компрессора. Хотя такой подход может оказаться положительным в целях повышения результативности обработки барабанных ударов, но например, он является нежелательным если вы используете лимитирование;
Noise Gating — полностью подавляет шума, которые находятся ниже установленного порога.
Band Limiting
Область частот на которую воздействует Dynamics Processing.
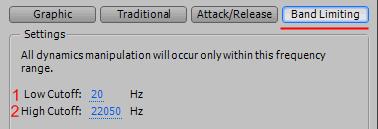
Low Cutoff — самая низкая частота, на которую будет влиять динамическая обработка. Вы можете определять группу или диапазон, которые будут обработаны;
High Cutoff — самая высокая частота, на которую будет влиять динамическая обработка. Чтобы использовать весь диапазон частот в исходном материале, введите половину текущей частоты дискретизации.
Читайте также: