Audio clip fl studio что делать
Обновлено: 07.07.2024
This section covers the FL Studio desktop and basic workflow. FL Studio allows you to load instruments and samples, play these live or manually enter the note data, record external sounds (from a microphone for example) and play the whole mix back through the mixer (adding effects). The completed project can be saved to a .flp or .zip and/or exported (rendered) to .wav, .mp3 or .ogg audio.
Getting Started Videos
General workflow and production including audio recording.
Stepesequencer and percussion techniques .
For a more in depth tutorial see the - FL Studio 20 Beginners Tutorial
After the above, we also recommend you watch the FL Studio | What's New YouTube play list. It's a great way to cover all the latest features.-
Main Windows
The FL Studio desktop is based on a number of windows, most of these are movable (with overlap), resizable, zoomable and switchable so if a window isn't visible open it using the Shortcut toolbar (or the function keys as noted in brackets). The main windows involved in FL Studio music creation are - Channel Rack ( F6 ), Piano roll ( F7 ). Mixer ( F9 ) and Playlist ( F5 ). The Browser ( Alt+F8 ) is used to access audio files, plugins & presets (see the File setting options for adding folders elsewhere on your computer to the Browser). NOTE: If you ever need to reset the position of all windows to their default use ( Ctrl+Shift+H ) or see the View menu options.

Workflow
Once you have mastered the FL Studio interface, the next step is to learn the procedure for creating music - the FL Studio 'workflow'. The typical steps making a track are outlined below:
1. Instruments
It's important to know FL Studio does not impose a simple Instrument > Playlist Track > Mixer Track relationship. While the Channel Rack holds instruments (plugins) that create sound and internal generators that control automation, every pattern has access to all instruments in the rack. This means all patterns have access to all instruments in the Channel Rack. In other words, patterns also are not limited to a single instrument as they are in most other sequencers. This opens several workflow opportunities as shown below. Music data can come in the form of Step sequences and Piano roll scores. The height of the Channel Rack will change dynamically as you add and remove plugins. The Step Sequencer, ( Video Here) is a pattern-based grid sequencer ideal for creating drum loops when Channels are loaded with the native Sampler, that holds a single percussion sample per Channel.
-
Instruments - Instrument plugins make the sounds used in a song and are loaded in the Channel Rack. In the screen-shot above, the instrument interfaces are minimized and can be accessed by Left-clicking on the Channel buttons. Instruments generally fall into two types, software synthesizers that create audio using an internal 'synthesis engine' or sample players that play back 'audio recordings' such as drum loops, percussion samples or instrument samples.
- Composing - Musical notes and chords can be played live via a controller keyboard or entered manually in the Piano roll (( Right-click ) the Channel buttons to open the Piano roll) OR use the default Step Sequencer to trigger percussion samples. There is a Step Recording option on the Shortcut icons too.
- When editing patterns, make sure you are in Pattern Mode so that when you press play the currently selected pattern is played.
- To the right of each instrument button in the Channel window is either a step-sequencer display (rows of squares) or a mini-preview of a Piano roll (green lines). and Piano rolls are interchangeable for each Channel.
- New instruments start with an empty Step Sequencer pattern by default. Step Sequencers and Piano rolls hold the note data only for the instrument channel they are associated with.
- Step-sequencer 'steps' are activated by by Left-clicking the squares to turn them on, or ( Right-click ) to turn them off (great for percussion programming).
- To open an existingPiano roll, Left-click directly on the mini-preview window.
3. Arranging & editing
The Playlist sequences all the elements of the project that play to make the final song. The Playlist window is a stack of multi-purpose 'Clip Tracks' that can host Patterns Clips, Audio Clips and Automation Clips. Unlike most other sequencers, the Playlist tracks are not bound to any one instrument, audio recording or even Clip type. You can put any Clip type anywhere and even overlay Clips. Think of Clips as a little like notes in the Piano roll. When the play-head reaches a Clip, FL Studio plays whatever the Clip instructs it to do.
- Arranging - A handy tool to use when arranging is the Picker Panel (shown above). Use this to select, or drag and drop, Patterns, Audio and Automation Clips into the Playlist. It's also great for managing content, allowing you to group rename and color Clips.
- Arranging with 'Producer edition' - Use the Playlist to hold three types of data, use the Clip source selector (shown below) to select:
-
- Patterns generally hold note data for sequencing Plugin instruments, although they can also contain Automation Event data. - If an Audio Clip already exists, it can be selected from the 'Clip source selector', otherwise you can drag sample/loop/audio files from the Browser directly into the Playlist. Add your own folders to the Browser with the F10 >File settings dialog. - Automation Clips move knobs and controls on the FL Studio interface and plugins. To create an Automation Clip ( Right-click ) on an interface control and select 'Create automation clip'.
- Audio - Since Audio Clips are not available in Fruity Edition, to insert track-length audio you can trigger a Sampler Channel from a Pattern using the Piano roll to control the duration of the sample. The note C5 will play the audio at the original pitch.
- An alternative Clip selection method is to ( Right-click ) a tab of the Playlist Clip Focus selector to show Clips of the desired category.
- Once a Clip is selected, select Draw (Pencil) or Paint (Brush) mode Left-click on a blank area of the Playlist. Dragging in Paint mode will repeat the Clip as you drag horizontally.
- Once placed, Pattern Clips can be clicked + dragged around (horizontally or vertically) by the name-bar that runs along the top of the clip. The way the clip moves will depend on the Playlistsnap settings and zoom level.
- The Playlist Clip Tracks can be named, colored, moved up/down or muted. These functions are accessed by a ( Right-click ) on the Name area at the start of each track.
- You can place any Pattern Clip in any Clip Track, or any number of different clips in the same track. Clip tracks are just universal holding lanes for any and all data types.
- Playback - Make sure you are in Song Mode so that the patterns are played from the Playlist. Otherwise, you will play only the selected pattern. There are Play buttons on the top of the Channel window and Playlist, so you can also initiate a Pattern or Playlist play-back that way.
- FL Studio is not limited to pattern-based sequencing, you can also enter an unused Pattern Clip into the Playlist and play song-length data (patterns). Thus, FL Studio has the flexibility of being either a 'track-based' sequencer, a 'pattern-based' sequencer, or a combination of the two.
4. Mixing
The Channel Rack shows a Channel button for each instrument. The audio from each Channel is sent to one of the Mixer Tracks for effects processing and level mixing. Set the destination Mixer track from the selector to the left side of the Channel Button. The same selector is also available from the Instrument Channel Settings under the Channel Settings icon. Playlist Clip Tracks are not bound to Mixer tracks, rather Channel Rack to Mixer routing decides the Mixer track/s that are used. So Instrument Channels are bound to Mixer tracks, not Playlist tracks. For example, a single Pattern Clip on a single Playlist track, could trigger every Channel Rack instrument, and so all Mixer tracks if they were routed accordingly. If you want to simulate 'traditional' sequencer workflow: Route each Instrument to a separate Mixer track. Use one Instrument Channel per Pattern Clip and use one song-length Pattern Clip per Playlist track.
![]()
- Mixing - Sound from the instrument channels is routed to the Mixer using the Channel settings Mixer TRACK send (as shown above). Use the Mixer to set levels and add Effects (FX) such as reverberation (reverb), chorus and delay.
- See the page Levels, Mixing & Clipping for more detailed Mixing advice, and in particular the section Making tracks louder! (and good) for some tips on getting a great 'commercial' sound.
- Almost all aspects of mixing are automatable, so fader movements and knob changes become part of the overall performance.
- The Mixer is also the place where external audio from a microphone, guitar or synthesizer can be recorded along with the internal instruments.
- The recorded sound is displayed in the Playlist as an Audio Clip.
- NOTE:Routing Instrument Channels to Mixer tracks - The most efficient way to route one or more Channels to Mixer tracks is to:
- 1. Left or Right-Click the Channel Selector LED's to the right side of each Instrument Channel you want to route (( Right-click ) allows multiple selections).
- 2. Right-Click the target Mixer track and select 'Link selected channels > to this track' from the pop-up menu. OR use 'Link selected channels > starting from this track' to assign multiple Channels to multiple Mixer tracks.
5. Exporting audio
- Exporting/Rendering - The final mix is exported from FL Studio to a .wav, .mp3 or .ogg file format by selecting the export option from the file menu in a non-real time process called rendering.
![]()
6. Using the Manual and Website
They say, if you give a hungry man a fish, you feed him for a day, but if you teach him how to fish, you feed him for a lifetime. Let's learn how to fish then.
7. YouTube 3rd Party Video Tutors
As a FL Studio user, there is an exciting and wide range of video producers creating excellent content to help you create music in almost any style. Below are some of our favorite PowerTubers!
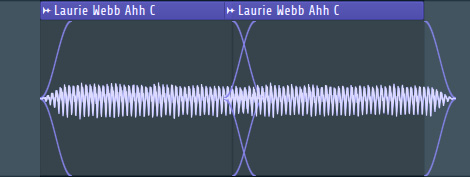
NOTE: The view modes (Stereo, Combined and Spectral) are set from the Channel Settings, Preview window, Right-click options.
Audio Clips
To load a sample in an Audio Clip Channel drag and drop your sample from the Browser (or external File Browser) and drop it on the Playlist. If you drop your sample on the Channel Rack you will create a Sampler Channel. While both Audio Clips and Sampler Channels look similar Audio Clips only have the SMP and MISC tabs on the Channel Settings due to their main purpose being to feed the Audio Clips visible in the Playlist.
See the Audio Clip Menu section for more on-Clip options.
Audio Clip Focus
- Right-Click tab - Show Audio Clip menu.
- Zero-Cross - Slicing & resize edits will be made at the nearest zero-crossing to the slice point. Useful for avoiding clicks at the slice location. NOTE: This option can interfere with your ability to slice at specific locations, as the nearest 'Zero Crossing' will be used.
- Stretch - When the left or right edge of the clip is selected and dragged the clip will be stretched according to the Audio Clip Time stretching settings. See the section Working with the stretch/pitch functions for more details on synchronizing/beatmatching audio clips to the project tempo.
Working with Audio Clips
- Make unique & Make unique as sample - With Audio Clips the original audio file is re-used in the new Audio Clip channel. Alternatively use 'Make unique as sample' Clones the original Audio Clip AND clones the sample file on disk. Use this when you want to physically edit the sample data and change it in some way.
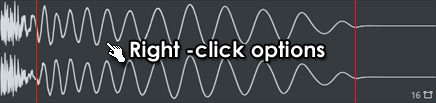
- Autodetect slicing - To split an Audio Clip into beats using its integrated BeatSlicer, open the clip menu (see the mouse pointer in the main screenshot above) and select Chop > Dull / Medium or /Sharp to auto-detect beats.
- Region slicing - To split an Audio Clip into regions, open the clip menu and from the Chop into menu select Regions (if the wave doesn't contain regions, this command is disabled).
Audio Clip Channel Settings
You can open Audio Clips in the Channel Rack to access individual settings. The two tabs that appear on the Audio Clip Channel are described in detail in the Channel Sampler/Settings sections:
Declicking Options
See the Sampler Channel Settings - Declick options to learn more about the special declick features that are available when an Audio Clip is sliced.
The Channel Sampler is an integrated, single-sample, sampler instrument useful for percussion and related one-shot sounds. To load a sample drag and drop the sample from the Browser or Windows Explorer onto Channel Rack. If you drop the sample on the Playlist you will create an Audio Clip, a related, but different instrument type.
![]()
NOTES:
- ADSR & Filtering - Channel Samplers have a number of useful controls under the Channel Settings Tab controls that include the integrated ADSR vol, pan, filter, pitch & LFO envelopes. For example, samples will continue to play after note release unless you activate the Volume envelope.
- Disabled options - You may notice that some of the options in your Sampler Channels are disabled (grayed out), however you can still toggle the switches on/off. This improves workflow when trying out different samples in the same Sampler Channel, so that if a selected option becomes possible it will become activated automatically.
Load and locate samples. Clicking on the sample name will open a File Explorer to the location of the currently loaded sample. Use the icons to the right to:
Load sample file - Opens a file explorer window. Right-Click - To open the history of samples loaded. Locate sample in browser - Opens the Browser to the location where the sample is saved. Remove sample - This only removes sample from the selected Sampler Channel, it does not delete the original sample data file. Content
-
Keep on Disk - For FL Studio 32 Bit this can be used to free virtual memory allocation allowing more and/or larger Audio Clips / Sampler Channels to be used in the project. Sample data is moved from FL Studio's virtual memory allocation to a separate memory allocation. For FL Studio 32 & 64 Bit - It can significantly speed load times for multi-GB projects. When 'Keep on disk' is selected the maximum memory available to each Audio Clip / Sampler Channel will be 2 GB. Your Windows OS version (32 or 64 Bit) and installed RAM will determine how smoothly your sample playback works (if you load more samples than you have RAM then disk-swapping may cause buffer underruns as the data is read off disk).
- Samples must be in 16 or 32-Bit .wav format. Keep on disk won't work with compressed formats such as .ogg or .mp3, otherwise the option will be grayed out.
- Automatically 'Keep on disk' with the 'Auto keep long audio on disk' on the F10 General Options, then re-load your project.
- 'Keep on disk' precludes the use of precomputed effects, that require the whole sample is loaded in memory.
- For smooth operation without underruns or glitches, your physical RAM should (at least) match the project's total sample-space demand. It may also take a while for very large projects to load so be patient. TIP: Zoom out on the Playlist, ( Ctrl + Right-Click ) on a blank area, so all Audio Clips are visible in their entirety prior to pressing Play for the first time. This forces Audio Clip data to be cached into RAM.
Playback
- Start Offset - Offsets the sample start point relative to the start of the sample data (automatable). There is also a 'Sample Start' on the Precomputed tab that trims the sample data to create the new start point. NOTE: The Declicking options work with Start Offset to remove unwanted clicks when non-zero, sample data start points are used.
- Use loop points - Select this option to make the sample loop, when the sample contains loop points (see Sample view below). The play position starts at the sample beginning and when it reaches the loop-end point, jumps back to the loop-start point and repeats this process while the note is held. NOTE: The Precomputed Processes allows you to create a Crossfade Loop.
- Ping pong loop - The play-position bounces back and forth between the loop start and loop end points (forwards then backwards through the loop region).
Declicking
These options help to remove 'clicks' at the start (in) or end (out) caused by sharp level discontinuities when you slice Audio Clips. That is, where the sample starts or ends with a value significantly different from another sample in close proximity, the sudden jump from one value to the next causes a 'click'. The default setting is 'Out only' (10 ms fade), this will not cause audible artifacts. Set by ear.
![]()
- Out only (no bleeding) - No in-declicking, declicking-out is a 10ms (cosine S-shaped) fade-out.
- Transient (no bleeding) - Useful for drum samples as the attack transient is fully preserved (only the first few samples are ramped). The declick-out uses a no-bleeding, short (10ms), filtering fade-out.
- Transient (bleeding) - Same attack processing as above, with a declick-out based on a 20 ms (cosine S-shaped) fade-out.
- Generic (bleeding) - A 20ms cosine S-shaped fade-in and fade-out.
- Smooth (bleeding) - A 100ms cosine S-shaped fade-in and fade-out.
- Crossfade (bleeding) - A 200 ms attack/release that is designed to crossfade contiguous (touching) Audio clips. This is not a true crossfade, where clips overlap, the fade start and end is designed to work well with another clip with the same settings butted up against it. NOTE: Both Audio Clips need to have been sliced to use this setting, as data before and after the slice points is used to create the Crossfade.
Time stretching / Pitch shifting
The Time stretching / Pitch shifting algorithms can synchronize pitch and/or tempo with your project, since pitch and playback speed can be adjusted independently. These are the same algorithms used by the Edison Time Stretch / Pitch Shift tool. There are off-line (computed then applied) and realtime (computed on-the-fly) stretching options. Off-line provides the highest quality but can't be used with Tempo changes. See a video here.
Video Tutorial
Options
- PITCH (Pitch Shift) - Change sample pitch while preserving its length. If the 'resample' method is selected it will be automatically changed to 'Auto' after tweaking this knob.
- MUL (Time Multiplier) - Use this knob to modify the sample length. For example, you can quickly stretch the sample to twice its original length without needing to modify the Time setting.
- TIME (Sample Duration) - The time it takes to play the sample from start to end. Depending on the Stretch Mode, the consequences of adjusting 'Time' will be different. NOTE: To maintain a constant pitch as Project Tempo is automated, use Mode (menu) > Realtime > Stretch.
- Resample - Standard pitch shifting that varies sample length with sample pitch. When the 'TIME' knob is set to anything other than '(none)', for example locked to Project Tempo, shown above, this option behaves like a tape or record, where pitch changes with play-speed. Audio Clips - Will change pitch as Project Tempo is changed or Clip length physically stretched. Piano roll - If you play a chord, each note will play back at a different speed according to the pitch of the note.
- Stretch - Vocals and other rhythmic samples stay in-key and in-time as the project tempo is automated AND OR maintain the original sample duration when playing a MIDI keyboard / changing pitch in the Piano roll. For example, 'Stretch' will allow you to play a chord and keep all voices in-sync. 'Stretch' works for both Audio Clips and Sampler Channels. NOTE: When 'Stretch' is selected for the first time, the TIME knob (sample duration) is locked to the current Tempo. To default TIME to a new tempo: Right-Click the TIME knob and select 'Project tempo'.
- e3 Generic - A 'Default' mode is designed to work with the widest range of input signals. As usual, experiment with other methods if you hear unwanted artifacts.
- e3 Mono - Specialized for monophonic input signals such as vocals or solo instruments. Uses automatic formant preservation techniques.
Special - These options are designed to work with percussion, specifically to preserve attack transients. The important 'click', 'thwack' and 'tshhhh' sounds that start most percussion samples.
- Slice stretch - Use for drum loops, that include slice markers aligned with the drum hits, that have a tempo lower or equal to the project. Slice markers are used for transient preservation and each slice is stretched according to e3 Default. NOTES: Use Slicex for more advanced loop slicing and processing options. If your samples already contain Slices or Regions and 'Load Regions' / 'Slice Markers' is selected. These will be used to stretch the sample and preserve transients. The markers are assumed to be on the beat. Otherwise FL Studio will perform an on-the-fly analysis. This may be more or less accurate depending on the slice data contained in the sample (sometimes samples contain unhelpful slice or region data).
- Slice map - Use for drum loops, that include slice markers aligned with the drum hits, that have a tempo higher or equal to the project tempo. Slices are moved (unstretched) to map to the positions each slice would play at the selected pitch/tempo NOTES: Use Slicex for more advanced loop processing options. If your samples already contain Slices or Regions and 'Load Regions' / 'Slice Markers' is selected. This data will be used to stretch the sample and preserve transients. The markers are assumed to be on the beat. Otherwise FL Studio will perform an on-the-fly analysis. This may be more or less accurate depending on the slice data contained in the sample (sometimes samples contain unhelpful slice or region data).
- Auto - Selects the best stretch algorithm in light of the other options and settings you have selected. You trust us don't you?
- e2 Generic (Pro default & Pro transient) - Older version of e3 Generic.
- e2 Transient (Transient & Tonal) - Transient and formant preserving stretch method.
- e2 Mono (Monophonic) - Older version of e3 Mono.
- e2 Speech (Speech) - Optimized for spoken words. For singing, use the 'e3 or e2 Mono' mode).
Working with the stretch/pitch functions
To perform dynamic tempo changes during the song (tempo automation), use Time stretching > Mode > Stretch to keep samples in sync (otherwise with Resample, pitch and duration will change with tempo). See a video here. Alternatively for a more creative option try Fruity Granulizer.
- Disable time stretching for a sample, turn the Time knob maximum left (right-click to select 'none'). This is the default mode when samples are dropped on the Playlist.
- Manually lock a sample to the project tempo: If your samples are not being automatically stretched when you make a change to the project tempo. There are two methods, either Right-Click the 'Time' knob and select 'Project' OR for more control you can sync to the project as follows:
- 1. Select the Audio Clip's menu (top left hand corner of the Audio Clip) and choose 'Fit to tempo'.
- 2. On the pop-up dialog choose the tempo marked '(project)'
- 3. The clip is now synced (or locked) to the project tempo. Further tempo changes will automatically stretch the clip so that it stays in time and with the original pitch. At any stage you can change the stretch method to one that sounds best and/or alter the pitch using the sample options tab.
- 1. Open the Sample Properties with Edison.
- 2. Make sure the original sample tempo (Tempo (BPM)) is set correctly, you may need to use the 'Autodetect tempo' feature.
- 3. Turn Tempo-sync ON.
- 4. Save the sample with these settings (only .wav files can contain this meta-data, it will be discarded if you convert to mp3 for example).
- 5. Make sure the F10 General Settings, 'Read sample tempo information' option is ON.
- 6. Drag the audio file from the Browser and drop on the Playlist. It will then auto-stretch to match the current BPM of FL Studio.
Precomputed Processes
- Remove DC offset - Removes any DC offset or bias from the sample. DC offset is a bias in the average of the waveform above or below the zero line. This can cause clicks, distortion or FX plugins to behave badly.
- Reverse polarity - 'Flips' the waveform vertically.
- Normalize - Maximizes the sample volume without clipping.
- Fade stereo - Creates a stereo fade from the left to the right channel of the sample.
- Reverse - Reverses the sample.
- Swap stereo - Switches the left and right channels of the loaded sample.
- Sample Start (SMP START) - This control redefines the start point by trimming the sample to the start selection, updating the view to reflect this. This can be useful for functions that process the entire sample window. If you need to automate the start point use the 'Start Offset' in the Playback section.
- Length - Redefines the sample end (length) and updates the view to reflect this.
- Fade in (IN) - Applies a quick fade-in to the sample (turn maximum left to disable).
- Fade out (OUT) - Applies a quick fade-out to the sample (turn maximum left to disable).
- Crossfade - Allows you to crossfade the sample to create smooth loop sections (turn maximum left to disable).
- Trim threshold (TRIM) - FL Studio trims any silence at the end of a sample. The TRIM option allows you to raise the volume threshold at which FL Studio detects 'silence'. Using this control you can allow FL Studio to filter very quiet noise in your sample or, by setting the threshold to zero, filter 'mathematical' silence.
- Boost - Amplitude level control.
- Clip - Sample will clip if boosted above 0 dB. Useful for distortion sounds.
- A/B - Reverb type. A - Closer source, tighter space. B - Distant source, larger space. Set by ear.
Sample View
![]()
The sample view displays the loaded sample (with all pre-computed effects applied). Information and icons in the lower right section indicate bit-depth (e.g. 16-Bit, 32-Bit) and stereo configuration (: e.g. mono, stereo), respectively. NOTE: MP3, OGG, .WV and 24 bit source samples are converted to 32 bit on loading, so don't use this display to determine the source sample format. Check in the Windows browser.
The display also shows loop points (vertical red lines) and region markers (orange triangles along the top of the display) if these 'meta data' are present within the sample. Loop points and regions can be edited, added or removed using Edison.
Left-click - the sample view to preview the sound (if time stretching is enabled, the preview is tempo-synchronized).
![FL STUDIO Mobile]()
В этой теме ответы на частые вопросы. А так же советы, приемы и тонкости. Разбор функций и возможностей в приложении FL Studio Mobile. Тут только готовые ответы.
Что такое FL Mobile и почему платное?
FL Studio Mobile — это коммерческий продукт компании Image-Line, которая делает настольную версию FL Studio и другие музыкальные плагины и существует уже более 20 лет на музыкальном рынке имея у себя в команде более десятка разработчиков. Это приложение переписано и оптимизировано с нуля для быстрой работы на мобильных устройствах. Имеет большой функционал, стандартные плагины отработки, синтезаторы, и библиотеку сэмплов. Приложение создано профессионалами своего дела за многолетний опыт, преобретая это приложение, вы получаете пожизненные бесплатные обновления, всегда оперативные исправления и обновления следующих версий. И помогаете разработчикам для дальнейшей разработки и улучшения.
![FL STUDIO Mobile]()
Как загрузить в ВКонтакте свой трек?
![FL STUDIO Mobile]()
Где скачать семплы, инструменты бесплатно?
Или можете искать самостоятельно в интернете, так как сэмплов сейчас очень большое количество в разных жанрах.
Куда загружать: Мои файлы » память устройства » FLM User Files » My Samples
Как открыть: Ударные сэмплы можно открыть через инструмент Drum Sequencer или DirectWave. Сэмплы инструментов Bass, Piano, Bells, Plucks через инструмент DirectWave. Эффекты можно открыть как Audio Clip.
![FL STUDIO Mobile]()
Почему в проекте треск, хрип, щелчки?
Здесь может быть несколько причин. Сильно завышен уровень громкости одного из инструментов или нескольких, поэтому происходит перегруз. Возможно сам телефон слабоват и не справляется с большими и загруженными проектами.
И возможно, не правильно выбран режим в настройках аудио. Так как для разных смартфонов может подойти разный режим. Попробуйте переключить все три режима «Mode» c включенным «Multi Core» и без.
![FL STUDIO Mobile]()
Как сделать автоматизацию / Automation?
Если вы хотите сделать плавный подъем громкости, открытие фильтра, усиление реверберации или других параметров. Нужно сделать автоматизацию этого параметра. Добавляем, например, на канал дорожки «Leveller», нажимаешь на полоску громкости, далее внизу три точки и «Add automation track». Далее рисуем линию снизу вверх. И получаем автоматизацию громкости. Тоже самое и с другими параметрами и ручками на эффектах или инструментах.
![FL STUDIO Mobile]()
Для чего нужен лимитер / Limiter?
Для чего нужен компрессор / Compressor?Более подробнее лучше почитать в интернете, что такое лимитр и компрессор. По сути они почти одинаковы, если коротко, то компрессор делает тихие звуки громче, а громкие (пики) тише. Лимитер делает тихие звуки громче, а громкие (пики) срезает. Но для того, чтобы лимитер правильно работал, нужно чтобы при пустом мастер канале ваш трек играл не громче (пики) -8dB. Если ваш трек долбит в 0dB или выше, то лимитер просто сделает ещё хуже и все будет перегружено и хрипеть. На втором рисунке (лимитер из настольной версии) видно по графику, что примерно происходит со звуком.
![FL STUDIO Mobile]()
Для чего нужен стереоризер / Stereorizer?
Stereoizer - создает стереоэффект из моно источников, делает звук более широким.
Доступны два стереоэффекта:
1. На основе фазы - Strength, Timber, Focus.
2. Delay L/R («эффект Хааса») - задержка левого и правого канала.Strength (сила) - Сила стереоэффекта.
Timber (тембр) - изменяет тембр стереозвука
Focus (фокус) - наиболее часто затрагиваемый диапазон частот. Делает акцент на нужную частоту.Стерео с помощью задержки (эффект Хааса):
Как правило, чтобы использовать это действие, установите значение «Strength», «Timber» и «Focus» на ноль, будет активна только Dalay L/R.
Dalay L/R - задерживает канал L или R на несколько миллисекунд, чтобы создать иллюзию пространства. Чем больше значение, тем больше задержка, а значит больше стереоэффект.
Pan - Стандартный контроль панорамирования.
В зависимости от инструмента и его характеристик может подойти одно и двух решений или оба. Как правило ударные или короткие звуки (Leads, Pluck) реагируют лучшим образом на эффект задержки Delay L/R. А например продолговатые звуки Pads, Strings, Atmosphere будут лучше реагировать на фазовое стерео. Но все зависит от конкретной ситуации.
Добавьте плагин на одну из своих дорожек, где короткие звуки, например Pluck. Сделайте настройки, как на скрине и послушайте звук с выключенным и включенным плагином.
![FL STUDIO Mobile]()
Как загрузить, импортировать MIDI файлы?
Для начала перетащитe свои миди файлы в папку: Память телефона » FLM User Files » My MIDI. Затем откройте FL Mobile и на трековом микшере (стойка слева) на нужном инструменте (дорожке) нажмите и удерживайте значок «клавиши», далее всплывет меню настроек дорожки, там есть пункт Import MIDI Tracks.
Как вставить, загрузить сэмплы или mp3?
Перетащитe свои сэмплы, wav или mp3 файлы в папку: Память телефона » FLM User Files » My Samples. Затем откройте FL Mobile и внизу плейлиста есть кнопка «плюс», выбираете «Audio Clip», добавляется аудио дорожка. Кликайте по пустому месту и добавляете свои аудио файлы из нужной папки.
![FL STUDIO Mobile]()
Что такое сайдчейн / Side-Chain?
Это способ управления какими-либо сигналом с помощью другого сигнала. Чаще всего под этим выражением понимается сайдчейн-компрессия, когда например бочка управляет басом, подавляя его, посредством компрессора, чтобы избежать конфликтов в нижних частотах.
В последнее время чаще используется сайдчейн посредством автоматизации громкости или частоты, рисуя кривую, при которой происходят изменения. Например, тот же бас или лид партия. И часто используют сайдчейн в виде «Эффект кача», когда инструменты играют громче тише, создавая эффект движения.
Как сделать сайдчейн Side-Chain в FL Mobile?
1. Плагин Autoduck - простыми манипуляциями ручек можно настроить эффект сайдчейн для прямого бита, если бит не ровный, этот вариант не подойдет.
2. Автоматизация громкости. Самый популярный способ. Добавляем на канал дорожки плагин «Leveller», нажимаешь на полоску громкости, то есть обозначаем ручку, далее внизу три точки и «Add automation track» и рисуем линию снизу вверх. (выше есть информация про автоматизацию).
3. Автоматизации частоты у эквалайзера. Еще один уникальный способ по избежанию конфликтов между инструментами, это автоматизация конкретной частоты, не весь сигнал приглушать, а только его часть, например нижние частоты у баса. Сделать автоматизацию ручки у эквалайзера, точно так же нажимаем на нужную ручку, далее три точки и «Add automation track» (видео ниже как это работает).
4. Автоматизацию громкости и частоты использовать вместе. Но в небольших количествах. Это придаст и движения инструменту вверх вниз и уберет конфликтующие частоты.
![FL STUDIO Mobile]()
Как вырезать голос из трека, песни, бита? Оставить только голос или только музыку.
В идеале найти акапеллу, это чистый голос без музыки. Или минус, это только музыка без голоса артиста. В большинстве случаев их можно найти в интернете.
Если не удается найти, то воспользоваться:
iZotope FX 7 youtu.be/y6ykex4tKh4Это плагин для FL Studio на ПК, который в пару кликов отделит голос артиста от трека, песни, бита. Таким образом вы можете отделить и оставить только вокал, или отделить и оставить только музыку.
![FL STUDIO Mobile]()
Как увеличить громкость трека в FL Mobile?
Все очень просто, необходимо использовать лимитр (Limiter). Как правило, трек сводится на низкой громкости, для каких-то отдельных звуков, можно сделать погромче, чтобы услышать детали. Всегда делайте сводите трек так, чтобы у вас оставался запас громкости, не стоит делать трек с самого начала максимально громко. Ваш трек должен звучать не громче -8dB, чтобы был запас (Headroom) для дальнейшей обработки и увеличения общей громкости трека.
После того, как вы свели трек, на мастер канал добавляете Limiter. Для начала увеличиваем Threshold на -8dB. То есть ваш звук сжимается и увеличивается на +8dB. Послушайте как звучит ваш микс и потихоньку можно повышать больше, если в звук не добавляется никаких явных искажений. Главное не пережать и не сделать звук пластмассовым. Где-то в районе Threshold -10-12dB ваш трек должен за звучать. Ручку Output Gain на -0,3dB, так как при дальнейшей кодировки в mp3, происходят искажения, и некоторые пики могут выйти за -0dB. И появятся дополнительные трески.
По мимо этого низкие частоты очень чувствительны к таким подъемам. По этому могут возникать жуткие трески и хрипы.
Как избавиться от хрипов и тресков в треке при введении общей громкости трека?
На мастер канале, и на дорожках с басовыми инструментами (кик, бас, мид бас, жирные пэды), вырезайте эквалайзером в районе 30-40Hz. Этот шлак только портит звук и не несёт в себе никакой полезной информации. На не массовых инструментах лиды, плаки, пэды, смело можете резать от 200hz и выше. Если продолжает хрепеть нужно понизить громкость всей дорожки с басом и киком.
Для более ярких верхов, на эквалайзере перед лимитером, можно поднять на +2dB шельфом в районе 1,20kHz. И немного убавить на -1,4dB в районе 120Hz.
Итог. Чем больше вы сжимаете лимитером, тем больше общая громкость трека, но придется делать тише басовые инструменты. И не стоит очень сильно пережимать, так как может получится не естественный и пластмассовый звук.
Что такое лимитер есть инфа выше. И обязательно почитайте в интернете.
![FL STUDIO Mobile]()
Как разогнать, ускорить, сделать быстрее хэты HiHats в FL Studio mobile?
Многие начинающие музыканты, в основном битмейкеры задаются вопросом как в приложении разогнать, ускорить хэты.
Все очень просто, как обычно добавляем драм секвенсор / Drum Sequencer (скрин 1).
В обычном режиме нельзя растянуть или уменьшить нотки ударных (скрин 2).
Для того что бы ускорить хэты в 2, 4, 6, 8 раз быстрее, нужно добавить дополнительный нотный трек «Add Notes Track» (скрин 3).
Теперь вы можете прописать хэты в виде нот, и уменьшать их размер в несколько раз. В этом треке ударные рисуете заново (скрин 4).
Не забываете что у нот есть привязка к сетке, ее можно менять в левом верхнем углу, нажав и удерживая магнит (скрин 5).
Можно удалить верхний трек, у вас останется только нотная дорожка, и прописать весь бит там. Или оставить нижний нотный трек и прописывать там только хэты или перкуссии, которые нужно делать быстрее (скрин 6).
![FL STUDIO Mobile]()
Что такое AUX Effects Track?
Что такое AUX в Drum Sequencer?
И как с этим работать (скрин 1-2).AUX Track — это как Send канал в настольной версии FL Studio. То есть, мы создаём эту дорожку, называем ее например «FX AUX Reverb», добавляем в стойку эффектов сам ревербератор, настраиваем, как нам удобно (скрин 3). И перенаправляет туда другую дорожку (скрин 4). Получается ваш звук идёт по изначальной дорожке, потом на AUX дорожку и поступает на мастер дорожку.
Для чего нужен AUX Effect Track?
Зачем AUX Track в драм секвенсоре?
Вы сделали партию ударных, нарисовали определенный рисунок. Затем хотите обработать различными эффектами, например реверберация, но для бочки, реверберация не нужна. Создаёте AUX канал, называете его Kick и перенаправляете из драм секвенсора на AUX Kick (скрин 5-6). Таким образом, в общей дорожке с ударными, все кроме бочки, будет под реверберацией. Или требуется сделать хлопок с большой реверберацией, чем остальные ударные. Так же, делаем AUX канал, называем его Clap. Перенаправляем Clap на AUX канал. И в этом канале добавляем реверберацию с длинным, жирным хвостом, готово. При этом не трогаем остальные инструменты.
![FL STUDIO Mobile]()
Для чего нужен DirectWave инструмент?
Где взять Пианино, Скрипки, гитары?DirectWave — Это сэмплер инструмент, который воспроизводит заранее заготовленные звуки, записанные в WAV или DWP формате (каждая клавиша, это отдельно записанный звук). Чаще всего сэмплеры используют для живых инструментов, гитары, пианино, скрипки, виолончели, трубы и другие оркестровые и симфонические инструменты. Так как синтезировать живой инструмент, практически не возможно. По мимо этого, сэмплеры воспроизводят и электронные звуки, то есть, саунд дизайнер создал определенный звук, например Bass, на одном из синтезаторов и сохранил каждую ноту в WAV файл. Затем, вы, не используя сложных синтезаторов, открываете DirectWave и выбираете готовый звук.
Плюсы сэмплеров в том, что таких звуков очень много, на разный вкус и цвет. Основной плюс это минимальное потребление вашего процессора. Так как это WAV файл, а не сложная настройка синтезатора, с различными волноформами, обработками, модуляциями и тд.
Минусы в том, что такие звуки мало управляемы, так как нельзя вернуться к редактированию исходного звука, поменять волну, настройки осциллятора и тд. То есть, пользуйтесь исключительно тем звуком, который есть. Тем не менее, характер звука, все таки можно поменять, применив различные FX обработки: хорус, фейзер, дисторшн, дэлей, реверберация и тд.
DirectWave в FL Mobile имеет пока небольшой функционал, при этом очень прост в использовании (скрин 1-2).
DirectWave воспросизводит файлы, формата DWP (DirectWave Presets), где в одном файле собраны все WAV ноты какого-то инструмента, то есть каждая клавиша, отдельный записанный звук. Но DirectWave воспроизводит и еденичные WAV звуки, что чаще всего встречается в интернете. И путем искусственного поднятия или понижения питча, меняет звук на ту ноту, клавишу, которую нажимаете.
Где бесплатно скачать WAV библиотеки инструментов для плагина DirectWave?
Ну и конечно поиск по интернету. Надеемся, вы усвоили что такое ромплер, для чего нужен DirectWave, более подробно почитайте в интернете и посмотрите видео на Ютубе.
Читайте также:
- Arranging with 'Producer edition' - Use the Playlist to hold three types of data, use the Clip source selector (shown below) to select:
-
There are several ways to load a new instrument, these will determine your main workflow choice. The first two below will auto-name and auto-route the instrument to the Mixer track:
-
Instrument & Audio Track workflow (linear) - Load plugins (or Audio) onto Playlist Track headers by opening the Plugin Picker ( F8 ), Browser or external Operating System Browser (for Audio) to drag-and-drop on the desired Playlist Track header (the area at the start of the Playlist lane).
Alternatively, ( Right-click ) target Playlist Track header and select Track mode > Instrument track and load an instrument from the pop-up menu.
Both cases create a group between the Instrument Channel, Playlist Track and Mixer track including a new Pattern Clip named after the Instrument Channel. Changes to names of colors of any member of this group will ripple throughout. This most closely mirrors Instrument Channel > Playlist Track > Mixer Track workflow found in most other DAWs.