
Clip studio paint экспорт настроек
Обновлено: 07.07.2024
You can manually copy the settings and material data customized in Clip Studio Paint folder by folder to another computer.
This page will guide you through the process of copying settings from one Windows device to another Windows device.
If you are using macOS, please refer to the following page.
Transferring settings from a Windows device to a macOS device or vice versa can cause problems.
If you want to transfer settings to a different OS, please refer to 3. Copy Your Settings to Different Devices and 6. How to Use the Manage materials screen from How to Use the Cloud Service.
Note: Please use the cloud service for the tablet, smartphone, and Chromebook versions.
How to use the cloud service
1. Backup the Clip Studio Paint user settings folder
Procedure 1
Make sure you have the CELSYS folder in the following location.
1.10.13 or later
Note: If you have updated from version 1.10.13 or earlier and have not moved the folder, please see the section for 1.10.12 or earlier.
Note: The AppData folder is a hidden folder. To make it visible, go to the View tab at the top of Explorer and check Hidden Files.
1.10.12 or earlier
Make sure you have the CELSYS folder in your Windows Documents folder.
Procedure 2
Close all Clip Studio applications and copy the CELSYS folder to a USB flash drive or external HDD.
NotePlease make sure that the data capacity of the copied folder matches that of the folder in the source computer. If the data size does not match, the copy may be incomplete. In this case, please delete the folder you copied to the external HDD and copy it again.
If the storage location of a material has been changed
2. Install Clip Studio Paint on a new PC
If Clip Studio Paint is not yet installed on your new PC, follow this procedure.
If you have already installed the software, skip to 3. Copy backed-up user settings to a new PC.
Procedure 1
Click here to download and install Clip Studio Paint on your new PC.
Procedure 2
Check that Clip Studio and Clip Studio Paint can be started up properly.
Note: Your license will need to be activated when you start up Clip Studio Paint.
3. Copy backed-up user settings to a new PC
Procedure 1
Start the new PC.
Close all Clip Studio applications that are running.
Procedure 2
Move the CELSYS folder from its original location to the desktop.
If you cannot find the CELSYSUserData folder, launch Clip Studio and Clip Studio Paint to create it. Once created, close both applications.
If you are using a version earlier than 1.10.13, move the CELSYS folder in the Documents folder to the desktop or another location.
Procedure 3
After oving the existing CELSYS folder, copy the settings folder from the USB flash drive or external HDD to the same location.
NOTEBe sure to replace the folder instead of overwriting it, as overwriting may cause settings to not be updated correctly. Move the original folder to another location as specified as in Procedure 2, and then copy the folder that you want to use.
Choosing the material’s storage location
After completing the above steps, copy the CLIPStudioCommon folder to the new computer in the same location as the original.
Example:
If you moved the original folder in the D drive to "A", create a folder called "A" on the destination D drive as well and copy the CLIPStudioCommon folder into it.
If your PC has a different drive configuration, follow the steps below.
1. Copy the Document and Material folders from the CLIPStudioCommon folder on your external drive to the CELSYS > CLIPStudioCommon folder on your PC.


Export (Single Layer)
Exports all layers of the current canvas as a single flattened image.
· You can set whether or not to export draft layers, as well as the size settings and scaling process.
· For TIFF, JPEG, Adobe Photoshop Document (extension: psd), and Adobe Photoshop Big Document (extension: psb) formats, you can set ICC profile embedding.
· In EX, all pages in the work can be exported together by selecting the [Page Manager] window. For information on how to export pages together, see " Batch export " .
[Export settings] Dialog Box
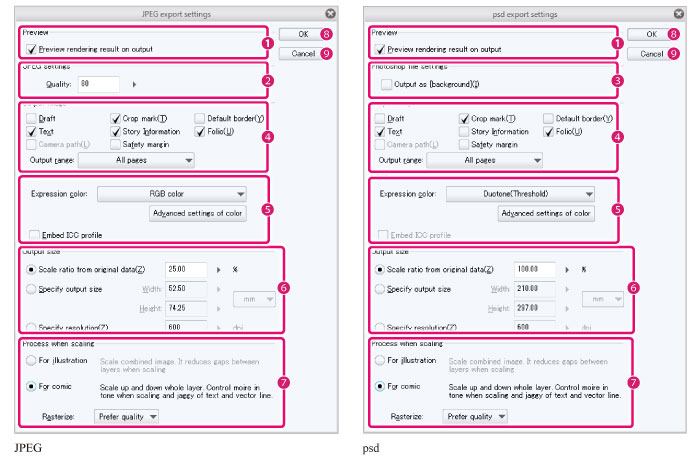
[Embed ICC profile] and [Advanced settings of color] are not available in DEBUT.
(1) Preview rendering result on output
When turned on, the [Export preview] dialog box will when exporting.
For details on the [Export preview] dialog box, see " [Export preview] Dialog Box " .
(2) Quality
When exporting in JPEG, you can set the image quality. The larger the value, the higher the image quality. This option does not appear for save formats other than JPEG.
(3) Output as [Background]
(4) Output image [PRO/EX]
When exporting images, you can select whether to include the drafts, crop marks, default border, text, story information, folio, camera paths, and safety margins. The checked items will be exported.
[Selection] exports a rectangular image with the width and height of the current selection area.
(5) Expression color
For TIFF, JPEG, Adobe Photoshop Document (extension: psd), and Adobe Photoshop Big Document (extension: psb) formats, you can set ICC profile embedding.
Click [Advanced settings of color] to open the dialog box. In the dialog box, you can set the color for crop marks, default border, and the default frequency of screentones. For details on the [Advanced settings of color] dialog box, refer to " [Advanced settings of color] Dialog Box [PRO/EX] " .
· The [Embed ICC profile] option does not appear when saving in BMP, PNG or Targa.
· [CMYK] is available when exporting an image in TIFF (extension: tif), JPEG (extension: jpg), Adobe Photoshop Document (extension: psd) or Adobe Photoshop Big Document (extension: psb) format. [PRO/EX]
· In the [Preferences] dialog box, you can set default values for the color profile, rendering intent, and library for exporting in [RGB] or [CMYK]. For details on these settings, see " Color conversion [PRO/EX] " . [PRO/EX]
· [Auto detect appropriate color depth] is determined based on the expression color of each layer.
· [Duotone (Threshold)] sets a brightness of 50% as the threshold and outputs in binarized form.
· [Duotone (Toning)] exports in screentones according to the default frequency of the canvas.
(6) Output size
You can specify the size of the file to output.
Scale ratio from original data
Specify the size of the image to export as a ratio of the original data.
Specify output size
Specify the size of the image to export with width and height parameters.
You can select a unit from centimeters, millimeters, inches, pixels, or points.
Specify the size of the image to export by specifying the resolution. The resolution can be specified as a value between 72dpi and 1200dpi.
(7) Process when scaling [PRO/EX]
Specify the process for enlarging or reducing the image for exporting. You can select from [For illustration] and [For comic].
When you select [For comic], you can set the image quality if you export specifying [Rasterize]. You can select from [Fast] or [Prefer quality]. When [For illustration] is selected, [Prefer quality] is always used for exporting.
If quality is desired when exporting in a reduced size, we recommend configuring [Prefer quality] for [Rasterize].
(9) Cancel
Cancels the settings and closes the [Export settings] dialog box.
[Export preview] Dialog Box
Click [OK] in the [Export settings] dialog box to display the [Export preview] dialog box. This shows a preview of the exported image. When exporting in JPEG format, you can set the quality of the image while checking the preview.
The [Export preview] dialog box does not appear if [Preview rendering result on output] is turned off in the [Export settings] dialog box.
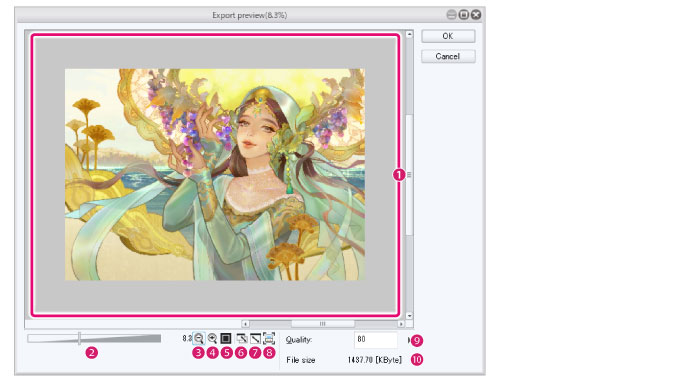
(1) Image preview
This shows a preview of the exported image. You can drag the [Image preview] to adjust the display position of the previewed image.
(2) Scale up/down slider
By dragging the slider, you can adjust the scale of the [Image preview]. Dragging to the right scales up the image while dragging to the left scales down the image. You can also click the numeric value to directly enter the scale.
(3) Zoom out
Click to scale down the image preview.
(4) Zoom in
Click to scale up the image preview.
(5) 100%
Click to display the image preview at 100%.
(6) Fit to navigator
Click to display the image preview to fit to the window size. When the size of the [Image preview] window is adjusted, the image preview will change size accordingly.
(7) Fit to Screen
Click to make the image preview fill the window size. When the size of the [Image preview] window is adjusted, the image preview will not change size.
(8) Print size
Clicking it shows the Print size in the [Image preview].
(9) Quality
When exporting in JPEG, you can set the image quality. The larger the value, the higher the image quality. This option does not appear for save formats other than JPEG.
The [Quality] setting is reflected in the image preview.
(10) File size
When exporting in JPEG, the size of the file to export is displayed. This option does not appear for save formats other than JPEG.
[Advanced settings of color] Dialog Box [PRO/EX]
In the [Export settings] dialog box, click [Advanced settings of color] to open the dialog box. In addition to crop marks, default border, and safety margins, you can also set the color for exporting the camera and transformed camera paths. You can also set the frequency for tones and effects.
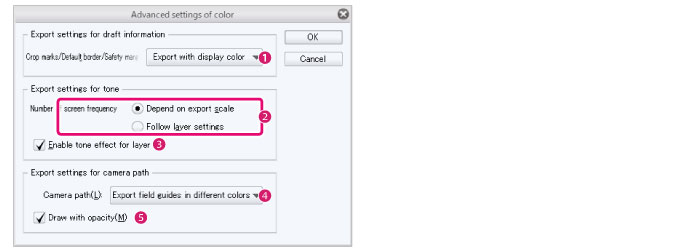
(1) Crop marks/Default border/Safety margins
You can the export color for crop marks, default border, and safety margins.
Export in displayed colors
· The color of crop marks and the default border will be as set in [Preferences] > [Ruler/Unit].
Crop marks, default border, and safety margins will be exported in cyan.
Export in black
Crop marks, default border, and safety margins will be exported in black.
(2) Frequency
Set the frequency for exporting an image.
Depend on export scale
The frequency adjusts depending on the output size specified in the [Export settings] dialog box.
Follow layer settings
The frequency will be as set in the original image.
(3) Enable tone effect for layer
When turned on, the content set in the [Layer Property] palette > [Tone] will be reflected when exporting the image.
(4) Camera path
You can choose the color of the camera path when exporting a file.
Export in displayed colors
The color of the camera or transformed camera paths will be exported according to the settings in [Preferences] > [Camera path/Camera].
The color of the camera or transformed camera paths is set to different colors for each frame. The reference color is the [Display color] set under [Preferences] > [Camera path/Camera]. Even if [Display in different colors] is turned off in [Preferences] > [Camera path/Camera], the colors will be exported in different colors.
Export in black
The color of the camera or transformed camera paths are set to black.
(5) Draw with opacity

Dmitry, ну да вернуть первую раб среду в изначальное состояние Reload

да, попробую. Спасибо. Если получится сообщу. Ну и если не получится, тоже сообщу ))))

Алина, на отдельную кисть этот значок. Или в детальных настройках аналогичный на все кисти. Детальные настройки это где гаечный ключ.

Помогите, пожалуйста, я работаю в режиме "анимация" и когда я перематывают кадры у меня очень плохое качество, как сделать так , чтобы во время воспроизведения анимации было такое же хорошее качество как после экспорта ?

Александр, разве шестерёнка в красном квадрате, слева, и та, на которую указывает стрелка - не одно и то же? Сводит к настройкам по умолчанию только одну выбранную кисть, с которой работаешь. Я пока не нашла способ вернуть все кисти к настройкам по умолчанию, кроме как сбросить всю программу к заводским настройкам

Полина, там рядом с кнопкой открывания настроек тыкните на кружок, он сводит к стандартным настройкам
Ян, мы как раз об этом и говорили с Александром) Но она (шестеренка) сводит к настройкам по умолчанию параметры только одной кисти, я пока не знаю способы разово восстановить все кисти, только каждую индивидуально через шестеренку, либо через сброс программы, чтобы восстановить только предустановленные инструменты. Конечно, на вопрос девушки уже ответили, сейчас развили тему

доброго, а функция смены яркости-контраста-тона на одном отдельном слое в приложении доступны?


Валерия, нет такой возможности в программе.
Если ровные линии нужно провести лишь под определенным углом, даже тремя разными заданными углами, то можно вытащить линейку на три оси (из перспективной делается) и включать выключать к ней примагничивание хоткеем.
Еще можно делать лайн на векторном слое и эмитировать нажим изменяя толщину линии инструментами такой правки потом. В этом случае возможно было бы целесообразно вообще отключить нажим у кисти, чтобы линии проведенные без шифта и с шрифтом не сильно отличались друг от друга перед правкой.
Но как в фотошопе нет такого, наверное к сожалению. Недоработка разработчиков.

Кто-нибудь еще может подсказать, как сделать бэкап всех своих настроек, а именно:
1. Command Bar Settings
2. Shortcut Settings
3. Modifier Key Settings
4. Workspace
?
Уточню, что мне не надо сохранять эти настройки сами по себе где-то в программе, я хочу экспортировать все эти настройки в виде файла, сохраненного на жестком диске компьютера
И есть ли возможность сочетанием клавиш активировать предпросмотр изображения в ч/б с возможностью нанесения мазков в режиме реального времени, своего рода аналог View -> Proof Setup -> Dot Gain 25% из Photoshop
Также интересует возможность активации функции, именуемой "Warp Mode", и активируемой во время трансформирования. Она накладывает сетку на выделенную область, и путем взаимодействия с составляющими этой сетки, можно производить деформацию выбранной области (см. скриншот)
Валерия, возможно можно перебросить все настройки через облако, но я не разбирался
Насчет ч/б. создай выше всего слой залитый нейтральным цветом и поставь его в режим колор. Нужно в чб включишь этому слою глазин, не нужен выключишь.
Сетка трансформации есть отдельным инструментом в меню Edit, подменю трансформация. По умолчанию клавиша не назначена, можно назначить самостоятельно. Или вывести кнопкой в команд бар (вверху такая панелька с командами) или в бар, что ниже выделенной области появляется.
Читайте также: