Drumaxx fl studio как пользоваться
Обновлено: 07.07.2024
мастеринг лучше делать в какой нибудь другой проге, потому что ресурсы проца лучше оставить для большего количества гармоник. лучше куб наверное..сводишь в фруктах и готовую вавку в куб , можно и в саунд форже, да куда угодно..можешь и в фрукт обратно её загрузить, если он тебе привычней, просто долго будет загружаться и сохраняться.
Вешай на мастер iZotop Ozone , некоторые пользуются другими плагами.. кто в чём привык. Изотоп хорошо выполняет свои функции.
главное при мастеринге (не считая руки с ушами) - помещение и контроль. одной пароы мониторов, даже высококлассных, увы не хватит.
. именно по этому у мну такой г мастеринк
Видеообучалка для Озона. Все понятно - хоть и на аглицком.
а если звуковуха простецкая?хороший мастеринг сделать нереально?или от кривизны рук все зависит?
кто то говорит,что не в звуковухе дело,главное слух.а кто то утверждает,что без хорошей звуковухи не добиться качественного звучания.
звуковуха тебе нужна чтоб слышать все честоты а руки чтоб испровлять ошибки
Ты знаешь, мне кажется тут нужно и то и другое. Слух конечно решает всё, но чтобы добиться хороших результатов нужна и хорошая карта, и колонки, также важна аккустика помещения. Вообщем нюансов много. Ну и естественно практика, и еще раз практитка
вобще мастеринг эт не придание треку сочности динамики и тд и тп..мастеринг это подготовка трека к определенному носителю будь то касета или сд. уделяй больше внимания сведению..из гавна даже дорогим компрессором и эквалайзером конфетку не сделать.
вообще название тему вызывает улыбку
FL изна4ально была позиционирована разработ4иками, как прога для людей не владейщих спец музыкальными знаниями инавыками.
В описании так и написали.
Так 4то делать в ней мастеринг.. вряд ли им приходило вв голову, 4то кто-то задастся такой идеей)
попробуй лу4ше в аудишене
хахахахахаахха да харош уже проги грязью поливать, фрукты говно куб говно аблетон говно ризон вопще говно а про лоджик молчю потомучто там и говорить неочем такое говнище да за такие деньги ухахахахахаххаха
никак, для него нужен подходящий аудиоредактор, из разряда Вэйвлаб,
а вобще как бы реально написать на фруктах и пусть сделать мастеринг в других прогах ну вобщем так чтоб звучало как в комерческих?просто не хочу етого фруктового оттенка звука еси реально то скажите как а еси нет то проги для созд подскажите и плз прошу оч сино пишите в личк3 умона и сюда но и в личку обязательно)

Ты не прав. Вот например может слышал о Anno Domini Beats один из самых известных андерграундных продюсеров хип-хоп музыки в мире, с более чем 30 млн. записанных трэков, занимающих верхние строчки на различных чартах.
Владеет своей звукозаписывающей компанией "Anno Domini Records" and Mewsic Ltd. и делает FL Studio. Или наши Diamond Style Production тоже качественые биты.
пропиарили молодого человека на будующее не известно каким способом)
Качества и объема добиваются изначально, в самом начале создания трека с первой бочки или хлопочка. обрабатывать звук и расширять его надо с самого начала, а лучше все это представлять заранее как это все будет выглядеть. Ну а если спонтанно то обрабатывать так как хотелось бы слышать. Вон Andi Vax Открыл сайт (портал) где он предлагает свои услуги мастеринга и что же? он делает мастеринг? да он самым настоящим сведением занимается. (меняет инструменты, переделывает аранжировку и поправляет эквалайзеры и компрессоры) Мастеринг это окончательная подготовка трека к записи на СD, DVD там не знаю винил. А это уже проблема Лебла у которого должна быть студия ну или знакомый)). Из FL Studio можно выжить все что угодно, правильно пользоваться надо. И это не красивые слова это так и есть.
Да и именно по этому множество музыкантов пишут в фл, выпускаю треки и не партся
Мастеринг не для фруктов ТОЧНО. точнее фрукты не для него. более или менее звук из него можно выжать путем использования мифического количества фильтров и примочек, но от его фирменной пластмассовой оцифровки уже никуда не убежишь. Тут поможет только рендер в ВАВ и специально заточеный под мастеринг софт, которого, слава богу, на бесконечных просторах интренета просто куча. Сам люблю адоб за простоту или Нуэндо за качество звука.
Оболочка это программный интерфейс/посредник между плагином инструментом/эффектом и FL Studio. Все параметры являются общими для всех плагинов (родных FL и VST), в то время как опция плагинов (6) появляется только на оболочке VST плагинов. Оболочка обеспечивает совместимость с плагинами VST 1,2 и 3 стандартов (на скриншоте ниже демонстрируется фруктовая оболочка, содержащая VSTi-плагин Drumaxx). Для получения дополнительной информации об установке и использовании сторонних VST плагинов, нажмите здесь.

Существует родная и VST оболочка, FL Studio автоматически выбирает подходящую оболочку, в зависимости от типа загруженного плагина. Есть несколько параметров:
Содержание

Меню плагинов содержит различные специальные команды, в том числе управление пресетами. Отображаемые команды будут зависеть от типа подключаемого плагина. Примечание: Команду Save preset as (сохранить пресет как) можно перетаскивать на совместимые цели.
- Piano roll (пианоролл) - открывает окно пианоролла выбранного инструмента.
- Presets
- Presets (пресеты) - содержит подменю с пресетами для эффекта.
- Randomize (случайно) - даёт случайные значения для публичных (т.е. известных FL Studio) настроек плагина. Если эта функция включена, выбора пресета будет загружать его на 50% со случайными настройками, таким образом вы можете быстро смешивать различные пресеты и создавать новые эффекты.
- Hybridize (гибридизация) - смесь между предыдущим и следующим выбранными пресетами.
- Tree Display (отображать дерево) - отобразить список пресетов в виде "дерева". Меню Presets отключается, если нет эффекта установленного в слот плагина.
- Store in spare state (хранить состояние в запасе) - сохраняет текущие настройки плагинов во временном буфере (запасное состояние).
- Flip with spare state (переключить с запасным состоянием) - переключает текущие настройки плагина, с запасным состоянием.
- Link all parameters. (привязать все параметры) - открывает диалоговое окно привязки доступных для автоматизации параметров плагина с "задействованными" аппаратными контроллерами в последовательности "списка параметров" вниз. Имеется несколько опций для пропуска параметров или перехода к другому пункту списка.
- Базовые операции – выберите в меню Link all parameters, и переместите первый аппаратный контроллер, для которого нужно установить привязку (привязка создаётся с первым элементом в списке Current parameter (текущий параметр)). При перемещении второго аппаратного контроллера он будет автоматически связан со следующим параметром и так далее, пока не будет достигнут конец списка или закрыто диалоговое окно.
- Чтобы пропустить привязку, щёлкните левой кнопкой мыши по кнопке Skip (пропустить) в нижней части диалогового окна (сразу слева от кнопке Accept).
- Чтобы перейти к следующему параметру, используйте меню Current parameter (в самом верху диалогового окна) и выберите нужный вам целевой параметр. Затем вы можете продолжить автоматическое создание привязок с этой точки, перемещая аппаратные контроллеры, как до этого, или перейти к другому параметру используя список Current parameter, как описано выше.
- Allow threaded processing (разрешить многопоточную обработку) - улучшает многопоточность и производительностью многоядерных процессоров. Примечание: Некоторые сторонние плагины могут справляются с многопоточностью хуже. Если вы столкнулись с изменчивым или сломанным звуком (например от GPO/Kontakt Player), попробуйте выключить эту опцию. Чтобы навсегда отключить многопоточную обработку для плагина (даже для будущих сессий FL Studio) отключите опцию Processing > Allow threaded processing и сохраните это для типа плагина.
- Smart disable (умное отключение) - останавливает обработку плагином если он неактивен. Уменьшает нагрузку на процессор. Существует глобальный переключатель Smart disable в панели ( F10 ) Audio settings или Smart disable в Tools > Macros > Misc > Switch smart disable for all plugins (переключить умное отключение для всех плагинов).
- Save channel state as. (сохранить состояние инструмента как. )
- Route to free mixer track (маршрутизировать на пустой канал микшера ( Ctrl+L ))
Настройки оболочки - открывает и закрывает дополнительные детальные настройки которые описаны ниже.
Обработка ввода клавишами - когда включено, плагин получает нажатия печатной клавиатуры перед FL Studio. Любые неиспользуемые плагином нажатия клавиш передаются в FL Studio. Когда выключено, FL Studio получает нажатия печатной клавиатуры перед плагином. Любые неиспользуемые нажатия клавиш FL Studio затем передаются в плагин. Другими словами, это определяет, кто будет первым использовать команды от клавиатуры FL Studio или плагин. Когда команда клавиатуры используется, она не проходит дальше. Если не используется, она передается вниз далее. Этот параметр отображается только в том случае, если это применимо к плагину.
Если вышеуказанное не работает, вам может потребоваться принять во внимание следующее:
- Настройки оболочки - включите опцию Keep focus (см. ниже).
- Мост - плагины подключенные через мост (опция размера битности) при их выборе всегда занимают фокус клавиатуры (то есть по окну плагина было нажато). Вы можете избежать этого, используя плагины соответствующей битовой версии (32 бит или 64 бит) в правильной версии FL Studio. Примечание: FL Studio под Mac поддерживает только 64-битные VST и AU плагины.
- Patcher - все плагины в Patcher при их выборе будут занимать фокус клавиатуры.
- Некоторые плагины - некоторые плагины просто не передают в FL Studio клавишные события. Обратитесь к разработчику.
- Отделённые - некоторые отделёные окна плагинов занимают фокус клавиатуры при фокусировке на них. Избегайте этого, изменив состояние Detached плагина в меню окна плагина.
Обзор пресетов - это переключатели для пресетов, сохраненных пользователем и некоторых плагинов, которые публикуют свои пресеты для оболочки. В этом случае, при нажатии на стрелки влево/вправо пресеты будут пошагово переключаться. Щелчок здесь правой кнопкой мыши откроет меню настроек плагина.
Свернуть/закрыть - свернуть/закрыть интерфейс интерфейс плагина.
Интерфейс плагина - используйте это, чтобы вернуться к интерфейсу плагина, после использования настроек других вкладок.
Настройки - эти опции доступны только при использовании VST плагинов, они предоставляют доступ к расширенному управлению оболочкой VST плагинов.
![Fl Studio Additional Settings.jpg]()
Processing.
![Fl Studio Additional Settings2.jpg]()
Дополнительные настройки инструментов - они доступны для всех инструментов, нажмите здесь для получения полной информации о интересующем разделе.
The Drumaxx percussion modeling instrument gives you total control over 16 physically modeled drums that can be routed to independent outputs for external effects processing. Great, but why should you care when the internet is awash with drum samples? In two words, expressive control. See the Drumaxx video tutorial series here.
Drumaxx is not based on samples or even commonly used 'synthesis' techniques, where oscillators are mixed and the result is always 'electronic'. Drumaxx uses modeling algorithms to create bass drums, hi-hats, snares, realistic and electronic sounds too. But what about the traditional 'Achilles' heel' of synthesis, cymbals? Drumaxx creates cymbals and metallic 'ethnic' percussion sounds too.
At the core of Drumaxx is a model where the vibrating membrane is represented as a mesh of interconnected points. Each point is given physical properties including mass, inertia, stiffness, damping, and all that good physics stuff. For the musician, this means Drumaxx gives you control over multiple parameters such as material, thickness, tension and shape. More importantly, the parameters can be modulated in real-time as a function of velocity or external controls. The drum body is also under user control too, including body size and shape. All this gives you multi-dimensional performance options, a Matrix of variables providing nearly infinite possibilities.
![]()
An alternative to Drumaxx is Drumpad (free) that allows you to load a single Drumaxx Drum Pad into any number of individual Channels and use the FL Studio Stepsequencer or Piano roll to control them.
Visit the Drumaxx & Drumpad Image-Line forum for more patches and programming tips.
Overview
Main Controls
- Logo - Click on the Drumaxx logo to see version and registration information.
- Preset selector - The left/right arrows step through the presets in the bank. Click on the middle name field to open the preset browser and downloader for online content.
- Save/Load - Save/Load the complete set of 16 Drum Pads, including associated sequences. Kits are saved as .dmkit files. To Save/Load an individual Drum Pad use the Pad Name button (Load/Save).
- Options - Options include.
- Load/Save Drum Kit - Save/Load the complete set of 16 Drum Pads, including associated sequences. Kits are saved as .dmkit files. To Save/Load an individual Drum Pad use the Pad Name button (Load/Save).
- Copy/Paste Bar - Copy/Paste the currently selected sequencer Bar for the selected Drum Pad.
- Copy/Paste Track - Copy/Paste all 4 sequencer bars in the 'track' for the selected Drum Pad.
- Copy/Paste Pattern - Copy/Paste all sequencer data in the selected pattern (16 patterns are possible).
- Import Pattern - Loads sequencer patterns according to the Pad Trigger key numbers rather than selected Drum Pad numbers (as the 'Load' option does). For example, if a kick sequence was saved from Drum Pad 1 and Drum Pad 1 was originally mapped to C3, the sequence will load into the Drum Pad mapped to C3 in the current Drum Kit. If there is no Drum Pad set to C3 then the pattern won't be loaded. NOTE: This feature only works with Patterns saved from Drumaxx version 1.1 or higher.
- Save/Load Pattern - Save/Load all sequencer data in the pattern.
- Reset Pattern - Reset all sequencer data in the selected pattern.
Drum Pad Controls
- Volume - Pad volume level.
- Name button - Save, Load, Copy, Paste, Cut, Link & Route a Drum Pad.
- Up / Down arrows - The arrows leading the Drumpad name can be used to scroll through preset sounds. First click the name and load a Drumpad preset, once a directory has been selected the arrows will step through presets in the selected directory.
- Rename - Click to rename the Drum Pad. NOTE: Pad names will show in the Piano roll for the FL Studio version.
- Load/Save individual Pads - Click the name menu and save the Pad with a new name. This is also a great way to create custom drum-kits, loading and saving individual Pads.
- Copy/Paste - Select the source Drum Pad, select Copy, select the destination Drum Pad and select Paste. Easier, use the COPY/PASTE panel and click on the source Drum Pad, select the Copy button (double rectangle), click the destination Drum Pad and click the Paste button (arrow into rectangle).
- Learn - MIDI learn. Select the 'Learn' option and play the the key/pad on the controller you want to link to the Pad. The menu will close and the Pad name show 'Waiting for input' between selecting 'Learn' and playing the controller.
- Cut Group - Select a Cut Group for the Pad. Drum Pads in the same Cut Group will cut each other's sound. The most recent Pad in the Group will cut previously triggered Pads. Useful for transitions between open and closed Hi-hats for example.
- Set Pad Mixer track offset - Selecting an offset will route the Drum Pad to the indicated Mixer track. See: Multiple outputs. NOTE: The maximum number of outputs for the VST version is 11 (Master plus 10) and 99 for the FL Studio version (Master plus 98).
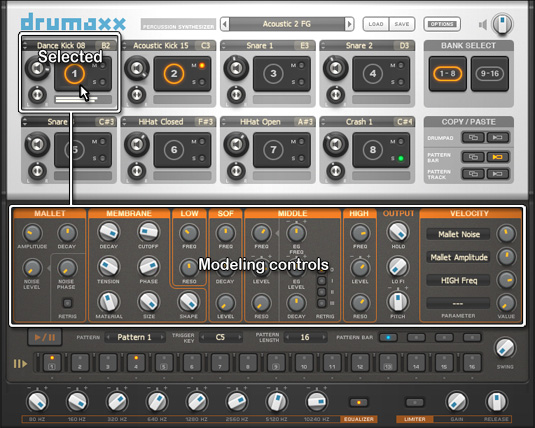
Modeling Controls
The Drum Pad controls change to reflect the selected Drum Pad as shown in the screenshot above. Click on the Drum Pad to be edited.
![]()
Mallet
- Amplitude - Striking force.
- Decay - Decay time for the strike. Simulate quick, sharp hits or slower, deep hits.
- Noise Level - Noise to simulate brushes and softer mallets. As the noise level is increased the fundamental (lower) frequencies are reduced. To compensate you can increase the amplitude.
- Noise Phase - To be used in conjunction with Noise Retriggering. The Phase will influence the tonal character of the mallet.
- Retrig - Noise retriggering. When selected the tonal character of the noise remains constant (the same each time as the noise is 'retriggered'). When deselected the noise will continue to randomize so that each hit will have a slightly different character.
Membrane
- Decay - Decay time for the membrane response and reflections.
- Tension - Membrane tension (how tightly stretched the drum is).
- Material - This control moves the membrane material through a range of possible characteristics and types. Generally left are heavier slower materials and right are lighter more reflective materials. Set by ear.
- Cutoff - High frequency cutoff.
- Phase - Relates to the impact-point on the drum-head. Set by ear.
- Size - Drum-head size.
- Shape - The shape can be varied from square (left) to round (right). Most drum-heads are round, but experimentation is always rewarded!
Low Frequency Filtering
- Freq - Low frequency cutoff.
- Res - Resonance or 'Q' adds a peak at the equalizer's cutoff frequency. Useful to simulate resonances in the drum head or body or accentuate the 'tone' or pitch of a drum.
Self Oscillating Filter (SOF)
-
Freq - Down-sweep starting frequency. The frequency will sweep down to
Mid Frequency Filtering
- Freq - Initial filter cutoff frequency.
- EG Freq - Determines where (left = lower, right = higher) the frequency moves after the mallet hits.
- Level - Boost/Cut Mid frequencies.
- EG Level - Determines where (left = lower, right = higher) and how strongly the frequency moves after the mallet hits.
- Res - Resonance or 'Q' adds a peak at the equalizer's cutoff frequency.
- Decay - How quickly the Freq and Level are modulated.
- Retrig - Retriggering of the modulation envelope. Zero = no retriggering. Retriggering values (I to III) are necessary to make Claps for example.
NOTE: The Mid frequency Freq and Level controls are excellent modulation targets for velocity.
High Frequency Filtering
- Freq - High frequency cutoff.
- Level - High frequency level.
- Res - Resonance or 'Q' adds a peak at the equalizer's cutoff frequency.
Output
- Hold - Overall sustain.
- Lo Fi - Bit reduction effect. Turn right for a low bit-rate crunch.
- Pitch - Drum tuning.
Velocity Modulation
- Parameter - Select Modulation targets by clicking on the Parameter name field and selecting from the pop-up menu.
- Value - Modulates the target parameter value as a function of velocity and 'Value' setting. If the velocity = minimum, the target parameter remains at its original value. If velocity = maximum then the target parameter = Value setting. Intermediate values are the linear scaling between those two points.
NOTE: You can automate any of the modeling controls using standard automation & modulation techniques.
Performance Sequencer
The Sequencer is primarily for live use, so complex and perfectly 'in time' rhythms can be triggered from a single key. When a trigger note is held, the Pad's sequencer will play until a new pattern is triggered or the same pattern is retriggered. Drum Pads can be assigned up to 16 unique patterns, each with a unique trigger key. To create a pattern, click on the Step-Buttons to play in the bar and set their velocity sliders (to the left of each Drum Pad) where needed. NOTE: Velocity must be associated with the Drum Pad controls in the 'Velocity Modulation' matrix for these sliders to have any effect.
- Play/Pause - The sequencer tempo is linked to the host tempo and all patterns on all Drum Pads play.
- Pattern - Select the pattern number, 1 to 16, to play on the selected Drum Pad. To edit a pattern, select the pattern number and edit the Step Sequencer steps by selecting/deselecting them. The pattern changes are automatically saved for the edited pattern.
- Trigger key - Select a MIDI key to trigger the currently selected pattern. By assigning different MIDI keys to each of the 16 patterns (per Drum Pad) complex sequences can be accessed.
- Pattern length - Set the number of steps in each pattern. By default the Step Sequencer displays 16 steps. To activate a step Left-click an inactive step (LED off). To deactivate a step Left-click an active step (LED on). If your pattern is more than 16 steps use the Pattern Bar control to access more steps in banks of 16. Up to 64 steps can be accessed this way.
- Pattern Bar - Accesses each of the 64 possible steps in groups of 16 (bars 1 to 4).
- Swing - Alters the timing of notes to produce a 'lilting' or 'shuffle' rhythm. Swing holds the first note of the bar at the expense of the second note in the bar.
- Steps - Click on a step to activate or deactivate it. The Drum Pad displays a LED when selected.
- Velocity sliders - To the left of each step a small volume slider controls the velocity/volume for the step.
- Copy/Paste, Load/Save sequences and patterns - Use the Options menu.
- Import pattern - Loads sequencer patterns according to the Pad Trigger key numbers rather than selected Drum Pad numbers (as the 'Load' option does). For example, if a kick sequence was saved from Drum Pad 1 and Drum Pad 1 was originally mapped to C3, the sequence will load into the Drum Pad mapped to C3 in the current Drum Kit. If there is no Drum Pad set to C3 then the pattern won't be loaded. NOTE: This feature only works with Patterns saved from Drumaxx version 1.1 or higher.
Effects
Drumaxx incorporates an 8 band Equalizer and Limiter into the output of the plugin.
![]()
Equalizer
- Enable/Disable - Select the switch above the Equalizer label.
- EQ bands - Adjust the EQ bands from -100% (- 6 dB cut) to +100% (+ 6 dB boost).
Limiter
- Enable/Disable - Select the switch above the Limiter label.
- Gain - Limiter input level. Higher levels will cause more limiting. The Limiter threshold is set to 100% output level with an infinite compression-ratio.
- Release - Limiter release time. Longer release times will cause the decay (tail) of the drum to be more audible.
Multiple outputs
- Enable independent Drum Pad output - Click on the Drum Pad name window (shown below left) and select an offset from the drop-down list. The number is an offset to the host Mixer track, listed as 'Master'.
- Change Drum Pad output channel - Click on the name menu on the Drum Pad and select a new Mixer track offset.
![]()
In the example left, the drop-down menus are shown for VST (Pad 2) and FL Studio native (Pad 4).
FL Studio native - Offsets can range from negative values to +98 (not shown). Negative numbers indicate Mixer tracks to the left of Drumaxx's routed Mixer track, positive to the right.
VST - 11 outputs (Master + 10) are available. The Mixer channels these route to will be determined by the plugin wrapper's settings (see your Host's manual).
NOTE: 'Master' in VST & FL versions refers to the Mixer track Drumaxx is routed to, not (necessarily) the host's 'Master' Mixer track.
The Drumpad percussion modeling instrument gives you total control over a physically modeled drum and is based on the Drumaxx instrument. Drumpad has been designed to work with the FL Studio Stepsequencer, so that any number of Channels can be loaded with a Drumpad instrument. Great, but why should you care when the internet is awash with fantastic sounding drum samples? In two words, expressive realism.
![]()
Once a drum sound is recorded, the performance and modulation options are limited to filtering, volume or similar 1-dimensional effects. When a single drum sample is triggered in a roll you get the familiar 'machine-gun' effect, it just sounds artificial. Multi-sampled, multi-layered drums can overcome this limitation but need multi-megabyte or even Gigabyte! drum libraries, and even then, you are still limited to the sounds originally recorded. Drumpad is not based on samples or even commonly used 'synthesis' techniques, where oscillators are mixed and the result is 'electronic'. Drumpad is a truly 'modeled' drum, and not just a single drum, Drumpad can model bass drums, hi-hats, snares, realistic and yes electronic sounds too. But what about the traditional 'Achilles' heel' of synthesis, cymbals? We have left the best until last, Drumpad models cymbals & metallic 'ethnic' percussion instruments with ease.
At the core of Drumpad is a model of the drum-head. Here the vibrating membrane is represented in a mesh of inter-connected of points, each given physical properties, mass, inertia, stiffness, damping and all that good physics stuff. For the musician, this means Drumpad can model the drum-head with multiple parameters such as material, thickness, tension and even shape. More importantly the parameters can be modulated in real-time as a function of velocity or external controls. The drum body is also modeled, in terms of size and shape. All this gives you multi-dimensional performance possibilities, a Matrix of variables providing the almost infinite complexity & subtlety of hitting a real drum.
Visit the Drumaxx & Drumpad Image-Line forum for more patches and programming tips.
Header Controls
- Preset selector - The left/right arrows on the window. Step through the presets in the bank. Right-click to open the preset browser.
- Save Drum Pad - Save/Load the complete set of 10 drumpads. Kits are saved as .dmpatch files. These can be shared with Drumaxx.
- Save single presets - Open the Wrapper menu and use 'Save preset as. '.
Modeling Controls
![]()
Mallet
- Amplitude - Striking force.
- Decay - Decay time for the strike. Simulate quick, sharp hits or slower, deep hits.
- Noise Level - Noise to simulate brushes and softer mallets. As the noise level is increased the fundamental (lower) frequencies are reduced. To compensate you can increase the amplitude.
- Noise Phase - To be used in conjunction with Noise Retriggering. The Phase will influence the tonal character of the mallet.
- Retrig - Noise retriggering. When selected the tonal character of the noise remains constant (the same each time as the noise is 'retriggered'). When deselected the noise will continue to randomize so that each hit will have a slightly different character.
Membrane
- Decay - Decay time for the membrane response and reflections.
- Tension - Membrane tension (how tightly stretched the drum is).
- Material - This control moves the membrane material through a range of possible characteristics and types. Generally left are heavier slower materials and right are lighter more reflective materials. Set by ear.
- Cutoff - High frequency cutoff.
- Phase - Relates to the impact-point on the drum-head. Set by ear.
- Size - Drum-head size.
- Shape - The shape can be varied from square (left) to round (right). Most drum-heads are round, but experimentation is always rewarded!
Low Frequency Filtering
- Freq - Low frequency cutoff.
- Res - Resonance or 'Q' adds a peak at the equalizer's cutoff frequency. Useful to simulate resonances in the drum head or body or accentuate the 'tone' or pitch of a drum.
Self Oscillating Filter (SOF)
-
Freq - Down-sweep starting frequency. The frequency will sweep down to
Mid Frequency Filtering
- Freq - Initial filter cutoff frequency.
- EG Freq - Determines where (left = lower, right = higher) the frequency moves after the mallet hits.
- Level - Boost/Cut Mid frequencies.
- EG Level - Determines where (left = lower, right = higher) and how strongly the frequency moves after the mallet hits.
- Res - Resonance or 'Q' adds a peak at the equalizer's cutoff frequency.
- Decay - How quickly the Freq and Level are modulated.
- Retrig - Retriggering of the modulation envelope. Zero = no retriggering. Retriggering values (I to III) are necessary to make Claps for example.
NOTE: The Mid frequency Freq and Level controls are excellent modulation targets for velocity.
High Frequency Filtering
- Freq - High frequency cutoff.
- Level - High frequency level.
- Res - Resonance or 'Q' adds a peak at the equalizer's cutoff frequency.
Output
- Hold - Overall sustain.
- Lo Fi - Bit reduction effect. Turn right for a low bit-rate crunch.
- Pitch - Drum tuning.
Velocity Modulation
- Parameter - Select Modulation targets by clicking on the Parameter name field and selecting from the pop-up menu.
- Value - Modulates the target parameter value as a function of velocity and 'Value' setting. If the velocity = minimum, the target parameter remains at its original value. If velocity = maximum then the target parameter = Value setting. Intermediate values are the linear scaling between those two points.
NOTE: You can automate any of the modeling controls using standard automation & modulation techniques.
Читайте также:
- Presets (пресеты) - содержит подменю с пресетами для эффекта.