Harmless fl studio обзор
Обновлено: 07.07.2024
Компания image-line выпустила новый синтезатор Harmless с довольно странным описанием:"аддитивный синтезатор, который использует субтрактивный синтез".
Что же имеется в виду ? Этот синтезатор в основе имеет субтрактивный синтез звука, т.е. тембр формируется из богатого гамониками сигнала (шума). Однако делается это с использованием алгоритмов аддитивного метода синтеза звука. Разработчики пишут о том что шум не фильтруется, как это обычно происходит при субтрактивном синтезе, и что делается это ещё до генерирования звука (. ). Какие конкретно плюсы это даёт, примеры звучания и прочую техническую информацию разработчик не предоставил. Следовательно логично предположить то что это простой маркетинговый ход.
Harmless is an additive synthesizer doing subtractive synthesis. Or if you prefer, a subtractive synthesizer powered by an additive synthesis engine.
You may ask: why?
For several reasons. To begin with, there are too many subtractive synthesizers already, often bragging about being virtual analog. This one is digital, and proud to be. Everything is fake, the tone generator, the filter & its resonance, the phaser, all performed on the harmonics, before partials are computed.
Now, how it's synthesized shouldn't matter after all, if the result sounds subtractive. But Harmless is more than a proof of concept, it allows fine control that wouldn't be possible through classic subtractive synthesis. Filtering and phasing can be assigned unusual shapes & slopes, something normally only possible through offline digital filters. Filter slopes can even be defined in Hz instead of octaves. Finally, you get control on each partial's frequency, creating timbres definitely impossible using common synthesis methods.
Harmless, for less harmonics
Again, Harmless is additive doing subtractive. Harmonics are not produced to be filtered, the timbre is filtered before being generated. This may sound like a detail, but generating sounds this way offers a lot more advantages than drawbacks.
Not necessarily less efficient
Powered by a highly optimized, multithreaded additive engine, CPU usage is comparable to the one of traditional subtractive synthesizers, especially for low-passed timbres. Voices may be generating hundreds of harmonics in parallel and still not overload the CPU.
Because less is more
Harmless was limited by design. We don't have any problem with complex synthesizers (we made several), but they're not for everyone. Here, no tabs, no hidden controls, no multipoint envelopes, all features are visible at once, and color-grouped. Over 100 parameters, most of which being automatable, are laid over a clear GUI.
Harmless, only in appearance
Simpler to program, yet packed with evil features. Under the hood, you will find unique options, like linking the phaser's output to partials frequencies. The LFO section can act as a special modulation source, linking the phaser's width to the velocity, or the pitch to the filter's envelope.
Of course, Harmless also offers features typically unique to additive synthesis, like its automatable harmonic mask.
Harmless is also packed with effects, the usual chorus, delay & reverb, but also a multiband compressor/limiter powered by Maximus itself. It also inherited the powerful unison from Sytrus.
In conclusion, our goal was to create a subtractive synthesizer with a unique twist, that also was easy to program, and we believe it succeeded.
Так же, как и его предшественник Harmless, Harmor рассчитан на питание от движка мощного аддитивного синтеза. Его модули будут выглядеть знакомо энтузиастам субтрактивного синтеза: осцилляторы, фильтры и фэйзер. Это есть и в Harmor, но поскольку эти функции выполняются к данным аддитивного синтеза, а не к звуку, это предлагает больше свободы.
Аддитивно/субтрактивный синтез - в Harmor не существует звукового потока, вместо этого используются таблицы частот и эффективная манипуляция данными амплитуды, такой способ не возмоежн при традиционных методах, которые обрабатывают звукового поток. Нарисуйте форму фильтра и получите полный контроль над каждым аспектом процесса генерации звука. Изображение и ресинтез звука - изображения и звуковые файлы (WAV, AIFF, WavPack, MP3, OGG, Rex1 и 2) можно перетаскивать в Harmor обеспечивая воспроизводство звуков "сэмплерного-качества", также можно работать с изображением основывающим синтез, используя Harmor в сочетании с вашим любимым редактором изображений. Просто вырезайте и вставляйте между Harmor и вашим редактором.
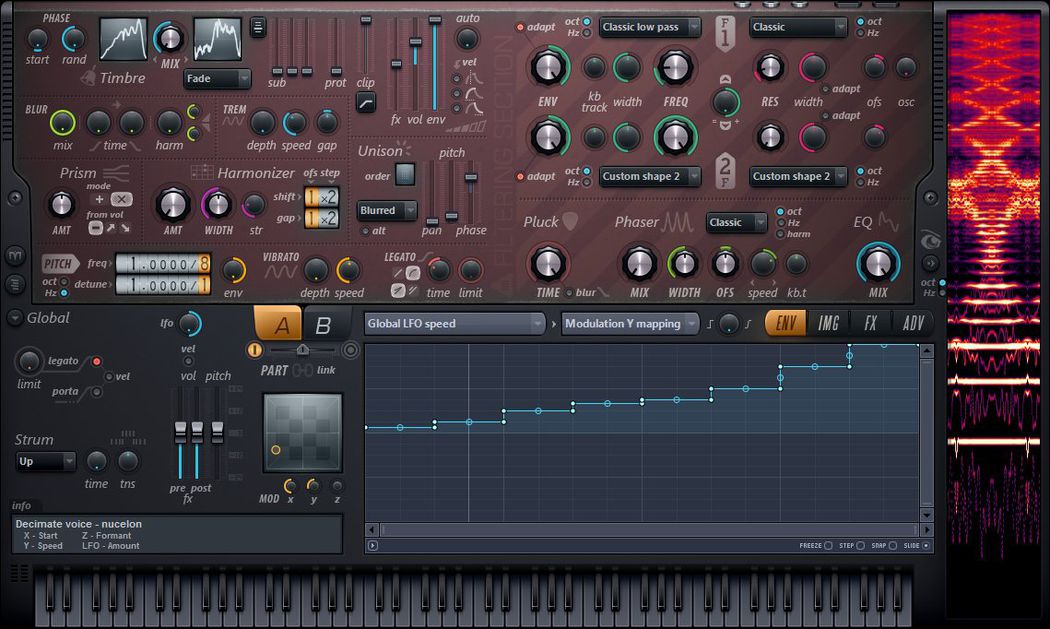
Графический интерфейс Harmor имеет цветовые коды ручек и ползунков так, что соответствующие элементы управления имеют тот же цвет. Мы рекомендуем открывать панель визуализации обратной связи пока вы учитесь программировать плагин, как говорится картинка стоит 1000 слов. Вы также можете щёлкнуть правой кнопкой мыши по большинству элементов управления, чтобы открыть соответствующую огибающую готовую к модуляциям.
Философия дизайна Harmor "чем больше - тем лучше", все функции, элементы управления и гармоническая функция были тщательно отобраны для максимальной эффективности.
- Аддитивный движок - выполнение аддитивно/субтрактивного синтеза так же эффективно, как в традиционных "субтрактивных" синтезаторах.
- Много-модельный синтез - классический субтрактивный+звуковой ресинтез+синтез изображения.
- Специализированные процессоры - Prism, pluck, blur, filters, phaser.
- Модуляция - расширенные состоящие из нескольких частей соединения огибающих.
Harmor может генерировать до 520 синусоид (частичных тонов), в нотах, в голосах унисона и модулирует их в режиме реального времени для ресинтеза любого непрерывно развивающегося звука. Так что же такое аддитивный синтез? Это видео является прекрасным введением в тему - Обертона, гармоники и аддитивный синтез (на английском).
Одним словом, французский математик, Жозеф Фурье, показал, что любую форму можно разложить на множество синусоидальных компонентов. Каждая синусоида называется «частичным тоном», потому как она является частью полного ряда синусоидальных волн, которые в совокупности производят оригинальную форму волны или звука. Частичные тона могут быть гармониками, точно (целое число) кратными базовой частоте (высоте ноты) или нарушающими гармонию, десятично кратные основной частоте. Гармонические частичные тона приводят к укреплению высоты тона основной ноты добавляя сложности, сохраняя при этом тембр мелодичным. Нарушающий гармонию частичные тона имеют тенденцию нарушать высоту тона основной ноты добавляя металлические или шумовые края к тону. Есть три набора данных, необходимых для хранения и обработки аддитивного сигнала.
- Частота частичного тона - воспроизводится частота каждого частичного тона. Этот набор частичных тонов масштабируется на основе фундаментальной часты (основная нота).
- Амплитуда частичного тона - воспроизводится амплитуда каждого частичного тона. Не все частичные тона воспроизводятся на том же уровне.
- Фаза частичного тона - воспроизводится фаза каждого частичного тона. Является ли синусоида увеличивающей или уменьшающей значение от начальной точки?
В результате, вы увидите ссылки на «частичные тона» и «назначения» в данном руководстве и интерфейсе Harmor. Хорошая новость в том, что вам не нужно понимать аддитивный синтез используемый в Harmor, но имея некоторое представление об этом поможет вам быстрее вступить в управление синтезатором.
Harmor это аддитивно-субтрактивный синтезатор, делать быстрые изменения в программе просто и он идеально подходит для живых выступлений и экспериментирования. Основные категории элементов управления:
Harmless performs subtractive synthesis using an additive synthesis engine, but why? The subtractive-additive process can create sounds that are simply not possible or if they are, tediously complicated to program using subtractive synthesis alone. With Harmless, filters and phasers can be assigned unusual shapes and slopes, the slopes can even be defined in Hz resolution instead of octaves. Finally, Harmless gains control of each partial's frequency, opening a world of new possibilities for creating innovative sounds. But all that is just detail, put simply, Harmless is a ground-breaking subtractive-additive synthesizer that sounds amazing, has a huge repertoire and invites experimentation, as you are about to discover.
Check the Harmless video series Image-Line | Harmless (VST & Native Plugin Instrument) or Harmless forum here.

Click on the screenshot above to jump to the help for that section
NOTE: The Harmless GUI color codes knobs and sliders so that related controls are the same color. We recommend loading a Wave Candy Spectral Analyzer after Harmless while you are learning to program the plugin, a picture is worth 1000 words, so they say.
Harmless Key Features
- Additive-Subtractive engine providing unique capabilities.
- Single page color-coded GUI for immediate gratification.
- Efficient CPU usage & multithreading.
- Harmonic mask function.
- Specialized pluck filter.
- Unique phaser & harmonizer
For more detailed information on programming Harmless, see the Tutorial section.
Main Controls
- Timbre - The oscillator or sound generation controls.
- Unison - Voice thickening & stereoizing effect.
- Phaser - Creates totally unique phasing and partial based effects, only possible with Harmless.
- LFO - Modulation source for adding motion and evolution to sounds.
- Effects - Chorus, Delay, Reverb & Compression.
Timbre
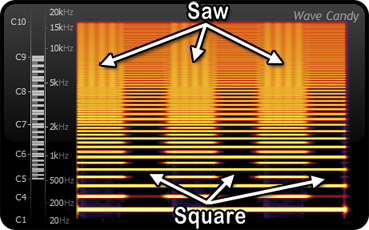
The Oscillator (audio source) is controlled by the Timbre selector. Choose from a range of waveform shapes. The oscillator is based on additive synthesis, that is a fundamental or root pitch and its harmonics are added to create more complex waveforms. Most of the built-in waveforms are bright, rich saws since other common waveforms, like pulse, are created by filtering. A pulse can be generated through the harmonic mask or even with the phaser. The additively generated waveforms are calculated according to the following controls:
- vol - Main output volume.
- VEL - Links note-on velocity to note volume.
Pitch
- porta - Portamento slides between the levels/pitch of the last note & the new one. time knob determines the slide time.
- legato - Legato is a monophonic mode and slides between overlapping notes. The time knob determines the slide time.
- time - Controls the porta and legato slide times.
- VEL - Links note-on velocity to portamento or legato attack time, and note-off velocity to legato release time.
NOTE: The default polyphony is 16 voices (see the Miscellaneous Channel Settings).
Filter
The filter functions control the type of filtering and cutoff frequency. Envelope and LFO functions are added to the filter cutoff frequency as set by the freq control.
- alt - Alternative, 'adaptive envelope' mode ensures the filter cutoff frequency is only modulated over the range from the current cutoff value to the max/min frequency limit. The cutoff modulation range is 'adaptive' in that 100% envelope modulation always = max/min frequency. Direction depends on the amt value being positive or negative. The purpose is to avoid 'pauses' that can happen in 'normal' mode when the cutoff is modulated above or below the max/min frequency and the cutoff pauses at the limit until the modulation value returns to within the audible range.
- att - Attack time.
- Attack slope - The knob below the att control determines the shape of the attack ramp.
- Decay slope - The knob below the dec control determines the shape of the decay ramp.
- Low pass - Filters frequencies above the cutoff frequency.
- Band pass - Filters frequencies either side of a central band.
- Band stop - Filters frequencies inside a central band.
- High pass - Filters frequencies below the cutoff frequency.
- Phaser - 'Comb filtering', a series of stacked band-stop filers.
- Classic - Single narrow resonance peak.
- Spring, Pedestal, Sedge hat, Wide bump & Double cone - Various resonance peak shapes, named according to their approximate shape.
- Well & Wormhole - Cut frequencies at the cutoff frequency with resonant peaks either side of the hole. These settings are designed to be used with the self-oscillation, to avoid annoying interferences and overly loud ringing when the resonance peak passes harmonic frequencies.
- Noise - Special effect. Randomly selects harmonics to play. Use the res knob to control the number of harmonics selected and ofs (offset) to control randomization speed.
Unison
Unison is a thickening and stereoizing effect, similar to chorusing. Unlike chorus, that is applied to the final output, unison is a per-note effect where each note is given a user-defined number of 'subvoices' (from the order setting). Subvoices are then given user-defined variations of panning, volume, pitch and phasing relative to the root note as per the following controls:
- Order - Number of unison voices. NOTE: Limit use of high unison orders where CPU load is a concern.
- Unison type menu - Select from three variations of pitch and panning spread (Classic, Uniform & Blurred). Set by ear.
- pan - Panning variation across the unison voices.
- pitch - Pitch variation (detune) across the unison voices
- VEL - Links note-on velocity to pitch variation.
Phaser
Phasing is the process of creating, constantly moving, frequency cancellation/s in a sound. The Harmless phaser allows individual harmonics to be phased rather than it being applied to the entire output or 'cancellation patterns' (cut templates) to be applied to the timbre making a range of interesting phasing and harmonic effects possible.
- amt - Amount of phasing.
- Phaser type menu - Select phaser type. There are three broad categories as follows:
- Classic, Triangle, Eggs - In this group you will find settings similar to traditional phaser sounds.
- Deep, Deeper, Condom, Twins, Cascade & Box - Are special phasing effects that fully exploit the Harmless additive architecture.
- freq - Extra special! Modulates the frequency of all the partials in the timbre.
- lfo - Subjects the width setting to LFO modulation. The lfo characteristics are set at the main LFO (lower right on the interface).
- lfo - Subjects the offset setting to LFO modulation. The lfo characteristics are set at the main LFO (lower right on the interface).
Harmonizer
The harmonizer clones the existing harmonics upwards, using various methods (+ octaves, or by an offset).
- amt - Harmonizing mix.
- width - Determines how far upward the harmonics are cloned.
- lfo - Subjects the width setting to LFO modulation. The lfo characteristics are set at the main LFO (lower right on the interface).
- VEL - Links note-on velocity to width.
The LFO (Low Frequency Oscillator) is a generic modulation source that can vary the value of a number of target parameters on the Harmless interface including;
- att - Attack controls the time taken for the LFO to reach maximum oscillation. The effect is similar to an attack envelope over the LFO.
- speed - LFO oscillation frequency. Direction left and right of the vertical position controls LFO phase.
- LFO shape/source menu - Select from a number of LFO waveforms or special sources. In particular the Special category sources:
- Filter envelope - Uses the filter envelope shape (as set by att, dec and their associated curve controls).
- Filter frequency - Value of the Filter frequency knob = LFO value.
- Voice random - The LFO value changes randomly each time a note is played. The new random value only affects the new note, sustained notes hold their original LFO values.
- Velocity - Note-on velocity acts as a modulation variable.
- Pitch - Note pitch. LFO Speed becomes an offset when this is chosen.
Effects
The integrated effects are designed to be easily tweaked and not distract you from the task of making music or sound-design. If you want more complex effects then use external plugins following Harmless in the Mixer chain. If you do this, keep an eye on the effects already in use on the patch so that you don't double up on reverbs or delays, unless that was your plan.
- Chorus - The Chorus effect results from the interaction of delayed copies of the input sound, that are detuned by a small and continuously varied amount. It is called 'Chorus' because it can make a single voice sound like that of a chorus of singers (all slightly out of tune relative to each other) and creates a thick and lush texture. The effect is similar to Unison but operates across all voices rather than per-voice and is much less CPU intensive. Select from
- Chorus type - Select from a range of different Chorus styles. Set by ear.
- Mix - Controls the balance between the dry (fully left) and chorused signal (fully right).
- vol - Controls the level of the delay echoes.
- fb - Feedback controls the number of delay echoes.
- time - Controls the spacing between the delay echoes. The control is tempo synced, watch the Hint Bar wile you adjust the time setting (delay values display in beats and beat fractions).
- Reverb type - Select from a range of room sizes.
- Vol - Volume controls the strength of the reverberant sound.
- Compression type - Compression increases the low-level parts of the sound reducing the dynamic range, and so, making it sound louder or whatever the 'Compression type' setting claims. The Limiting preset prevents the output from Harmless exceeding 0 dB (assuming its Mixer track and Channel setting volumes are at the defaults). When Limiting the Mix control is disabled. The remaining presets offer various compression 'flavors' as described by their names. Distortion does what it says. Set by ear.
- Mix - Control the mix between the dry and effected signal. Right = 100% effected.
CPU options
The switches to the right of the effects section provide options to trade audio quality for CPU efficiency.
- Processing quality - Select from normal where everything is normal or high quality where the sonic beauty will make you weep with desire. Use high quality mode for better live quality on transients and very fast LFO's. Quality comes at the cost of CPU load. NOTE: Harmless uses ultra high quality when rendering, and no you can't have that for live use, unless you are using the VST version then it's available on the Hint Bar Options menu.
- threaded - Allows multi-threading for improved multi-core CPU performance. Switching threading off may, in some cases, improve performance if the host's multithreading is more efficient than the plugins own.
About Harmless (?)
Special note colors
The native FL Studio version of Harmless responds to MIDI note colors 14, 15 and 16 as follows:
Attention class! Miss Harmless is ready to start 'Subtractive-Additive Synthesis 101'.
Tutorials
If you open the Harmless presets you will notice a 'Tutorial' category. Here we will explain what's happening with each of these presets.
Filter decay
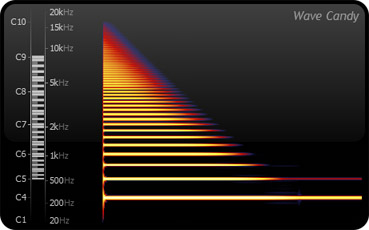
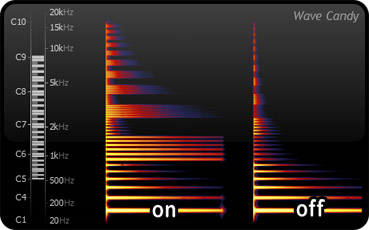
What you hear: Play a note (C5) and notice the sound becoming 'darker' over time. This is caused by the loss of high frequencies as a low-pass filter cutoff frequency is swept down from high to low as shown by the Wave Candy spectrum analysis below.
![]()
![]()
How it's done: The filter type has been set to 'Crude low pass', low pass filters allow frequencies through lower than the filter cutoff frequency (freq). In this instance the starting frequency is set by the amt knob, the decay time is set by the dec knob and the final frequency is (largely) set by the filter cutoff frequency (freq). Keyboard tracking, kb.t, is adding an offset depending on note pitch. This can be useful to make higher notes relatively brighter than lower notes.
- Decay time - Try changing the decay knob and notice how the decay-time changes.
- Decay envelope slope - The Wave Candy display (above) also shows the decay slope. Turn the decay slope (dec) all the way to the right and hold a note. It should sustains, it may take a while, then suddenly drop off. This reflects the rounded slope profile shown below the knob.
- Attack time - Try changing the attack time, att knob, and notice how you can sweep the cutoff frequency up to a peak then down according to the decay time.
- Amount sign - The amt control has a positive and negative direction (either side of the 12 o'clock position). Depending on the slope this can be used to invert the envelope shape.
- Filter types - Experiment with the various filter types selecting them from the drop-down menu.
Key to pulse saw morphing
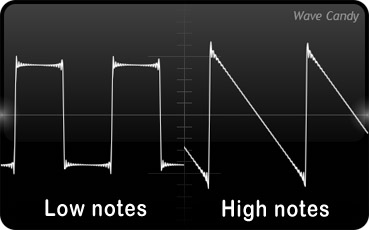
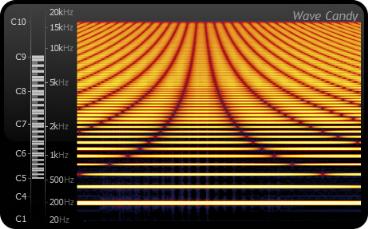
What you hear: This patch morphs the wave-shape (timbre) from a square-wave at the lowest notes to a saw-wave at the highest notes. It is a fairly subtle difference so you may want to set Wave Candy to Oscilloscope mode.
![]()
![]()
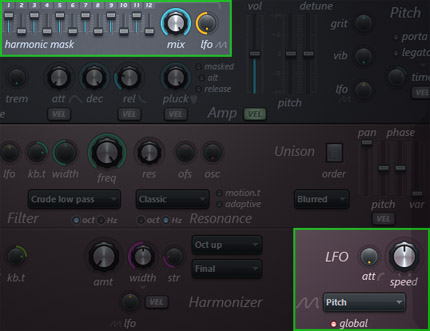
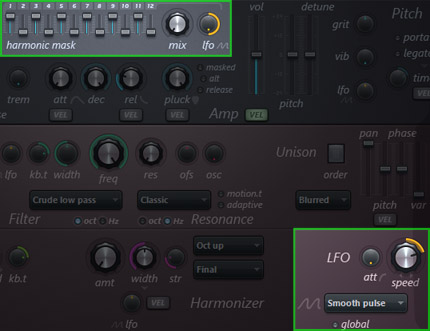
How it's done: The LFO section has been set to a special pitch mode, that is a modulation value that tracks note pitch (small for low notes, large for high notes). The harmonic mask mix is being varied as a function of note pitch. This is caused by the LFO modulation of the Harmonic mask mix value. In this case the low notes receive more masking and the high notes less masking. You will have to trust us that you can turn a saw-wave into a square wave by masking the even harmonics and sounding the odd harmonics, as set by the mask.
- Modulation source - Select Smooth pulse from the LFO shape/source selector and turn the speed control to the 3 o'clock position and play a note. Now the harmonic maskmix value is being modulated by an LFO waveshape. Try experimenting with the other shapes 'Stairs' is fun.
- Harmonic mask - Experiment with various mask-slider positions and see how it changes the waveform.
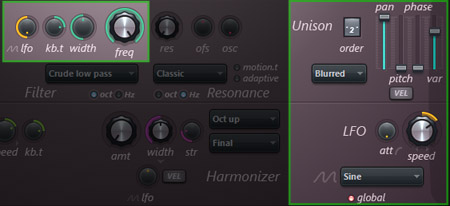
LFO on phaser
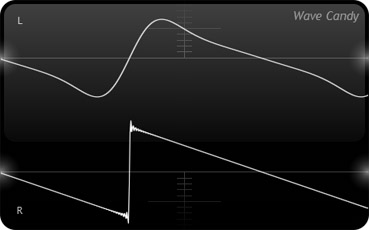
What you hear: A pulsing sound 'rippling' through the note. This is caused by a shifting band of frequencies that are removed from the sound. In other words, similar to sweeping a 'cut' setting on a parametric equalizer. Traditionally the phasing frequency loss is caused by 'phase cancellation' when two identical or very similar sounds are delayed slightly and mixed together. By varying the delay by an LFO the phase cancellation frequencies ripple through the sound. Harmless, with its 'subtractive-additive' architecture can dispense with all that mucking about and simply work directly on the harmonics and remove them as follows:
![]()
![]()
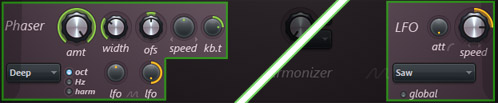
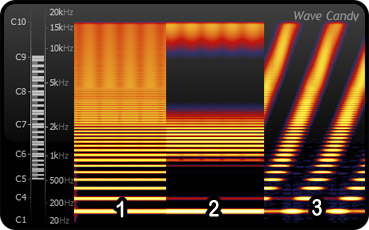
How it's done: Phasing in Harmless is simulated by a harmonic 'mask', essentially a harmonic cut template, that removes a few bands of harmonics. On the spectrograph, ( 1 ) shows the original sound prior to any phaser effect. This was achieved by turning the amount control to minimum. ( 2 ) shows the static harmonic mask (no movement). This was achieved by turning the lfo control associated with the offset to minimum (12 o'clock). ( 3 ) shows the original 'LFO on phaser' patch. The LFO is varying the mask (phaser) offset ofs. The offset just controls where in the frequency spectrum the cut bands appear.
Looking now at the LFO section, note the shape is set to Saw, this describes the repeating LFO modulation pattern. The global switch is off, this means that the phaser lfo 'resets' and start from the same position for each new note.
- Width - Try varying the width parameter and see how more or less cut-bands affect the phasing sound. You can also put the width under LFO modulation by increasing the value of the lfo knob below it.
- Phaser type 'Deep' etc. - Changes the shape of the cut mask. Try the other settings to see how the shape of the mask is changed.
- Phaser type 'Freq' - This one is a beauty! Select it and the section is no longer a 'phaser'. Rather than cutting the harmonics, those that are in the timbre are individually modulated.
- Speed - Note also that the speed control on the Phaser section is a multiplier to the speed on the LFO section. You should also see in the Hint bar the LFO speeds are shown in tempo units. Meaning the phasing effect can be matched to project tempo or multiples off it.
- Ups and downs - You can change the direction of the offset (moving up or down) by the direction you turn the speed controls either side of the 12 o'clock position.
- Global - Turn on the global switch on the LFO section and listen to the way separately timed notes all phase in sync compared to a bit of a 'mess' when it's off.
- Zap - Set phasers to stun!
Local voice random + unison
What you hear: Each time a note is played the pan position of the voice changes.
![]()
![]()
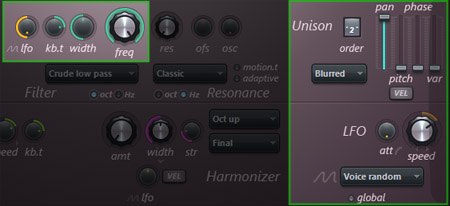
How it's done: The LFO section has a special Voice random mode that selects a new random value for each new note played AND global mode has been switched off, this allows the LFO randomization value to be different for all voices. While the purpose of the pan setting on the Unison is to spread the pan position of the unison voice copies, this isn't what is causing the panning effect. pan only affects the maximum possible pan position in this patch. Panning is caused by the lfo on the filter section causing a random cutoff freq setting for each note played as shown in the spectrograph (13 notes shown). The causes the high-frequency cutoff for each unison voice to differ and this is causing the apparent position of the notes to shift.
- Filter lfo - Reduce the lfo value and notice how the panning effect reduces.
- Unison pitch - Increase the pitch slider. No it isn't responding to the LFO in any way, it just sounds better.
Voice random
What you hear: Subtle variations in brightness from note to note.
How it's done: This patch is almost identical to the Velocity to filter frequency example, however, the LFO has been set to Voice random that generates a new (random) values at each note-on.
Masked pluck
What you hear: A 'masked' pluck timbre. Notice the extra high harmonics when the masked option is on vs off as shown in the spectrograph.
![]()
![]()
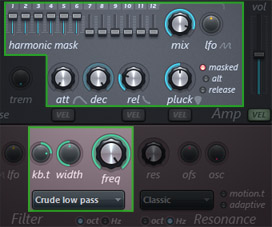
How it's done: The masking function filters harmonics, and so can be thought of as a specialized 'cut' filter. By selecting masked to the right of the filter, it's actually the reverse of what you may expect, that is the mask is ignored during the 'pluck'. The length of the pluck is determined by the pluck knob setting, left is shorter. The pluck control is a specialized and fast low pass filter designed to create pluck effects (naturally enough).
- Pluck length - Starting with the Masked pluck patch turn the pluck knob to the 9 o'clock position and listen to the sound with the masked switch on and off. Notice when it's on the pluck sound has a metallic resonance, similar to a string buzzing on a fret. That's one reason the masked option is there.
- Harmonic mask mix - Notice that the mix control must be at a setting of less than 100% for the masked pluck to work.
- Filter cutoff frequency - Notice also that the filter cutoff frequency freq must allow the unmasked components of the timbre for the masked pluck to have any effect. Lower the frequency cutoff while playing notes and at some point the masked option will cease to have a noticeable effect.
What you hear: Pulse Width Modulation sounds similar to 'phasing' with notes morphing from a full to a thin and brittle tone, and back again.
![]()
![]()
How it's done: This is similar to the Phasing effect as described above. A harmonic cut template (Eggs in this case) has its frequency width modulated by an LFO set to a Saw modulation shape and sync set to Global. This means all notes share the same phase for the LFO modulation. Note the Phaser scale is set to harm, harmonics.
- See the PWM morphing waveform - Open Wave Candy and select the 'Oscilloscope' display. Play a C5 note on Harmless and adjust the update setting on Wave Candy until the waveform stabilizes, somewhere around 12 o'clock. You should see the waveform shape. Note how the waveform periodically morphs between a Saw wave and something more complex. By the way, the Saw shape isn't caused by the LFO 'Saw' setting, the Saw shape comes from the Timbre color setting Saw. Change the Timbre color setting and note the changes in the waveform shape.
- LFO frequency & shape - Play with the LFO speed. Choose the Stairs shape and you can get an octaving pulse set by the LFO frequency.
- Phaser type settings - Try the different Phaser type settings, the Condom shape sounds cool since it has very wide cut-bands.
Saw pulse
What you hear: Is a sound changing tone in a cyclic pattern. This tutorial should some as no surprise if you have read the section on Key to pulse saw morphing.
![]()
![]()
How it's done: The LFO section has been set to Smooth pulse mode. This creates a cyclic modulation value that affects the harmonic mask mix value. You will have to trust us (again) that filtering a saw wave as set by the harmonic mask can cause a saw wave to become a square wave.
- Modulation source - Select Stairs from the LFO shape/source selector and turn the speed control to the 3 o'clock position and play a note. Now the harmonic maskmix value is being modulated by a new LFO waveshape. Try experimenting with the other shapes.
- Harmonic mask - Experiment with various mask-slider positions and see how it changes the waveform.
Unison variation
What you hear: The sound pans left and right when a note is held. All notes are panned in sync, regardless of pitch and the time they are triggered.
![]()
![]()
How it's done: The Unison order (2 in this patch), generates two voices for each note. It's the subtle variations on these voices that creates interesting Unison effects. Here, the Unison pan spreads the unison voices in the stereo field but the pan control isn't causing the panning effect, only the maximum pan position. Eh? Notice the lfo on the filter section is activated and the LFO section has been set to a sine wave shape. The LFO causes a cyclic change in the high-frequency content of the two unison voices because the Unison var control is adding a unique LFO start offset to each voice. So, it's the cyclic and different loss of high-frequencies from the two Unison voices that causes the apparent position of the note to shift. You can see in the image above-right the Left channel is smooth and the Right channel is a saw shape (has higher harmonic frequencies) and so the pan would appear to be shifted to the Right.
- Speed & LFO shape - Start with the LFO section, try different LFO shapes and speed.
- Global - Notice the global switch ensures that all the notes you play are in panning sync. Turn it off and the LFO phase will re-start for each new note, this allows you to have several notes panning in all directions. Chaotic but interesting with the right sound.
- Unison variation - Turn var to minimum and notice the panning stops, although the filter frequency variation continues. This is because the two unison voices are now identical as their LFO values are in phase. Note how the pan effect is at maximum with var settings of 50% and diminishes to nothing again at 100%. What's up there? Remember the unison variation slider acts as an offset to the phase of the LFO. We are using a Sine wave here, a gently undulating wave. Offsetting a sine wave by 100% (360 degrees for mathematicians) gets you back to where you started. Anyhow, the maximum offset is at 50%, i.e the two Unison voices are 90 degrees out of phase. Other shapes will behave differently, of course, but you get the idea.
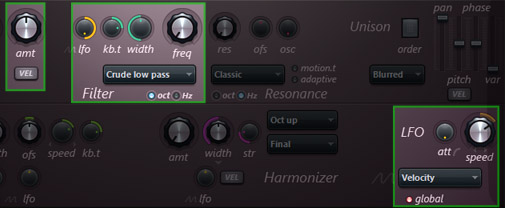
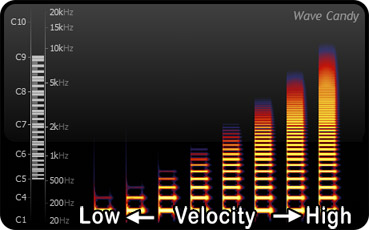
Velocity to filter frequency
What you hear: As note velocity increases the notes become brighter, as velocity decreases the notes become duller. In the spectrograph (below) the higher harmonics (frequencies) can be seen increasing as note velocity increases (8 notes spanning the velocity range are shown).
![]()
![]()
How it's done: This patch has a twist, rather than linking the filter envelope amt knob to velocity by switching VEL on, we have instead increased the lfo value on the filter and set the LFO to a special Velocity mode. This uses note-on velocity as a modulation value. So it is easy, just not what you were probably expecting. The good news here is that this patch shows there are several ways you can modulate targets in Harmless.
Читайте также: