
Как анимировать в clip studio paint
Обновлено: 07.07.2024
Комментарии • 43
Я сделала маленькую часть анимации в скетче, начинаю просматривать и вижу что она пиксельная, а когда останавливаю анимацию, то пикселей нету и кадры чёткие, вы не знаете с чем это связано? ( программа не взломанная, а купленная )
Не ожидаю что мне ответят, но вот я вставляю картинку стороннюю, и в папках анимации она не показывается, как решить эту проблему ._.
Для создания аниме самое то?
А как добавить видео в кадры в Clip Studio Paint?
Как сохранить на прозрачном фоне?
Спасибо большое, всё очень понятно, но у меня есть вопрос: вот я выделяю кусок рисунка и хочу его повернуть, как это сделать? Просто когда я нажимаю деформацию я могу менять только размер, а мне надо его повернуть в другую сторону, как это сделать?
Боже, скажите, как копировать кадры без/с изменениями.
Простое копирование: на кадр нажимаешь ПКМ - ом, вылазит окно, находишь copy, нажимаешь, тыкаешь куда вставить и всё также, толко вместо copy, жми paste.
С изменениями: нажимаешь на кадр ЛКМ - ом, лассо выделяешь, картинку, CTRL C + CTRL V, нажимаешь куда вставить кадр, нажимаешь ПКМ - ом, вылазит окно, находишь слева панель кадров, находишь с буквой кадр (например копирууешь 1 - ый кадр, а в окне будет 1a) нажимаешь на этот кардр (1а), потом стераешь что не нужно и всё.
Спасибо большое! Всё понятно и доступно)))
Ох, наконец-то я нашёл человека, который объяснил более понятно:')
Давно хотел попробовать там что-нибудь сделать, но не решался
От души душевно в душу ,спасибо ,вы мне очень помогли)
0:34 у меня нет вк,родители до 14 лет запретили скачивать :( А вы можете,пожалуйста,написать тут ссылку?
В видео я озвучила почему так, сразу после того как сказала писать мне в ВК
@Raspberry ARTхорошо щас попробую
@psycho shit , хорошо, тогда попробую объяснить так. Смотри твоя главная задача сейчас это кликнуть правой кнопкой мыши на значек динамика в правом нижнем углу, нажать на "Звуки", и открыть вкладку "Воспроизведение", затем просто попробуй найти твой графический планшет, кликнуть на него правой кнопкой мыши и выбрать пункт отключить.
@Raspberry ART но я не имею аккаунта в вк
@Raspberry ART я не использую наушники. но я использую графичекий планшет, это может быть как то связано с пропажей звука?
Большое спасибо за видео, пока что самое адекватное что я видел, мне очень понравилась подача, всё чётко и по существу, желаю успехов в дальнейшем
можно ли где то посмотреть настройки твоих кистей и планшет которым ты пользуешься?
Я рисую на графическом мониторе XP-Pen Artist 22E PRO, а кисти я с интернета скачивала, если напишешь мне в ВК то я попробую тебе их скинуть
Господи, спасибо вам огромное, вы не представляете как меня выручили! Хорошего вам дня :D
Также с 100 подписчиками вас!
@Raspberry ART ох, спасибо вам ещё раз, мне нравиться то как вы внимательны! Буду теперь знать, а то я никак не могла понять qwq
Кстати, если нужно будет просто сохранить анимацию для дальнейшей доработки то просто нужно зайти в "Файл"(File) и выбрать "Сохранить"(Save) после чего выбрать место для сохранения
Особый подход к подписчикам - это сразу чувствуется. Очень хороший материал, монтаж вообще - супер! Запускайте уже рекламу на канале,а то кроме меня никто не увидит, есть же куча сервисов типа u t i f y, настроящие зрители и т.д.
В про версии ограничение в виде 24 кадров в секунду, или ограничение по длительности не более 24 кадров?


Animated GIF
You can export the current animation as an animated GIF. If camera movement has been added with 2D camera folders, these effects will be exported in the animated GIF.
When using Windows/macOS
When using a Tablet/Smartphone
[Animated GIF output settings] Dialog Box
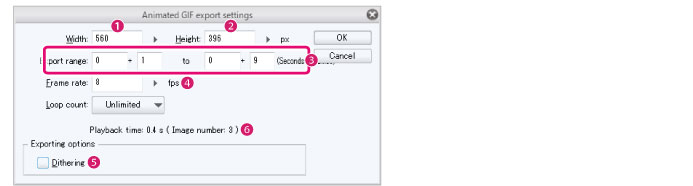
(1) Width
Set the width of the animated GIF to be exported. The aspect ratio of the width and height is fixed. Changing the width will automatically change the height accordingly.
(2) Height
Set the height of the animated GIF to be exported. The aspect ratio of the width and height is fixed. Changing the height will automatically change the width accordingly.
(3) Export range
Specify the start frame and end frame of the range to be exported as an animated GIF.
The frames up to the specified end frame will be exported as an animated GIF.
(4) Frame rate
Set the frame rate of the animated GIF. The frame rate is the number of cels (images) per second. Changing this setting does not change the playback time of the animation.
(5) Loop count
Specify the number of times that playback is looped. You can specify a number of playback loops by selecting [Number of loops]. You can create an endless loop by selecting [Unlimited].
(6) Playback time
Displays the playback time of the animated GIF and the number of images in the file.
(7) Dithering
Turn this on to apply dithering to the exported GIF.
Dithering is a method of artificially reducing the color ranges of images. It simulates a larger range of color expression with a small amount of colors, but may also increase the file size.

In this article, we will introduce the basic functions and terms needed to make animations in Clip Studio Paint.
This is fundamental knowledge you will need, regardless of the type of animation. Please do check it out!
The following pages provides several tutorials to help master the animation features.
You don’t need any beforehand knowledge on animation: just follow the steps to learn how to use Clip Studio Paint’s animation features and how they work.
Learn to Animate
Creating a new canvas
Note: These settings can be changed later.
Select [File] menu > [New] to view the settings.
From the [New] dialog box, select [Use of work], then [Animation] to show the animation file creation settings.
Next, we will explain each animation setting.
Settings that determine the size of animation
With illustrations, you normally set the image size using the [Canvas] option. With animation, you will need to enter other settings such as [Output size] and [Overflow frame] to determine the canvas size.
Let’s go into each setting.
The [Output size] is the size of your complete animation.
An [Output frame] will be made according to the set size, and the contents inside the [Output frame] will become be exported.
The standard size will change according to the medium you want to post to (Twitter, Instagram, Youtube, or other web services).
The following three standard sizes are already registered in [Preset].
[720x540 (144dpi) with blank space]
[1280x720 (144dpi) with blank space]
[1920x1080 (192dpi) with blank space]
●Overflow frame size
[Overflow frame] is an option used when adding camera movement. Ignore this if you aren’t planning to use camera movement.
By setting an [Output size] that is larger than the canvas, you can draw outside of the export area.
2D cameras can be adjusted to change what is shown in the [Output frame].
Sets the blank space of Overflow frames.
If [Overflow frame] is turned off, the blank space will be created in the output frame.
Note: What are effect frames?
Enable [Effect frame] when you want to specify an area that will never be cropped regardless of the environment. When producing TV animations, some portions would be cropped due to different screen sizes.
You don’t need this setting if you plan to post your work to the internet.
Settings that determine the smoothness and length of animation+B6C64:D64
[Timeline] allows you to set the smoothness and playback time of the animation.
Let’s go into each setting.
Note: There is an upper limit to the number of frames that can be used in Debut and Pro versions.
For details, please read the following “Frame number limit for Pro and Debut versions.”
●Frame rate (fps = Frames Per Second)
The [Frame rate] is the number of frames (= still images) shown per second.
The default 30 fps will display 30 frames per second.
The higher the frame rate, the more frames you can show per second, and the smoother the animation.
Example: Smoothness comparison due to different frame rates
(5 fps, 10 fps, 30 fps)
[Playback time] allows you to set the length of your animation.
By default, this is displayed as the number of frames, with [Frame rate] determining the actual playback time.
By setting the same value for [Playback time] as the [Frame rate], the animation will be one second long.
■Different ways of showing [Playback time]
There are four different ways to show [Playback time].
・[Frame number (starting from 1)]
・[Frame number (starting from 0)]
Shows the playback time in frames.
The difference between [Number of frames (1 start)] and [Number of frames (0 start)] is whether the first frame is displayed as frame “1” or frame “0.”
In video editing software, frames are usually numbered from 0 as they start from "second 0" on the timeline. However, in the Japanese animation industry, frames are usually numbered from 1. Choose whichever numbering method you prefer for your file.
CLIP STUDIO PAINT course usually uses [Frame number (1 start)] as per the initial setting.
Shows the playback time in seconds. If you want to add frames after the specified number of seconds, set the number of frames (frames) you want to add.
Shows the playback time in minutes and seconds. You can set this with Minutes: Seconds: Number of additional frames.
These are the basic options that you will need to set in the [New] dialog box.
Note: For more information on other options, please read the reference guide (English) below.
The upper limit in frames for Pro and Debut.
Debut and Pro versions have an upper limit of 24 frames. Clip Studio Paint EX does not have this frame limit.
If you create animations with only 24 frames, you are limited as follows:
・By using 8 frames per second (= 8 fps), you can create animations with a playback time of 3 seconds, but the animation will not be smooth.
・By using 24 frames per second (= 24 fps), the playback time will only be 1 second long, but the animation will be smooth.
Using the [Timeline] palette
Selecting [OK] under the [New] dialog box, will create a new canvas for animation.
You will need to use the [Timeline] palette to create animations.
If the palette is not displayed, select the [Window] menu → [Timeline].
Note: For smartphone Users
Clip Studio Paint for smartphones requires palette bar customization to create animations.
Use the following procedure to add the [Timeline] palette.
The [Timeline] palette and the [Layer] palette are linked, but they display different things.
●The structure of the [Timeline] palette
・Vertical Hierarchy: [Track]
Layers in the [Layer] palette and layer folders will be displayed as [Track]s in the same hierarchy as the [Layer] palette.
・Horizontal Hierarchy: [Frame]
Each [Frame] of the timeline will be displayed.
When the animation is played, the leftmost [Start frame] will be shown first, and the rightmost [End frame] will be shown last.
You can change the [Start frame] and [End frame] by dragging the blue rectangle.

Digital Animation has taken off as a major trend in recent years, be it in a commercial environment or as a hobby. In this course, we will do a general overview of the animation tools and UI of Clip Studio Paint EX, then go into the process for creating an animation.
2. Creating New Animation Overview
Creating a canvas:
- After creating a new canvas in Clip Studio Paint EX, first click on the “animation” option under “Use of work.”
- Under “File Name,” you can name your file.
- Under “Preset,” you can choose from a list of predetermined sizes to work with.
- You can also save your own presets by pressing the save icon next to the dropdown menu. This will allow you to easily come back to your saved options in the future.
- Under “Unit,” you can determine what units you want to work with from centimeters, millimeters, inches, pixels, and points.
-I mainly use pixels (px), and I will be using that for this tutorial.
Determine your Reference frame size:
- Here you can set your reference frame dimensions (the blue line). I recommend researching the recommended size dimensions of the platform you plan to upload on because size dimensions differ among different video sharing platforms (and constantly change with updates).
For example, as of date (August 8, 2019):
- YouTube: Anything with a 16:9 ratio (1920x1080, 1280x720, etc.)
- Instagram: A 1:1 aspect ratio (1080x1080) for square or a 1.91:1 ratio is recommended (1080x608) for landscape, but you can go as far as 16:9
- Twitter: 16:9 aspect ratio (1280x720 is what they recommend)
-As for resolution, note that although we will be using a vector layer later, you will need to ensure that your resolution is above at least 150 pixels; otherwise your vector lines will look pixelated. Setting the resolution now is advised.
-I usually have my resolution set to 600 px, but you really don’t need it this high.
Effect frame and Drawing size:
Effect frame:
- You likely won’t need this unless you are using CSP for professional animation (for TV/feature animation), but it’s good to keep in mind.
-This basically sets the guidelines for the area that will definitely show up in your animation. This is done because not all TV screens are the same size, so there is a cut off zone that might not show up on certain screens. Setting this guideline helps to make sure you don’t frame your shots in ways that may be cut off on different screens.
Drawing size:
- This refers to the size of the extra white space you may need for your animation. If you are doing vertical or horizontal background pans or very specific pivot movements of characters, you may want your canvas to extend beyond your reference frame line. For example, if you are animating a walk but only show the feet, it is often best to animate the lower body off screen and keep the feet in the boundary of your reference frame so your walk has an accurate pivot point. You can set your drawing size at a specified scale (i.e.by 2x or 3x the scale of your reference size) or by a specific height and width (in my case by measurements of pixels).
I am not going to be using either of these options for my animation, so I will be leaving them unchecked.
Читайте также: