Как пользоваться flex в fl studio 20
Обновлено: 08.07.2024
FLEX is a preset-based synthesizer driven by an advanced synthesis engine capable of Subtractive, Wavetable, Multisample, FM & AM based synthesis. The 8 Macros control custom synthesis targets, for each patch, and allow you to focus on what's most important: making music.

NOTES: Use ( Ctrl + Up/Down Arrow ) keyboard shortcuts to load previous and next presets. See the FLEX video playlist here.
FLEX Preset Browser
The Preset Browser is used to select the sounds you want to use in FLEX. It allows you to access installed Packs, download previously purchased Packs, or purchase new Packs which you can then download and instantly start to play with.
- ALL - Shows all installed presets, listed on the right side. This can be useful when used with TAGS to show all 'Bass' or 'FX' presets, for example.
Online Packs
- FREE TO DOWNLOAD - Free and purchased packs that are ready to download. Click the Download Icon after the pack name to download and install it.
- STORE - Packs that have not been purchased. After purchase they will move to the 'For Download' category.
There are a number of icons to familiarize youtself with, from top to bottom:
- Store icon - Click to open the in-app store. This allows you to login to your Image-Line account to purchase, or gain access to content you have already purchased and need to download.
- Queued - If you select multiple Packs for download, the first will start downloading and others will be queued, showing this icon.
- Downloading - Packs downloading show a clock icon and when dowanloading, a progress bar below the Pack. NOTE: If you close FL Studio before a Pack has completed downloading, any downloaded data will be discarded and you will need to start the download again. If you place your Mouse cursor over the download icon and it will change to Cancel download.
- No icon - Installed packs: The Pack is installed. Store packs: Available for purchase. Click these Packs to select them for purchase, a tick will appear (see below).
- Download (clickable icon) - This icon shows for purchased and free packs, available for download and also when there is an update to a pack. Click the icon to start the download. Some packs such as Essential Strings, Essential Pianos are free to registered FL Studio customers only, so will only be available for download once you have unlocked FL Studio. This icon will also show if a Pack has been updated and a new download of it is available. NOTE: The FL Studio Hint Bar will show the download size on mouse-over the download icon.
- Selected for purchase - This Pack has been selected (clicked) and will be added to your cart for purchase when you open the Shop.
Purchasing Packs
Click the pack in FLEX and add it to the internal Shop cart. Then follow the on-screen instructions to purchase the pack. To learn more about the Packs, or purchase them through our Shop, head over to the Plugin Content page and select FLEX as the Instrument.
Free Libraries for FL Studio Owners
Please make sure you are using the latest version of FL Studio to access all packs.
Installing Packs on an Offline Computer
- Use the automated download and installation through FLEX, using your online machine. Then copy the entire . Image-Line/FLEX folder from your online machine to your offline machine under the User data folder. So you should have . Image-Line/FLEX on your offline machine when you have completed the task correctly.
- Purchase Packs from our Shop. Then, download them from your Image-Line Account. Follow the download and installation instructions shown under My Account > My Licenses, for each Pack you need to install. Copy the .flexpack files to your User data folder under Image-line/FLEX/Packs. You will need to manually create the . FLEX/Packs sub folders ( Pay attention to capitalization! ).
FLEX Connection or Download Errors
- Examples - FLEX connection error (12002), FLEX connection error (12029), FLEX download error (12057), FLEX download error (12157)
Main Controls
Sculpt, alter and play with the sounds to fit into the project you are working on.
Analysis
The icons along the top select (from left to right):
- Logo - Shows when no sound is detected. NOTE: You can double-click the display to cycle through the available GUI themes.
- Waveform - Displays the audio waveform. The oscilloscope sync is locked to the lowest MIDI note played. Right-click to disable or enable 'Pinch' view (tapers the ends of the waveform).
- Spectrogram - Displays a moving trace of the audio signal. Color hue represents intensity (level), vertical position represents frequency (20 Hz to 20,000 Hz, bottom to top is represented) and horizontal position represents time.
- Vectorscope - The Vectorscope measures the differences between the left and right channels of a stereo input and can provide information about stereo content, panning and phase. The flying spot - follows the positive and negative amplitude oscillations of the left and right input waveforms. See Wave Candy for a more detailed explanation.
- Frequency histogram - Shows the frequency spectrum, low frequencies left, high frequencies to the right. The height of the display represents the relative strength of those frequencies.
Macros
There are 8 Macros per preset. The total number of active Macros (colored slider handles) and their target varies from sound to sound. Macros usually point to controls not available on the main plugin UI. FLEX has 100's of possible synthesis parameters that designers may link to a Macro, 'Unison' for example. Automating macros is a great way to impart unique character to presets.

Pitch
Controls the main Pitch output from the plugin.
- Arpreggiator - Disables the Arpeggiator(s) for some presets. The icon will turn orange when the option is available.
- +/- buttons - These change pitch in semitones. Hold ( Shift ) for octaves. The maximum range of the control is 2 octaves up or down (24 semitones).
- Slider - Changes the pitch in cents. Hold ( Alt ) for finer control.
Filter
The Main Filter is under the control of the preset designer, and may be a high, low, notch or other style filter.
- Cutoff - Filter cutoff frequency.
- Resonance (Res) - Filter resonance introduces a frequency boost just prior to the cutoff slope. This gives the sound a metallic or 'resonant' quality.
- Envelope Amount (Env Amt) - Modulation of the filter cutoff envelope.
Envelopes
Envelopes are a modulation triggered by note on, velocity, hold and release. These aspects of the note can then control parameters in the preset related to filters or volume respectively. The controls here act as multipliers to the default envelope length of the preset, with the range of these varying from preset to preset.

- Attack (A) - Time taken to reach the 'Hold' level.
- Hold (H) - Initial level at which the sound is played when a key is held.
- Decay (D) - Time taken for the level to decay to the 'Sustain' level.
- Sustain (S) - Defines the 'Sustain' level, when a key is held.
- Release (R) - Defines how quickly the sound decays to silence on release (note off), if at all.
NOTES: Sustain & Release - If the patch you are editing is SAMPLE based, and they are short in duration, the S/R controls may not have much effect OR if you are increasing S/R controls, the corresponding Filter or Volume may need adjusting longer too. For example, if the Filter is short, the sound may be cut off early by the filter, no matter how long the Volume decay is.
Effects
The bottom row of panels are all master effects. They are present in each preset and usually have embedded a state of the controls. This means that while the preset will usually already have a good sounding default state, you can turn these off, on or tweak them to your liking. NOTE: There may be additional effects applied to patches, not accessible from these controls.
Master Filter
Choose from one of the many filter types available in FLEX.
- Cutoff - Filter cutoff frequency.
- Resonance (Res) - Filter resonance introduces a frequency boost just prior to the cutoff slope. This gives the sound a metallic or 'resonant' quality.
- Filter Types:
- Low pass 6 - Low pass, 6 dB per octave slope, starting at the Cutoff frequency.
- Low pass 12 - Low pass, 12 dB per octave slope, starting at the Cutoff frequency.
- Low pass 12 Alt - Low pass, 12 dB per octave slope, starting at the Cutoff frequency.
- Low pass 24 - Low pass, 24 dB per octave slope, starting at the Cutoff frequency.
- Low pass 24 Alt - Low pass, 24 dB per octave slope, starting at the Cutoff frequency.
- High pass 6 - High pass, 6 dB per octave slope, starting at the Cutoff frequency.
- High pass 12 - High pass, 12 dB per octave slope, starting at the Cutoff frequency.
- High pass 12 Alt - High pass, 12 dB per octave slope, starting at the Cutoff frequency.
- High pass 24 - High pass, 24 dB per octave slope, starting at the Cutoff frequency.
- Band pass 12 - Band pass, 12 dB per octave slope, starting at the Cutoff frequency.
- Band pass 12 Alt - Band pass, 12 dB per octave slope, starting at the Cutoff frequency.
- Low shelf - Boost/cut all frequencies below the cutoff (like a Bass control).
- High shelf - Boost/cut all frequencies above the cutoff (like a Treble control).
- Notch - Very narrow band of frequencies are cut at the Cutoff frequency.
- Peak - Very narrow band of frequencies are allowed through at the Cutoff frequency.
- Phaser 1 - Phasing effect. The phasing is under the control of the Cutoff knob.
- Phaser 2 - Alternative phasing effect. The phasing is under the control of the Cutoff knob.
- Phaser 3 - Alternative, alternative phasing effect.. The phasing is under the control of the Cutoff knob.
- Vowel - Resonant filter that can make spoken vowel type resonances. Use the Cutoff to change the a,e,i,o,u sound.
- Comb+ - Series of very narrow band peaks. Looks like a comb.
- Comb- - Series of very narrow band cuts. Looks like a comb.
- All pass - Changes the phase of frequencies in the sound, without actually cutting or boosting any.
Delay
This unit is based on Fruity Delay 3.
- Time - Time delay between echoes.
- Feedback - Level of the echo sent back into the plugin. Level can be set to values above 100%
- Mix - Amount of filtering of the echoes.
- Color - Low-pass filtering of the echoes (cutoff frequency).
- Mod - Sine wave shape modulation of the delay time. Creates a less regular delay period, and so more complex sound.
- Delay Types
- Fake stereo - Pseudo-stereo delay effect based on a single, monophonic delay line with summed L/R signal and 2 different tap points for L & R delay.
- True stereo - Echoes are stereo. The Left and Right channels are separately delayed. Offset controls pre-delays for the Left and Right channels to create left-right bouncing / panning effects. Feedback is likewise per channel, so the left and right channels stereo content is maintained.
- Ping pong - Echoes are mixed stereo, with the left and right channels alternately flipped on each delay loop to create the left-right bouncing effect. If you are using a stereo source you will hear the channels swap or bounce on each echo. If you use a mono source, you will need to adjust the Pan to create stereo ping-pong effects. Pan acts the same way as panning in the FL Studio mixer to pan the input to the plugin.
Reverb
Use reverb to simulates acoustic spaces.
- Decay - Controls the decay time of the reverb, this is the time it takes for the signal to decay to -60dB (1/1000 of the maximum amplitude). Use low decay times for small rooms (good for fattening drum sounds), and long decay times for large rooms (halls or church-effects).
- Size - Use this knob to set the size of the virtual room being simulated (the display will give you feedback). For realistic effects, the Room Size should be adjusted according to the decay time. Small rooms sound better with a short decay time, large rooms sound better with longer reverb times.
- Mix - Sets the relative level of the reverberant (wet) signal.
- Color - Adjusts damping of the high frequencies in the reverb signal. Damping refers to the rate at which the high frequencies decay. This effect causes the sound to become gradually muffled and warmer.
- Mod - Modulates the reverb time, to break up 'metallic' ringing sounds associated with artificial reverb. Small values make the reverb sound smoother and more natural. Extreme modulation values can add a detuned sound to the reverb.
- Speed - Modulation speed for the (sine-wave) modulation of reverb-time.
Limiter
Select from compression, limiting and distortion effects. This unit is based on Maximus. NOTE: The threshold is represented by the top of the peak-metering bars.
- Pre - Pre-compression gain. Useful for raising the level of a band into the active compression region.
- Mix - Compression mix. Partial values reflect a state of parallel compression.
- Type:
- Limiter - Hard limiting.
- Warming - Soft saturation style compression.
- Heating - Saturation style compression.
- Distortion - Distortion-prone compression.
Output Volume
The volume slider controls the final output from FLEX. This is the last control in the effects chain.
FLEX is a preset-based synthesizer driven by an advanced synthesis engine capable of Subtractive, Wavetable, Multisample, FM & AM based synthesis. The 8 Macros control custom synthesis targets, for each patch, and allow you to focus on what's most important: making music.
![]()
NOTES: Use ( Ctrl + Up/Down Arrow ) keyboard shortcuts to load previous and next presets. See the FLEX video playlist here.
FLEX Preset Browser
The Preset Browser is used to select the sounds you want to use in FLEX. It allows you to access installed Packs, download previously purchased Packs, or purchase new Packs which you can then download and instantly start to play with.
- ALL - Shows all installed presets, listed on the right side. This can be useful when used with TAGS to show all 'Bass' or 'FX' presets, for example.
Online Packs
- FREE TO DOWNLOAD - Free and purchased packs that are ready to download. Click the Download Icon after the pack name to download and install it.
- STORE - Packs that have not been purchased. After purchase they will move to the 'For Download' category.
There are a number of icons to familiarize yourself with, from top to bottom:
- Store icon - Click to open the in-app store. This allows you to login to your Image-Line account to purchase, or gain access to content you have already purchased and need to download.
- Queued - If you select multiple Packs for download, the first will start downloading and others will be queued, showing this icon.
- Downloading - Packs downloading show a clock icon and when downloading, a progress bar below the Pack. NOTE: If you close FL Studio before a Pack has completed downloading, any downloaded data will be discarded and you will need to start the download again. If you place your Mouse cursor over the download icon and it will change to Cancel download.
- No icon - Installed packs: The Pack is installed. Store packs: Available for purchase. Click these Packs to select them for purchase, a tick will appear (see below).
- Download (clickable icon) - This icon shows for purchased and free packs, available for download and also when there is an update to a pack. Click the icon to start the download. Some packs such as Essential Strings, Essential Pianos are free to registered FL Studio customers only, so will only be available for download once you have unlocked FL Studio. This icon will also show if a Pack has been updated and a new download of it is available. NOTE: The FL Studio Hint Bar will show the download size on mouse-over the download icon.
- Selected for purchase - This Pack has been selected (clicked) and will be added to your cart for purchase when you open the Shop.
Purchasing Packs
Click the pack in FLEX and add it to the internal Shop cart. Then follow the on-screen instructions to purchase the pack. To learn more about the Packs, or purchase them through our Shop, head over to the Plugin Content page and select FLEX as the Instrument.
Free Libraries for FL Studio Owners
Please make sure you are using the latest version of FL Studio to access all packs.
Installing Packs on an Offline Computer
- Use the automated download and installation through FLEX, using your online machine. Then copy the entire . Image-Line/FLEX folder from your online machine to your offline machine under the User data folder. So you should have . Image-Line/FLEX on your offline machine when you have completed the task correctly.
- Purchase Packs from our Shop. Then, download them from your Image-Line Account. Follow the download and installation instructions shown under My Account > My Licenses, for each Pack you need to install. Copy the .flexpack files to your User data folder under Image-line/FLEX/Packs. You will need to manually create the . FLEX/Packs sub folders ( Pay attention to capitalization! ).
FLEX Connection or Download Errors
- Examples - FLEX connection error (12002), FLEX connection error (12029), FLEX download error (12057), FLEX download error (12157)
Main Controls
Sculpt, alter and play with the sounds to fit into the project you are working on.
Analysis
The icons along the top select (from left to right):
- Logo - Shows when no sound is detected. NOTE: You can double-click the display to cycle through the available GUI themes.
- Waveform - Displays the audio waveform. The oscilloscope sync is locked to the lowest MIDI note played. Right-click to disable or enable 'Pinch' view (tapers the ends of the waveform).
- Spectrogram - Displays a moving trace of the audio signal. Color hue represents intensity (level), vertical position represents frequency (20 Hz to 20,000 Hz, bottom to top is represented) and horizontal position represents time.
- Vectorscope - The Vectorscope measures the differences between the left and right channels of a stereo input and can provide information about stereo content, panning and phase. The flying spot - follows the positive and negative amplitude oscillations of the left and right input waveforms. See Wave Candy for a more detailed explanation.
- Frequency histogram - Shows the frequency spectrum, low frequencies left, high frequencies to the right. The height of the display represents the relative strength of those frequencies.
Macros
There are 8 Macros per preset. The total number of active Macros (colored slider handles) and their target varies from sound to sound. Macros usually point to controls not available on the main plugin UI. FLEX has 100's of possible synthesis parameters that designers may link to a Macro, 'Unison' for example. Automating macros is a great way to impart unique character to presets.
![]()
Pitch
Controls the main Pitch output from the plugin.
- Icons along the top (left to right):
- Dump score to Piano roll - Some patches may come with a Piano roll score (sliced loops for example). Click the icon to send the score to the FLEX pattern in use. The icon will turn orange when the option is available.
- Arpeggiator - Disables the Arpeggiator(s) for some presets. The icon will turn orange when the option is available.
- Lock changes - Locks changes to the panel.
Filter
The Main Filter is under the control of the preset designer, and may be a high, low, notch or other style filter.
- Cutoff - Filter cutoff frequency.
- Resonance (Res) - Filter resonance introduces a frequency boost just prior to the cutoff slope. This gives the sound a metallic or 'resonant' quality.
- Envelope Amount (Env Amt) - Modulation of the filter cutoff envelope.
Envelopes
Envelopes are a modulation triggered by note on, velocity, hold and release. These aspects of the note can then control parameters in the preset related to filters or volume respectively. The controls here act as multipliers to the default envelope length of the preset, with the range of these varying from preset to preset.
![]()
- Attack (A) - Time taken to reach the 'Hold' level.
- Hold (H) - Initial level at which the sound is played when a key is held.
- Decay (D) - Time taken for the level to decay to the 'Sustain' level.
- Sustain (S) - Defines the 'Sustain' level, when a key is held.
- Release (R) - Defines how quickly the sound decays to silence on release (note off), if at all.
NOTES: Sustain & Release - If the patch you are editing is SAMPLE based, and they are short in duration, the S/R controls may not have much effect OR if you are increasing S/R controls, the corresponding Filter or Volume may need adjusting longer too. For example, if the Filter is short, the sound may be cut off early by the filter, no matter how long the Volume decay is.
Effects
The bottom row of panels are all master effects. They are present in each preset and usually have embedded a state of the controls. This means that while the preset will usually already have a good sounding default state, you can turn these off, on or tweak them to your liking. NOTE: There may be additional effects applied to patches, not accessible from these controls.
Master Filter
Choose from one of the many filter types available in FLEX.
- Cutoff - Filter cutoff frequency.
- Resonance (Res) - Filter resonance introduces a frequency boost just prior to the cutoff slope. This gives the sound a metallic or 'resonant' quality.
- Filter Types:
- Low pass 6 - Low pass, 6 dB per octave slope, starting at the Cutoff frequency.
- Low pass 12 - Low pass, 12 dB per octave slope, starting at the Cutoff frequency.
- Low pass 12 Alt - Low pass, 12 dB per octave slope, starting at the Cutoff frequency.
- Low pass 24 - Low pass, 24 dB per octave slope, starting at the Cutoff frequency.
- Low pass 24 Alt - Low pass, 24 dB per octave slope, starting at the Cutoff frequency.
- High pass 6 - High pass, 6 dB per octave slope, starting at the Cutoff frequency.
- High pass 12 - High pass, 12 dB per octave slope, starting at the Cutoff frequency.
- High pass 12 Alt - High pass, 12 dB per octave slope, starting at the Cutoff frequency.
- High pass 24 - High pass, 24 dB per octave slope, starting at the Cutoff frequency.
- Band pass 12 - Band pass, 12 dB per octave slope, starting at the Cutoff frequency.
- Band pass 12 Alt - Band pass, 12 dB per octave slope, starting at the Cutoff frequency.
- Low shelf - Boost/cut all frequencies below the cutoff (like a Bass control).
- High shelf - Boost/cut all frequencies above the cutoff (like a Treble control).
- Notch - Very narrow band of frequencies are cut at the Cutoff frequency.
- Peak - Very narrow band of frequencies are allowed through at the Cutoff frequency.
- Phaser 1 - Phasing effect. The phasing is under the control of the Cutoff knob.
- Phaser 2 - Alternative phasing effect. The phasing is under the control of the Cutoff knob.
- Phaser 3 - Alternative, alternative phasing effect.. The phasing is under the control of the Cutoff knob.
- Vowel - Resonant filter that can make spoken vowel type resonances. Use the Cutoff to change the a,e,i,o,u sound.
- Comb+ - Series of very narrow band peaks. Looks like a comb.
- Comb- - Series of very narrow band cuts. Looks like a comb.
- All pass - Changes the phase of frequencies in the sound, without actually cutting or boosting any.
Delay
This unit is based on Fruity Delay 3.
- Time - Time delay between echoes.
- Feedback - Level of the echo sent back into the plugin. Level can be set to values above 100%
- Mix - Amount of filtering of the echoes.
- Color - Low-pass filtering of the echoes (cutoff frequency).
- Mod - Sine wave shape modulation of the delay time. Creates a less regular delay period, and so more complex sound.
- Delay Types
- Fake stereo - Pseudo-stereo delay effect based on a single, monophonic delay line with summed L/R signal and 2 different tap points for L & R delay.
- True stereo - Echoes are stereo. The Left and Right channels are separately delayed. Offset controls pre-delays for the Left and Right channels to create left-right bouncing / panning effects. Feedback is likewise per channel, so the left and right channels stereo content is maintained.
- Ping pong - Echoes are mixed stereo, with the left and right channels alternately flipped on each delay loop to create the left-right bouncing effect. If you are using a stereo source you will hear the channels swap or bounce on each echo. If you use a mono source, you will need to adjust the Pan to create stereo ping-pong effects. Pan acts the same way as panning in the FL Studio mixer to pan the input to the plugin.
Reverb
Use reverb to simulates acoustic spaces.
- Decay - Controls the decay time of the reverb, this is the time it takes for the signal to decay to -60dB (1/1000 of the maximum amplitude). Use low decay times for small rooms (good for fattening drum sounds), and long decay times for large rooms (halls or church-effects).
- Size - Use this knob to set the size of the virtual room being simulated (the display will give you feedback). For realistic effects, the Room Size should be adjusted according to the decay time. Small rooms sound better with a short decay time, large rooms sound better with longer reverb times.
- Mix - Sets the relative level of the reverberant (wet) signal.
- Color - Adjusts damping of the high frequencies in the reverb signal. Damping refers to the rate at which the high frequencies decay. This effect causes the sound to become gradually muffled and warmer.
- Mod - Modulates the reverb time, to break up 'metallic' ringing sounds associated with artificial reverb. Small values make the reverb sound smoother and more natural. Extreme modulation values can add a detuned sound to the reverb.
- Speed - Modulation speed for the (sine-wave) modulation of reverb-time.
Limiter
Select from compression, limiting and distortion effects. This unit is based on Maximus. NOTE: The threshold is represented by the top of the peak-metering bars.
- Pre - Pre-compression gain. Useful for raising the level of a band into the active compression region.
- Mix - Compression mix. Partial values reflect a state of parallel compression.
- Type:
- Limiter - Hard limiting.
- Warming - Soft saturation style compression.
- Heating - Saturation style compression.
- Distortion - Distortion-prone compression.
Output Volume
The volume slider controls the final output from FLEX. This is the last control in the effects chain.
FLEX is a preset-based synthesizer driven by an advanced synthesis engine capable of Subtractive, Wavetable, Multisample, FM & AM based synthesis. The 8 Macros control custom synthesis targets, for each patch, and allow you to focus on what's most important: making music.
![]()
NOTES: Use ( Ctrl + Up/Down Arrow ) keyboard shortcuts to load previous and next presets. See the FLEX video playlist here.
FLEX Preset Browser
The Preset Browser is used to select the sounds you want to use in FLEX. It allows you to access installed Packs, download previously purchased Packs, or purchase new Packs which you can then download and instantly start to play with.
- ALL - Shows all installed presets, listed on the right side. This can be useful when used with TAGS to show all 'Bass' or 'FX' presets, for example.
Online Packs
- FOR DOWNLOAD - Free and purchased packs that have not been downloaded.
- STORE - Packs that have not been purchased. After purchase they will move to the 'For Download' category.
There are a number of icons to familiarize youtself with, from top to bottom:
- Store icon - Click to open the in-app store. This allows you to login to your Image-Line account to purchase, or gain access to content you have already purchased and need to download.
- Queued - If you select multiple Packs for download, the first will start downloading and others will be queued, showing this icon.
- Downloading - Packs downloading show a clock icon and when dowanloading, a progress bar below the Pack. NOTE: If you close FL Studio before a Pack has completed downloading, any downloaded data will be discarded and you will need to start the download again. If you place your Mouse cursor over the download icon and it will change to Cancel download.
- No icon - Installed packs: The Pack is installed. Store packs: Available for purchase. Click these Packs to select them for purchase, a tick will appear (see below).
- Download (clickable icon) - This icon shows for purchased and free packs, available for download and also when there is an update to a pack. Click the icon to start the download. Some packs such as Essential Strings, Essential Pianos are free to registered FL Studio customers only, so will only be available for download once you have unlocked FL Studio. This icon will also show if a Pack has been updated and a new download of it is available. NOTE: The FL Studio Hint Bar will show the download size on mouse-over the download icon.
- Selected for purchase - This Pack has been selected (clicked) and will be added to your cart for purchase when you open the Shop.
Purchasing Packs
Click the pack in FLEX and add it to the internal Shop cart. Then follow the on-screen instructions to purchase the pack. To learn more about the Packs, or purchase them through our Shop, head over to the Plugin Content page and select FLEX as the Instrument.
Free Additional Download Packs for FL Studio Owners
Please make sure you are using the latest version of FL Studio to access all packs.
Installing Packs on an Offline Computer
- Use the automated download and installation through FLEX, using your online machine. Then copy the entire . Image-Line/FLEX folder from your online machine to your offline machine under the User data folder. So you should have . Image-Line/FLEX on your offline machine when you have completed the task correctly.
- Purchase Packs from our Shop. Then, download them from your Image-Line Account. Follow the download and installation instructions shown under My Account > My Licenses, for each Pack you need to install. Copy the .flexpack files to your User data folder under Image-line/FLEX/Packs. You will need to manually create the . FLEX/Packs sub folders ( Pay attention to capitalization! ).
FLEX Connection or Download Errors
- Examples - FLEX connection error (12002), FLEX connection error (12029), FLEX download error (12057), FLEX download error (12157)
Main Controls
Sculpt, alter and play with the sounds to fit into the project you are working on.
Analysis
The icons along the top select (from left to right):
- Logo - Shows when no sound is detected. NOTE: You can double-click the display to cycle through the available GUI themes.
- Waveform - Displays the audio waveform. The oscilloscope sync is locked to the lowest MIDI note played. Right-click to disable or enable 'Pinch' view (tapers the ends of the waveform).
- Spectrogram - Displays a moving trace of the audio signal. Color hue represents intensity (level), vertical position represents frequency (20 Hz to 20,000 Hz, bottom to top is represented) and horizontal position represents time.
- Vectorscope - The Vectorscope measures the differences between the left and right channels of a stereo input and can provide information about stereo content, panning and phase. The flying spot - follows the positive and negative amplitude oscillations of the left and right input waveforms. See Wave Candy for a more detailed explanation.
- Frequency histogram - Shows the frequency spectrum, low frequencies left, high frequencies to the right. The height of the display represents the relative strength of those frequencies.
Macros
There are 8 Macros per preset. The total number of active Macros (colored slider handles) and their target varies from sound to sound. Macros usually point to controls not available on the main plugin UI. FLEX has 100's of possible synthesis parameters that designers may link to a Macro, 'Unison' for example. Automating macros is a great way to impart unique character to presets.
![]()
Pitch
Controls the main Pitch output from the plugin.
- +/- buttons - These change pitch in semitones. Hold ( Shift ) for octaves. The maximum range of the control is 2 octaves up or down (24 semitones).
- Slider - Changes the pitch in cents. Hold ( Alt ) for finer control.
Filter
The Main Filter is under the control of the preset designer, and may be a high, low, notch or other style filter.
- Cutoff - Filter cutoff frequency.
- Resonance (Res) - Filter resonance introduces a frequency boost just prior to the cutoff slope. This gives the sound a metallic or 'resonant' quality.
- Envelope Amount (Env Amt) - Modulation of the filter cutoff envelope.
Envelopes
Envelopes are a modulation triggered by note on, velocity, hold and release. These aspects of the note can then control parameters in the preset related to filters or volume respectively. The controls here act as multipliers to the default envelope length of the preset, with the range of these varying from preset to preset.
![]()
- Attack (A) - Time taken to reach the 'Hold' level.
- Hold (H) - Initial level at which the sound is played when a key is held.
- Decay (D) - Time taken for the level to decay to the 'Sustain' level.
- Sustain (S) - Defines the 'Sustain' level, when a key is held.
- Release (R) - Defines how quickly the sound decays to silence on release (note off), if at all.
NOTES: Sustain & Release - If the patch you are editing is SAMPLE based, and they are short in duration, the S/R controls may not have much effect OR if you are increasing S/R controls, the corresponding Filter or Volume may need adjusting longer too. For example, if the Filter is short, the sound may be cut off early by the filter, no matter how long the Volume decay is.
Effects
The bottom row of panels are all master effects. They are present in each preset and usually have embedded a state of the controls. This means that while the preset will usually already have a good sounding default state, you can turn these off, on or tweak them to your liking. NOTE: There may be additional effects applied to patches, not accessible from these controls.
Master Filter
Choose from one of the many filter types available in FLEX.
- Cutoff - Filter cutoff frequency.
- Resonance (Res) - Filter resonance introduces a frequency boost just prior to the cutoff slope. This gives the sound a metallic or 'resonant' quality.
- Filter Types:
- Low pass 6 - Low pass, 6 dB per octave slope, starting at the Cutoff frequency.
- Low pass 12 - Low pass, 12 dB per octave slope, starting at the Cutoff frequency.
- Low pass 12 Alt - Low pass, 12 dB per octave slope, starting at the Cutoff frequency.
- Low pass 24 - Low pass, 24 dB per octave slope, starting at the Cutoff frequency.
- Low pass 24 Alt - Low pass, 24 dB per octave slope, starting at the Cutoff frequency.
- High pass 6 - High pass, 6 dB per octave slope, starting at the Cutoff frequency.
- High pass 12 - High pass, 12 dB per octave slope, starting at the Cutoff frequency.
- High pass 12 Alt - High pass, 12 dB per octave slope, starting at the Cutoff frequency.
- High pass 24 - High pass, 24 dB per octave slope, starting at the Cutoff frequency.
- Band pass 12 - Band pass, 12 dB per octave slope, starting at the Cutoff frequency.
- Band pass 12 Alt - Band pass, 12 dB per octave slope, starting at the Cutoff frequency.
- Low shelf - Boost/cut all frequencies below the cutoff (like a Bass control).
- High shelf - Boost/cut all frequencies above the cutoff (like a Treble control).
- Notch - Very narrow band of frequencies are cut at the Cutoff frequency.
- Peak - Very narrow band of frequencies are allowed through at the Cutoff frequency.
- Phaser 1 - Phasing effect. The phasing is under the control of the Cutoff knob.
- Phaser 2 - Alternative phasing effect. The phasing is under the control of the Cutoff knob.
- Phaser 3 - Alternative, alternative phasing effect.. The phasing is under the control of the Cutoff knob.
- Vowel - Resonant filter that can make spoken vowel type resonances. Use the Cutoff to change the a,e,i,o,u sound.
- Comb+ - Series of very narrow band peaks. Looks like a comb.
- Comb- - Series of very narrow band cuts. Looks like a comb.
- All pass - Changes the phase of frequencies in the sound, without actually cutting or boosting any.
Delay
This unit is based on Fruity Delay 3.
- Time - Time delay between echoes.
- Feedback - Level of the echo sent back into the plugin. Level can be set to values above 100%
- Mix - Amount of filtering of the echoes.
- Color - Low-pass filtering of the echoes (cutoff frequency).
- Mod - Sine wave shape modulation of the delay time. Creates a less regular delay period, and so more complex sound.
- Delay Types
- Fake stereo - Pseudo-stereo delay effect based on a single, monophonic delay line with summed L/R signal and 2 different tap points for L & R delay.
- True stereo - Echoes are stereo. The Left and Right channels are separately delayed. Offset controls pre-delays for the Left and Right channels to create left-right bouncing / panning effects. Feedback is likewise per channel, so the left and right channels stereo content is maintained.
- Ping pong - Echoes are mixed stereo, with the left and right channels alternately flipped on each delay loop to create the left-right bouncing effect. If you are using a stereo source you will hear the channels swap or bounce on each echo. If you use a mono source, you will need to adjust the Pan to create stereo ping-pong effects. Pan acts the same way as panning in the FL Studio mixer to pan the input to the plugin.
Reverb
Use reverb to simulates acoustic spaces.
- Decay - Controls the decay time of the reverb, this is the time it takes for the signal to decay to -60dB (1/1000 of the maximum amplitude). Use low decay times for small rooms (good for fattening drum sounds), and long decay times for large rooms (halls or church-effects).
- Size - Use this knob to set the size of the virtual room being simulated (the display will give you feedback). For realistic effects, the Room Size should be adjusted according to the decay time. Small rooms sound better with a short decay time, large rooms sound better with longer reverb times.
- Mix - Sets the relative level of the reverberant (wet) signal.
- Color - Adjusts damping of the high frequencies in the reverb signal. Damping refers to the rate at which the high frequencies decay. This effect causes the sound to become gradually muffled and warmer.
- Mod - Modulates the reverb time, to break up 'metallic' ringing sounds associated with artificial reverb. Small values make the reverb sound smoother and more natural. Extreme modulation values can add a detuned sound to the reverb.
- Speed - Modulation speed for the (sine-wave) modulation of reverb-time.
Limiter
Select from compression, limiting and distortion effects. This unit is based on Maximus. NOTE: The threshold is represented by the top of the peak-metering bars.
- Pre - Pre-compression gain. Useful for raising the level of a band into the active compression region.
- Mix - Compression mix. Partial values reflect a state of parallel compression.
- Type:
- Limiter - Hard limiting.
- Warming - Soft saturation style compression.
- Heating - Saturation style compression.
- Distortion - Distortion-prone compression.
Output Volume
The volume slider controls the final output from FLEX. This is the last control in the effects chain.
![]()
У FL Studio сильная фанатская база — благодаря ей софт часто лидирует в рейтингах лучших DAW.
Программу легко освоить новичкам, но и для продвинутых пользователей есть много полезных функций. Перед вами 20 способов выжать максимум из программы от Image-Line.
1. Работа с базой данных
База плагинов состоит из пары папок на винчестере, поэтому вы можете добавлять, перемещать и копировать их просто через Проводник. Также возможно сохранять папку в папке.
![]()
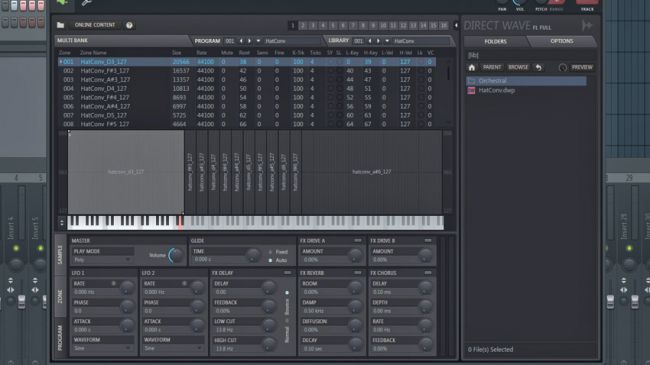
2. DirectWave и оптимизация
Консолидируйте нужную дорожку с помощью ресемплинга. Начиная с FL Studio 12.5, вы можете использовать инструмент DirectWave, чтобы снизить размер семплов для обмена проектами.
3. Разметка семплов
С помощью инструмента Edison можно легко ставить метки на продолжительных семплах. Выберите отрывок, нажмите Alt+L, чтобы поставить метки, и Ctrl+L, чтобы открыть опции Tune Loop.
4. Сайдчейн и Love Filter
Fruity Love Philter можно использовать для создания сайдчейна. Выберите Vol и Pat, чтобы нарисовать форму огибающей и воспользуйтесь пресетом Sidechain Low Frequency.
![]()
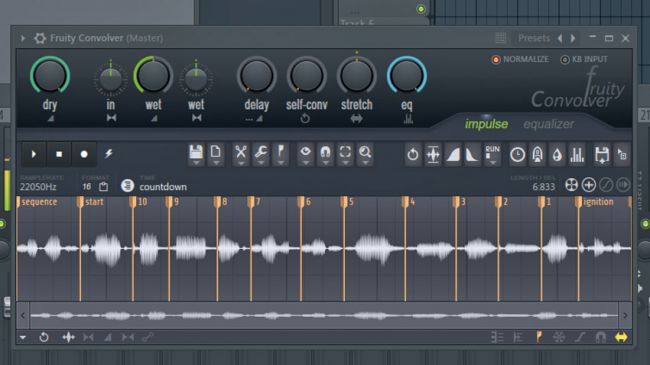
5. Convolution и саунд-дизайн
Fruity Convolver отвечает не только за реверб, но и за обработку семплов и лупов. Так вы можете получить самые неожиданные эффекты.
6. Zoom in/out
В FL легко приближать и отдалять рабочую зону. Нажмите правую кнопку мыши и протяните курсор в соответствующем направлении, чтобы приблизить или отдалить. Зум работает в Playlist, Piano Roll и Editor.
7. Посыл/возврат
Fruity Send позволяет маршрутизировать сигнал любым способом по FX-цепи. Аудиосигнал через Fruity Send продолжит приходить в целевой трек, даже если заглушить источник (в отличие от маршрутизации в микшер). Функция пригодится и для изоляции send-канала.
8. Визуализация плагинов
Нажмите правой кнопкой мыши по пустому слоту на микшере, чтобы открыть Plug-in Picker. Так можно включить визуализацию плагинов, что удобнее чем текстовой список.
9. Declick и фейдауты
При нарезании аудиоклипов для плейлиста может потребоваться сделать между ними фейдауты. Дважды кликните на клип, чтобы перейти в настройки канала. Чтобы подобрать длину фейда, выберите Declicking: Transient, Generic, Smooth или Crossfade. Визуальное отображение доступно через зум.
10. Очеловечивание барабанов
Гост-ноты нужны для того, чтобы сделать барабанные треки более выразительными, особенно хорошо этот прием показывает себя на малом барабане. Перейдите в Piano roll, перейдите в Menu > Helpers > Editable Ghosts для редактирования гост-нот. Так вы сможете оживить самые банальные партии.
11. Быстрый доступ к плагинам
Если вам нужно отредактировать звук инструмента, пока вы находитесь в пиано-ролле, нажмите правой кнопкой мыши по наименованию плагина, чтобы открыть соответствующий интерфейс.
12. Конвертация секвенции в паттерн
Сконвертировать секвенцию в паттерн можно через Tools > Dump score to selected pattern.
![]()
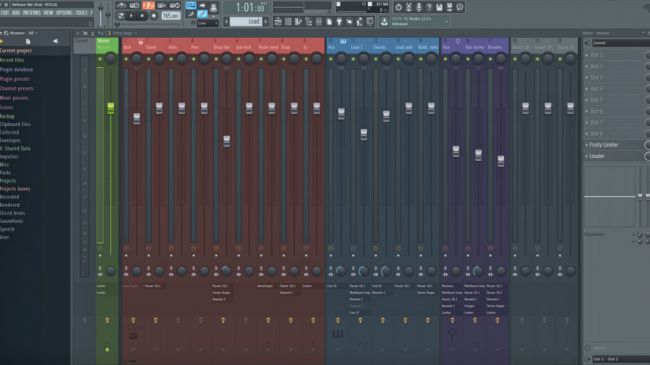
13. Смена масштаба микшера
У микшера есть множество опций отображения. Например вы можете включить режим Extra Large Mixer, чтобы увидеть все плагины на всех каналах сразу, с прямым доступом к контекстным меню. Включить его можно, нажав на нижнюю стрелку на линейке в верхнем левом углу микшера.
14. Picker и работа с паттернами
С помощью Picker Panel можно легко посылать инструменты на паттерн в плейлисте. Нажмите правой кнопкой на клип в Picker, выберите Split by channel и перетащите группу в плейлист.
15. Ресайз
Начиная с FL Studio 12, можно менять размер треков в плейлисте: Tools > Macros > Unlock all Playlist tracks from content.
16. Упорядочивание плейлиста
Плейлист можно и нужно держать в порядке. Чтобы избавиться от лишнего мусора, перейдите в Playlist Options, нажмите правой кнопкой мыши на Picker Panel Icons. Выберите Select Unused > Patterns/Audio/Automation.
17. Сохранение пресетов цепей
В FL очень гибкая система коммутации. Часто используемые цепи эффектов можно сохранять в пресетах, чтобы потом использовать в любом проекте; Для сохранения кастомных настроек интерфейса используется функция Control Surface.
18. Быстрое начало работы с шаблонами
Быстро начать работу над новым проектом можно с помощью собственных шаблонов. Например, вы можете создать шаблоны для битов, сведения и набросков песен.
19. Визуализация сигнала
В FL Studio вы можете легко добавлять спектрограммы, осциллографы, децибеллометры и прочие девайсы для визуализации сигнала на текущий трек на микшере, нажав C. Теперь девайсы будут отображать сигнал выбранного выхода.
20. RTFM
Начните читать мануал. Он включается клавишей F1 в любое время. Мануал интерактивный и открывает информацию, которая соответствует последнему действию, совершенному в своем DAW.
Читайте также: