
Как установить драйвера usbdm
Обновлено: 08.07.2024
To support the 64-bit version of Windows it has been necessary to update to using libusb1.0 drivers. For consistency this is also done on Linux and the other windows platforms. As part of this process the Vendor-ID/Product-ID (VID/PID) for the hardware (BDM) has been changed. This will allow the co-existence of Freescale's OSBDM-JM60 hardware while using a new driver for USBDM. Formerly both these BDMs used the same VID/PID and changes to the driver would not be possible without rendering the OSBDM-JM60 inoperable.
Note: On Windows, libusb1.0 is a thin wrapper around the Microsoft winUSB low-level USB drivers. Because of this you may see references to winusb in the following.
Note for upgrading from version 3.x to 4.x USBDM firmware
This change is complicated by the existence of a Bootloader in the BDM firmware. If not replaced this loader will continue to use the original VID/PID. Because of this, it is desirable to completely replace the BDM firmware.
For JS16 based BDMs this is a simple process since the Freescale JS12 Bootloader software may be used to replace all the firmware. See Construction and Installation.
For JMxx based BDMs it is necessary to use a HCS08 programmer to re-program the entire device so that the Bootloader is updated when the rest of firmware is changed. If a programmer is not available then it is still possible to update the BDM firmware using the Bootloader but the Bootloader will remain unchanged. To do this it will be necessary to install the drivers twice - once for the old VID/PID used by the Bootloader and again for the new VID/PID used by the main firmware. Doing so will render any OSBDM drivers inoperable on that USB port.
Installation of USBDM USB drivers for Linux
There isn't any. The installation script provided will modify the /etc/udev/rules.d file to allow access to the USBDM device. The required driver for USBDM BDM interface (LibusbV1) is included in the standard Linux (at least Ubuntu current version). The CDC (serial port) is a standard device and should also be installed without any extra steps.
If more installation is required on your version you will have to investigate this yourself. I'm not a Linux expert and I don't have access to other versions for testing. If you find other steps are necessary then please advise and I will try to update the installation accordingly.
Installation of USBDM USB drivers for Windows
This driver allows the USBDM software to communicate with the USBDM cable. You would usually only need to install these driver files once. If you subsequently plug the USBDM cable into another USB port of the same computer the driver will be installed for that port automatically.
The required drivers are copied to the installation location as part of the installation process. The driver folder may be opened from the window's Start Menu.
Setting up the drivers differs somewhat between the different versions of windows. In versions before Windows 7 you will be automatically prompted to install the drivers using a Found New Hardware Wizard when you first plug in the USBDM. For Windows 7 the installation will quietly fail and it is necessary to manually trigger the wizard.
Prior to Windows 7 the following sequence should occur:
- 1. Plug in the USBDM.
- 2. The Found New Hardware Wizard should appear. Select the Install from a list or a specific location option.
Select Next to continue.


The above sequence may be necessary a second time if you are installing a USBDM supporting a serial port connection. The serial port appears as a second device.
With Windows 7 the following sequence should occur:
- 1. Plug in the USBDM.
- 2. A small pop-up alert indicates windows is searching for the drivers.


Alternative Driver Installation Method for Windows
Preliminary
- Download the current version of the required driver installation program from Windows Backend - libusb or using the direct link (at this time) zadig.exe.
- Plug in the programmed BDM.
- Cancel any dialogues prompting to install the device drivers.
- Under Windows 7 the automatic driver installation will proceed and fail.
This following process will install the correct libusb 1.0 driver.
-
1. Run the zadig_XXX.exe program.


Select Yes to replace any existing driver

This may take a while!

Note if successful and then Close

Select Yes to refresh the list of devices.
Installation of USBDM USB drivers for old VID/PID
This process should only be done if you need to use the USBDM Bootloader to update an old JMxx based BDM when you do not have access to a HCS08 programmer.
Preliminary
- Plug in the old BDM before proceeding.
- Do not move the BDM to another port before updating the firmware as the driver installation will apply only to that port.
- If the BDM has already been updated once, then it may be necessary to use the setboot.exe utility to place the BDM in ICP mode before installing the driver.
-
1. Run the zadig_XXX.exe program.


- 4. Make sure that WinUSB is selected as the Target Driver
Click the Install Driver button. This will install the driver for the selected device. You may see a number of dialogues as shown above.
- The device should now be using the new driver and the USBDM Bootloader program may be used to update the firmware.
- If desired, a similar process may be used to restore the original libusb driver if it is needed for other devices. Just select the correct Target Driver.
Linux Drivers
The shell scripts supplied with the linux version should install the required information for the libusb drivers to work on a linux machine.
You will also need to make sure you have installed some libraries: (Some information posted by joncas on Freescale Forums - thanks)
Потребства в прошивке у всех разные, у кого то закусывает блок и авто не ставится / снимается с охраны. Кто-то обновляет по в надежде, что блок после этого не сгорит (это относится к старым блокам первых годов выпуска)
В теории можно менять привязку блока к авто (ее начали делать, начиная с 2017 года) Скоро проверю
Также допаяв не достающие элементы на плату блока нормы и прошить люксовой прошивкой можно получить полноценный люксовой блок)
Подробнее про блоки цбкэ можно
почитать / посмотреть вот Здесь turbomotor412 очень подробно все рассказал
Лично мне прошивка нужна для собственных маньяакальных ритуалов
"Но это уже совсем другая история"
До настоящего времени блок можно было прошить с помощью
1 — ДСТ-14 дилерская приблуда шьёт блок через разъём OBD2
2 — iprog и его собратья Читают / шьют блок на столе.
Оба варианта не из дешёвых
И мне не очень подходят особенно по цене
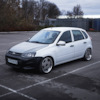
Покурив интернет было ясно что на борту нашего зверька Проц MC9S12G192 а также на плате имеется НЕраспаяный 6-ти контактный разъем (через который собственно и работает iprog)
Из это вывод что USBDM тоже должен читать/писать данный проц
Осталось только это проверить
И так для того чтобы прошить нам нужна прошивка. А где её взять?
Правильно считать с заведомо рабочего блока.
Первым делом я полез в CodeWarrior
Но в списке поддерживаемых процессоров MC9S12G192 нет, просмотрев datasheet я понял что проц очень схож с нашим любым MC9S12HY64 (стоит в приборках)
Создав проект с MC9S12HY64 мне удалось считать из MC9S12G192
Целый D-Flash и часть P-FLAH.
Карта процессора(назовём ее так) MC9S12HY64 не содержит всех нужных адресов для MC9S12G192 по этому и часть.
Я решил подлечить codewarrior, добавить недостающие адреса чтобы полностью читать MC9S12G192
Убил пару вечеров но так ничего и не удалось.
И в Один момент я вспомнил что примерно год — полтора назад RUPARADOX писал в своем блоге о правильном снятии дампа с помощью Memory Dump. Пост он почему-то удалил, но не беда я из тех кто полезную информацию сохраняет локально (целиком страницу на пк)
Следуя его инструкции, решил для начала считать прошивку с приборной панели с процессором MC9S12HY64 а потом уже приступать к MC9S12G192
Делая всё чётко по инструкции прошивка считывалась, но не вся только часть середины и эта часть повторялась только с разными адресами по совету RUPARADOX я пробовал разные варианты адресов, но нечего не менялось
Решение проблемы считывания подсказал kcctech
с "Если содержимое одно и то же, то значит не меняется страница памяти в контроллере, возможно не тот адрес регистра выбора страницы"
И тут я начал искать этот адрес регистра.
Как оказалось всё регистры для процессоров лежат под носом, а именно в папке USBDM "hcs12_devices.xml"
Ну и поставив правильный регистр, прошивка из приборки считалась целиком,
Затем я успешно считал прошивку из ЦБКЭ
По итогу
Сравнив считанный дапм и конвертированный из bin в s19 (снятый iprog, взят из интернета) идентичны, также считанный дамп и bin схожи по данным
А это означает Успех сего мероприятия)
И так с считыванием разобрались, но что же на счёт прошивки?
Да тут все намного проще
В более поздних версиях USBDM появилась поддержка проца MC9S12G192 и это значит что прошивается точно так же как и приборка)
Ну и непосредственно Гайд
1. Подготовка
1.1 На плате присутствует не распаянный разъем его можно распаять как сделал я, видно на фото, либо припаять проводочки, все в ваших руках)
1.2 Cкачиваем
Драйвера USBDM X64 X32
И сам USBDM_4_12_1_140_Win именно эту версию! (версии Выше 4_12_1_140 сохраняют дамп с длинной строки 32 символов нам же нужна длинна строки 64)
1.3 Устанавливаем
Сначала драйвера (возможно потребуется отключение проверки подлинности драйверов на win 8 — 10 у меня лично без отключения все отлично работает)
Затем устанавливаем usbdm пакет, все по дефолту
1.4 Подключаемся
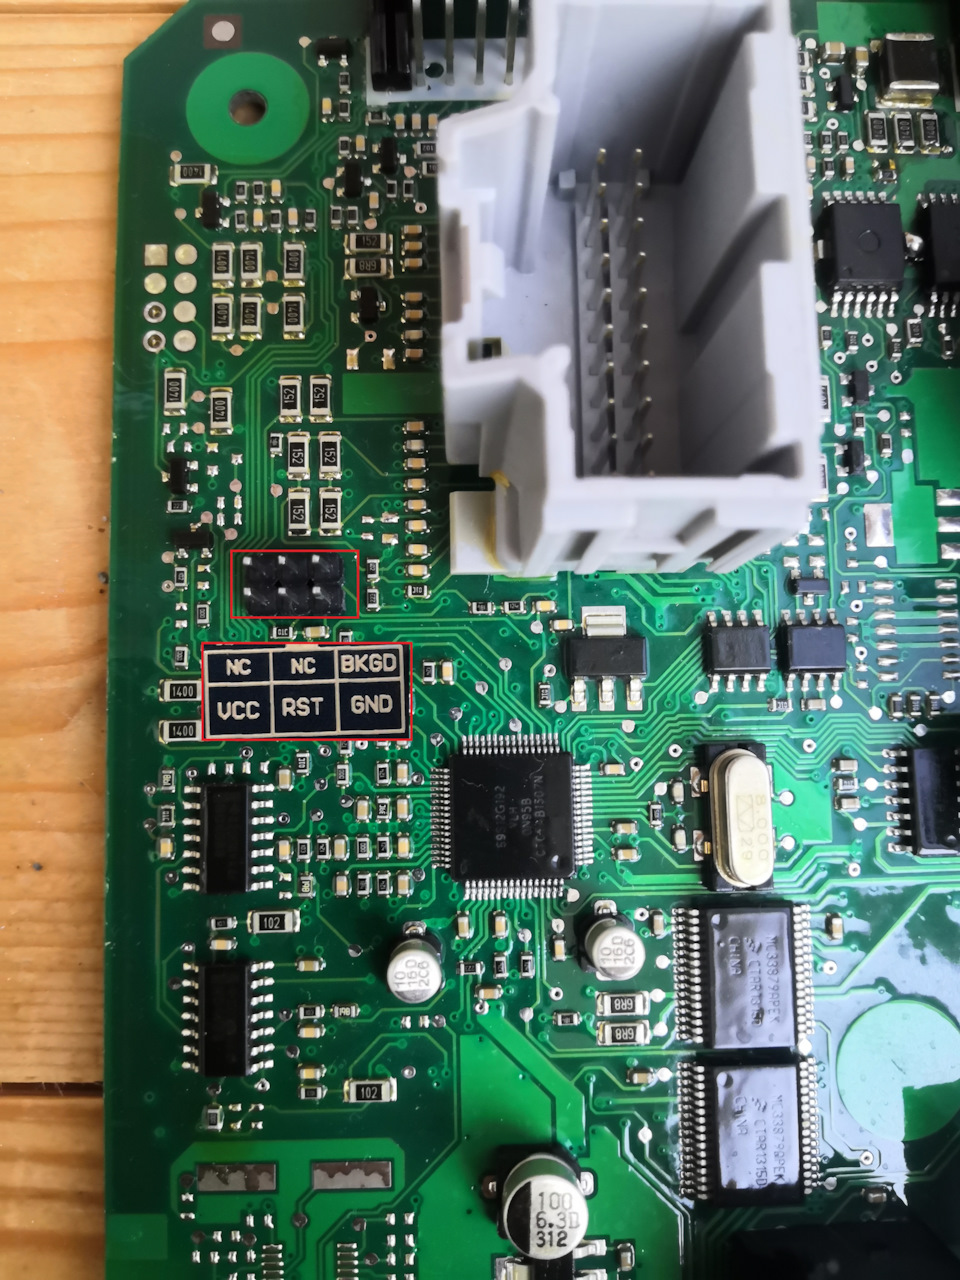
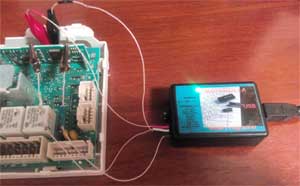
Согласно схеме подключаем USBDM программатор к приборке
Ставим перемычку на 3.3в
Подключаем программатор к компу
2. Проверка
Если мы все сделали правильно то должны гореть все 3 светодиода и можно приступать к считыванию /прошивке
Если не горит средний светодиод то значит драйвер не встал, или встал криво. отключаем проверку подлинности драйверов и переустанавливаем драйвер пробуем снова)
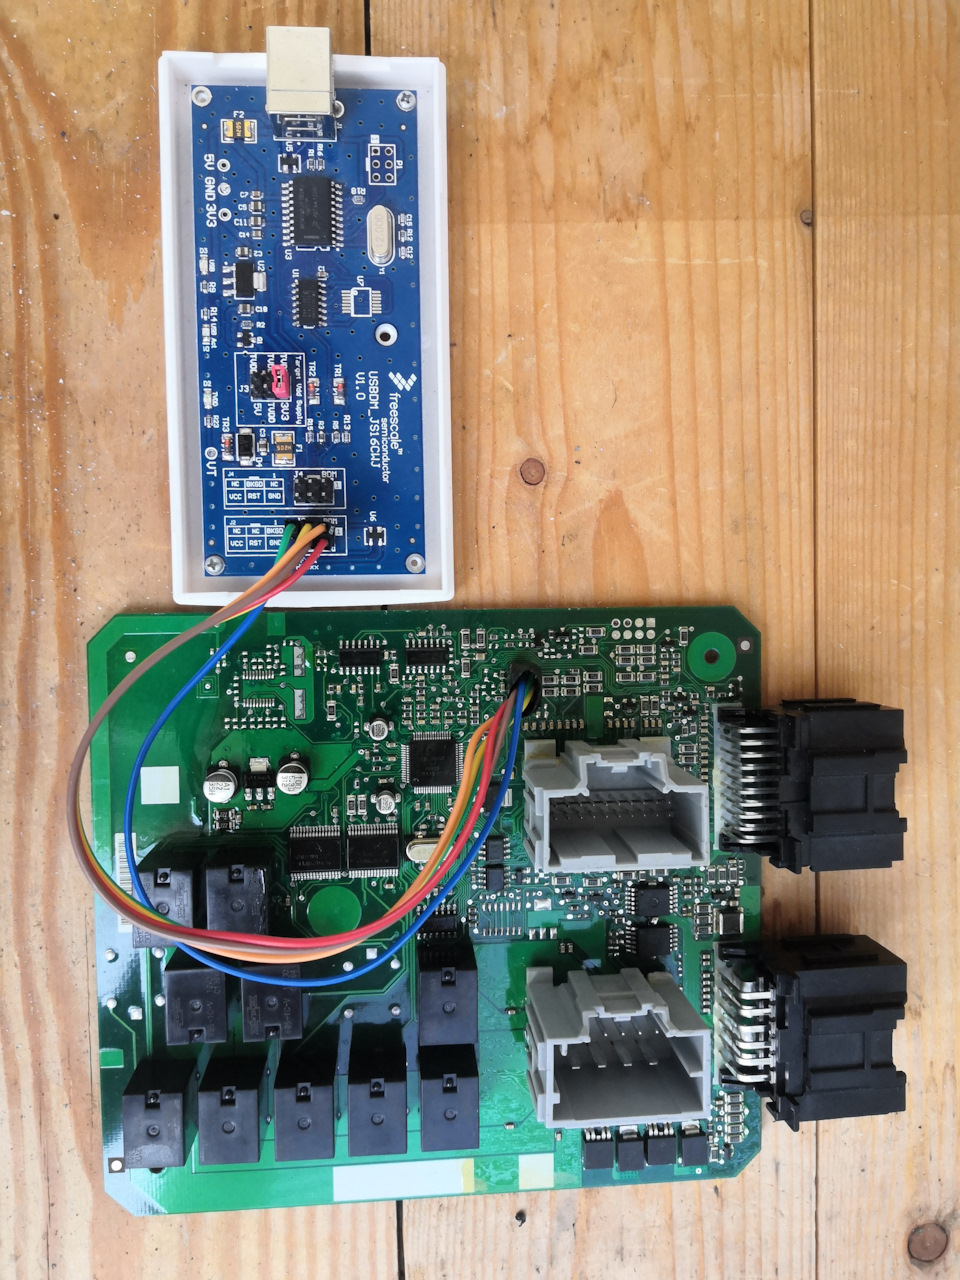
Запускаем Memory Dump (находится в меню пуск)
1. Выбираем HCS12
2. Нажимаем Detect должен определиться наш программатор (если не определился, возвращайтесь драйверам)
3. Выбираем параметр Page и вписываем значения регистра "15"
4. Прописываем адреса
Внимательно! без пробелов!
D-FLASH
400 — 13FF
P-FLASH
48000 — 4BFFF
58000 — 5BFFF
68000 — 6BFFF
78000 — 7BFFF
88000 — 8BFFF
98000 — 9BFFF
A8000 — ABFFF
B8000 — BBFFF
C8000 — CBFFF
D8000 — DBFFF
E8000 — EBFFF
F8000 — FBFFF
Внимательно! без пробелов!
5. Ставим галочку чтобы не пропускались пустые строки !
6. Читаем прошивку
7. Сохраняем прошивку
На этом со чтением все! если возникают ошибки, прежде чем писать еще раз внимательно все проверьте!
Да и не пугайтесь что прошивка ЦБКЭ в начале пустая, это нормально! данные начинаются с середины.
Прошивка
Запускаем HCS12 Programmer (находится в меню пуск)
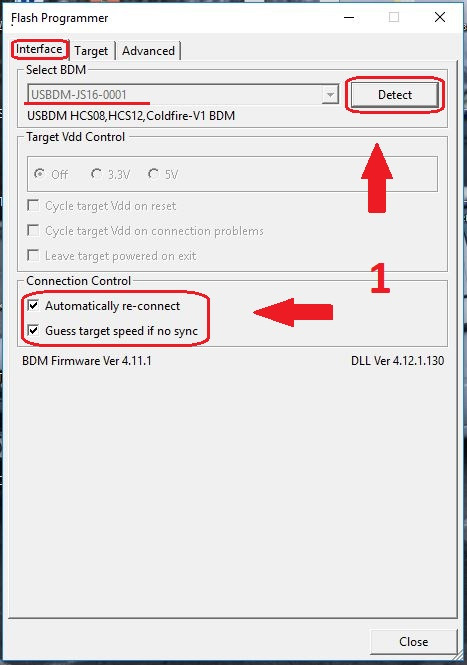
1. Вкладка interface ставим галочки, Нажимаем Detect должен определиться наш программатор (если не определился, возвращайтесь драйверам)
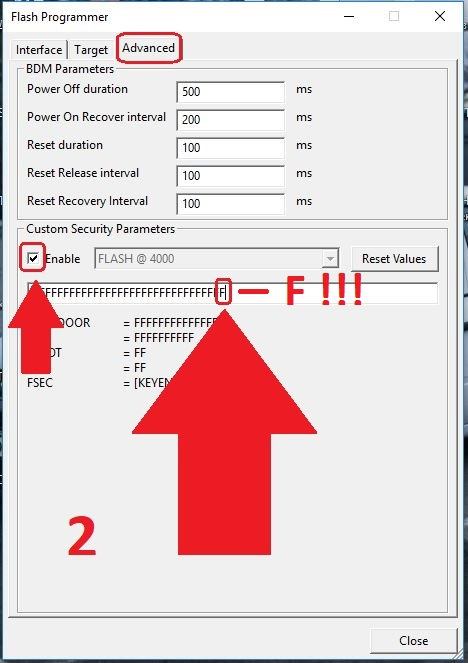
2. Вкладка Advanced ставим галочку и обязательно ОБЯЗАТЕЛЬНО Меняем E на F (можно приложить блок, восстанавливать потом через CodeWarrior с большим бубном
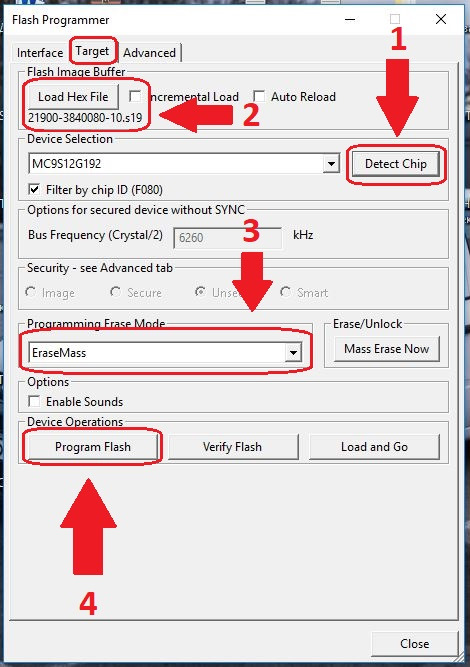
3.Вкладка Target
1. Жмем Detect Chip, определяется проц MC9S12G192 (если не определился, возвращайтесь драйверам, или проверьте соединение )
2. Выбираем файл прошивки
3. В списке выбираем EraseMass — прошивка с полной очисткой (можно прошить только P-FLASH тогда выбираем EraseSelective)
4. Прошиваем, В конце прошивки выскочит окно об успешной прошивке, и предложением прошить еще одно устройство, жмем НЕТ
Точно также можно читать и шить приборные панели, естественно по другим адресам)
Ну и в заключении
Особая благодарность txsmp который подогнал подопытного ( над которым будет еще много экспериментов)
Большое спасибо RUPARADOX kcctech за подсказки и turbomotor412 за отличную инфу по блокам ЦБКЭ
>>>>> Папка с прошивками <<<<<
Список постепенно будет обновляться
Если у вас есть прошивки которых нет в папке, присылайте обязательно добавлю ( в любом формате)

В настоящее время Sky Prog Programmer поддерживает чтение флэш памяти, вывод статистики ошибок, конвертирование в s19, сохранение в s19, запись всей флэш памяти микроконтроллеров FREESCALE MC9S08GB60 и MC9S08GB60A с помощью интерфейса USBDM.
Что бы USBDM работал на Вашем компьютере, необходимо установить:
2. Программное обеспечение USBDM.
Версия 4.10.6.XX (Тестировано автором 4.10.6.80)
Версия 4.11.1.XX (Тестировано автором 4.11.1.60)
Обратите внимание, если Вы приобрели устройство USBDM с ailexpress или ebay, в описании которого версия 4.12, то и программное обеспечение с драйверами нужно устанавливать 4.12.
Версия 4.12.1.XX (Протестировано, рекомендовано)
Обязательно обновите прошивку программатора USBDM до той же версии, которой устанавливаете драйвер и ПО.
Однако, перед его использованием нужно обновить программное обеспечение USBDM, а так же прошивку самого USBDM.
Это так же относится и к другим устройствам USBDM, у которых устаревшее ПО и внутренняя прошивка.
Если ПО USBDM и/или прошивка самого USBDM устарели, Sky Prog сообщит об этом в разделе "Настройки --> Основное"
После установки нового программного обеспечения USBDM нужно обновить внутреннюю прошивку самого устройства USBDM. Для этого нужно запустить соответствующее приложение через кнопку
"Пуск --> Все программы --> USBDM xx.xx.xx.xx --> USBDM Firmware Updater"
См. рисунок ниже.
В открывшемся окне нужно нажать на кнопку "Program flash"

Не забывайте перезагружать компьютер после установки ПО USBDM.
Если всё выполнено корректно, устройство должно быть готово к работе.
Created with the Personal Edition of HelpNDoc: Free HTML Help documentation generator
Note: On Windows, libusb1.0 is a thin wrapper around the Microsoft winUSB low-level USB drivers. Because of this you may see references to winusb in the following.
Note: These drivers are signed.
Please install the drivers before plugging in a BDM.
Steps to follow under WIN-7 (it's similar for WIN-XP but there will be other confirmation dialogues). Windows 8 and 10 are less talkative.
- Download the appropriate driver installation file (as above) from Sourceforge: USBDM Sourceforge
- Remove the BDM if it is already plugged in.
- Install the driver .msi file. This should clean out any incompatible driver files.
- You will be prompted by a UAC dialogue to allow the installation of the drivers.


There isn't any. The DEB file provided will modify the /etc/udev/rules.d file to allow access to the USBDM device. The required driver for USBDM BDM interface (LibusbV1) is included in the standard Linux (at least Ubuntu current version). The CDC (serial port) is a standard device and should also be installed without any extra steps.
If more installation is required on your version you will have to investigate this yourself. I'm not a Linux expert and I don't have access to other versions for testing. If you find other steps are necessary then please advise and I will try to update the installation accordingly.
The shell scripts supplied with the linux version should install the required information for the libusb drivers to work on a linux machine.
You will also need to make sure you have installed some libraries: (Some information posted by joncas on Freescale Forums - thanks)

- Generated on Sun Jan 8 2017 16:33:31 for USBDM by 1.8.9.1
Читайте также: