
Как восстановить биос на ноутбуке делл востро
Обновлено: 05.07.2024
Ответы на вопросы в Железячнике Ru.Board
Искусcтво перешивки BIOS - статья на wiki.rom.by
Часть 1. Для тех, кому лень читать, а хочется побыстрей прошить и забыть.
Часть 2. Для тех, кому это нужно/интересно, либо было лень читать первую, а теперь надо восстановить "как было"…
Часть 3. Для тех, кому, всё же, нужно разобраться. Азы.
Часть 4. "Хабовые" флэши.
Часть 5. Собственный "перешивочный" комплекс.
Часть 6. Восстановление запаянных биосов БЕЗ их выпаивания.
После перепрошивки биоса надо сбросить его настройки в "Defaults". Обычно это делается перемычкой на материнке. А в ноуте - попробуйте вынуть батарейку на час-два. может и поможет.
пробовал подключить USB-FDD - не реагирует. также никакой реакции при нажатии клавиш fn+esc, fn+b, win+b
пробовал записать на CD файл биоса который распаковывается в файл вида F50SVAS.203
(203 какбы версия биоса) файл биоса переименовал в amiboot.rom
в этом случае обращение к CD длиться на 2 секунды дольше чем в случае включения с пустым приводом. после этого ноут сам по себе выключается.
если подрубить USB-CD то он тоже раскручивается и чего-то там пытается прочесть 2-4 секунды
USB-FDD всегда безмолвен.
сам биос прошивал через утилиту с сайта ASUS AFLASH2.EXE может и CD надо сделать автомат загрузчик с этой утилитой?
в службе поддержки ASUS мне сказали что это все. тока СЦ…
если БИОС специально не изуродовать отрубив функцию кризисного восстановления, то эта функция есть во всех биосах
Наврядли производитель будет так поступать, думаетца они перепрятали функцию восстановления за хитровые** процедуры
Моя конфигурация:
Биос: AMIBIOS Core 070010 размер 256 кб
Мать: ASRock P4i45D+.
Помогите пожалуйста разобраться.
Заранее благодарю за ответы.
Обычно после перепрошива биоса сбрасывают его настройки в "Defaults" перемычкой на материнке "Clear CMOS".

Если вам потребовалось восстановить Windows или Linux в заводском состоянии на ноутбуке Dell Inspiron, Vostro, Latitude, XPS или другом, для этого есть простые возможности: вы можете скачать образ восстановления системы с официального сайта Dell или использовать встроенный образ на самом ноутбуке.
В этой инструкции подробно о том, как скачать образ восстановления Dell для ноутбука с Windows 10, 8.1 и Windows 7 или Linux, а также о том, как запустить восстановление из встроенного образа при его наличии. См. также: Как восстановить заводские настройки ноутбука.
Как скачать образ восстановления системы для ноутбука Dell
Dell — одна из компаний-производителей ноутбуков, которая позволяет в любой момент скачать образ восстановления Windows или Linux для вашего устройства даже в тех случаях, когда использование встроенного образа невозможно (например, после его удаления и замены жесткого диска или SSD).

Для загрузки вам потребуется сервисный код ноутбука, который расположен на наклейке в нижней части (на некоторых моделях скрыт под шторкой), обычно обозначен как «Service tag (S/N) и состоит из 7 букв и цифр, а вот Express Service Code, расположенный там же, нам не требуется.
Если на текущем компьютере у вас установлена Windows, вы можете выполнить следующие шаги для скачивания образа восстановления системы (флешку, на которую будет загружаться образ лучше подключить заранее, также учитывайте, что все данные с неё будут удалены):
Утилита Dell OS Recovery Tool доступна только для Windows, однако вы можете скачать образ восстановления в формате ISO из Linux или Mac OS (или даже из Windows, если сменить в браузере user-agent), после чего вручную записать его на USB-накопитель:
К сожалению, для некоторых ноутбуков, как правило, с предустановленной Linux, при попытке скачать образ восстановления сообщается «Образ восстановления сейчас недоступен» или «Нет образов ОС для этого кода». Тогда, восстановление возможно из встроенного образа, если вы его не удалили (например, при ручной установке системы).
Использование встроенного образа восстановления на ноутбуке Dell
На старых ноутбуках Dell с предустановленной Windows 7 для запуска восстановления из встроенного образа нужно было выполнить такой порядок действий: при включении нажимать клавишу F8, пока не откроется меню, а затем выбрать пункт «Repair your computer».
На новых ноутбуках с заводской Windows 10 и 8.1 можно зайти в особые варианты загрузки (в Windows 10 — Пуск — Параметры — Обновление и безопасность — Восстановление — Перезагрузить сейчас, либо на экране блокировки, удерживая Shift нажать по кнопке питания и пункту «Перезагрузка»), а затем найти пункт «Восстановление из образа» в дополнительных параметрах восстановления. Однако, после переустановки ОС или обновлений системы пункт может пропадать.
- Подключите USB флешку (данные с нее будут удалены) и запустите утилиту. Сделать это можно и на другом компьютере.
- Выберите флешку в списке и нажмите кнопку для записи. В моем тесте Dell Recovery and Restore отображалась странно (как на скриншоте), но отработала исправно. Если вы тоже столкнетесь с таким отображением, убедитесь, что не подключены другие съемные накопители (потому как могут быть затронуты данные на них).
- По завершении работы вы получите загрузочную флешку со средствами восстановления Dell. После загрузки ноутбука с неё и выбора языка появится следующий экран.
- После нажатия «Continue» будет выполнена попытка восстановления уже имеющейся системы на диске, а при неудаче — предложено и начато восстановление из встроенного образа, если он присутствует на жестком диске.
Дополнительная информация
Некоторые дополнительные сведения, которые могут оказаться полезными в контексте восстановления ноутбука Dell к заводским настройкам из образа:
- Для использования флешки в обоих способах вам нужно будет поставить загрузку с флешки в БИОС или использовать Boot Menu (на Dell обычно вызывается по F12). Для современных систем с предустановленной Windows 10 или 8 используйте загрузку в UEFI режиме.
- Образы восстановления содержат все драйверы для вашего ноутбука, а на сайте Dell их даже обновляет, но все равно обычно там не последние версии, обновитесь после восстановления (особенно если использовали встроенный образ).
- Windows 10 содержит встроенные средства для восстановления системы и её переустановки, которые применимы независимо от марки вашего компьютера, подробнее: Автоматическая чистая установка Windows 10, Как сбросить Windows 10.
- Если ни один из методов не помогает, а образ восстановления не удается скачать, вы можете скачать Windows 10 с официального сайта Майкрософт и вручную выполнить чистую установку. Какой-либо ключ при установке вводить не нужно (при условии, что на ноутбуке была предустановлена Windows 10, 8 или 8.1), система будет активирована после подключения к Интернету. Останется вручную или с помощью Dell Support Assist установить все оригинальные драйверы.
Надеюсь, что-то из описанного в руководстве окажется полезным в вашей ситуации. Если же проблемы сохраняются, подробно опишите их в комментариях, я постараюсь помочь.
Dell Bios Recovery Procedure
While the step below work for the Vostro 3500 and 3700, the same procedure should also work for other models. To get started you need an empty 1GB or 2 GB flash drive.
We now have a formatted flash drive and downloaded bios file. Copy the bios file, A3500_A10.exe to the flash drive. Open PowerShell or Cmd (Windows key + R and type CMD <enter>) and go the flash drive. Run the following two commands to create the hdr and rom file:
If you now look a the flash drive, you will find a file called A3500_A10.hdr and A3500_A10.rom
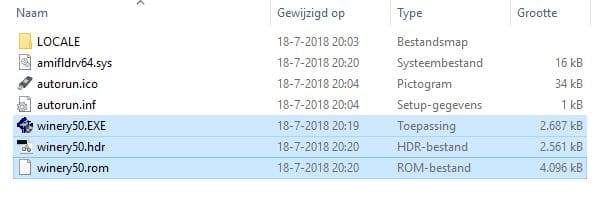
Rename the hdr and rom file to winery50.hdr and winery50.rom for the Vostro 3500 and to winery70.hdr / .rom for the Vostro 3700. When done you should have the following files on you flash drive.
Wait a couple of seconds before you release the end button. The recovery mode will start.
Update the bios and reboot the computer.
If the recovery mode does not start, try another USB port.
Related Posts
How To use the IPConfig Command and Options Explained
78 thoughts on “Bios Recovery Dell Vostro 3500 / 3700 after update failed”
Hi Brother
Your trick allowed me to resuscitate my vostro 3300 which had died after flashing the bios A12. I just changed the files with winery30 and it worked great.
Thank you so much.
You are awesome man! you just saved my life!
I did everything like said
I have tried with a 4gb and 8 gb usb key in FAT 32
I cant format them to FAT32 in 512 bits
Wonderful explanations.
I could save my old vostro 3700 with your advices and method.
Thanks a lot.
Kind regards.
Thank you very much!
After the update from Dell scrapped the computer, I was really angry. You could forget the DellSupport.
Thanks for the super guide. It worked immediately . MEGACOOL .
In doing so, we have saved our planet from e-waste for a while.
Greetings
Brother, your solution was very effective, for a vostro 3300, change the names to winery30.hdr and winery30.rom. I followed your steps and it allowed me to recover the bios and even install the bios that had problems.
Thank you!! worked on a bricked dell vostro 5480 bios!
The accepted method is to update the BIOS with the official A12 version BIOS first and then update the BIOS again using the Modded A12 BIOS version.
Any and all info related to this modded BIOS is in the link shown above and it is advised you read through the posts for such information as you require for your setup and obviously prior to any further updating from A10 version BIOS.
Thank you very much. I was ready to trash the PC, till I tried your terrific solution.
Yet another big thank you Ruud, Windows borked my BIOS flash from A04 to A10 and I was gutted, I’d just bought a new battery, had 2 x 4Gb sticks in my drawer, and a spare SSD 480GB and finally I purchased a backlit keyboard (why all laptop keyboards aren’t backlit is a total mystery to me, but I digress) Anyhoo, this process worked for me so big love from the UK.
As a side note, I noticed there was an A12 BIOS floating about in the internet aether, is this BIOS usable on the Dell Vostro 3700
thanks you so much. you saved me from a windows bios update failed.
good explication, it works!!
Excellent article . Thank you :-))))))
Great job on this tutorial it saved my dead Vostro 3500 laptop. Thank you so very much
There is a space between the / and writehdrfile. Make sure you remove this.
Gracias, no he logrado entrar al modo recovery en mi vostro 3700 con otros metodos, voy a probar tus instrucciones: con la tecla fin y el dispositivo usb formateado con rufus en freeDOS. Luego les comento, deseenme suerte.
with battery you mean the bios battery or the battery of the laptop?
The battery of the laptop self
I was able to salvage my DELL Vostro 3700 following the instructions to build a USB boot drive. The trickest part was getting the files renamed within the CMD commands. IT WORKS!
Muchas gracias, después de varios intentos y búsquedas logre encontrar esta pagina y sus recomendaciones y pude reparar mi DELL Vostro 3500. millon gracias
This is how I recovered Vostro 3500 BIOS Update Failed – Recovery Procedure
Here is how to recover from a failed BIOS flash update of a Vostro 3500 laptop
Found Rudy Mens steps on internet, many thanks!
1. Download the Dell BIOS update 3500A12.exe file to my C:\Users\NameXXX
2. Run the 3500A12.exe file with /writehdrfile parameter (within CMD) in C:\Users\NameXXX
3. Run the 3500A12.exe file with /writeromfile parameter (within CMD)in C:\Users\NameXXX
4. Copy the 3500A12.exe 3500A12.hdr and 3500A12.rom file renamed to winery50.exe winery50.hdr winery50.rom (change the BIOS File name to winery50.hdr and winery50.rom)
Copy all files to the formated Flash Drive 3500A12.exe ,3500A12.hdr, 3500A12.rom,(all these 3 files with file name changed to winery50.exe ,winery50.hdr, winery50.rom), and amifldrv64.sys, (Folder LOCALE, autorun.ico, autorun.inf, these files are added to flash drive after formatting with Rufus 3.8.1580
5. Remove the battery and AC power from the dead computer
6. Insert the flash drive into the dead computer’s USB port
7. Hold down the End key and then connect the AC power
8. Dead computer reads USB flash and asks if update should be done
9. Allow the update to finish and then reboot.
10. Computer is now working normally.
Very Happy!!
Format Flash Drive with RUFUS usb 3_8 in 512 bits
Open CMD (DOS application in Administrator mode)
This instruction is for BIOS update 3500A12.exe, otherwise the same method for other BIOS update downloaded file but obviosly the file name has to be changed in down below instructions for writehdrfile and writeromfile extraction from the exe file.
1. Download the Dell BIOS update 3500A12.exe file to a USB flash drive.
2. Run the 3500A12.exe file with /writehdrfile parameter (within CMD)
3. Run the 3500A12.exe file with /writeromfile parameter (within CMD)
4. Copy the 3500A12.exe 3500A12.hdr and 3500A12.rom file renamed to winery50.exe winery50.hdr winery50.rom (change the BIOS File name to winery50.hdr and winery50.rom)
Copy all files to the formated Flash Drive 3500A12.exe ,3500A12.hdr, 3500A12.rom,(all these 3 files with file name changed to winery50.exe ,winery50.hdr, winery50.rom), and amifldrv64.sys, (Folder LOCALE, autorun.ico, autorun.inf, these files are added to flash drive after formatting with rufus usb 3.8 software in 512 bit)
winery50.rom
5. Remove the battery and AC power from the dead computer
7. Hold down the End key and then connect the AC power
8. Dead computer reads USB flash and asks if update should be done
9. Allow the update to finish and then reboot.
10. Computer is now working normally.
Thanks for sharing!
It is thanks to you Rudy, that I managed to recover by following your procedure, after no success multiple times, I searched for the latest Rufus Software and formatted the dFlash drive to 512, and succeeded recovery.
I posted a recovery option that I used and successfully recovered ( the flash drive has to be formatted to FAT32 in 512 bits
You could try removing the Hard Drive and following the above Rudy procedure, I formatted the Flash Drive with latest Rufus in 512 bytes, worth a try, Flash Drive I used was 1GB.Hope you have Luck, I have no idea in Flashing BIOS while on Motherboard
thanks very much it worked for me for a dell vostro 3700 , i wanna tell people be sure that u r using the end button , for my part i used to push FN for hours without working , hehehehe
you rock .
saved my laptop
Did you try running the commands as described in step 3?
Windows key + R and type CMD
Navigate to the flash drive with d: or e: (check Explorer to find the correct drive letter)
Run the commands to create the files.
Yeah, even tried in Windows XP on virtual as i thought it might be issue with win10 and tried on all BIOS exe available on Dell support (A11, A12, A14) /writeromfile /writehdrfile -writeromfile -writehdrfile and nothing 🙁 just starts flashing software
I understand your concern. Just double-checked it, but you can safely click Yes. (I also updated the article with the warning)
Same result as always, just the fan on full power and usb illuminated but no lights on the laptop and no other response.
Vostro 3700, worked for me ! You are my hero!
Muchas gracias me funciono para reparar la bios dell Vostro 3700
Hola, sé que ya tiene rato este post, pero quiero saber si me puedes decir como lograste hacer que botee desde la usb, tengo la usb formateada con rufus, he intentado con 512 y 4096, tengo los archivos como los solicitan, pero al momento de conectar solo encienden el ventilador y no se ve nada en la pantalla, me puedes ayudar? saludos
Thanks! Tried the same method a hundred times, with the same instructions from a dozen different websites. Only you included the Rufus step, which did the trick for me.
Good to hear you were able to fix it!
work for optiplex 980?
change name same or not?
Prima, danke!
Hat mir geholfen.
Anfänglich hatte ich den Fehler gemacht, nach dem Einstecken des Netzsteckers noch zusätzlich die Einschalttaste am LapTop zu drücken.
Hello. Thank you for your efforts and help. I hoped this would fix my issue, but unfortunately it did not. Dozens of attempts using this method (and others) later and no luck.
As I understand it, this is the variation I would have before changing names:
3700_a10
3700_a10.rom
3700_a10.hdr
amifldrv64.sys
autorun.inf
autorun.ico
locale
After I change the names this is what I should have:
winery70
winery70.rom
winery70.hdr
amifldrv64.sys
autorun.inf
autorun.ico
locale
Is it possible I need a 1gb drive or different 2gb? Would it be wasted to test a 128gb?
Thanks again. I have like 10 tabs open and have been trying a ton of stuff. I really hope to get this back up and running so I can add an SSD and the extra RAM I picked up.
Two suggestion, you mentioned a possible screen issue. Do you see anything at all on the screen or does it stay black? You could try attaching an external screen.
Разберемся, как войти и настроить BIOS ноутбука Dell Vostro 1015 для установки операционной системы Windows 7 или 8 с флешки либо привода.
Флешка или диск должны быть подключены к ноутбуку. Включаем ноутбук. Во время загрузки системы жмем кнопку «F2», чтобы попасть в BIOS. BIOS на этом ноутбуке оригинальный. При этом, работать с ним будем при помощи тачпада.
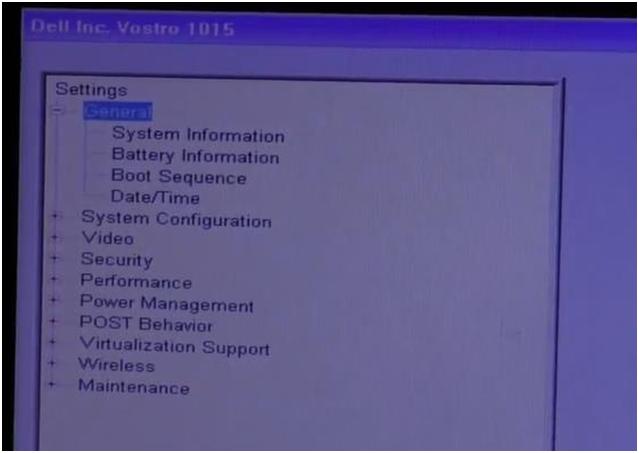
В разделе «Settings» выбираем пункт «Boot Sequence».
С правой стороны появится список устройств, с которых есть возможность загрузить операционную систему.
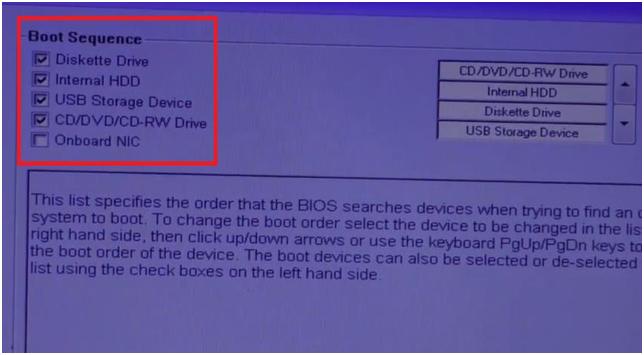
Это дискета, жесткий диск, USB носитель, CD/DVD-диск.
Еще правее есть таблица с нашими устройствами. В ней их можно переместить вверх-вниз, в зависимости от наших потребностей.
Для этого подводим курсор к нужному устройству (на изображении ниже стрелочкой выделена флешка). Затем кнопками вверх и вниз перемещаем на первую позицию.

Теперь при загрузке системы ноутбук обратится к флешке в поисках операционной системы в первую очередь.
Далее с правом нижнем углу окна нужно нажать кнопку «Apply», чтобы применить сделанные изменения в настройках. Затем нажать кнопку «Exit».
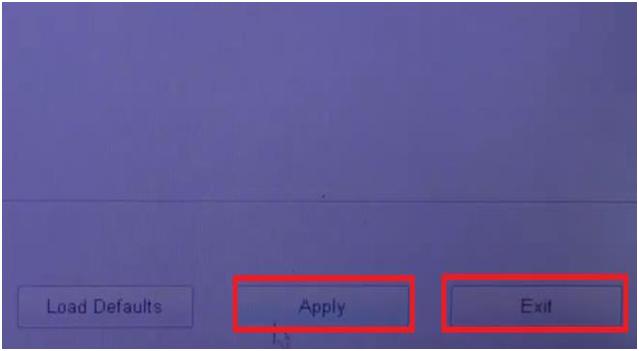
Кнопка «Load Defaults» активирует заводские настройки BIOS. Ее мы не трогаем.
Ноутбук уйдет в перезагрузку. При повторном включении ноутбук автоматически перейдет к загрузке операционной системы с флешки.
Аналогичные действия применяем при необходимости загрузки операционной системы с иного устройства.
Существует и второй способ, более быстрый.
При включении ноутбука нажимаем кнопку «F12». Попадаем в окно «Boot Menu».
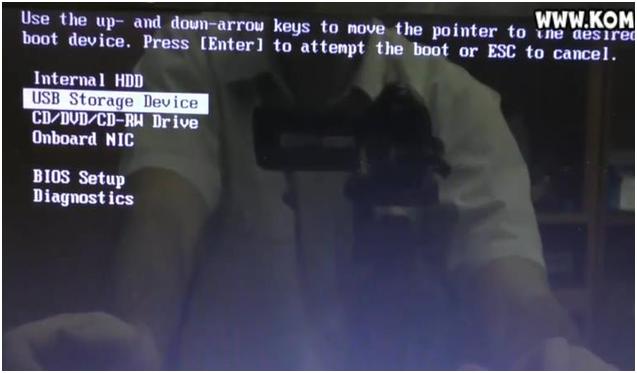
Кнопками курсора выбираем устройство, с которого мы хотим загрузить операционную систему. Нажимаем кнопку «Enter». Через несколько секунд начнется загрузка с выбранного устройства.
Читайте также:
- Для работы с текстом в программе microsoft office powerpoint 2007 нужно применить команды копировать
- Настройка 1с бухгалтерия 8 3
- Outlook имя сертификата безопасности недопустимо или не соответствует имени сайта
- Ндс по основным средствам в 1с не попадает в книгу покупок
- Как полностью удалить орион про с компьютера