
Спеллчек в ворде как сделать
Обновлено: 08.07.2024
All Microsoft Office programs can check spelling, and most can check grammar.
If you find that spelling or grammar checking isn't working as you'd expect see The spelling and grammar checker isn't working as expected. If you'd like to check spelling or grammar in a language other than your default language see Check spelling and grammar in a different language.
Using Microsoft 365? You may be interested in checking out the powerful new Editor feature in Word! See Editor - your writing assistant for more information.
Run the spelling and grammar checker manually
To start a check of the spelling and grammar in your file just press F7 or follow these steps:
Open most Office programs, click the Review tab on the ribbon. In Access or InfoPath you can skip this step. In Project you'll go to the Project tab.
Click Spelling or Spelling & Grammar.

If the program finds spelling mistakes, a dialog box appears with the first misspelled word found by the spelling checker.
After you decide how to resolve the misspelling (ignoring it, adding it to the program’s dictionary, or changing it), the program moves to the next misspelled word.
Click a heading below for more information
Most Office programs automatically check for potential spelling and grammatical errors as you type, so you don't need to do anything to show errors while you work.
Automatic spelling and grammar checking is not available in Access, Excel, or Project. You can manually start a spell check by pressing F7.
Automatic grammar checking is available only in Outlook, Word, and PowerPoint 2013 (or newer).
Office marks potential spelling errors with a red squiggly line, and potential grammatical errors are marked with a blue squiggly line.
If spelling or grammatical errors aren't marked, automatic checking might be turned off. You can turn on the automatic spelling and grammar checker.
When you see a spelling or grammatical error that you want assistance fixing, right-click on the underlined word or phrase and choose one of the options to fix the error.
If Office is flagging words as misspelled but you have it spelled the way you want it, select Add to Dictionary to teach Office not to flag that word as misspelled in the future. For more information on this see: Add or edit words in a spell check dictionary.
Turn the automatic spelling and grammar checker on or offIf you don't want Office to mark potential errors with squiggly lines while you are working, you can turn automatic spelling and grammar checking off:
Open the spelling and grammar options:
In OneNote, PowerPoint, Publisher, Visio, and Word: On the File menu, click Options, and then click Proofing.
In InfoPath: On the Home tab, click the arrow next to or under Spelling, and then click Spelling Options.
In Outlook: On the File menu, click Options, and click Mail, and then click Spelling and Autocorrect.
Select or clear the Check spelling as you type check box. In programs that have automatic grammar checking, you may also select or clear the Mark grammar errors as you type check box.

Note: In Word, you can turn the spelling checker on or off for the document you're working with or for all new documents. Select an option in the Exceptions for list, and then select or clear the Hide spelling errors in this document only and Hide grammar errors in this document only check boxes.
If you don't want Office to check grammar at all (either when running a spell check or automatically as you type), you can turn it off:
Open the spelling and grammar options:
In OneNote, PowerPoint, Publisher, Visio, and Word: On the File menu, click Options, and then click Proofing.
In InfoPath: On the Home tab, click the arrow next to or under Spelling, and then click Spelling Options.
In Outlook: On the File menu, click Options, and click Mail, and then click Spelling and Autocorrect.
Clear the Mark grammar errors as you type and Check grammar with spelling check boxes.

Note: Not every Office program will have both of these options.
Recheck spelling and grammar that you previously ignoredIn Word, Outlook, PowerPoint 2013 (or newer), you can force a recheck of the words and grammar that you previously skipped by doing the following:
Open the document or item that you want to check.
On the File menu, click Options > Proofing> Recheck Document. In Outlook you'll find this under File > Options > Mail > Spelling and Autocorrect
Click Yes when you see the warning message about resetting the spelling and grammar checker.
Click OK in the dialog box to get back to the document, and then run the spelling and grammar checker again.
See Also
Office for Mac applications automatically check for potential spelling and grammatical errors as you type. If you’d rather wait to check spelling and grammar until you're done writing, you can turn off automatic checking, or you can check spelling and grammar all at once.
Check spelling and grammar automatically as you type
Word marks potential spelling errors with a red squiggly line, and potential grammatical errors are marked with a green squiggly line.
Tip: If spelling or grammatical errors aren't marked, you might need to turn on automatic spelling and grammar checking, which is explained in the next procedure.
When you see a spelling or grammatical error, Control click the word or phrase and choose one of the options.

If Word has incorrectly flagged a word as misspelled and you want to add that word to your dictionary so that Word will properly recognize it in the future see Add or edit words in a spell check dictionary
Turn on (or off) automatic spelling and grammar checkingOn the Word menu, click Preferences > Spelling & Grammar.
In the Spelling & Grammar dialog box, under Spelling, check or clear the Check spelling as you type box.
Under Grammar, check or clear the Check grammar as you type box.
Close the dialog box to save your changes.
On the Review tab, click Spelling & Grammar.
If Word finds a potential error, the Spelling & Grammar dialog box will open, spelling errors will be shown as red text, and grammatical errors will be shown as green text.
To fix an error, do one of the following:
Type the correction in the box and then click Change.
Under Suggestions, click the word you want to use, and then click Change.
To skip the error, do one of the following:
Click Ignore to skip only that instance of the error.
Click Ignore All to skip all instances of the error.
For a grammatical error, click Next Sentence to skip that instance of the error and move to the next error.
To skip a misspelled word in all documents, click Add to add it to the dictionary. This only works for misspelled words. You can’t add custom grammar to the dictionary.
After you correct, ignore, or skip an error, Word moves to the next one. When Word finishes reviewing the document, you’ll see a message that the spelling and grammar check is complete.
Click OK to return to your document.
Recheck the spelling and grammar that you previously checked and chose to ignoreYou can clear or reset the list of Ignored Words and Grammar so Word will check for spelling and grammar issues you previously told it to ignore.
Note: When you reset the list of Ignored Words and Grammar, the list is cleared only for the currently open document. Any spelling or grammar issues you told Word to ignore in other documents won't be affected.
Open the document that needs to be checked.
On the Tools menu, point to Spelling and Grammar, and then click Reset Ignored Words and Grammar.

Word displays a warning about the operation resetting the spelling checker and the grammar checker.
Click Yes to proceed.
Click the Review tab, and then click Spelling & Grammar to check spelling and grammar.
Outlook
Check spelling and grammar automatically as you type
By default, Outlook checks for spelling errors as you type. Outlook uses a dashed red underline to indicate possible spelling errors and a dashed green line to indicate possible grammatical errors.
When you see a word with a dashed underline, Control click the word or phrase and choose one of the options.

On the shortcut menu, do one of the following:
Click one of the guesses at the top of the shortcut menu.
Click Ignore Spelling to ignore one instance of the word.
Click Learn Spelling to add the word to the spelling dictionary.
Turn on (or off) automatic spelling and grammar checkingAfter opening an email message:
To have Outlook correct spelling mistakes automatically, on the Outlook menu, click Preferences. Click on Spelling and Grammar under Personal Settings. Click box next to Checkspelling as you type.
To turn automatic grammar checking on or off, on the Outlook menu, click Preferences. Click on Spelling and Grammar under Personal Settings. Click box next to Check grammar as you type.
You can correct all the spelling and grammar issues at the same time after you finish composing a message or other items.
On the Edit menu, point to Spelling and Grammar, and then click Spelling and Grammar.
Do any of the following:
In the list of suggestions, click the word that you want to use, or enter a new spelling in the box at the top, and then click Change.
Click Ignore to ignore this word and move on to the next misspelled word.
Click Add to add the word to the spelling dictionary.
Tip: The keyboard shortcut for skipping to the next spelling or grammar error is + ; .
PowerPoint
You can check spelling in PowerPoint, but you can't check grammar.
Check spelling automatically as you type
PowerPoint automatically checks for and marks potential spelling errors with a wavy, red underline.
Tip: If spelling errors aren't marked, you might need to turn on automatic spell checking, which is explained in the next procedure.
When you see a spelling error, Ctrl+click or right-click the word or phrase and choose one of the suggested options.
On the PowerPoint menu, click Preferences > Spelling.
In the Spelling dialog box, select or clear the Check spelling as you type box.
On the Review tab, click Spelling.
If PowerPoint finds a potential error, the Spelling pane opens and spelling errors are shown.
To fix an error, do one of the following:
Correct the error on your slide.
Click one of the suggested words in the Spelling pane, and then click Change.
To skip the error, do one of the following:
Click Ignore to skip only that instance of the error.
Click Ignore All to skip all instances of the error.
click Add to skip a misspelled word in all documents and add it to the dictionary.
After you correct, ignore, or skip an error, PowerPoint moves to the next one. When PowerPoint finishes reviewing the presentation, you’ll see a message that the spelling check is complete.
Click OK to return to your presentation.
Excel
You can check spelling in Excel, but you can't check grammar.
Check spelling all at once
On the Review tab, click Spelling.
Note: The Spelling dialog box will not open if no spelling errors are detected, or if the word you are trying to add already exists in the dictionary.
Do any of the following.
Change the word
Under Suggestions, click the word that you want to use, and then click Change.
Change every occurrence of this word in this document
Under Suggestions, click the word that you want to use, and then click Change All.
Ignore this word and move on to the next misspelled word
Click Ignore Once.
Ignore every occurrence of this word in this document and move on to the next misspelled word
Microsoft Editor runs in Word for Microsoft 365 to analyze your document and offer suggestions for spelling, grammar, and stylistic issues, like making sentences more concise, choosing simpler words, or writing with more formality.
To use Editor, on the Home tab choose Editor.

Reviewing suggestions
To focus on the issues you care most about, choose a correction or refinement type, like Grammar or Clarity. Then, use the arrows near the top of the pane to step through each of that type of issue.

Choose a suggestion to incorporate it into your document. If you don't like the suggestion, choose Ignore Once. Or, if you never want this type of suggestion, choose Don't check for this issue.

Note: If you change your mind about an issue you ignored, close and reopen the document, and go back to Editor. Editor will find the issue again.
Tailor what Editor checks for
By default, Editor checks for several categories of issues, and the suggestions may or may not suit your writing style. To finely tune Editor for suggestions you want, do the following:

In the Editor pane, choose Settings.

In the Word Options dialog box, next to Grammar & Refinements, choose Settings.
Scroll through the list of options. Select issues you want Editor to check, and clear the issues you want Editor to ignore.
Note: Choosing Reset All returns to the default settings.

Tip: Editor is designed to empower you to bring out the best in your writing. We are continually making updates to its suggestions and experimenting to learn which suggestions are most welcome. If you have feedback for us, choose Help Improve Office? at the top of the Word window to open the Feedback pane.
You might notice Editor’s red, blue, and purple underlines in your document even when the Editor pane is closed. That’s because Editor is always running in the background, checking for spelling, grammar, and some style issues.
Right-click the underlined text to see the suggestion. Use context menu to:
Listen to the suggestion by clicking the arrow next to the suggestion and then choosing Read Aloud.
Skip this instance of the issue by choosing Ignore Once.
Tell Editor to stop checking for this issue by choosing Don’t check for this issue.
Fine tune the settings for this type of issue by choosing the Options link.
Get more information about the issue by choosing See More.

Your document might be written in more than one language, or you might want to switch to another language for Editor to check. If you are set up to use multiple authoring languages (File > Options > Language), Word detects the language you’re writing in, and Editor will check for issues in that language.
However, you might be writing in a language that Word doesn’t detect automatically. In that case, you can get Editor to check text in that language by selecting the text and going to Review > Language > Set Proofing Language, and then choose your language.

When Editor is checking more than one language, the Editor pane lists corrections and refinements for each language in the document.

For information about the issues that Editor checks in various languages, see Editor's spelling, grammar, and refinement availability by language.
When you work on documents in Word on the web, Editor provides a rich set of features that are coming soon to Word for Windows. Even when you’re not using Word, the Editor browser extension helps you with writing on websites like LinkedIn, Twitter, Facebook, and Gmail.
When you are working on your resume, Editor checks for issues like reference to first person, vague verbs, unsuitable expressions, and more.
Go to Review > Resume Assistant.
Enter the Role and Industry. At the bottom of the Resume Assistant pane, switch Editor's resume checking on or off.

Word marks spelling, grammar, and stylistic issues with an underline. Right-click the underlined word, and then choose the suggestion you want, or learn more about the error and how to correct it.
Or, open the Editor pane to address issues by category.
On the Review tab, select Check Document.
The Editor pane categorizes spelling, grammar, and stylistic issues.
Click each category to address the issues.
Note: For keyboard shortcuts in the Editor pane, there's no need to press Alt. Just use the underlined letter to select the command (like i for Ignore Once, g for Ignore All, etc) .
In the Editor pane, click Settings.
Under When correcting spelling and grammar in Word, select Settings
For Writing Style, select Grammar & Refinements .
Scroll down to see all of the options available, and select or clear the rules you want. The settings apply to all the documents that you edit, not just the current one.
Requirements and availability of the Editor pane include the following:
Internet connection: Make sure your connection is working.
Intelligent Services switched on: Go to File > Options > General and turn on Office Intelligence Services.
Language availability: For information about the issues that Word checks for in various languages, see Editor's spelling, grammar, and refinement availability by language.
Word marks spelling, grammar, and stylistic issues with an underline. Control-click the word or phrase and choose one of the options.
If Word incorrectly underlined a word as misspelled and you want to add that word to your dictionary so that Word will properly recognize it in the future, see Add or edit words in a spell check dictionary.
If spelling or grammatical errors aren't underlined, you might need to turn on automatic spelling and grammar checking, as follows.
Turn on (or off) automatic spelling and grammar checking
On the Word menu, click Preferences > Spelling & Grammar.
In the Spelling & Grammar dialog box, under Spelling, check or clear the Check spelling as you type box.
Under Grammar, check or clear the Check grammar as you type box.
Close the dialog box to save your changes.
On the Review tab, click Spelling & Grammar.
Word displays the issues it finds in the Spelling & Grammar dialog box.
To address an issue, do one of the following:
Type the correction in the box and then click Change.
Under Suggestions, click the word you want to use, and then click Change.
To skip the error, do one of the following:
Click Ignore Once to skip only that instance of the error.
Click Ignore All to skip all instances of the error.
For a grammatical error, click Next Sentence to skip that instance of the error and move to the next error.
To skip a misspelled word in all documents, click Add to add it to the dictionary. This only works for spelling. You can’t add custom grammar to the dictionary.
After you correct, ignore, or skip an issue, Word moves to the next one. When Word finishes reviewing the document, you’ll see a message that the spelling and grammar check is complete.
Click OK to return to your document.
Recheck the spelling and grammar that you previously checked and chose to ignoreYou can clear or reset the list of Ignored Words and Grammar so Word will check for spelling and grammar issues you previously told it to ignore.
Note: When you reset the list of Ignored Words and Grammar, the list is cleared only for the currently open document. Any spelling or grammar issues you told Word to ignore in other documents won't be affected.
Open the document that needs to be checked.
On the Tools menu, point to Spelling and Grammar, and then click Reset Ignored Words and Grammar.
Word displays a warning about the operation resetting the spelling checker and the grammar checker.
Click Yes to proceed.
Click the Review tab, and then click Spelling & Grammar to check spelling and grammar.
Word marks potential spelling errors with a red squiggly line, and potential grammatical errors are marked with a blue squiggly line.
Right-click on the underlined word or phrase and choose a correction, or ignore the suggestion.
Note: If Word is flagging words as misspelled but you have it spelled the way you want it, select Add to Dictionary to teach Word not to flag that word as misspelled in the future. For more information on this see: Add or edit words in a spell check dictionary.
If you don't want Office to mark potential errors with squiggly lines while you are working, you can turn automatic spelling and grammar checking off:
On the File menu, click Options, and then click Proofing.
Select or clear the Check spelling as you type and Mark grammar errors as you type check boxes.
Note: You can turn the spelling checker on or off for the document you're working with or for all new documents. Select an option in the Exceptions for list, and then select or clear the Hide spelling errors in this document only and Hide grammar errors in this document only check boxes.
If you don't want Word to check grammar at all (either when running a spell check or automatically as you type), you can turn it off:
On the File menu, click Options, and then click Proofing.
Clear the Mark grammar errors as you type and Check grammar with spelling check boxes.
On the File menu, click Options > Proofing> Recheck Document.
Click Yes when you see the warning message about resetting the spelling and grammar checker.
Click OK in the dialog box to get back to the document, and then run the spelling and grammar checker again.
See also
For more topics on spelling and grammar, see Spelling and grammar in Word.


Время клиента —
ценнейший ресурс.
Мы гарантируем качество
нашей работы.


Нужен срочный перевод?
Переведем с листа за 60 минут.
Или 100 страниц на следующий
день. Проверить!

Сэкономим Ваш бюджет,
используя высокотехнологичные
программные решения:
CAT, Xbench, Verifika и др.

Конфиденциальность
для нас — синоним
профессии переводчика.
Работаем в соответствии с
Этическим кодексом
переводчика

Мастерство, оточенное
временем. Ведем
сложные переводческие
проекты с 2008 года.

Качественный сервис —
это вдумчивые и
внимательные менеджеры.
А также удобный Вам способ
оформления сделки и оплаты.
Проверьте!

Гибкая ценовая политика —
неотъемлемая часть
умного сервиса.
У нас Вы всегда
будете понимать
за что платите.

«ЛингваКонтакт» —
это еще и крупнейшие
переводческие курсы России.
Профессию переводчика
мы знаем со всех сторон!

Для MS Word 2007 (2010)
1) Выделить весь текст документа (ctrl+a)
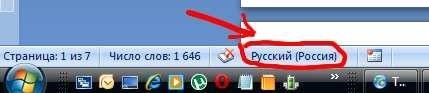
2) Кликнуть на язык в левом нижнем углу в строке состояния:
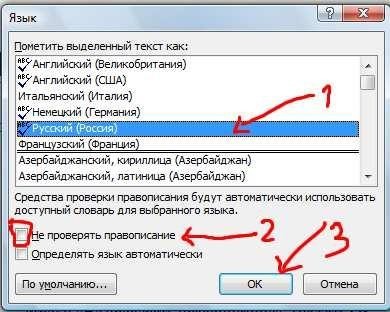
3) Выделить нужный язык (например, Русский (Россия)) > Убрать выделение со строки «Не проверять правописание» > нажать ОК:
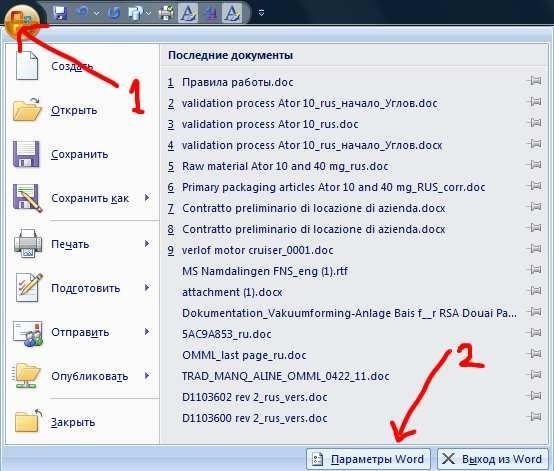
Если это не помогает, необходимо включить функцию проверки правописания в принципе.
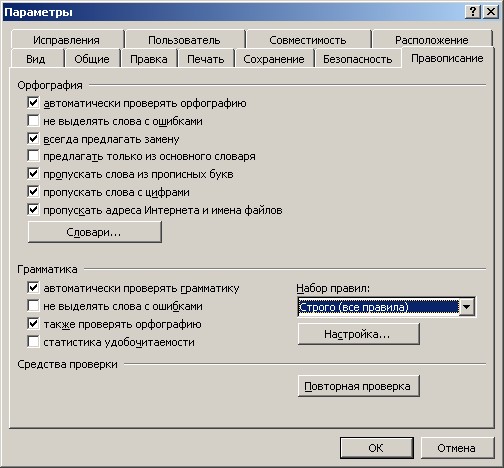
1) Нажать круглую кнопку в левом верхнем углу экрана > Параметры Word:
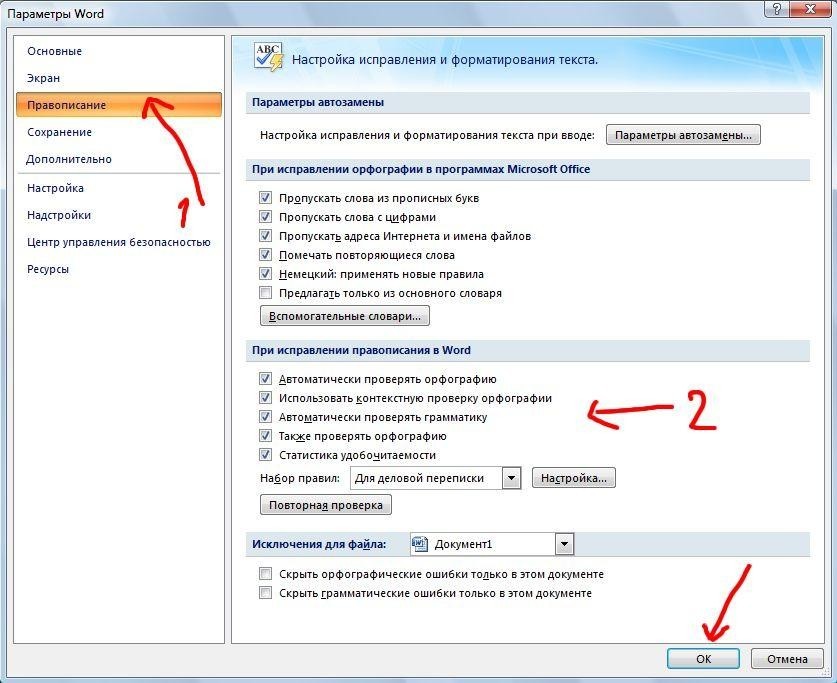
2) Зайти в раздел «Правописание», проставить необходимые галочки, нажать ОК:
Для MS Word 2003
Сервис > Параметры > Правописание. Установите флажок «Автоматически проверять орфографию»:

Включение проверки орфографии в Ворде
- Откройте меню «Файл» (в ранних версиях программы необходимо нажать кнопку «MS Office»).


Примечание: Галочку напротив пункта «Показывать статистику удобочитаемости» можно не устанавливать.
Помимо слов и фраз, написанных с ошибками, текстовый редактор также подчеркивает неизвестные ему слова, отсутствующие во встроенном словаре, который является общим для всех приложений, входящих в состав пакета Microsoft Office. Кроме неизвестных слов, красной волнистой линией подчеркиваются еще и те слова, которые написанные на отличном от основного языка и/или активного в данный момент орфографического пакета (отображается в строке состояния). Ниже показан пример того, как англоязычное название самой программы кажется ей же ошибочным только потому, что проверка выполняется для русского языка.


Проверка орфографии в Ворде
Включение проверки орфографии – это лишь первый шаг на пути к грамотному написанию текста в Word. Сделав это, можно и нужно приступать к поиску и устранению ошибок или же исправлять их непосредственно в процессе ввода. На нашем сайте есть отдельная статья, в которой рассказывается о том, как все это делать в автоматическом режиме, то есть просто следуя рекомендациям текстового редактора от Microsoft, а также о том, как реализовать данную работу вручную. Последнее будет полезно как при самостоятельном, так и при совместном создании текстового документа, а это, в свою очередь, может подразумевать не только работу над ошибками, но и рецензирование, а также составление примечаний. Обо всем этом мы тоже писали ранее, а потому просто рекомендуем ознакомиться с представленными по ссылкам ниже материалами.

Заключение

Отблагодарите автора, поделитесь статьей в социальных сетях.
Читайте также: