
Vocodex fl studio как пользоваться
Обновлено: 07.07.2024
Синтезатор речи в FL Studio – это «плагин» предназначенный для преобразования английских букв в речь. При этом учитываются такие параметры как тип голоса, стиль речи, скорость произношения и др. Синтезатор речи или Speech synthesizer (именно так он называется в FL Studio) является уникальным инструментом для генерации голоса. Однако его нельзя назвать полноценным плагином, скорее – это генератор сигнала.
Давайте рассмотрим принцип работы синтезатора речи Speech synthesizer и попробуем сгенерировать с помощью него какой-нибудь сигнал (голос).
Принцип работы синтезатора речи Speech Synthesizer
Как я уже сказал, Speech synthesizer не является отдельным плагином. Этот инструмент способен лишь сформировать аудио сигнал на основе выбранных параметров. После того как сигнал будет сформирован и сохранен в файл с расширением *.speech, в пошаговом секвенсоре создастся канал с плагином Fruity Slicer, в который и загрузиться сгенерированный сигнал (то есть наш голос).
Рассмотрим все параметры инструмента Speech synthesizer:

Область Text
1. Text – поле для записи текста;
2. Listen – клавиша для прослушивания результата;
Область Voice
3. Personality – выбор типа голоса (выбор персоны). В этом поле доступно 20 типов голосов.
4. Style – стиль речи. Здесь выбор намного меньше, всего 4 варианта (натуральный голос с более естественной интонацией, монотонный голос, пение в одной тональности и случайная интонация).
5. Mode – режим исполнения. Их всего 3 (нормальный, хриплый и шепот)
6. Rate – скорость воспроизведения сигнала (bpm);
7. Pitch – выбор тональности в полутонах и октавах;
8. Accept – клавиша для сохранения выбранного пресета.
Итак, я настроил синтезатор речи как показано на картинке выше, нажал Accept и сохранил пресет.

После проделанных операций автоматически открылся плагин Fruity Slicer, в который уже загружен сгенерированный мной голос.
О том как работать с аудио в Fruity Slicer вы можете прочитать в статье «Работа с лупами в Fruity Slicer» .
Давайте прослушаем результат моей работы.
Подобные вставки вполне можно использовать в треках различной стилистики. Однако стоит отметить, что синтезатор речи, каким бы качественным он не был, не в состоянии заменить живой человеческий голос. Speech synthesizer или подобный ему инструмент подходит только для придания оригинальности треку, вставки определенных голосовых элементов. Очень часто в электронной музыке используется голос робота. Такого эффекта можно добиться используя вокодер или синтезатор речи.
Настраивать Vocodex будет легче, если вы чётко понимаете, как работает вокодирование. В этом разделе рассматриваются основы вокодирования и далее переход к некоторому более творческому использования Vocodex.
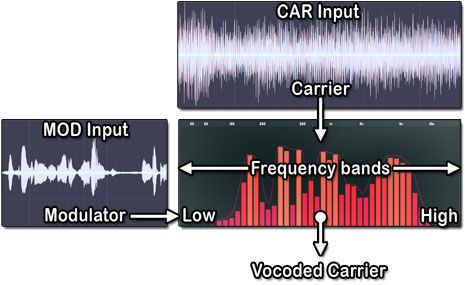
Вокодирование это процесс определения уровней сигнала по ряду узких частотных-полос одного звука (модулятора, MOD) и фильтрации другого звука (носителя, CAR) с помощью тех же самых уровней активности частотных полос.
Полосы анализа - на картинке выше, вертикальные цветные полосы отражают уровни активности частот модулятора. Уровни полос по сути регулируются автоматически в от 5 до 100 полос графического эквалайзера через который проходит носитель. При открытии полосы, частота носителя пропускается (если она присутствует). Точный анализ каждой полосы частот непрерывно отслеживает изменения огибающей уровня в модуляторе и применяет эту огибающую к эквивалентной полосе в банке фильтров носителя. Именно через этот процесс носитель приобретает частотно-временные характеристики звука модулятора, и это суть вокодирования.
Vocodex позволяет изменять количество полос вокодирования от 5 до 100 (с помощью переключателя полос). Как правило, чем больше полос используется, тем больше звук похож на оригинал (на звук модулятора), вокодированный звук будет (в пределах частотного диапазона и тембра носителя, смотри ниже). Если вы хотите получить более "роботизированный" (жёсткий) звук попробуйте использовать диапазон полос от 16 до 32. Вы также можете достичь подобного эффекта, поворачивая ручку ширины полос вправо, и расширяя диапазон частот полос. Чтобы уменьшить нагрузку на процессор мы рекомендуем использовать наименьшее количество полос, необходимые для достижения нужного звука.
Носитель - должно быть ясно, что если открывается полоса частот, и нет никакого звука на этой же частоте в носителе, то данный "тембральный" характер звука модулятора, будет потерян. В частности ясность речи, страдает, когда в звуке носителя мало или нет высоких частот. Это происходит потому, шипящие звуки ("с", "т", и т.д.) в основном состоят из высокочастотного шума. В ответ на эту проблему Vocodex включает в себя параметр NOISE (который добавляет шум в носитель), и ползунок пропускания модулятора (MOD) с фильтром высоких частот, чтобы выбрать из пропускаемого модулятора только звуки шипящих (который также может быть установлен, чтобы пропускать только высокие частоты модулятора). Используйте любой из этих параметров, чтобы сохранить разборчивость речи.
Для генерации внутреннего звука носителя в Vocodex используется движок синтезатора Sytrus, см. разделе синтезатора носителя выше для получения более подробной информации о том, как повторить внутренние звуки носителя с помощью Sytrus в качестве внешнего источника.
Отслеживание высоты тона модулятора - один интересный вариант на тему стандартного эффекта вокодера достигающийся тогда, когда носитель отслеживает высоту тона модулятора (как правило, высота тона модулятора и носителя являются независимыми), это приводит к более "чистому" звучания голоса вокодера более тесно напоминающее "Talk-Box".
Перкуссия - несмотря на то, что вокодеры обычно ассоциируются с речью, они также делают уникальные и интересные эффекты при применении к ударным и другим инструментам. При использовании Vocodex как эффекта (в частности на перкуссии), вы можете захотеть, чтобы некоторые части оригинальных звуков модуляторов (ударных) проходили через с помощью параметра MOD (уровень прохождения модулятора). Носители могут быть звуками эффектами или чем то совершенно другим, как обычно, экспериментирование вознаграждается.
Нужна речь? - если у вас нет микрофона или вы ищете интересные записи речи, для использования в качестве модуляторов, проверьте LibriVox, это библиотека записей без авторского права. См. страницу сайта Copyright для получения подробной информации о том, как они могут быть использованы.
Вокодер для работы нуждается в двух источниках звука:
- Носитель - звук, который жертвует свой тембр и высоту тона. Это звук, который вы слышите (обычно синтезатор). Стерео носители проходят через Vocodex в стерео, моно носители будут оставаться моно, поэтому широкие стерео носители будут часто звучать лучше. Примечание: Внутренний синтезатор носитель предназначен для живой "демо" цели, для работы над проектом используйте внешний носитель (как описано далее).
- Модулятор - звук, который будет управляет частотным спектром носителя, как правило это речь. Модулятор обычно не слышен напрямую. Примечание: Анализируемые полосы модулятора суммируются в моно, L+R каналы, хотя проходящий модулятор стерео.
Метод «быстрый» опирается на внутренний генератор носителя (синтезатор), который встроен в Vocodex и он предназначен для демо использования, когда вам не нужно управлять синтезатором носителем из пианоролла (смотрите примечание в конце этого метода), устанавливается следующим образом:
Режим внутреннего носителя нацелен на живое использование, когда Vocodex не реагирует на ноты пианоролла. Здесь нет пути от пианоролла или пошагового секвенсора на эффекты и плагины. Смотрите раздел синтезатора носителя для более подробной информации о том, как повторить звуки внутреннего носителя с помощью синтезатора Sytrus.
Метод «производственный» позволяет использовать внешний плагин для обеспечения звука носителя, под управлением пианоролла/пошагового секвенсора или MIDI клавиатуры. Этот метод предназначен для серьезной музыкальной деятельности и задач вокодирования. Vocodex может принимать сигналы модулятора и носителя от любого из других каналов микшера (через маршрутизацию по боковой цепи) или звук, проходящий через собственный канал микшера Vocodex (установите переключатель в 0). По умолчанию переключатель входа установлен предполагая, что звук модулятора идёт от другого канала микшера по боковой цепи на канал с Vocodex, а носитель направлен на канал микшера Vocodex непосредственно:
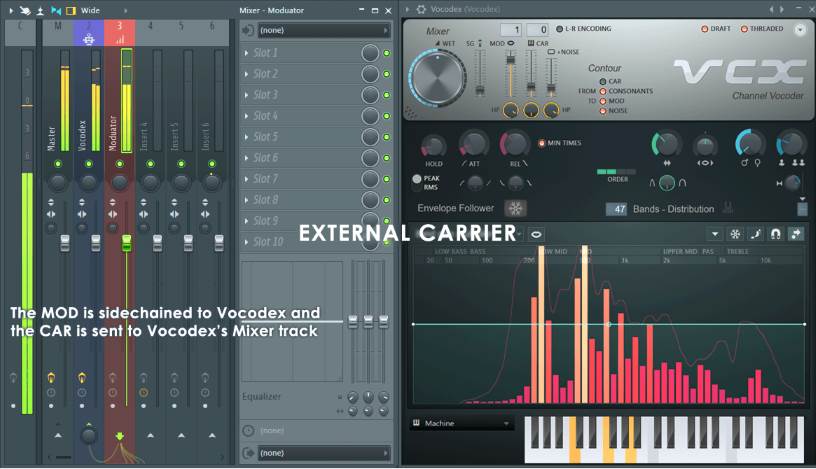
Вы можете использовать переключатели MOD и CAR, чтобы выбрать сигналы модулятора и носителя из любого количества каналов микшера которые отправлены на канал Vocodex по боковой цепи.
In FL Studio, there are two plugins that we can use to create a robotic voice effect. In this tutorial, you’ll learn how to use Vocodex and Fruity Vocoder plugins in FL Studio to create and record your own robot vocals. Let’s get started with this Vocodex infographic, with more details and the roasting of Mark Zuckerberg to follow.
Note: You will need FL Studio Producer Edition or higher to record vocals. FL Studio Fruity Edition does include the Fruity Vocoder plugin, but you will not be able to use it for live voice synthesis. See the feature comparison on Image-Line’s web page for more details.

Click or tap to expand.
Use this Image on Your Site:
What is a Vocoder?
The word “vocoder” is a combination of the words “voice” and “encoder”. They were originally developed by telecommunications engineers in the 1930s. The goal back then was to make human voice easier to transmit over long distances and to encrypt radio communications. This prevented the enemy from listening in on sensitive information sent over radio.
Using many of the same principles, engineers at the Siemens Studio for Electronic Music began experimenting with vocoders for use as instruments in the mid-1950s. In the 1960s, several engineers including Robert Moog, founder of the Moog synthesizer, made further developments and advancements in the field of vocoders as speech synthesizers.
Modern Vocoders
Since then, vocoders have evolved and made their way into mainstream music and film production, especially electronic music. These modern vocoders can mix human voice with synthesizers to create a robotic vocal effect. Big-name artist like Daft Punk have made the sound and style immensely popular. Vocoders can be found in many subgenres of trance too. The intro to this psytrance remix is a great example of what a vocoder sounds like.
How Do They Work?
Vocoders split the modulator signal, which is usually a voice coming from a microphone, into pieces called bands using a series of band-pass filters. The filters are each assigned a range of frequencies to operate in within the frequency spectrum. The range and coverage of each band is determined by the filter band width and the number of bands being used.
The vocoder then analyzes the signal level of each band and uses the band levels and frequencies like gates. They let the carrier signal through based on the levels and frequencies present in the modulator bands. This effectively mixes the spectral data of the human voice with the synthesizer to create an insane robot voice effect.
Part 1: How to Use Fruity Vocoder
Fruity Vocoder is a zero-latency vocoder plugin by Image-Line. In this plugin, your voice will be deemed the modulator MOD and the synth you choose to mix your voice with will be deemed the carrier CAR.

Step 1: Add Fruity Vocoder to an Empty Mixer Track
Name the Mixer track “Vocoder”. Center wheel-click on the track to rename it. You can change the color from here too.
Step 2: Set Up a Mic Input Modulator Mixer Track
- See Steps 1 through 4 in the tutorial on recording vocals in FL Studio
- Name your mic input mixer track Modulator
- Pan the Modulator mixer track hard left
- Un-route the Modulator mixer track from the Master track
- Route it to the Vocoder mixer track from Step 1
- Add Maximus with a de-esser preset. The de-esser will help with excessive hissing and sibilance coming from the mic
- Add Edison for recording later on
Step 3: Add Sytrus to the Channel Rack
Add Sytrus and choose a Sytrus vocoder preset. I think Bright sounds the best, but there are a few others in there that sound really good as well. You can find them under Vocoder carriers in the preset menu. Then, route Sytrus to a blank mixer track.
Step 4: Set Up a Carrier Mixer Track
- Name the blank mixer track that you routed Sytrus to Carrier
- Pan the Carrier mixer track hard right
- Un-route the Carrier mixer track from the Master track
- Route it to the Vocoder mixer track from Step 1
Now, your Carrier and Modulator should both be routed to the Vocoder, and the Vocoder should be routed to the Master track.
Step 5: Fruity Vocoder Settings
Next, we need to tweak the Fruity Vocoder settings. Navigate to the Vocoder Mixer track and open up Fruity Vocoder. The picture of Fruity Vocoder at the beginning of this section shows the same settings:
Step 6: Additional Fruity Vocoder Signal Processing
I added a few additional effects and processors to the Vocoder track after Fruity Vocoder in the following order to soup up the final product:
- Fruity Chorus with the Low Enhance preset
- another Maximus narrow band de-esser – this removes any additional hissing added by the synthesis
- turn the HIGH band off
- delete the knee point in the MID band
- set the MID band compressor threshold to -14.2 dB (click and drag the point down)
- Change mode to Compressor COMP
- Threshold THRES to -28 dB
- KNEE to 43%
- GAIN to 6.5 dB
![vocoder limiter and maximus settings]()
OK, we’re all done. To use the vocoder, just speak into the mic while holding down a key on your keyboard with Sytrus open. Your voice will be mixed with the Sytrus Bright preset to create an awesome robotic voice. It should sound like this:
You can play around with different notes and chords, and even change the pitch in Sytrus in real time to simulate tonal changes in human speech. You can also experiment with the FORM fader in Fruity Vocoder.
OK, now on to part two with the other popular FL Studio vocoder plugin, Vocodex.
Part 2: How to Use Vocodex
Vocodex can do everything we just did with Fruity Vocoder, and also has some really great additional features on top of that:
- between 5 and 100 bands
- built-in Soundgoodizer
- modulator and carrier pass-through high-pass filters and low-pass filters
- carrier noise addition and pass-through high-pass filter
- modulator pitch shift, band width multipliers, unison, EQ, and noise cancellation inputs for both the modulator and the carrier
This is all packaged into one plugin, and this makes the setup a little easier. We’ll cover what all this means in a bit. For now, let’s get everything set up. We can set Vocodex up to work in two ways:
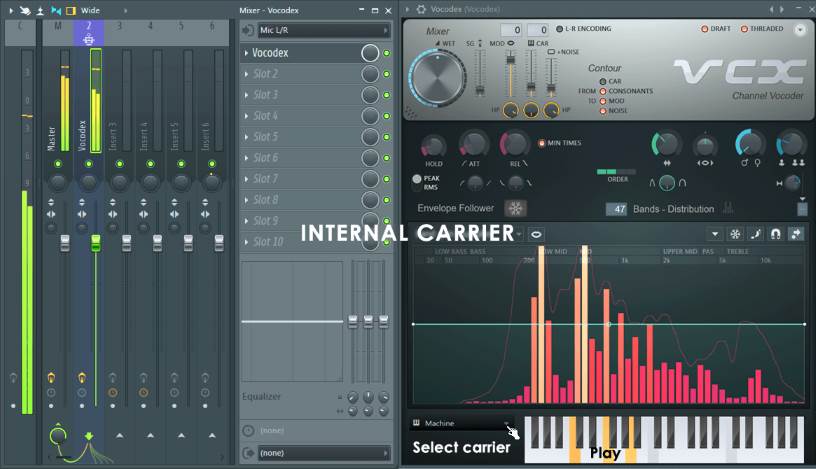
Simple Vocodex Setup
A simpler setup mode where the carrier is a built-in Sytrus engine with the same vocoder presets as the Fruity Vocoder example in Part 1 of the tutorial. The modulator is the mic input routed directly into to the same mixer track as Vocodex.
How to use Vocodex in this mode:
- Add Vocodex to an empty mixer track – name it Vocodex
- Add Maximus with a De-esser narrow band preset. Change the settings as outlined in Part One: Step 6
- Tack on an Edison for recording later
- Route your mic input to the Vocodex Mixer track
- Open the Vocodex user interface
- Change the Modulator sidechain input number to 0. This is telling Vocodex that the modulator signal is coming from the same track that Vocodex is hosted on.
- Change the Carrier sidechain input number to — blank. This is telling Vocodex to use the internal Sytrus engine as the carrier.
- Turn Modulator and Carrier pass-through levels down to 0
- Select a Carrier tone from the bottom menu. These are the same Sytrus presets from before.
- Choose a key or multiple keys from the keyboard to use as the carrier key. Once selected, these keys will stay pressed until you click them again.
- Without speaking, select Detect modulator noise level from the drop-down menu. This applies a noise cancellation envelope to the modulator and gets rid of any background noise that may be modulating the carrier.
This mode is not very flexible since the keys in the built-in Sytrus engine are not linked to the Piano roll and cannot be programmed into a pattern to dynamically change with time. I suggest using the Advanced setup, since it overcomes this by allowing for an external carrier just like in the Fruity Vocoder example.
Advanced Vocodex Setup
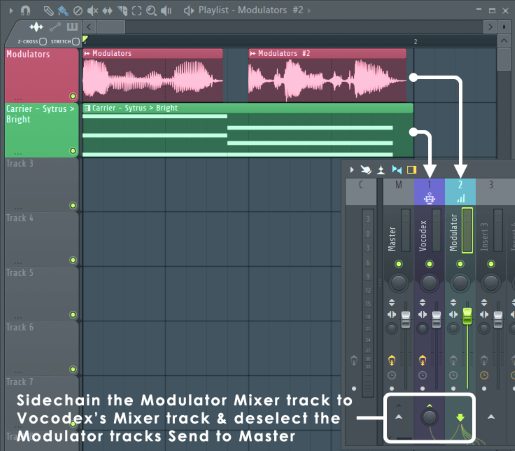
This is a more advanced setup mode where the carrier comes from another Mixer track that’s external to the Vocodex track through a sidechain input. We can also set this up to have the modulator come from an external track, but it works just fine with the modulator routed directly to the Vocodex track.
Any processing or recording you want to have done prior to Vocodex in the signal processing chain can be added to the Vocodex mixer track itself and arranged accordingly like we did with Edison and Maximus in the simple setup.
How to use Vocodex in this mode:
- Add Vocodex to an empty mixer track – name it Vocodex
- Add Maximus with a De-esser narrow band preset. Change the settings as outlined in Part One: Step 6
- Tack on an Edison for recording later on
- Route your mic input to the Vocodex Mixer track
- Add a Sytrus with Bright preset to the Channel rack
- Route Sytrus to a blank Mixer track – name it Carrier
- Unroute the Carrier Mixer track from the Master track
- Sidechain the Carrier Mixer track to the Vocodex track
- Open the Vocodex user interface
- Change the Modulator sidechain input number to 0. This is telling Vocodex that the modulator signal is coming from the same track that Vocodex is hosted on.
- Change the Carrier sidechain input number to 1. This is telling Vocodex that the carrier signal is coming from the external Sytrus Carrier track.
- Turn Modulator and Carrier pass-through levels down to 0
- Without speaking, select Detect modulator noise level from the drop-down menu. This applies a noise cancellation envelope to the modulator and gets rid of any background noise that’s being used to modulate the carrier.
- Open Sytrus and play any note while speaking into the mic
This method allows you to program MIDI data in the Sytrus carrier’s Piano roll, and then orchestrate it along with live vocals or vocal recordings in the Playlist. We’ll cover that later in the tutorial.
Either way, both advanced and simple setups, plus a slight decrease in the modulator pitch and increase in Soundgoodizer mix level, will leave you with something that sounds like this evil Mark Zuckerberg AI cyborg:
![]()
“New advancements in soul extraction technology have made it even easier to commoditize the souls of consumers.”
-Mark Zuckerberg
…you’re probably wondering what all those fancy buttons, knobs and faders do in Vocodex. Let’s take a look at some of them.
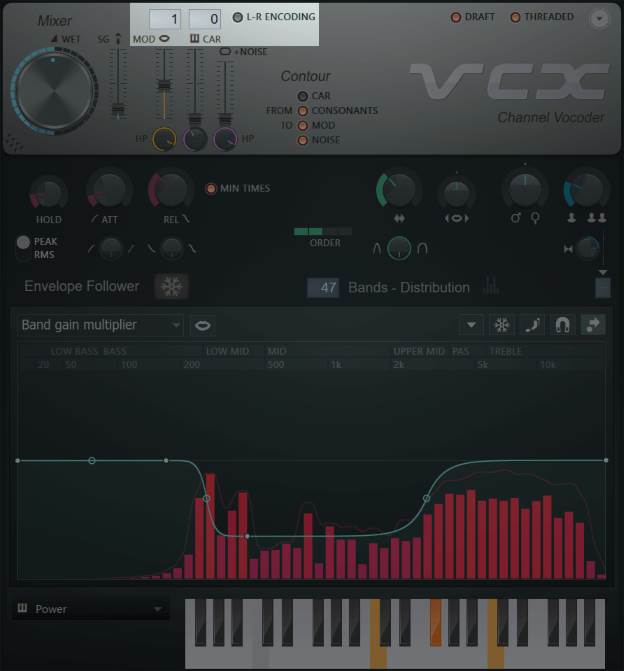
Vocodex Parameter Functionality
![vocodex function]()
- WET Vocodex wet mix level – this is basically Vocodex volume being sent out of the plugin.
- SG Soundgoodizer mix level – Soundgoodizer is just a Maximus preset in disguise. It can help make Vocodex “louder” and more clear-sounding.
- Modulator sidechain input number – 0 is telling Vocodex to take the modulator from the same track that Vocodex is hosted on. 1, 2, 3, etc. is telling Vocodex to use a modulator from a track that’s been sidechained to the Vocodex track.
- Carrier sidechain input number – — is telling Vocodex to use the internal Sytrus carrier. 0 is telling Vocodex to use a carrier routed to the same track Vocodex is hosted on. 1, 2, 3, etc. is telling Vocodex to use a carrier from a track that’s been sidechained to the Vocodex track.
- MOD Modulator pass-through level – how much of the original modulator signal is mixed in with the vocoded signal. This can make the make the spoken vocoded words more coherent, since you are mixing in some of the original voice.
- CAR Carrier pass-through level – how much of the original carrier signal is mixed in with the vocoded signal.
- +NOISE Carrier added noise level – how much white noise is added to the carrier. If you are using a carrier that does not share some parts of the frequency spectrum with the modulator, you can add white noise to the carrier to fill in the gaps. This can help to make the spoken vocoder words more coherent. White noise is a waveform with equal amounts of all frequencies across the entire spectrum.
- HP Modulator pass-through highpass filter cutoff frequency – modulator pass-through mixes the original voice with the vocoded voice, and this is a high-pass filter that is applied to the modulator pass-through signal so you can control what frequencies of the modulator will be present in the final vocoder signal. If your carrier lacks higher frequencies, you can turn up the filtered modulator pass-through and set the filter cutoff frequency to the frequency that your carrier starts to drops off at.
- Carrier pass-through lowpass filter cutoff frequency – it is safe to say that we are now speaking another language. Use this if you’re lacking some low-end in the final signal.
- HP Carrier added noise highpass filter cutoff frequency – controls what part of the spectrum you want noise in.
- Modulator attack, release, hold and tension settings – these can control how long it takes for the bands to react to the modulator input signal.
- Modulator unison shift, panning, and order – unison is when two or more waveforms with very similar timbre are mixed together. This setting lets you multiply the vocoder signal (unison order) and then apply small deviations in pitch across each new voice (pitch shift). You can also add a widening effect with the panning knob.
- Modulator pitch shift – increase or decrease the pitch of the original voice coming into Vocodex
- Band width multiplier – a low setting will make a more resonant sound, and a high setting will produce a raspy sound.
- Band width – controls the frequency range of each band.
- ORDER – this controls the roll-off (attenuation rate) of the left and right sides of each band-pass filter. 4 is a steep slope, 1 is a gentle slope.
- Bands – choose between 5 and 100. As a rule of thumb, more bands will sound more human, and less bands will sound more robotic.
- Modulator mapping window – this is where you’ll see your bands appear when you speak into the mic. It also shows the different mapping envelopes that can be changed in number…
- Modulation mapping settings – this lets you apply EQ, saturation, pitch shift, band panning etc. to the bands.
- Carrier tone – choose from theses Sytrus presets when using the Vocodex internal Sytrus engine as the carrier.
The Image-line website has more info on all of this, and goes into more technical detail. I defer to them, because if you’re still reading at this point, you’re either getting bored or you’re just one of the 1 in 10 people who take mixed amphetamine salts on the reg. You know who you are. I suggest just playing around with the settings and listening to get a feel for what they do.
Recording and Mixing with Vocodex and Fruity Vocoder
The last part we’ll look at is recording and orchestrating your voice recording with the carrier in the Playlist. The process is the same for both plugins/methods. This won’t work if you’re using the Vocodex internal Sytrus engine as the carrier.
We’ll record the dry vocal waveform using either of the two Edison’s that we placed in the modulator mic input Mixer tracks earlier. Once we have a recording, we will place it in the Playlist along with a Sytrus carrier Pattern. This ensures that they are both sent simultaneously to the vocoders.
Recording
- Add Fruity Balance in Slot 1 of the Modulator mic input Mixer track.
- Between Edison and Fruity Balance, add a Wave Candy with the meter setting.
- Speak into your mic as you would when you’re recording and adjust the Fruity Balance volume so that your peak level in Wave Candy is around -10 dBFS.
- Open Edison and begin recording.
- Do any editing you want in Edison, and then send your clip to the Playlist.
- Go to the Channel rack, find your new vocal recording, and route it to the modulator Mixer track.
- Turn off or reset Fruity Balance volume in the modulator Mixer track.
- Turn off or disconnect your mic from the Mixer track to avoid feedback. Alternatively, you could have routed the mic to a different Mixer track and just muted it.
![recording signal processing chain]()
For recording, your modulator Mixer track should look something like this.
Carrier Arrangement
This part’s pretty easy, it just takes some fine tuning with the lengths of your MIDI notes in the Piano roll to match up with different words in your recording:
- Go to the Channel rack and open up the Sytrus carrier Piano roll
- Add the notes and chords that you want to mix your voice with
- Copy the Pattern to the Playlist, overlapping with the recording in on both and with the Sytrus carrier Piano roll open, tweak the lengths of your notes/chords until they line up with different words or phrases
![carrier-recording staging]()
Above, you can see how I made the Zuckerborg AI voice. Now, when you play them in the Playlist, everything should sync up and you should hear your vocoded voice.
To make it even easier, you can record the vocoded voice in another instance of Edison after Vocodex. Next, just stage that in the Playlist instead. However, you may lose some flexibility in your mix that way. It’s up to you, there are lot’s of ways to do it.
If you’re still with me from the start, thanks for reading. This can be TONS of fun to mess around with.. sorry Mark.
Читайте также:


