
Xdo excel что это
Обновлено: 08.07.2024
BI Publisher provides a set of functions to achieve additional reporting functionality.
You define these functions in the Data Constraints region of the XDO_METADATA sheet.
The functions make use of Columns A, B, and C in the XDO_METADATA sheet as follows:
Use Column A to declare the function or to specify the defined name of the object to which to map the results of a calculation or XSL evaluation.
Use Column B to enter the special XDO-XSL syntax to describe how to control the data constraints for the XDO function, or the XSL syntax that describes the special constraint to apply to the XDO_ named elements.
Use Column C to specify additional instructions for a few functions.
The functions are described in the following sections:
Reporting Functions
You can add functions to a template using the commands shown and a combination of BI Publisher syntax and XSL.
A summary list of the commands is shown in the following table. See the corresponding section for details on usage.
XDO_SHEET_? with XDO_SHEET_NAME_?
XDO_LINK_? link object name ?
Splitting the Report into Multiple Sheets
Use this set of commands to define the logic to split the report data into multiple sheets.
Images are not supported across multiple sheets. If the template sheet includes images, when the data is split into multiple sheets, the images are displayed only on the first sheet.
The set of commands is described in the following list:
Use XDO_SHEET_? to define the logic by which to split the data onto a new sheet.
Use XDO_SHEET_NAME_? to specify the naming convention for each sheet.
The following table describes the column entries.
<? xsl_evaluation to split the data ?>
<? xsl_expression to name the sheet ?>
<? original sheet name ?>
XDO_SHEET_? must refer to an existing high-level node in the XML data. The example <?.//DEPT?> creates a new sheet for each occurrence of <DEPT> in the data.
If the data is flat, then you cannot use this command unless you first preprocess the data to create the desired hierarchy. To preprocess the data, define the transformation in an XSLT file, then specify this file in the Preprocess XSLT File field of the header section of the XDO _METADATA sheet. For more information, see Preprocessing the Data Using an XSL Transformation (XSLT) File.
Use XDO_SHEET_NAME_? to define the name to apply to the sheets. In Column B enter the XSL expression to derive the new sheet name. The expression can reference a value for an element or attribute in the XML data, or you can use the string operation on those elements to define the final sheet name. This example:
names each sheet using the value of DEPARTMENT_NAME concatenated with "-" and the count of employees in the DEPT group.
The original sheet name entry in Column C tells BI Publisher on which sheet to begin the specified sheet naming. If this parameter is not entered, BI Publisher applies the naming to the first sheet in the workbook that contains XDO_ names. You must enter this parameter if, for example, you have a report that contains summary data in the first two worksheets and the burst data should begin on Sheet3. In this case, you enter <?SHEET3?> in Column C.
Example: Splitting the data into multiple sheets
Using the employee data shown in the previous example. This example:
Creates a new worksheet for each department
Names each worksheet the name of the department with the number of employees in the department, for example: Sales-21.
To split the data into sheets:
- Enter the defined names for each cell of employee data and create the group for the repeating employee data, as shown in the following illustration.
Do not create the grouping around the department because the data is split by department.
Доброго времени суток, в этой статье хочу рассказать о своём опыте работы с BI Publisher и составлении шаблонов для MS Excel в родном для этой программы формате *.xls.
Небольшое предисловие
Работая с Oracle eBS, время от времени возникает необходимость создания дополнительных репортов (а соответственно и шаблонов в BI Publisher). В данном случае был довольно сложный репорт, который собирался из таблиц, заполняющихся данными в BEFORE REPORT триггере этого же репорта. Количество колонок в репорте могло динамичиски меняться.
Первоначально шаблон был сделан в формате RTF. Для каждого количества колонок был предусмотрен свой вариант репорта. На выходе мы должны были получить XLS файл с желаемыми для нас данными.

Возникшие проблемы
Когда выходящий файл является XLS файлом мы можем столкнуться со следующими проблемами, или если быть более точными, ограничениями:
1) Мы хотим чтобы Excel output файл выглядел именно, так как нам нужно — нужные столбцы находились именно там, где нам нужно, а не уезжали куда-то.
2) Чтобы типы данных передавались в Excel output, то есть чтобы у чисел был числовой тип данных в Excel, у дат — тип даты, и тому подобное…
3) При передачи данных, которые начинаются с «0» (leading zeroes), ведущие нули обрезаются, то есть нам нужно сохранить целостность данных.
4) Та же проблема появляется и при передачи данных с нулями после запятой (дробной частью).
Если 3 и 4 проблемы можно решить добавив два пробела или специальные символы в начало/конец аттрибута, то с остальными немного сложнее.
В моём случае мне нужно было передать значение «0000» в Excel при этом не потеряв ни одного нуля и не допуская никаких других символов в клетке.
Подробнее о других ограничения Excel output файлов, созданных с использованием RTF шаблонов можно прочитать здесь
Озарение
В результате долгих поисков в интернетах, в блоге Oracle было найдено упомянание о Real Excel Template.
То есть теперь можно создавать шаблоны не отходя от кассы не покидая MS Excel. Для этого нам нужно создать стандартный *.XLS файл и начать воять в нём наш чудо-шаблон.
Для начала немного о различиях между RTF и XLS шаблонами.
1) В RTF для обозначения элементов мы должны были ставить тег <?ELEMENT_NAME?> , а в XLS мы должны писать в свойствах ячейки, где у нас будет находиться элемент тег XDO_?ELEMENT_NAME? . Пример:

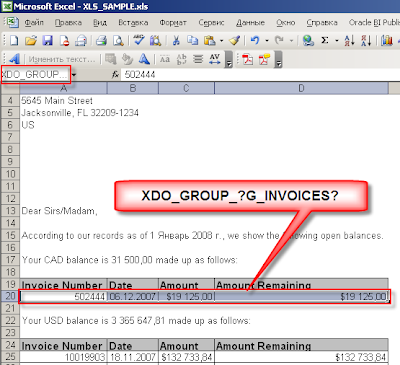
2) В RTF для обозначания открытия групп мы должны были ставить тег <? for-each: GROUP_NAME?> и для закрытия групп должны были ставить тег <?end for-each?> ,a в XLS мы должны выделить ячейки, которые будут заполнены данными из нашей группы и поставить им в качестве свойства XDO_GROUP_?GROUP_NAME? . Это быдет выглядеть так:

3) Будьте внимательными с тем, что пишете в самой клетке, так как вы можете задавать тип данных, которые будут находиться в клетке с помощью обычного Excel функционала, то и то, что написано в клетке должно соответствовать этому типу. Единственное, что у меня не получилось, это получить на выходе дату как даты, пришлось писать для этого небольшой макрос. Ах да, теперь мы можем дополнять наши габлоны макросами, что не было возможно в RTF шаблонах для Excel.
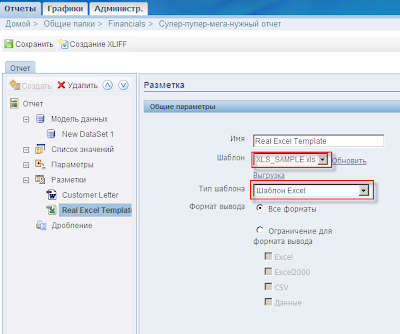
4) Обязательно должна присутствовать отдельная вкладка XDO_METADATA:

Всё, что написано до «Data Constraints:» включая менять не нужно и это должно присутствовать во всех XLS шаблонах. То, что ниже уже ваши функции. Поддерживается XSL, не знаю насчёт остальных. Если элемент находится вне групп, то его нужно получать через xsl:value-of select . Ко всем элементам в этой вкладке нужно обращаться через .//ELEMENT_NAME.
Послесловие
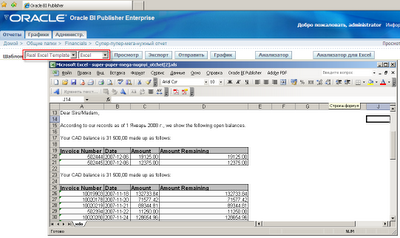
При использовании XLS шаблона мне больше не нужно было создавать для каждого поличества колонок отдельный вариант таблицы. Достаточно сделать таблицу для максимального количества колонок. Колонки, в которых будут присутствовать данные будут заполняться автоматически, в которых данных не будет так и будут оставаться пустыми. Это позволяет избежать лишней работы.
Дополнительную информацию по возможностям создания таких шаблонов можно найти по этой ссылке.
Надеюсь кому-то это поможет избежать лишних хлопот с составление шаблонов.
Similar to RTF template design, Excel template design follows the paradigm of mapping fields from the XML data to positions in the Excel worksheet.
Excel templates make use of features of Excel in conjunction with special Publisher syntax to achieve this mapping. In addition to direct mapping of data elements, Excel templates support more complex formatting instructions by defining the cell ranges and the commands in a separate worksheet designated to contain these commands. This sheet is called the XDO_METADATA sheet.
Map Data Fields and Groups
Excel templates use named cells and groups of cells to enable Publisher to insert data elements.
Cells are named using Publisher syntax to establish the mapping back to the XML data. The cell names are also used to establish a mapping within the template between the named cell and calculations and formatting instructions defined on the XDO_METADATA sheet.
The template content and layout must correspond to the content and hierarchy of the XML data file used as input to the report. Each group of repeating elements in the template must correspond to a parent-child relationship in the XML file. If the data isn't structured to match the desired layout in Excel, you can regroup the data using XSLT preprocessing or the grouping functions. However, for the best performance and least complexity it's recommended that the data model be designed with the report layout in mind.
Use Excel Defined Names for Mapping
Publisher uses the Excel defined names feature to identify data fields and repeating elements.
A defined name in Excel is a name that represents a cell, range of cells, formula, or constant value.
The Template Builder for Excel automatically creates the defined names when you use it to insert fields and repeating groups. You can also insert the defined names manually. The defined names used in the Excel template must use the syntax described in this chapter and follow the Microsoft guidelines described in the Microsoft Excel help document. Note that Publisher defined names are within the scope of the template sheet.
When you create an Excel Template manually (that is, NOT using the Publisher Desktop Excel Template Builder), you must provide default values for all marked up cells XDO_?. The default values must match to the data type of the report data XML file. Without default values for the XDO_? cells, the output cells generated from those template cells may lose formatting and the result is unpredictable. If you use Publisher Desktop to create an Excel Template, the default values are automatically supplied with the first row of sample data in the report data file.
Use "XDO_" Prefix to Create Defined Names
The Publisher defined names are Excel defined names identified by the prefix "XDO_".
Creating the defined name with the Publisher code in the template creates the connection between the position of the code in the template and the XML data elements, and also maintains the ability to dynamically grow data ranges in the output reports, so that these data ranges can be referenced by other formula calculations, charts, and macros.
Use Native Excel Functions with the "XDO_" Defined Names
You can use the XDO_ defined names in Excel native formulas as long as the defined names are used in a simple table.
When a report is generated, Publisher automatically adjusts the region ranges for those named regions so that the formulas calculate correctly.
However, if you create nested groups in the template, then the cells generated in the final report within the grouping can no longer be properly associated to the correct name. In this case, the use of XDO_ defined names with native Excel functions cannot be supported.
About the XDO_METADATA Sheet
Each Excel template requires a sheet within the template workbook called "XDO_METADATA".
Publisher uses this sheet in the template in the following ways:
To identify the template as an Excel template.
To insert the code for the field and group mappings you create with the Template Builder.
As the template designer, you also use this sheet to specify more advanced calculations and processing instructions to perform on fields or groups in the template. Publisher provides a set of functions to provide specific report features. Other formatting and calculations can be expressed in XSLT.
Create the XDO_METADATA Sheet
When you begin the design of a new Excel template using the Template Builder, the first time you use one of the Insert functions the Template Builder automatically creates a hidden XDO_METADATA sheet. A message informs you that the sheet has been created.
Publisher creates the sheet as a hidden sheet. Use the Excel Unhide command to view and edit the XDO_METADATA sheet.
Format of the XDO_METADATA Sheet
The XDO_METADATA sheet is created with the format shown in this figure. The format consists of two sections: the header section and the data constraints section. Both sections are required.
Preprocess XSLT File
Last Modified Date
Last Modified By
The Data Constraints section is used to specify the data field mappings and other processing instructions. Details are provided in the following sections.
Hide the XDO_METADATA Sheet
Oracle recommends that you hide the XDO_METADATA sheet before uploading the completed template to the Publisher catalog to prevent its inclusion in the final report output. Use the Excel Hide command to hide the sheet before uploading the template to the server.
Enable Excel Template Scalability
Enable Excel template scalability to process large data to output reports in Excel format.
If you try to publish reports with large amounts of data as Excel spreadsheets, you might encounter memory issues because the limit of an Excel sheet is 65536 rows. If you enable an Excel template to scale, that template divides a large amount of data into multiple sheets, which helps to avoid memory issues. You can enable Excel template scalability at the system level, the report level, or the Excel template level. The template level setting overrides the report level setting, and the report level setting overrides the system level setting. To ensure backward compatibility, Excel template scalability is set to false by default.
An Excel template that’s enabled to scale does the following to avoid memory issues:
- Flows data into multiple sheets when the data size is more than 65536 rows in a table.
- Flushes memory of every N rows after those N rows are processed for rendering the Excel report.
By default, the flush cell size = 3000 *100 (rows * columns). N = 3000 * 100 / Actual_columns_in_your_ Excel_template_sheet
You can override this flush cell size by specifying the flush cell size (XDO_FLUSH_CELLSIZE_? flush_cell_size ) below the "Data Constraints:" line in the XDO_METADATA sheet in the Excel template. An XDO_GROUP table might not work properly if the final report size of an XDO_GROUP table is greater than the flush cell size.
Enable Excel Template Scalability at the Template Level
You can enable scalability in an Excel template to avoid running out of memory while publishing large amounts of data to an Excel spreadsheet.
To enable Excel template scalability at the template level:- Open the Excel template.
- Select the XDO_METADATA sheet in the Excel template.
- Below the "Data Constraints:" line, enter XDO_SCALABLE_? in Column A, and type true in column B.
Enable Excel Template Scalability at the System Level
As an administrator, you can set a runtime property to enable scalability for all Excel templates.
To enable Excel template scalability at the system level:- As an administrator, navigate to the Runtime Configuration page.
- Scroll down to view the Excel template properties.
- Set the Enable Scalable Mode property to true.
Enable Excel Template Scalability at the Report Level
As a report author, you can set a report level property to enable scalability for the Excel template used by the report.

Наверняка, вы сталкивались с минусами такого подхода: невозможность точного форматирования выходной разметки, невозможность задания формата ячейки, невозможность разбиения отчета на листы, невозможность использования макросов, вывода графиков и диаграмм. Список можно продолжать.
Частично выручал метод создания отчетов с помощью XSL-шаблонов разметки, но и там большинство "нельзя" оставалось, плюс мы должны были регламентами использования ограничивать браузер (только IE), версию MS Office (2003 и выше), чтобы полученный отчет прозрачно для пользователя открывался в Экселе.
Прочитать об этом можно на блоге Тима Декстера
Итак, для использования XLS-шаблонов вам в первую очередь потребуется обновить BIPublisher. Для этого скачайте с металинка патч 9546699
Возьмите отформатированный в Экселе шаблон вашего отчета.
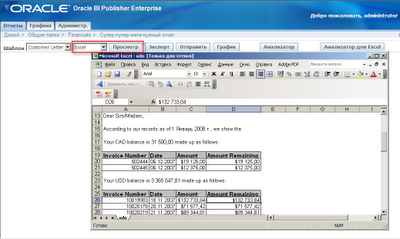
Я покажу пример на основе отчета "Balance Letter" из стандартной поставки BIPublisher.

Создайте в нем новый лист с именем XDO_METADATA , на котором поместите общую информацию о шаблоне.
(Не забудьте скрыть затем этот лист.)
Теперь для каждой ячейки низшей группы задайте имя, соответствующее элементу XML-файла данных.


На данном этапе будем считать наш шаблон разметки завершенным.
Выделенные области пока оставим без изменения.


Видим, что остались видны все имена именованных диапазонов исходного шаблона разметки. Именно по ним в итоге полученный XML-файл преобразуется в Excel.

На скрытом листе XDO_METADATA определим новую переменную, значение которой получается конкатенацией статического текста и динамического значения кода валюты и суммы по ней.

Присвоим первой ячейке в строке имя, равное определенной нами переменной.
Читайте также: