
Как удалить zimbra centos
Обновлено: 07.07.2024
Mail Server is one of the important and critical Server for any organization as most of business communication done via emails only. In Open source world there are couple of free email server but Zimbra is one of the leading mail servers. Zimbra Mail Server a.k.a ZCS (Zimbra Collaboration Suite) comes in two versions, Open Source and enterprise version.
Prerequisites of Zimbra Mail Server (ZCS)
In this article we will demonstrate how to install Open Source ZCS 8.8.10 on a CentOS 7.
Step:1) Login to CentOS 7 and apply updates.
Login to your CentOS 7 Server and apply the latest updates using following yum command and then reboot,
Add the following lines in /etc/hosts file,
After configuring the hostname, verify the A and MX is configure for your domain using dig command,
Step:2) Install Zimbra dependencies using yum
Run the below command to install Zimbra / ZCS dependencies
Step:3) Download latest version of Zimbra (ZCS 8.8.10) using wget command
Create a folder with the name “zimbra”
Use below wget command to download the latest version of ZCS 8.8.10 from the terminal,
Step:4 Install Zimbra / ZCS 8.8.10
Extract the downloaded tgz file of ZCS 8.8.10 using the beneath tar command
Go to extracted folder and run the install script,
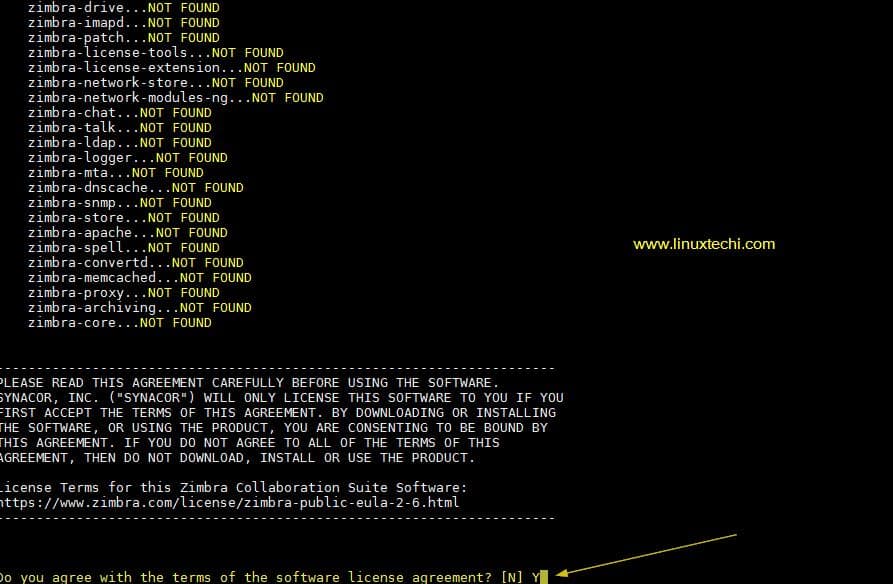
Once we run above install script then we will get text-based installation wizard, to Accept the license, press Y
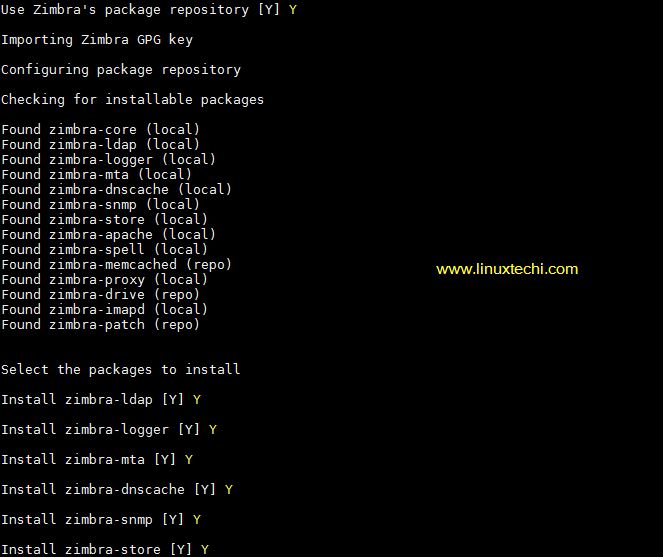
Now Configure the Zimbra package repository and select the all Zimbra Components to install.
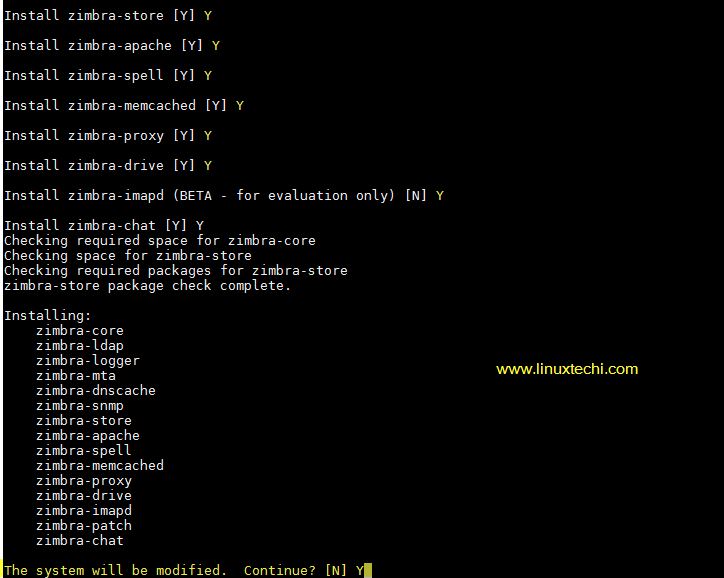
Press Y to modify the System,
After pressing Y, it will download the Zimbra related packages and it can take time depending upon on your internet speed.
Once all the Zimbra packages are installed in the backend then we will get the below window,
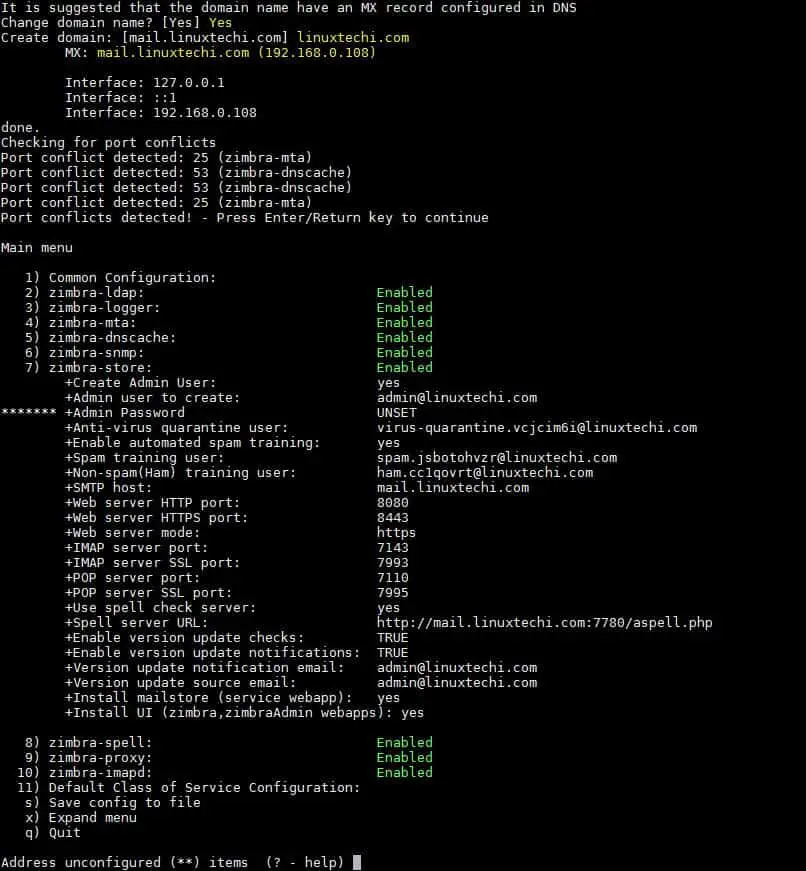
Now Press 7 and then 4 to set admin user password,
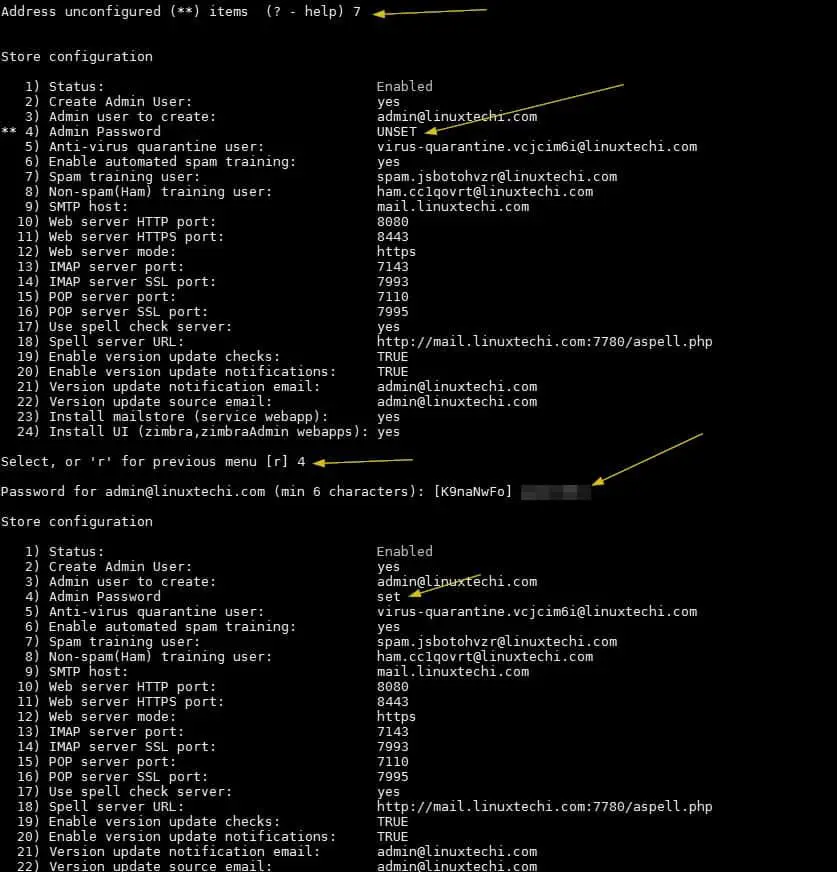
Now press “r” to go to previous menu and then press “a” to apply the changes.
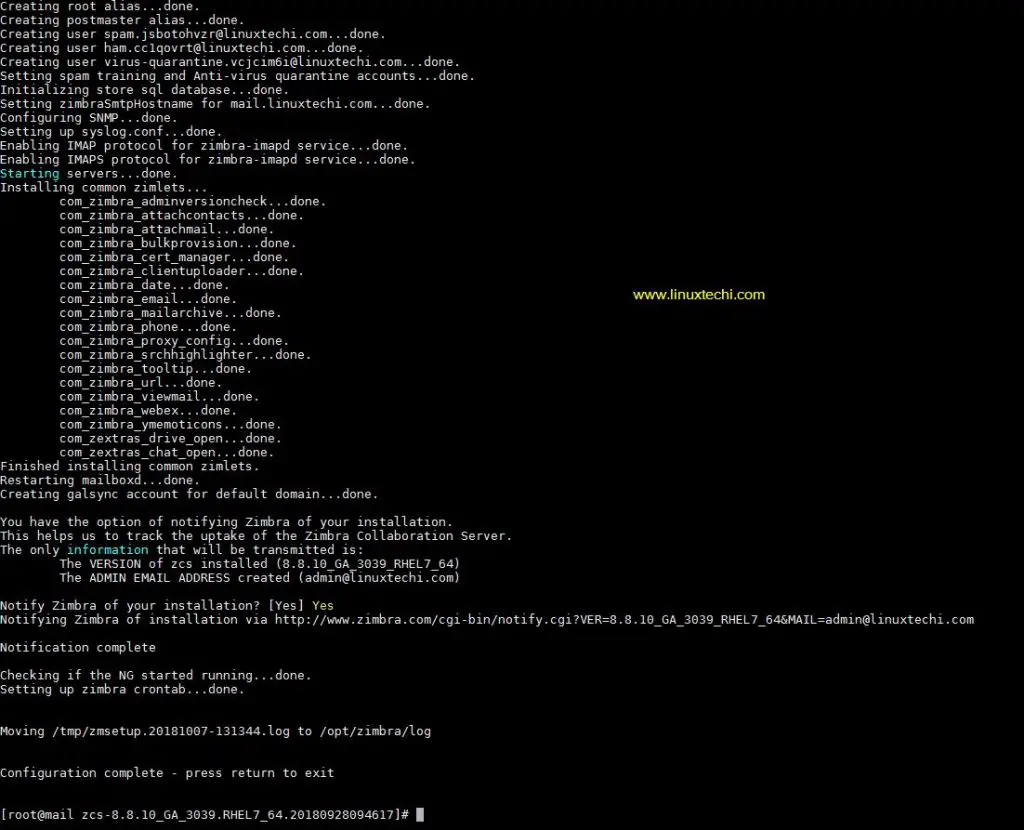
Once all the changes are applied and Zimbra related services are started then we will get the output something like below,
Open the ports in the firewall in case os firewall is running on your server
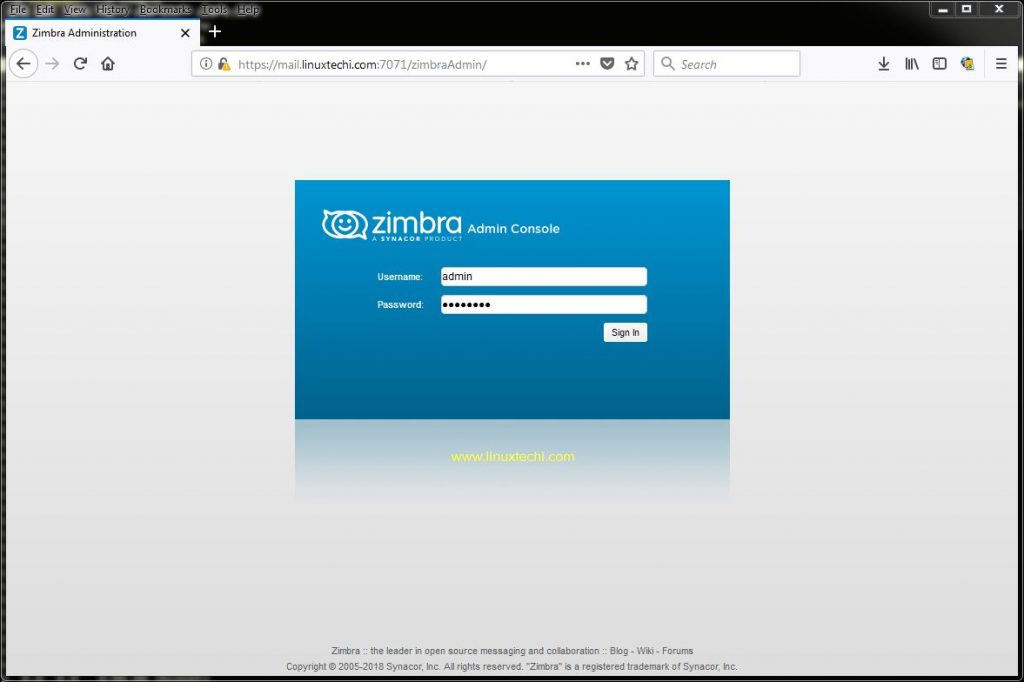
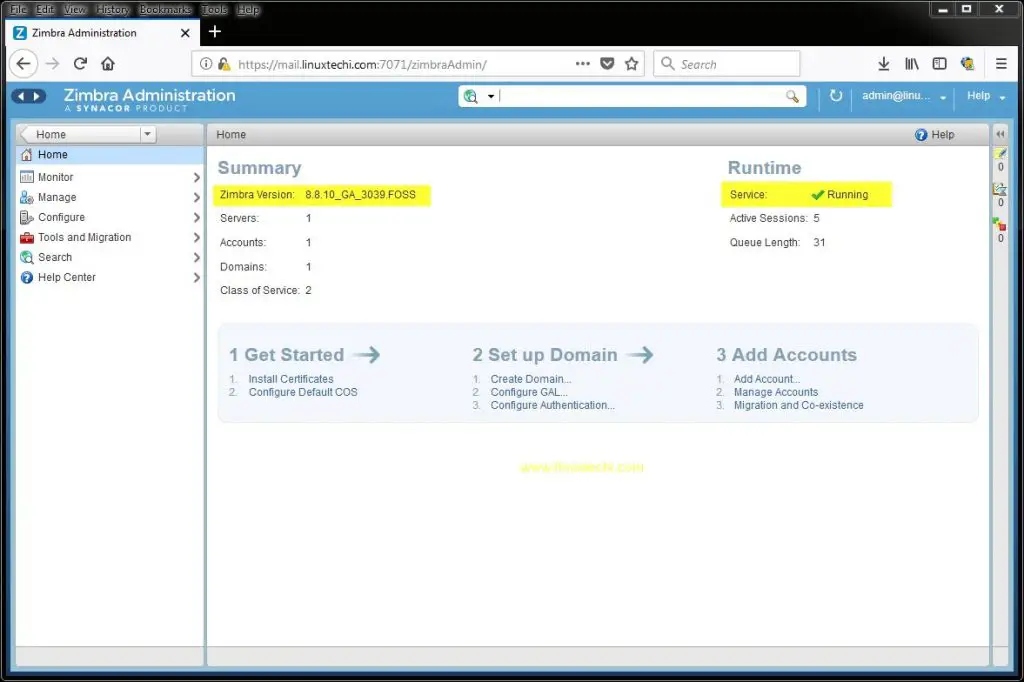
Step:5) Access Zimbra Admin Portal & Web Mail Client
To access the Zimbra Admin Portal, type below URL in Web Browser
To access Zimbra Mail Web Client, type the following URL in the browser
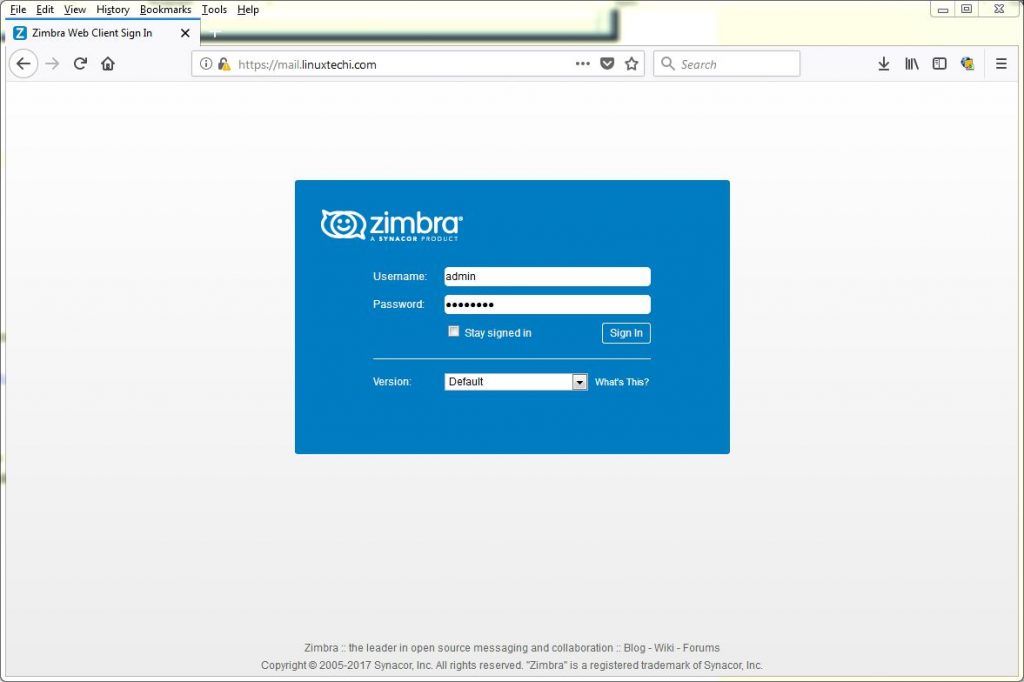
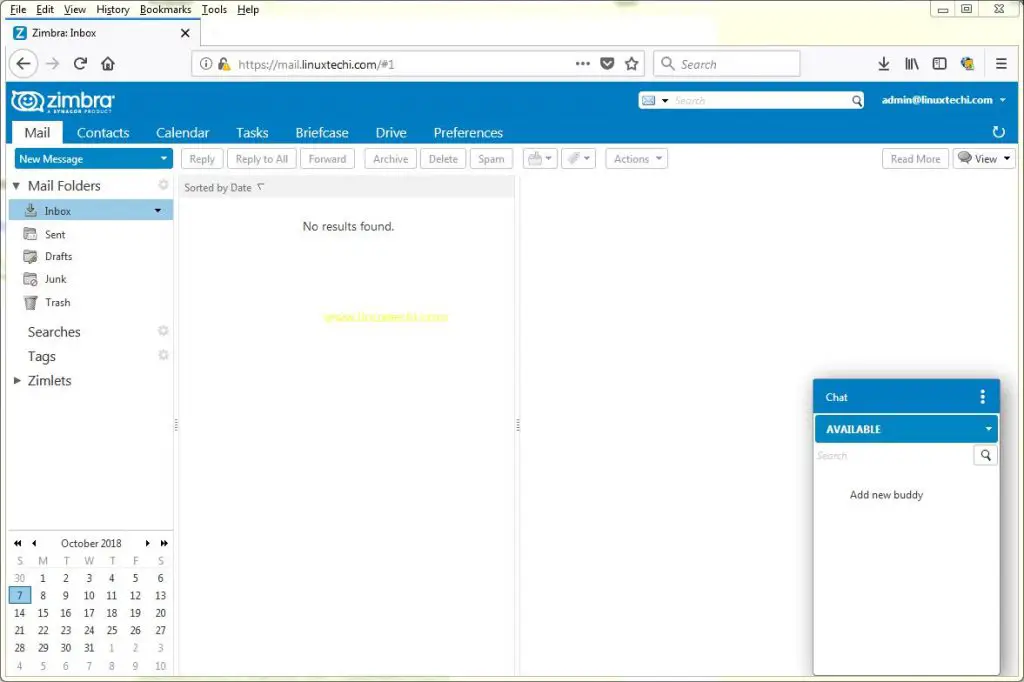
Note: For both the URLs we can use user name as “admin” and password that we set during the installation
Step:6) Troubleshooting Zimbra Services and Logs
There can be some scenarios where some zimbra services might be stopped, to find zimbra services status from command line, run the following command,
To restart the Zimbra Services use the following command,
All the log files for Zimbra server are kept under the folder “/opt/zimbra/log”
Note: In my case postfix was already installed and running on my centos 7 server because of that Zimbra MTA service was getting stopped and failed. To resolve this issue, I have to stopped and disable the postfix service and then restart Zimbra service using the “zmcontrol” command.
When you are done with Zimbra testing and want to uninstall it from the system, then run the “install.sh” script followed by “-u”
That’s conclude this article. If you find it informative please do share this among your Linux technical friends and share the feedback and comments in the comment section below.
31 thoughts on “How to Install Open Source Zimbra Mail Server (ZCS 8.8.10) on CentOS 7”
i have problem bro…. you can help me?
Connect: Unable to determine enabled services from ldap.
Unable to determine enabled services. Cache is out of date or doesn’t exist.
Had this error after installing a new commercial certificate. The error seems valid as my server hostname and certificate name do not match, but it is my understanding this name mismatch is allowed and should still work.
To resolve this I just ran these two commands as Zimbra user.
zmlocalconfig -e ldap_starttls_required=false
zmlocalconfig -e ldap_starttls_supported=0
I am slightly concerned as to the security implications of disabling these settings. I am still on ldap not ldaps and this is on CentOS 7.
I have followed your article on “How to Install Open Source Zimbra Mail Server (ZCS 8.8.10) on CentOS 7”, but always fails and hung on the configuration process, i.e.:
Initializing store sql database…………..
This process hung infinitely.
Do you have any suggestion how to solve it according to your experience.
Look forward to hearing from you soon.
Best regards,
Suryana
Thank you very much, it was easy to understand and install. What about configuration tips, it will be great to have it from you.
Cheers from Turkey!
It seems like MX record is not configured for your test domain, also make sure your system points to correct DNS server where your domain records are configured.
Hi. I’m having this problem also. Can u explain which IP I have use. From my ISP? Or do I have to setup my DNS server where Zimbra is being installed? If yes, can you provide some tips how to do this? A lot of confusing info on Google so I’m struggling for a week now 🙂 My server is at home behind NAT router. Thank you in advance
You can send the emails via your NATed IP but to receive email from outside like Gmail , Yahoo etc then you must have a fix static IP which points to your Zimbra Server. You need make a MX record entry of the Static IP in your domain DNS Server. DNS server for your domain can be outside of Zimbra Server.
Thank you. I have MX record from my ISP. All installation goes nicely except MX part being rejected and after installation I cannot even go to Zimbra admin page. I’m trying to install Zimbra on clean centos. PC is on private network, Static IP fixed. Zibra status report OK. No luck until today 🙁 I’ve saw some advice to use DNSmasq. Is it so?
cent os 7 zimbra mail problem
MEta data I/o Error : block
Following your article to install open source Zimbra Mail Server in my laptop is successful as your instruction are so understandable that I didn’t find any difficulty while installing. But there was a bit problem occurred via DNS error and it was hanged for 2-3 times but it is solved now. It is very informative and I have shared this article to my technical friends and they are also very thankful for this wonderful article. The services I got from the article is very useful and you made my work very easy. Your article is full of open information and every steps are very clear with the help of screenshot you’ve mentioned too . There also exist the URL to access in any steps. I am very concerned as to the security regarding Mail Server which is one of the important and critical Server for any organization as most of business communication done via emails only.
It was easy to understand, Installation succeed also opened for the zimbra webmail url it was working but the issue was mail sending succeed but not received (Own Domain). I don’t know what’s the problem. help me
how can i backup and restore zimbra
hello My MTA service not started . How can i again kick start .
I have a problem:
Importing Zimbra GPG key
ERROR: Unable to retrive Zimbra GPG key for package validation
please how to i fix this
thank you
Congratulations for the manual !!
Perfect post. Thank you for this article. But i have a problem. My MTA is not running and service “postfix is not running” Log does not appear.
Thank you for this article, it saves me !
Hi
Thank you for a well written How-To!
I have tried to follow it but I stumbled and fell at step 4.
After agreeing to change the system there were some errors in finding packages and so the process stopped 🙁
I’ve cleared the yum cache and removed all cached files but it’s still no show.
When I look at the yum repository list there’s no entry for Zimbra, as I think there should.
Is there any way to manually add the Zimbra repository and get on with the installation, or maybe install it the “normal” way just using yum install ?
I am trying same thing but the error in postfix it’s not running so, do the needful.
Could you please elaborate more, on which step you are getting error.
Hi I have some problem running some processes, Can you help me?
]$ zmcontrol restart
Host mail.mydomin.ir
Stopping zmconfigd…Done.
…..
Host mail.mydomin.ir
Starting ldap…Done.
Starting zmconfigd…Failed.
Starting zmconfigd…/opt/zimbra/bin/zmconfigdctl: line 82: kill: (22675) – No such process
failed.
Starting dnscache…Done.
Starting logger…Done.
Starting mailbox…Done.
Starting memcached…Failed.
Starting memcached…failed.
Starting proxy…Failed.
Starting proxy…nginx: [emerg] bind() to 0.0.0.0:443 failed (98: Address already in use)
nginx: [emerg] bind() to 0.0.0.0:443 failed (98: Address already in use)
nginx: [emerg] bind() to 0.0.0.0:443 failed (98: Address already in use)
nginx: [emerg] bind() to 0.0.0.0:443 failed (98: Address already in use)
nginx: [emerg] bind() to 0.0.0.0:443 failed (98: Address already in use)
nginx: [emerg] still could not bind()
failed.
Starting amavis…Done.
Starting antispam…Done.
Starting antivirus…Done.
Starting opendkim…Done.
Starting snmp…Done.
Starting spell…Done.
Starting mta…Failed.
Starting saslauthd…done.
postfix failed to start
Starting stats…Done.
Starting service webapp…Failed.
Starting zimbra webapp…Failed.
Starting zimbraAdmin webapp…Failed.
Starting zimlet webapp…Failed.
Hi
Everything working fine. All service up and running. But Outgoing email unable to send other domains and internal
Hi
Everything working fine. All service up and running. But Outgoing email unable to send other domains and internal
Не рекомендуется на сегодняшний день ставить на CentOS 7.
Изменить настройки VM Tools можно через:
vmware-config-tools.pl
2) Настройка сетевой карты и поднятие интерфейса eth0
$ vi /etc/sysconfig/network-scripts/ifcfg-eth0
DEVICE=eth0
HWADDR=00:00:00:00:00:00
TYPE=Ethernet
UUID=62146aee-9a29-4826-9756-30ba7193529c
ONBOOT=yes
IPADDR=192.168.0.100
NETMASK=255.255.255.0
GATEWAY=192.168.100.1
DNS1=192.168.100.1
DNS2=192.168.100.2
NM_CONTROLLED=yes
BOOTPROTO=static
Чтобы происходило это автоматом в файле
vi /etc/sysconfig/network-scripts/ifcfg-eth0 должна быть строка: ONBOOT=yes
7) Установка и настройка NTP клиента:
$ yum install ntp
$ vi /etc/ntp.conf
server dc1.domain.local
server dc2.domain.local
Добавление службы в автозагрузку
$ chkconfig ntpd on
Корректировка временной зоны UTC +3:00
$ cp /usr/share/zoneinfo/Europe/Moscow /etc/localtime
или
$ rm -rf /etc/localtime
$ ln -s /usr/share/zoneinfo/Europe/Moscow /etc/localtime
$ date
8) Установка необходимых пакетов для Zimbra:
$ yum -y install gcc nc libaio.x86_64 unzip.x86_64 perl perl-core wget bind-tools sysstat nc unzip
9) Отключаем Sendmail и Postfix:
$ chkconfig sendmail off
$ chkconfig postfix off
$ service postfix stop
$ service sendmail stop
Если этого не сделать, то получите конфликт на 25м порту:
Checking for port conflicts
Port conflict detected: 25 (zimbra-mta)
Port conflicts detected! - Any key to continue
10) Загрузка Zimbra исходников:
11) Распаковка:
$ tar zxpf /mnt/cdrom/VMwareTools-9.4.5-1598834.tar.gz
12) Установка ( Ставим все компоненты кроме Proxy ):
$ cd zcs*
$ ./install.sh
(для деинсталяции ./install.sh -u)
Если установка завершилась, но вы не успели провести настройку в мастере, запускаем:
/opt/zimbra/libexec/zmsetup.pl
14) Меняем SSH порт (если нужно вам):
$ vi /etc/ssh/sshd_conf
Port 77722
$ su zimbra
$ zmprov mcf zimbraRemoteManagementPort 9242
15) Открываем порты в IPtables:
$ vi /etc/sysconfig/iptables
Они должны быть до строк:
-A INPUT -j REJECT --reject-with icmp-host-prohibited
-A FORWARD -j REJECT --reject-with icmp-host-prohibited
COMMIT
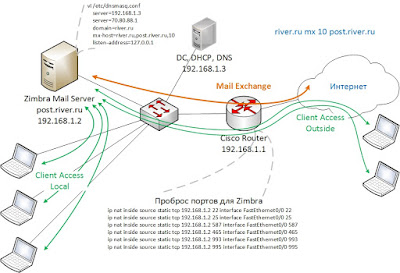
Решение для случая, когда ваш сервер находится за маршрутизатором, то есть NAT-ом.
Установка и подготовка операционной системы:
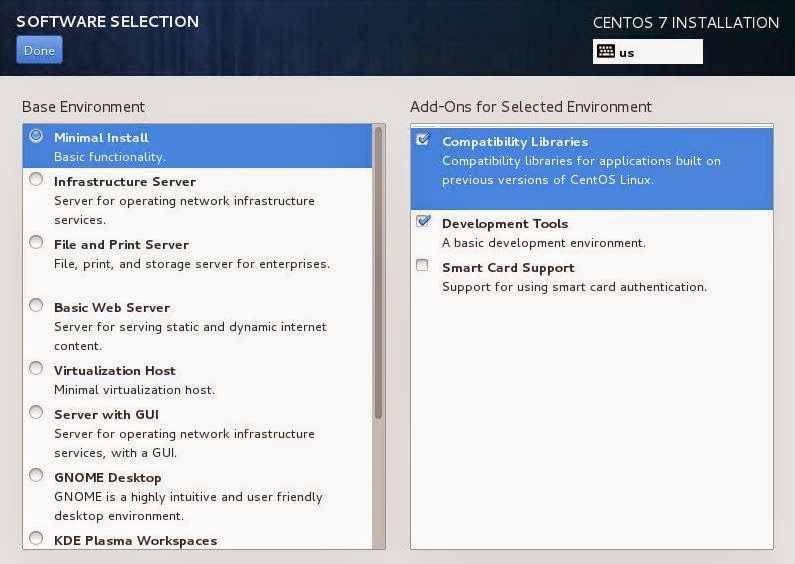
1) Устанавливаем CentOS в редакции Minimal
2) Во время установки обязательно настроить сеть (IP, Gateway)
(DNS строго 127.0.0.1 и 8.8.8.8 в нашем решении с сервером за NAT-ом)

4) Установить Net-Tools:
(чтобы можно было выполнить ifconfig и прочие команды по сети)5) Установить VMware Tools (опционально, для виртуальной машины)
6) Настраиваем сеть (если вы при установке всё настроили):
$ vi /etc/sysconfig/network-scripts/ifcfg-eth0
DEVICE=eth0
HWADDR=00:00:00:00:00:00
TYPE=Ethernet
UUID=62146aee-9a29-4826-9756-30ba7193529c
ONBOOT=yes (ВАЖНО)
IPADDR=192.168.1.2
NETMASK=255.255.255.0
DNS=127.0.0.1 (ВАЖНО в нашем решении)
GATEWAY=192.168.1.1
NM_CONTROLLED=yes
BOOTPROTO=static
*DNS сервера в свойствах интерфейса не прописываем, достаточно того что в resolv.conf
7) Прописываем DNS сервера
(если вы при установке всё настроили, это может не пригодиться):
$ vi /etc/resolv.conf
nameserver 127.0.0.1
*Больше никаких DNS серверов. В DNSmasq будут указаны все Forwarder-ы.
8) Отключаем FirewallD:
systemctl stop firewalldsystemctl disable firewalld
9) Устанавливаем и настраиваем IPtables:
yum install iptables-services
Добавляем IPtables в автозагрузку и запускаем:
systemctl enable iptables
systemctl start iptables
Прописываем нужные правила в IPtables:
$ vi /etc/sysconfig/iptables
$ service iptables restart
10) На маршрутизаторе прописываем правила проброса:
Правила для Cisco:ip nat inside source static tcp 192.168.1.2 22 interface FastEthernet0/0 22
ip nat inside source static tcp 192.168.1.2 25 interface FastEthernet0/0 25
ip nat inside source static tcp 192.168.1.2 587 interface FastEthernet0/0 587
ip nat inside source static tcp 192.168.1.2 465 interface FastEthernet0/0 465
ip nat inside source static tcp 192.168.1.2 993 interface FastEthernet0/0 993
ip nat inside source static tcp 192.168.1.2 995 interface FastEthernet0/0 995
*в целях безопасности порты 110 и 143 не прописаны
11) Настраиваем DNS - Установка и настройка DNSmasq:
Устанавливаем DNSmasq и Bind-Utils:
$ yum -y install dnsmasq
$ yum -y install bind-utils
$ systemctl start dnsmasq
$ systemctl enable dnsmasq
127.0.0.1 localhost localhost.localdomain localhost4 localhost4.localdomain4
Удаляем в resolv.conf все строки кроме nameserver 127.0.0.1 (нужно для нашего варианта с почтовым сервером за NAT-ом)$ vi /etc/resolve.conf
nameserver 127.0.0.1
12) Установка и настройка NTP клиента:
Добавление службы NTP в автозагрузку
$ systemctl enable ntpd.service
Обновляем систему, иначе пояс по Москве будет старый +4
$ yum update -y
Корректировка временной зоны UTC +3:00
cp /usr/share/zoneinfo/Europe/Moscow /etc/localtime
или
rm -rf /etc/localtime
ln -s /usr/share/zoneinfo/Europe/Moscow /etc/localtime
Проверяем
date
Wed Apr 1 20:53:58 MSK 2015
13) Отключаем ненужные службы:
systemctl stop postfixsystemctl disable postfix
systemctl stop sendmail
systemctl disable sendmail
Установка Zimbra
Распаковка
tar xzf zcs-8.6.0_GA_1153.RHEL7_64.20141215151110.tgz
Установка (Ставим все компоненты кроме Proxy и DNScache)
cd zcs*
./install.sh --platform-override
- В процессе вас спросят какие пакеты устанавливать - можно почитать тут
- Если в процессе установки будет ругаться:
ERROR: Installation can not proceed. Please fix your /etc/hosts file
Запустите nmtui и пропишите соответствующий hostname
Mail server is one of the important server for any organization as all the communication are done via emails. There are number free and enterprise mail servers available in the IT world. Zimbra is one of the high rated mail server that comes in open source and enterprise edition. In this article, we touch base on how to install and configure single node open-source Zimbra mail server on CentOS 8 / RHEL 8 system.
Zimbra is also known as Zimbra Collaboration Suite (ZCS) because it consists numbers of components like MTA (postfix), Database (MariaDB), LDAP and MailboxdUI etc. Below is the architecture of Zimbra

Minimum System Requirements for Open Source Zimbra Mail Server
Following are my Zimbra Lab Setup details:
Before jumping into the installation steps of Zimbra, let’s verify DNS records (A & MX) for our Zimbra Server, Login to your CentOS 8 / RHEL 8 system and use dig command to query dns records
Note: In case dig command is not available then install ‘ bind-utils ’ package
Run following dig command to query A record of our Zimbra server
Above outputs confirm that DNS records are configured correctly for our Zimbra mail server.
Note: Before starting Zimbra installation, please make sure no MTA ( or mail server) configured on the system. In case it is installed then first disable its service and remove its package
Let’s dive into Zimbra installation steps,
Step 1) Apply Updates, add entry in hosts file and reboot your system
Add the hostname entry in hosts file, run the following echo command,
Run the beneath command to apply all the available updates,
Once all the updates have been installed then reboot your system once.
Step 2) Download Open source Zimbra Collaboration suite
As we discussed above, Zimbra comes in two editions, so use the following URLs to download
To Download it from the command line, run following commands,
Step 3) Start Zimbra Installation via installation script
Once the compressed Zimbra tar file is downloaded in step 2 then extract it in your current working directory using tar command ,
Go to the extracted directory and execute install script to begin the installation
Output of install script would be something like below
Press ‘ Y ’ to accept the license agreement

In the next screen, press ‘ Y ’ to configure Zimbra package repository and install its components.

In the next following screen, press ‘ Y ’ to modify the system,

Once we press ‘ Y ’, it will start downloading and installing the Zimbra and its components. After the successful installation we will get the following screen:
As we can see above, admin user’s password is not set, so press 7 and then 4 to assign password to admin user.

Once the password is set then press ‘ r ’ to go previous screen and then press ‘ a ’ to apply changes.
Once all the configurations are completed and Zimbra services are started successfully then we will get following screen:
Perfect, above confirms that we have successfully installed Zimbra mail server. Before accessing its admin and web client portal, allow the following ports in OS firewall (In case firewall is disabled then you skip this step)
Step 4) Access Zimbra Mail Server Admin portal and Web Client
To Access Admin Portal, use the following URL:
Use the username as ‘ admin ’ and password that we set during the installation
Click on ‘ Sign In ’
Note: After Zimbra installation on CentOS 8 / RHEL 8 system, I have found amavis was not running and when I checked Zimbra logs ( /var/log/zimbra.log ) then I have found below error:
I resolved amavis issue by adding the following parameter in /opt/zimbra/conf/amavisd.conf file
and restarted the amavis service using following command,
To access web client, use the following URL:
After Entering credentials, click on ‘ Sign In ’

Step 5) Manage Zimbra from Command Line
All most all the Linux geeks prefer command line to manage their servers, so Zimbra can also be managed from command line with zmcontrol utility. All Zimbra related admin and operations task are performed with Zimbra user.
If you want to restart Zimbra service then run,
Zimbra logs are stored in ‘ /var/log/zimbra.log ’ file. We should always refer this file while troubleshooting. Log files for individual components are stored under ‘/ opt/zimbra/log’ directory.
Step 6) Uninstallation of Zimbra Server
For any reasons, if you wish to uninstall Zimbra server from your CentOS 8 / RHEL 8 system then go to Zimbra extracted folder and execute install script with ‘-u’ parameter, example is shown below:
That’s all from this tutorial, I hope you manage to install open source Zimbra server on your system by referring these steps. Please do share your feedback and comments.
Читайте также: