
Как установить gqrx в ubuntu
Обновлено: 02.07.2024
В прошлых версиях приемника применялся адаптер (чип R820T), сейчас уже выпускаются с чипом R820T2, у него улучшена чувствительность (
Установите Gqrx SDR на Ubuntu Linux
Gqrx уже много лет включен в Ubuntu Linux. Хотя эти версии часто немного устарели, они могут быть достаточными для вашего использования.
Если вы хотите использовать последнюю версию, вы можете использовать пакеты из нашего собственного личного архива пакетов (PPA), доступные для Ubuntu 14.04 - 17.10 на архитектурах i386 и amd64. Этот PPA зависит от нескольких других сторонних архивов пакетов для предоставления последних драйверов SDR и пакетов GNU Radio.
Чтобы начать использовать PPA, сначала убедитесь, что у вас нет другой исходной или двоичной установки gqrx, gnuradio или библиотек драйверов SDR. Следующие команды удаляют двоичные установки gqrx и gnuradio, но не установки из источника:
sudo apt-get purge --auto-remove gqrx
sudo apt-get purge --auto-remove gqrx-sdr
sudo apt-get purge --auto-remove libgnuradio*
Теперь вы должны удалить gqrx / релизы или gqrx / snapshots PPA из списка источников репозиториев / пакетов, если вы их использовали.
Затем добавьте новые репозитории в диспетчер пакетов, набрав в терминале следующее по одной строке за раз:
sudo add-apt-repository -y ppa:bladerf/bladerf
sudo add-apt-repository -y ppa:ettusresearch/uhd
sudo add-apt-repository -y ppa:myriadrf/drivers
sudo add-apt-repository -y ppa:myriadrf/gnuradio
sudo add-apt-repository -y ppa:gqrx/gqrx-sdr
sudo apt-get update
Если это произошло без ошибок, продолжайте установку gqrx:
sudo apt-get install gqrx-sdr
gqrx/+archive/ubuntu/gqrx-sdr/?field.series_filter=xenial
последняя версия:
gqrx-sdr 2.10-gqrx1
xenial
Теперь вы можете найти gqrx в меню рабочего стола или запустить его с терминала, набрав gqrx. Для запуска потребуются права суперпользователя.
После того, как вы установили Gqrx из PPA, обновления будут доступны через диспетчер пакетов. На сегодня актуальна эта версия

Рекомендуется также устанавливать пакет libvolk1-bin и запускать инструмент volk_profile для оптимизации производительности GNU Radio на конкретном компьютере, на котором он используется.
sudo apt-get install libvolk1-bin
Подождите, пока он закончит, а затем наслаждайтесь повышением производительности.
Для тестирования RTL-устройств нужно установить пакет rtl-sdr
sudo apt install rtl-sdr
и запускать тест командой
rtl_test -t
-например:
rtl_test -t
Found 1 device(s):
0: Realtek, RTL2838UHIDIR, SN: 00000001

Далее просто нажать кнопку Пуск в виде стрелки на панели или из меню.


Дополнительно к теме ссылки и рекомендации.
Очень много роликов имеется на Ютубе с обзорами RTL-SDR приемников.
По большому счету этот девайс годится для приема местных станций и сканирования определенного диапазона частот. Для более серьезных целей он требует и более серьезной переделки, например: установки дополнительных фильтров и конвертера на кварце для перекрытия всего диапазона частот от 0.1 до 1700 МГГц. Или нужно покупать подобное SDR устройство более высокого уровня сложности и соответственно большей цены.
Michael, DG0OPK has been doing a lot of experimenting with running Gqrx on various ARM boards. In this video below, he shows gqrx running on the latest Odroid C2 from Hardkernel, which has a 64 bit, 2 GHz quad-core processor.
Gqrx 2.5 released
Only a few weeks have passed since the gqrx 2.4 release, there has been enough development going on to justify a new release. This release includes a few new features as well as important bug-fixes.
New features
- Read out signal time and frequency on the waterfall (disabled on OS X).
- Save waterfall to graphics file.
- Allow user settable waterfall time span (up to 24 hours).
- Cmake option to build using gr-audio backend (Andrea Merello).
Bug fixes
- FM stereo (revert to pre-2.4 behavior).
- Mode selector not updated when selecting a WFM OIRT bookmark.
- Show correct filter preset when filter LO/HI corresponds to one.
- Prevent RDS panel from growing by making it scrollable.
- Use correct audio backend on OS X (app bundle only).
Improvements
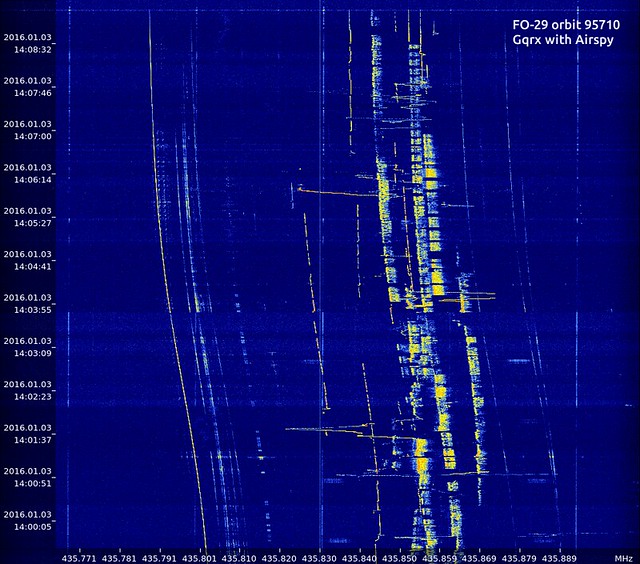
Details about the new waterfall features
As you may have noticed, new development for this released has been mostly on the waterfall. The adjustable time span allows us capture spectrum data over longer periods and the save functionality provides a convenient way to save the captured data to a graphics file.
The image below shows an example of such capture. It is a
20 minute capture of the transponder downlink from the FO-29 amateur radio satellite.
Another example for how this feature can be used is spectrum surveillance. The image below shows the 6–16 MHz HF spectrum over an 8 hour time period. It was captured using a HackRF device.
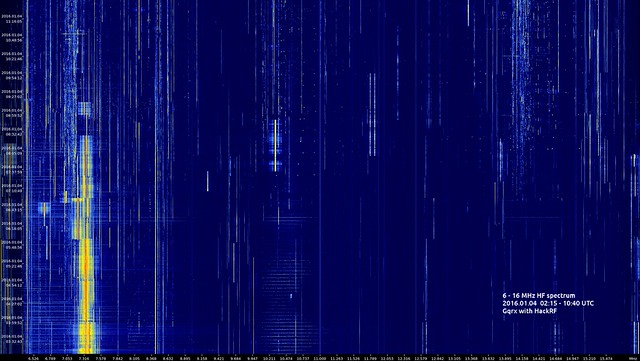
As written above, the time span can be up to 24 hours, however, this is only an arbitrary limit and we can increase it should the need arise.
Looking forward to seeing how people will use this feature.
Ubuntu Packages
Updated packages are already available in our new PPA. Instructions for new users are available on the Ubuntu Install page.
Mac OS X binaries
As always, there is an up to date Gqrx package in Macports shortly after the release. There is now also an app bundle available from GitHub or SourceForge. The bundle was built on Mac OS X El Capitan and contains all required third part libraries, as well as the command line utilities that come with the Airspy, RTL-SDR, Hackrf and Bladerf driver libraries. See the included README for details.
Installing from source
The source code can be downloaded from GitHub or SourceForge. Starting with this release, gqrx can also be compiled using cmake, see the README file for details. Building with qmake is still available and will not disappear any time soon, so feel free to use either method.
Analog bandwidth, named gain stages and a few UI tweaks
Ubuntu packages for armhf architectures
Just a quick note that we have got armhf builds enabled for our gqrx/snapshots repository. Armhf refers to ARM architecture with hardware floating point support.
For now I have rebuilt all packages for Ubuntu 12.04 as this seems to be most common Ubuntu used on ARM devices. Later I will also rebuild for Ubuntu 13.04 but there are limits on how much resources one can use when building for armhf and I have to watch out not to abuse this service.
I can imagine that gqrx may not be very useful on all arm devices; however, I hope that at least the driver libraries, the command line tools and maybe even gnuradio itself will be useful.
Этичный хакинг и тестирование на проникновение, информационная безопасность
Вопросы анализа радиоэфира, за пределами Wi-Fi, Bluetooth и BLE для меня довольно новые. Поэтому когда я получил на почте свой HackRF, то у меня возник вопрос — а что с ним, собственно, делать? Эта статья посвящена именно этому — как проверить и задействовать HackRF. Для наглядности мы просто будем слушать FM радио. Что-то более серьёзное будет в последующих инструкциях.
Если вы тоже начинающий, то HackRF это радио (Software-defined radio), прибор, которые может отправлять и получать радиоволны в очень широком диапазоне. А gqrx — это одна из программ для работы с получаемыми через HackRF (или другими аналогичными устройствами) данными. У этой программы графический интерфейс и она очень подходит для самого первого знакомства с SDR.
Настоятельно рекомендуется прочитать «SDR и HackRF для начинающих». Если не осилите всё, то хотя бы раздел «Как установить драйвер, инструменты HackRF и SDR утилиты». Также запомните, что HackRF не должен быть включён, а тем более передавать или получать данные, если к нему не подключена какая-либо антенна!
Где купить HackRF
Я купил у этого продавца. Особенность покупки HackRF в том, что имеется множество вариантов комплектаций:
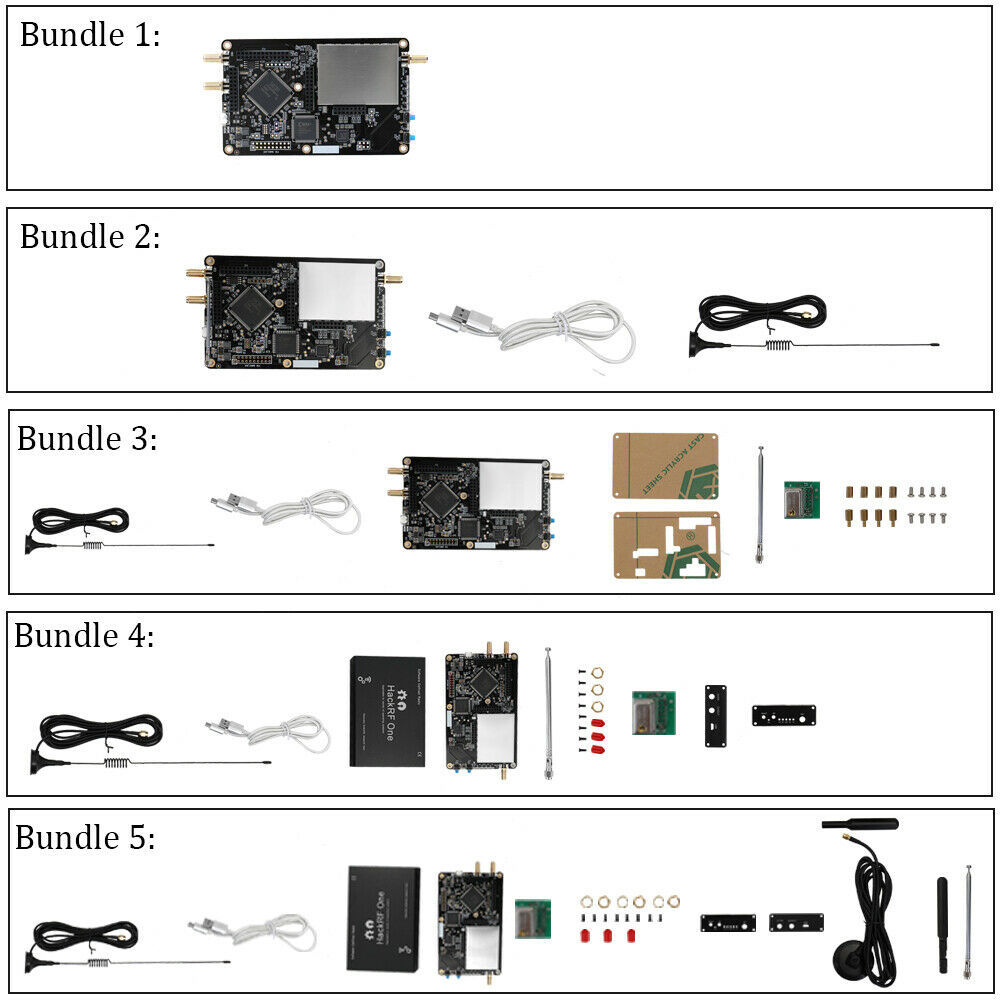
Можно купить только плату, даже без USB кабеля питания, а можно купить вместе с корпусом и несколькими антеннами. Виды корпусов также различаются. Ещё нужно быть внимательным, и не перепутать корпус без платы с самой платой — некоторые корпусы (с экраничиком и встроенной батареей) могут стоить как сама плата.

- 1 x HackRF One Software Defined Radio с алюминиевым корпусом
- 4 x HackRF SMA антенны (40MHz-6GHz антенна; 2.4G/5/5.8G антенна; 70MHz-2700MHz антенна; 40MHz-860MHz антенна)
- 1 x специальная защитная крышка (приварена к плате) для HackRF One
- 1 x модуль HackRF TCXO PPM0.1 GPS Clock
- 1 x кабель LG Micro USB
Мне понравилось, что имеется несколько антенн под разные нужды.
Коробка мне пришла в весьма мятом виде и я пока шёл с почты довольно сильно волновался за плату:
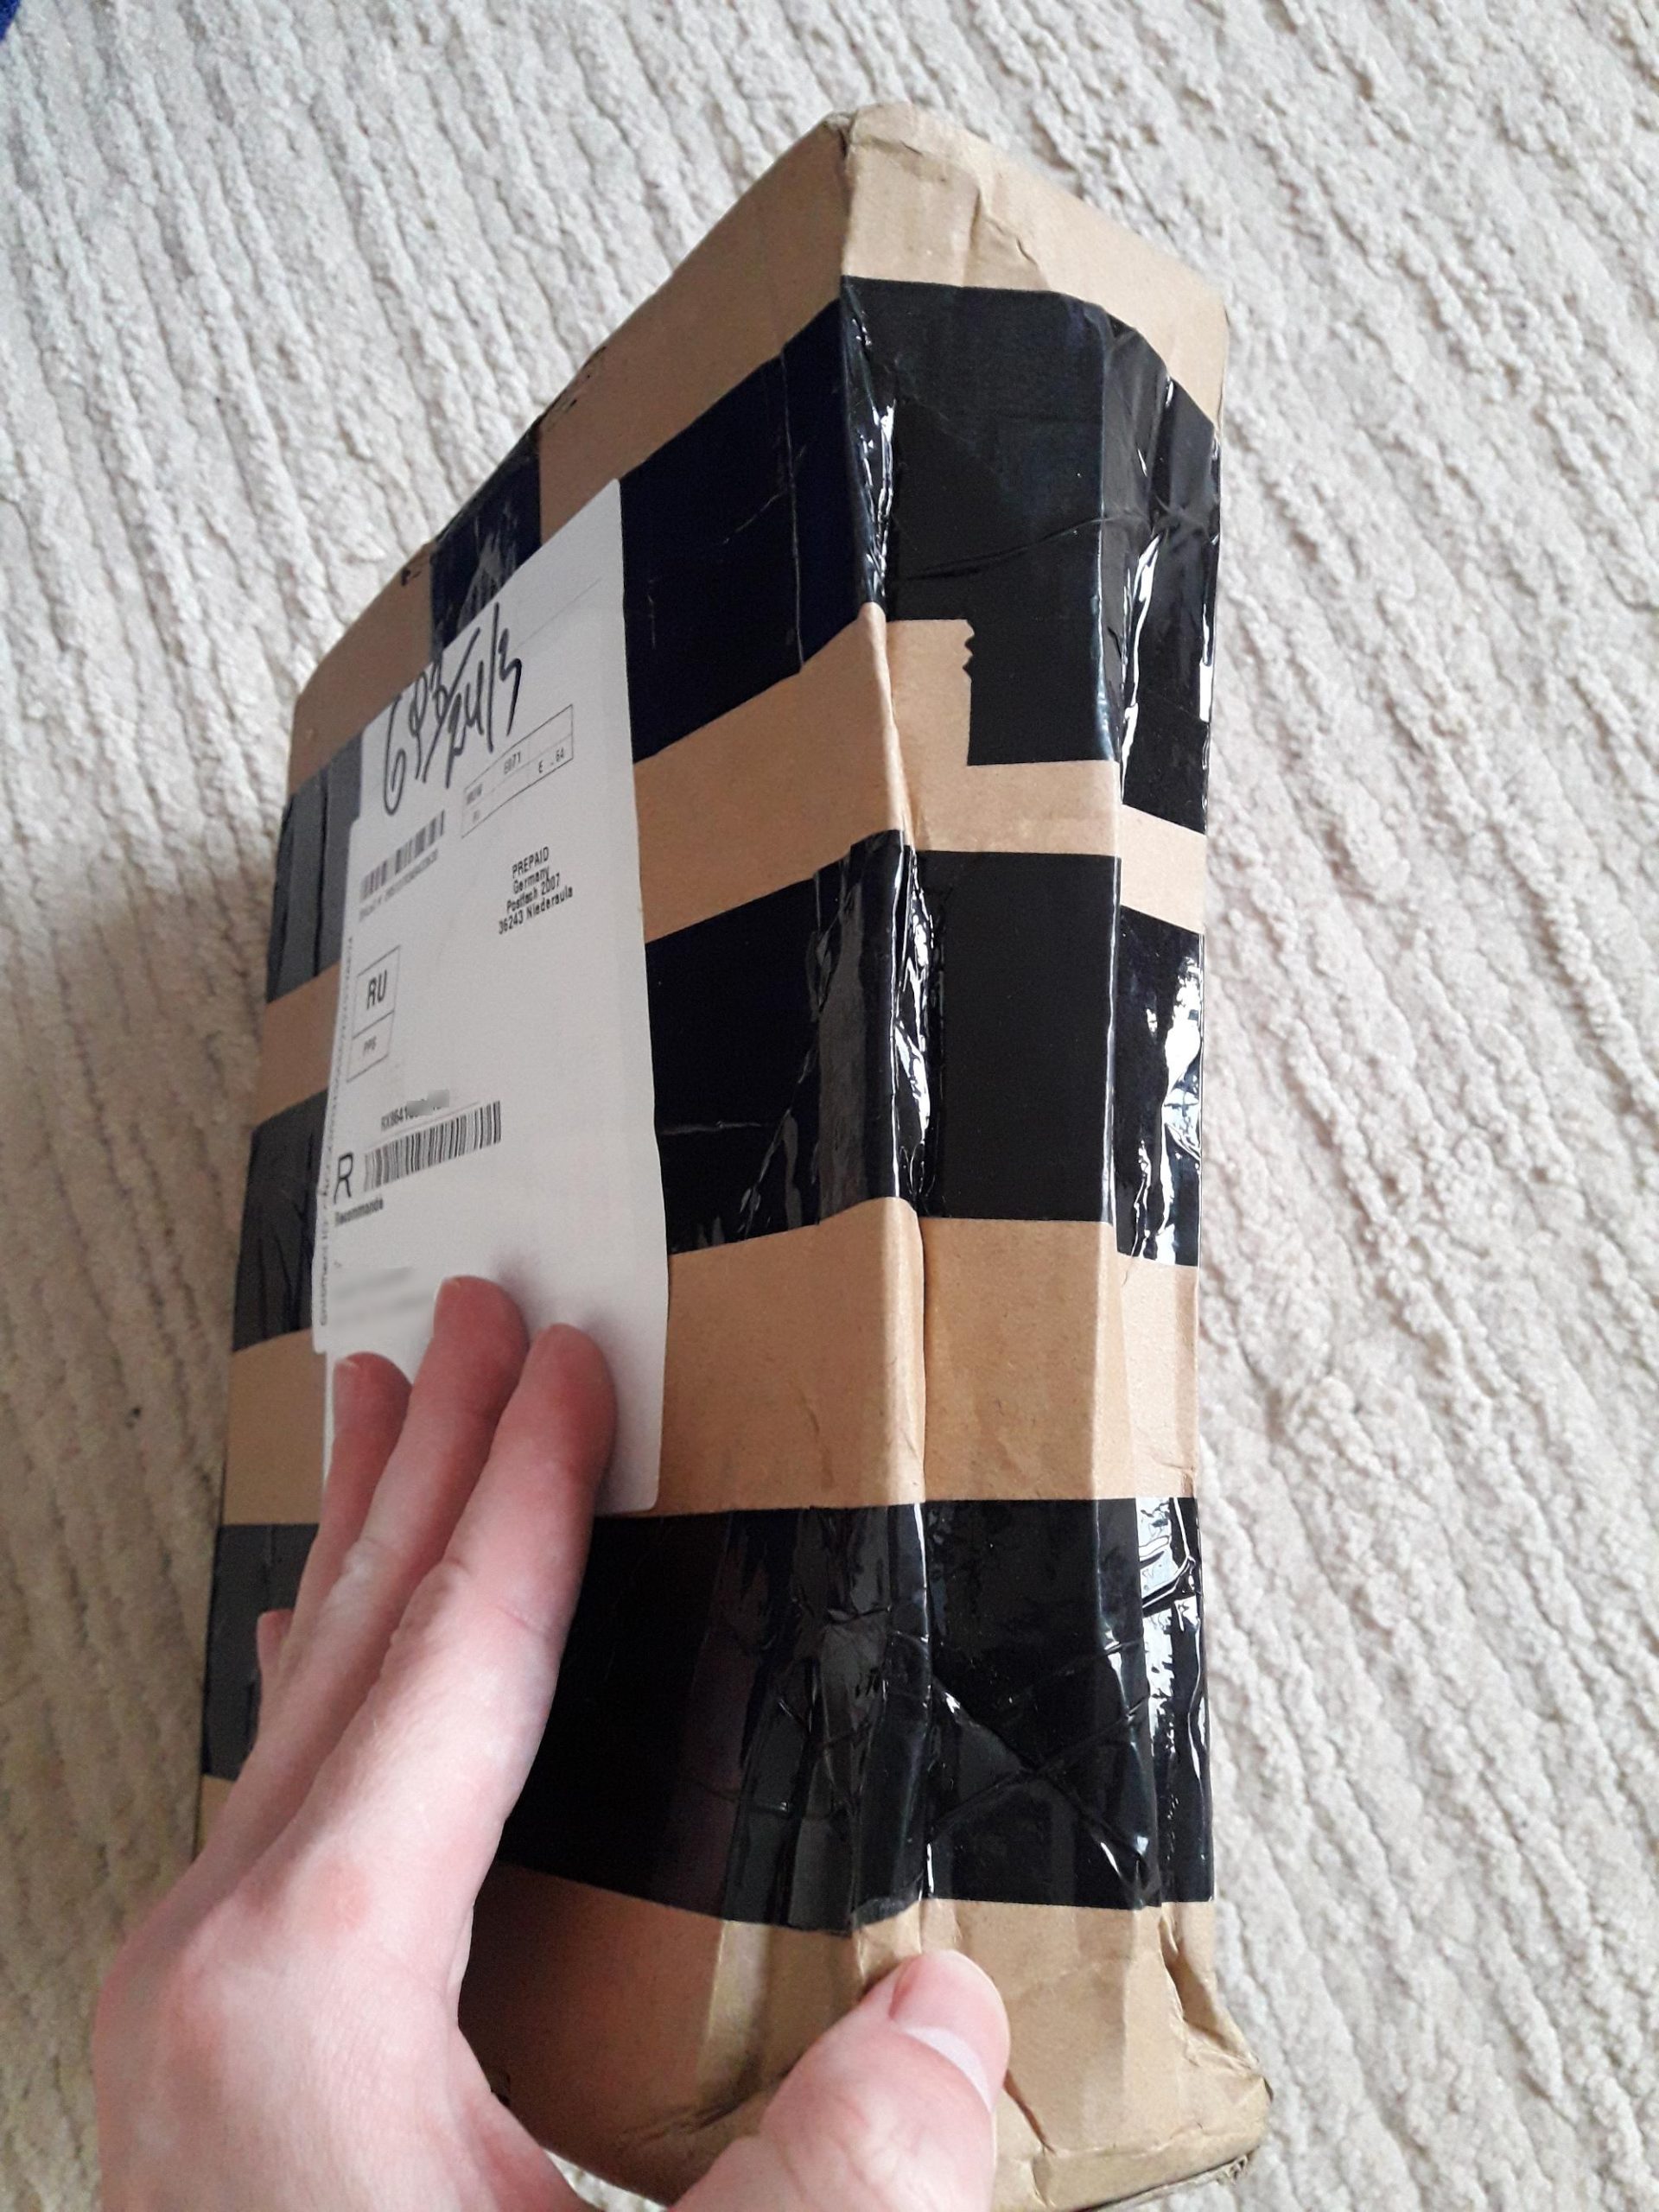
К счастью, плата была уже в корпусе, а корпус довольно крепкий и на нём не было ни царапины.
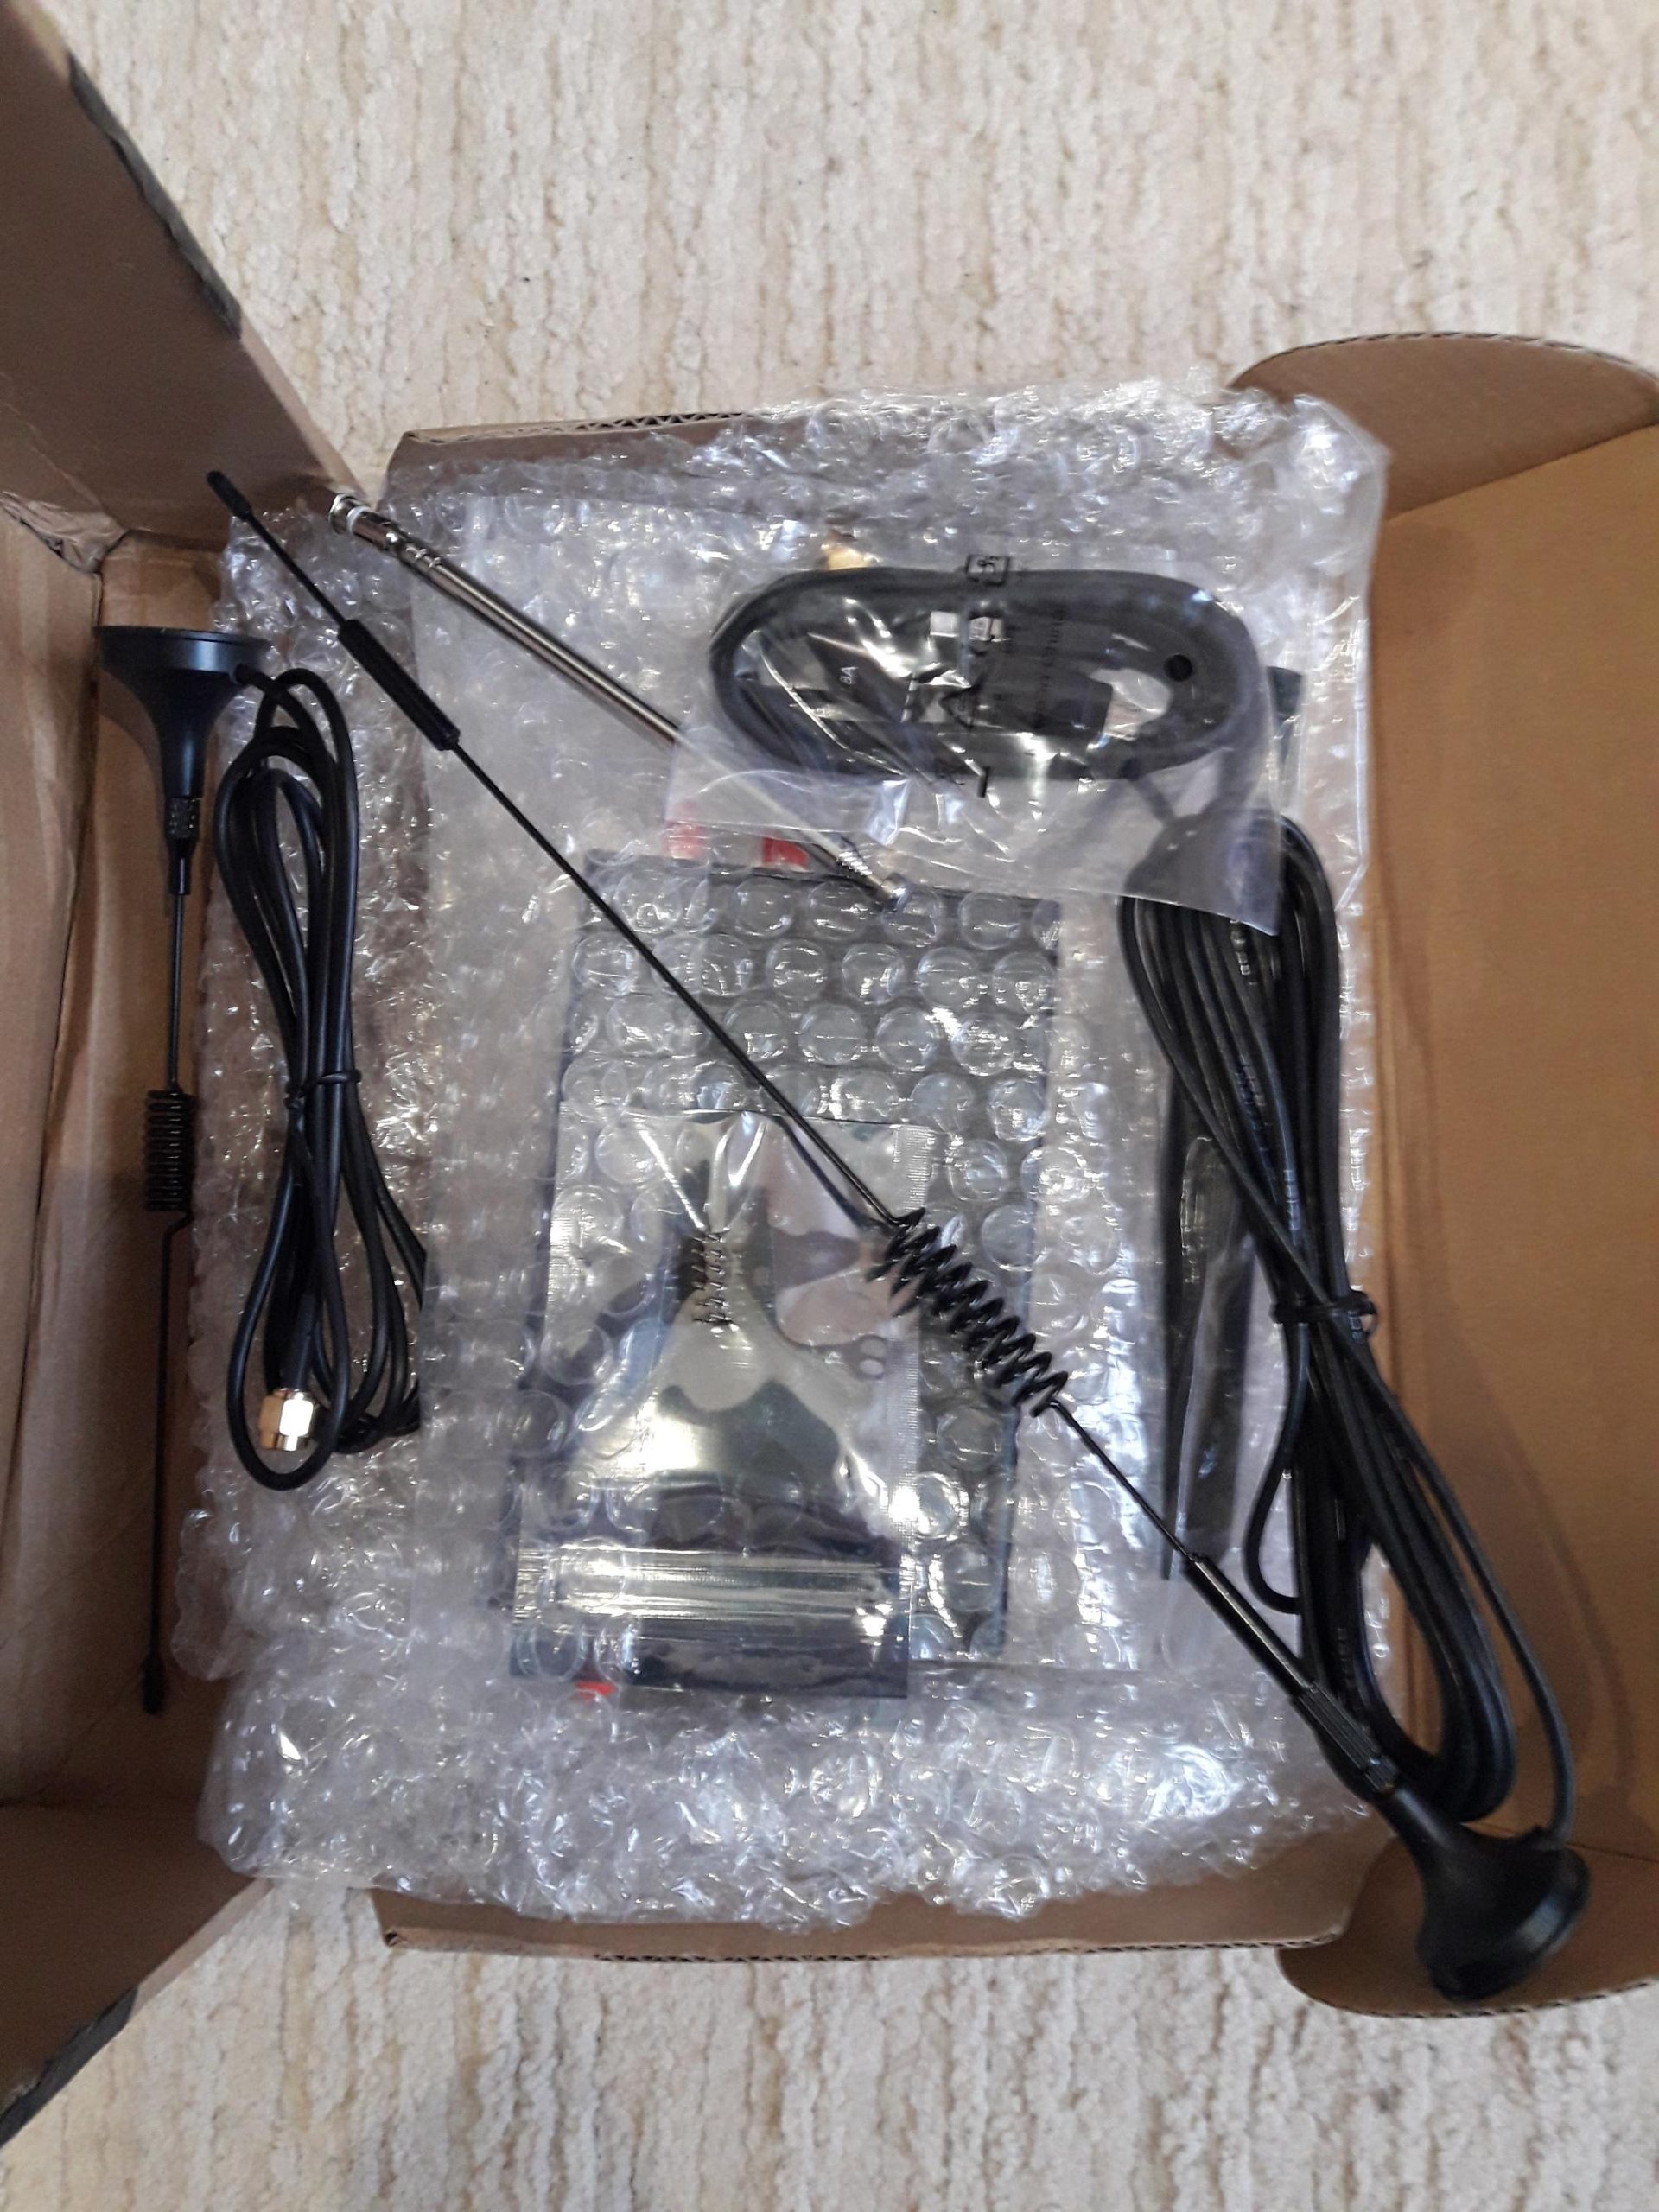
Антенны на вид очень хрупкие, но они оказались в полном порядке — не погнутые и не сломанные. Не повезло только устройству «HackRF TCXO PPM0.1 GPS Clock module», при деформации коробки, ножки проткнули упаковку:

Сами ножки также были погнуты.
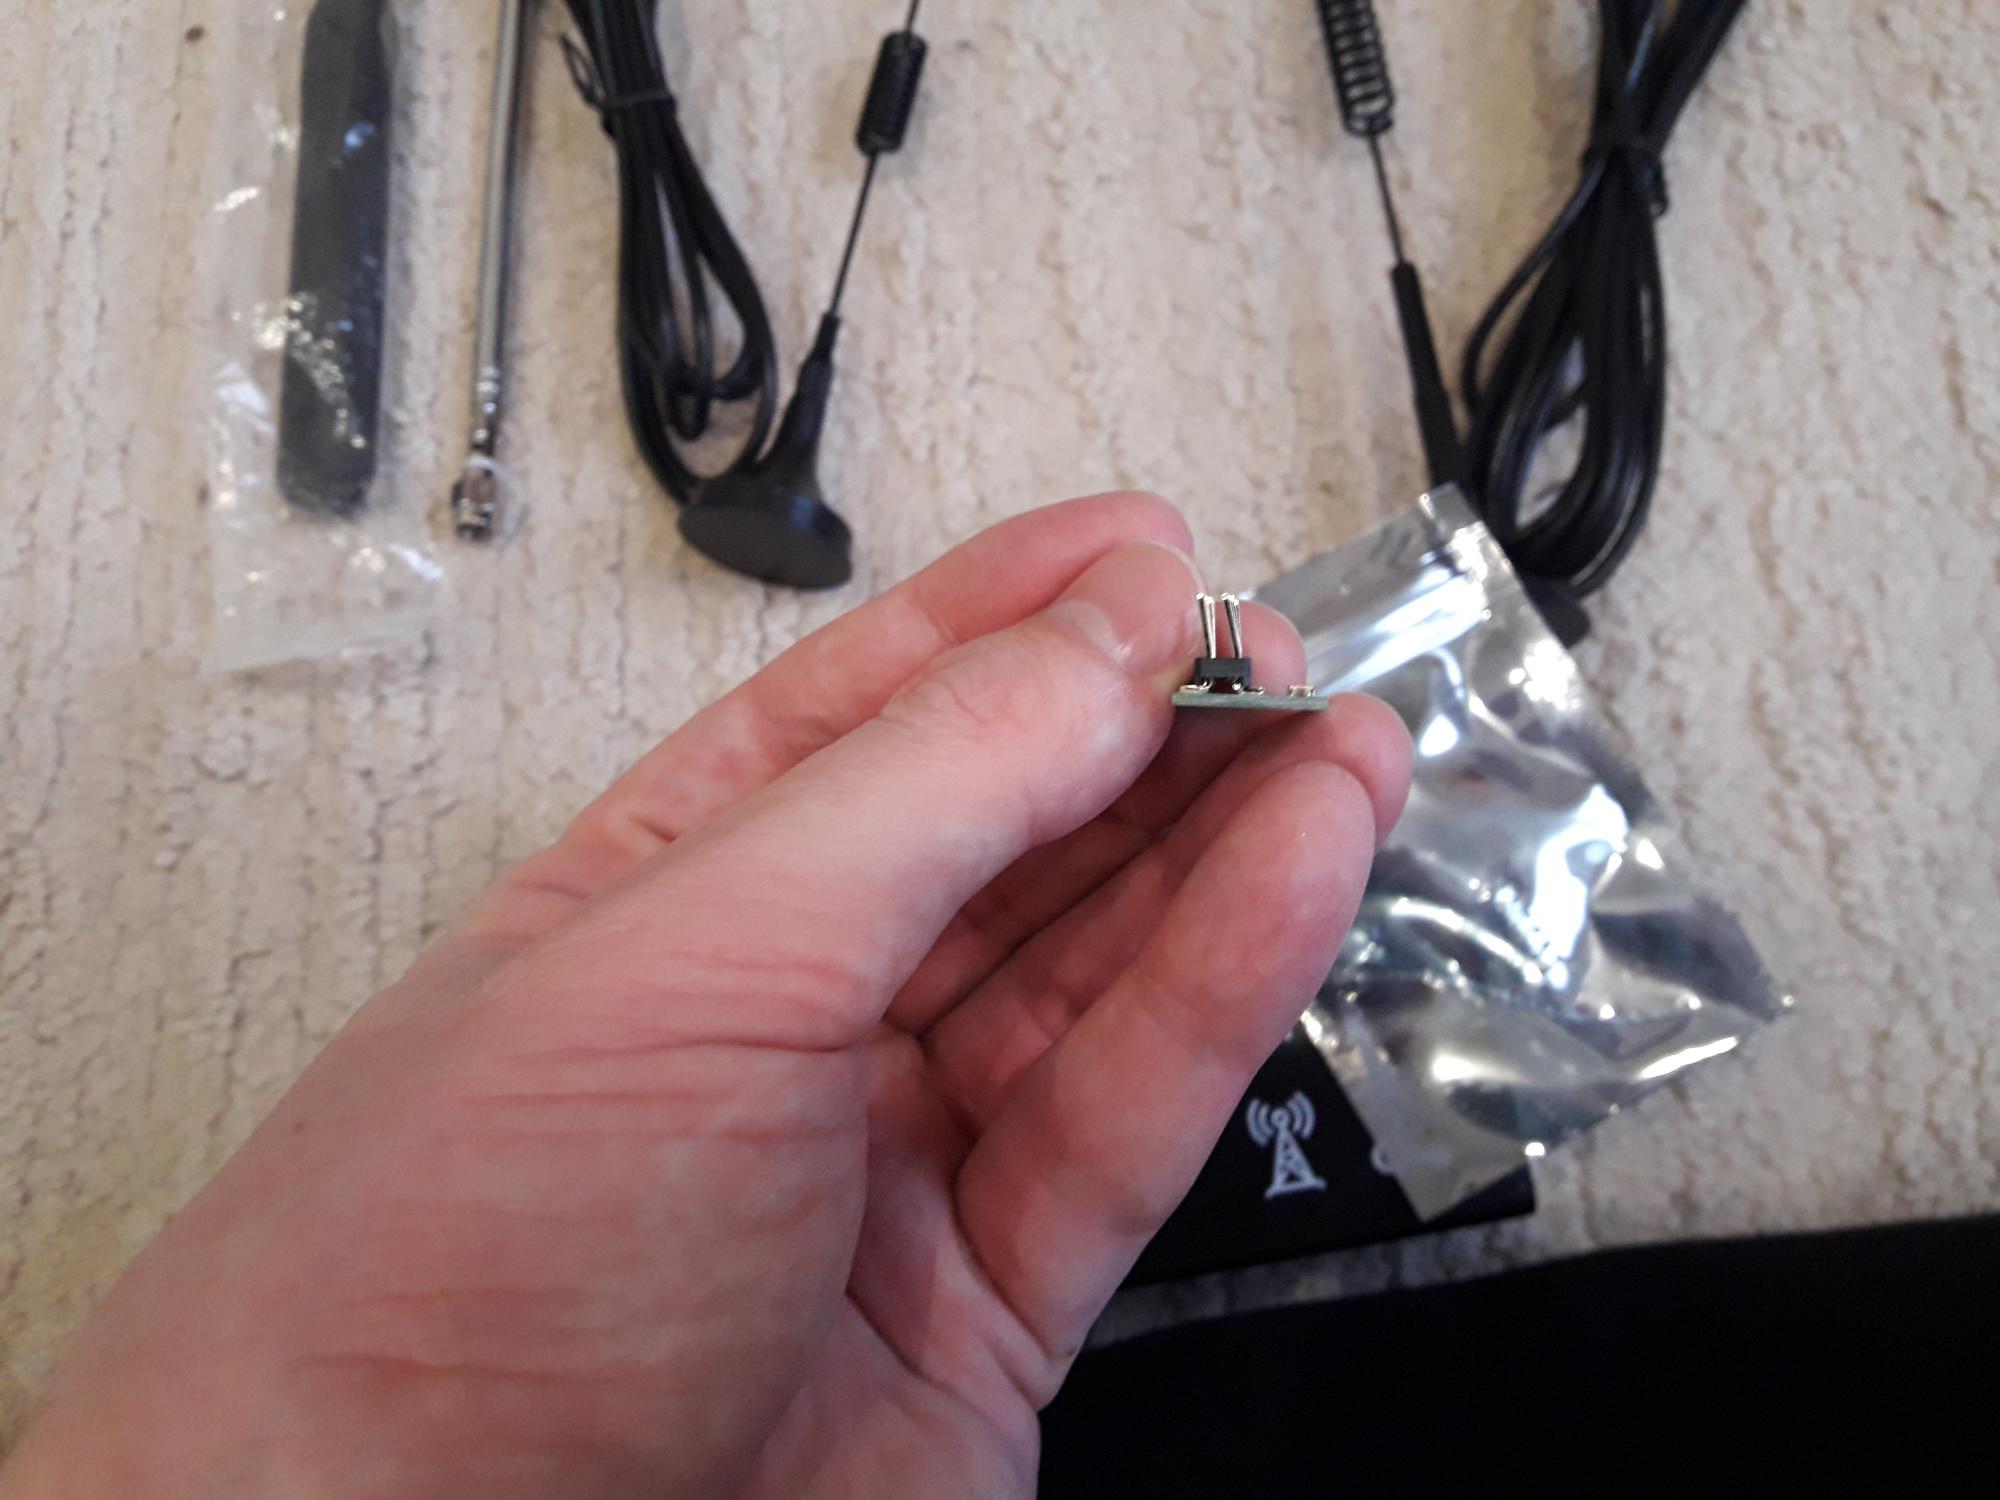
Я распрямил ножки плоской отвёрткой и установил этот модуль на плату HackRF. Я забыл сделать фотографию (а разбирать ещё раз лень) и к тому же я не уверен, что установил правильно. Поэтому про модуль HackRF TCXO PPM0.1 GPS Clock, для чего он нужен и как его использовать будет в какой-нибудь последующей статье.
Как проверить HackRF
При подключении HackRF к компьютеру с Linux практически ничего не происходит — только на плате загораются индикаторы. В самой системе нет каких-то встроенных аплетов для подключения к HackRF. Поэтому начнём с раздела «Быстрый старт с HackRF. Первый приём и передача данных в HackRF».

Попробуем получить данные на максимальной скорости:
![]()
![]()
Как минимум базовые тесты пройдены — несмотря на мятую коробку, устройство не пострадало.
Пошаговая инструкция по обновлению прошивки HackRF
С момента написания данной статьи вышло обновление программного обеспечения для HackRF, в том числе обновление прошивки HackRF.
Для проверки версии установленного ПО и прошивки HackRF запустите команду:

Как можно увидеть, версия программного обеспечения, установленного на данный компьютер, теперь 2021.03.1:
А версия прошивки 2018.01.1:

Там же мы узнаём, что начиная с выпуска 2021.03.1, CPLD bitstreams теперь включён в прошивку и автоматически загружается вместе с ней при обновлении. Отдельно обновлять CPLD больше не нужно.
Общие сведения о процессе апгрейда вы можете прочитать в разделе «Как обновить прошивку HackRF», этот же раздел пошагово покажет, как загрузить новую прошивку на HackRF.
Файл прошивки поставляется вместе с libhackrf и hackrf-tools. Название конкретных пакетов может быть разным в различных дистрибутивах Linux. Подробности смотрите в разделе «Как установить драйвер, инструменты HackRF и SDR утилиты».
То есть вам нужно дождаться, когда эти пакеты будут обновлены в репозиториях вашего дистрибутива, либо вы можете скомпилировать их самостоятельно.
Файл с прошивкой называется hackrf_one_usb.bin, найдём путь до него в системе:
В моём случае это /usr/share/hackrf/hackrf_one_usb.bin.
Хотя обновлённые libhackrf и hackrf-tools должны означать, что файл прошивки тоже новый, проверим, что у файла свежая дата создания.

Для запуска процесса обновления используйте команду вида:

Чтобы изменения вступили в силу, выключите и включите HackRF (отсоедините от USB кабеля).
Вновь выполним проверку версии ПО:
Теперь прошивка HackRF обновлена!

Как принимать сигнал с HackRF
Установим программу gqrx, для этого в Kali Linux, Debian, Linux Mint, Ubuntu и их производных выполните команду:
В BlackArch и Arch Linux выполните команду:
Запустите gqrx:
При первом запуске появится окно настройки, в нём можно выбрать источник принимаемых данных и устройство вывода звука. В качестве Device (Устройства) я выбрал HackRF, также увеличил Input rate до максимального значения 20000000.

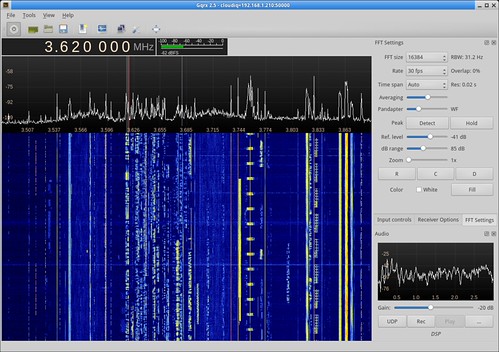
Главное окно gqrx:

Для запуска приёма сигнала нажмите кнопку «Start DSP processing», а для смены частоты можно указывать её в окне «Frequency», либо устанавливать на панели с цифрами. Панель можно передвигать за нижний ряд цифр:

Для остановки приёма сигнала нажмите кнопку «Stop DSP processing» (бывшая кнопка «Start DSP processing»). Если вы хотите отключить HackRF (например для смены антенны), то лучше выйти из gqrx, т. к. у меня после переподключения HackRF эта программа зависала.
Во время приёма сигнала довольно высокая нагрузка на центральный процессор, возможно, из-за того, что я выбрал высокий Input rate:

Как слушать FM радио с HackRF
Диапазоны FM это 92.1-107.1 MHz. Поскольку частота в окне «Frequency» указана в kHz (килогерцах), то нам нужно перейти примерно к 100000 kHz:

Вы можете увидеть, что в этом диапазоне много пиков — это и есть эфиры радиостанций.
В качестве «Mode» выберите «WFM (stereo)».
Увеличьте значение «Gain», иначе будет слишком тихо.
Нажимая на кнопку Bookmark можно сохранять частоты в закладки.
Если нажать на кнопку Rec, то можно записывать аудио.
Небольшое видео, на котором я осваиваю интерфейс gqrx:
Это только самое начало! Далее мы с вами будем разбираться с источниками сигнала и методами их декодирования. С помощью HackRF можно обнаруживать самые разные устройства: от беспроводных дверных звонков до жучков, скрытых камер и радаров. Некоторые виды сигналов возможно расшифровать: рации, устаревшие телефонные стандарты и т. п. Некоторые виды сигнала можно только фиксировать: Wi-Fi, современные телефонные стандарты и т. п. В любом случае, мир радио волн очень обширный и интересный!
Summary: This post describes how to setup Gqrx, a software defined radio program, on ubuntu 18.04 using an inexpensive RTL2832U USB dongle plugged into a Raspberry PI 3 mounted in an attic.
Gqrx is an open source Linux based Software Defined Radio (SDR) built using GNU Radio with a Qt graphical interface. When paired with any of a number of SDR hardware devices, Gqrx can be used to receive and listen to various radio signals.
In this post, I will describe how to use Gqrx on a computer running Ubuntu 18.04 to listen to radio signals pulled in by an inexpensive $25 NooElec NESDR Mini+ RTL2832U USB device attached to a Raspberry Pi 3.
Separating the SDR hardware (RTL2832U and Raspberry Pi) from the SDR software (Gqrx) allows me to mount the hardware in my attic (where the radio can be easily attached to one of several antennas) and listen from anywhere in the house without running antenna leads.

Install Operating System
To setup the raspberry pi, grab the lasted raspbian image and burn it to a fast SD card, boot the Pi up, and run through the initial setup tool. The Raspberry Pi Website provides step by step instructions for this. See the article Setting up your Raspberry Pi. At the time I did this, "Jessie" was the latest raspbian version.
Configure SSH and Set Static IP Address
Once you've got the Pi up and running, you may want to enable SSH and set a static IP address. SSH will enable you to use the Pi 'headless' without a monitor and keyboard. The static IP address will simplify use of Gqrx by eliminating the need to update the I/O configuration with a new IP address every time the router decides to issue a new dynamic IP address to the Pi.
To enable SSH, see the article SSH Secure Shell Access on the Raspberry Pi Foundation's website.
To establish a 'static' IP address, you have a few options. If you are familar with your router's DHCP settings, the easiest method is to have it always issue the same IP address for your Raspberry Pi. This way, you will not need to make any changes to the Pi. Alternatively, you can configure Raspbian to use a true static IP address. There are many guides on doing this. See, for example, Raspbian Jessie and Stretch Static IP Setup.
Install RTL-SDR
Finally, you'll want to add the STL-SDR package to your Raspberry Pi. To do this, you'll need to install a few dependencies, use git to download the rtl-sdr software code, compile the code with make, test it, and then set up rtl_tcp to start automatically on boot.
Install rtl_tcp dependancies
Before you install the RTL drivers, you will have to install the following dependencies by typing the following commands in terminal window at the prompt.
Download and build rtl_tcp
Now we are ready to install the rtl-sdr software. Open a terminal on your pi and execute the following commands:
Connect the RTL dongle hardware and test
Before plugging in the RTL dongle to the Pi's USB port, we'll need to "Blacklist" the TV driver that is associated with this device. (By default, ubuntu will treat the RTL2832U as a TV, not a radio, receiver.) To black list, execute the following commands in the terminal:
In the nano editor window, add the following text to the file:
To exit nano and save the file, press Ctrl+x and type yes when prompted to save.
Now plug in your rtl-sdr device. You can confirm that it works by issuing the following command:
You should see something like the following:
Type Ctrl+c to stop the test.
Start rtl_tcp and configure a service to start it at boot
To start the rtl server type rtl_tcp -a plus the ip address of your Pi. For example:
While you could log into the Pi and restart rtl_tcp manually everytime it reboots, you may want to set up the Pi to do this automatically. To do so, create a script for the autostart service and then enable it so that it starts automatically.
Open a terminal and enter the following command:
In the nano editor, enter the following:
Exit nano by typing Ctrl+x and then saying 'yes' when prompted to save.
Change the permissions on the file to allow it to be executed:
Finally, set the service to start automatically and then reboot:
After rebooting, the rtl_tcp service will start automatically. You can confirm the service started by issuing the following command from the Pi's command line:
You should get a line back that looks something like this: tcp 0 0 192.168.100.50:1234 : LISTEN
With the Raspberry Pi setup, we are ready to move on to Gqrx.
Ubuntu include Gqrx packages in its distributions. As Gqrx relies on gnuradio, you'll need to install it too. With that said, the version of Gqrx included in the distribution is usually a bit dated. Therefore, you may wish to install Gqrx from it's own PPA instead.
If you want to install the Ubuntu version:
Open a terminal window on your desktop (or laptop) computer running ubuntu and execute the following command:
If you want the lastest version:
To use the latest version, you can use the packages available from Gqrx. To install this version, see the Gqrx DSR article Install Gqrx SDR on Ubuntu Linux.
After installation is complete, you should find an entry in your Appication Launcher menu. If you are on a kubuntu system like I am, you'll find Gqrx on the KMenu under Applications > Internet. (As this didn't make a lot of sense to me, I created an SDR menu item and moved Gqrx under that). The application can also be launched from the terminal:
The first time the Gqrx starts, you'll be prompted to configure and I/O device. To configure the rtl_tcp feed, specify the following:

- Device": Select Other.
- Device string: Set this to rtl_tcp=192.168.100.50:1234,psize=32768 where 192.168.100.50 is the ip address of your Raspberry Pi. The psize=32768 is an optional argument that sets the payload size. It is not completely clear to me, but it appears that psize is the same as the buflen argument that would be used if Gqrx was running on the same hardware as the RTL hardware. See the discussion under Gqrx Supported Hardware for RTLSDR for details. For other optional Device string arguments, see OsmoSDR Support Wiki.
- Input rate: This is the sampling rate in Hz. 2048000 is the default, I've cut it down to 1024000.
- Decimation: Leave as None.
- Sample rate: This field will automatically take your Input Rate and convert it to a sample rate in Msps.
- Bandwidth: This setting refers to analog bandwidth, but this feature is not supported on RTL devices. Leave this field blank.
- LNB LO: In the field, you can specify a frequency adjustment if you are using an UpConverter. (An UpConverter, such as the NooElec Ham-it-up, allows you to shift the range of the SDR hardware up so that you can listen to shortwave, Ham, and other frequencies that are typically lower than what an RTL based SDR will support.) If you are using an Upconverter, you would enter the offset frequency here. For example, the Ham-it-up shifts the frequency 125 MHz, so you would specify -125.000000 MHz for this value. However, in this case I do not have an upconverter connected, so I will leave this value at 0.
- Audio output Device: This is the device on your local computer to output sound to.
- Audio output Sample rate: This is the sample rate that the local computer will play audio at. The default value is 48 kHz.
Once the configuration parameters are specified, click OK. You should now be able to tune in and listen to the radio.
To test that everything is working correctly, try tuning to a local FM radio station. In my case, I'll tune into 91.5 MHz FM. To do this, I first entered the frequency in the hardware frequency field (to convert from MHz to KHz, multiply by 1000. so 91.5 MHz x 1000 = 91500.000 Khz). I also changed the mode to Wide FM (stereo) to let Gqrx know how much of the spectrum to include when processing the signal, the the filter widths to normal and turned off Automatic Gain Control (AGC). To start the stream, click the play button (see screenshot, below).

At this point, you should see the waterfall start to fill-up and the auto start to play. Ideally, the center of the signal should be centered on the red line. However, RTL tuners, especially older models not specifically designed for RTL radio use, are subject to frequency drift. This can be easily corrected. To do so, you can made adjustments under the Input Controls.
First, select Input Controls on the side bar (see screenshot, below). Second, enter a frequency correction factor. For most 'generic' RTL dongles, start out with something relatively small, say 10 ppm or 20ppm and then raise or lower the ppm until the red line is centered on the center of the radio signal on the waterfall. Note that this value might drift over time as your RTL 'warms-up'. Therefore, you may want to wait 10 or 20 minutes and then make 'final' adjustments. Once the dongle warms up, this correction factor should be pretty stable. (Tip: if you have multiple RTL dongles, you might want to label each one with its PPM correction factor; it will likely be different for each dongle).
Finally, if you are having trouble getting a clear strong signal, you may also want to play around with the 'gain'. In the screenshot (below), I am using the hardware based automatic gain control. However, you can uncheck this box and experiment with setting the gain control manually. For FM signals, the hardware based gain control seems to work fine for me, but for other types of signals, fiddling with this setting can improve signal processing.

If you've been following along with this article, should now have a remote Raspberry Pi based hardware radio with the ability to remotely tune in and process it's signals on a remote laptop (or desktop) using Gqrx software. Happy listening!
In this tutorial you will learn how to update and install gqrx-sdr On Ubuntu 16.04 Lts? Learn how to uninstall and completely remove the package gqrx-sdr from Ubuntu 16.04 LTS Operating System.
Quick installation of gqrx-sdr:
Step 1: Update system:
Step 2: Install: gqrx-sdr
Ater updaing the OS run following command to install the packae:
How to install gqrx-sdr on Ubuntu 16.04?

First of all update your system with the command:
Above command will download the package lists for Ubuntu 16.04 on your system. This will update the list of newest versions of packages and its dependencies on your system.
After downloading the latest package list with the help of above you can run the installation process.
If gqrx-sdr is not installed on your compter then the command 'dpkg -L gqrx-sdr' will give followin error.
After system update use the following command to install gqrx-sdr:
Above command will confirm before installing the package on your Ubuntu 16.04 Operating System. If you are not already logged in as su, installer will ask you the root password. After completion of the installation you can use the package on your system.
How to uninstall/remove gqrx-sdr from Ubuntu 16.04?
Now we will see the commands for uninstalling the gqrx-sdr from Ubuntu 16.04. For uninstalling this package you can easily use the apt command and remove the package from Linux Operating System.
To remove the gqrx-sdr following command is used:
Following command is used to remove the gqrx-sdr package along with its dependencies:
This will remove gqrx-sdr and all its dependent packages which is no longer needed in the system.
Completely removing gqrx-sdr with all configuration files:
Following command should be used with care as it deletes all the configuration files and data:
or you can use following command also:
Читайте также: