
Чем открыть backup mikrotik
Обновлено: 05.07.2024
This manual introduces you with commands which are used to perform the following functions:
- system backup;
- system restore from a backup;
- configuration export;
- configuration import;
- system configuration reset.
Description
The configuration backup can be used for backing up MikroTik RouterOS configuration to a binary file, which can be stored on the router or downloaded from it using FTP for future use. The configuration restore can be used for restoring the router's configuration, exactly as it was at the backup creation moment, from a backup file. The restoration procedure assumes the configuration is restored on the same router, where the backup file was originally created, so it will create partially broken configuration if the hardware has been changed.
The configuration export can be used for dumping out complete or partial MikroTik RouterOS configuration to the console screen or to a text (script) file, which can be downloaded from the router using FTP protocol. The configuration dumped is actually a batch of commands that add (without removing the existing configuration) the selected configuration to a router. The configuration import facility executes a batch of console commands from a script file.
System reset command is used to erase all configuration on the router. Before doing that, it might be useful to backup the router's configuration.
System Backup
The system backup feature allows you to effortlessly save and load device's configuration. Read more about the backup feature in the System/Backup section.
Exporting Configuration
Command name: /export
The export command prints a script that can be used to restore configuration. The command can be invoked at any menu level, and it acts for that menu level and all menu levels below it. The output can be saved into a file, available for download using FTP.
Command Description
- file=[filename] - saves the export to a file
Example
To make an export file:
To see the files stored on the router:
Compact Export
Starting from v5.12 compact export was added. It allows to export only part of configuration that is not default RouterOS config.
Note: Starting from v6rc1 "export compact" is default behavior. To do old style export use export verbose
For example compact OSPF export:
Compact export introduces another feature that indicates which part of config is default on RouterOS and cannot be deleted. As in example below '*' indicates that this OSPF instance is part of default configuration.
List of default config by menus that cannot be removed:
| Menu | Entries |
|---|---|
| /interface wireless security-profiles | default |
| /ppp profile | "default", "default-encryption" |
| /ip hotspot profile | "default" |
| /ip hotspot user profile | "default" |
| /ip ipsec proposal | "default" |
| /ip smb shares | "pub" |
| /ip smb users | "guest" |
| /ipv6 nd | "all" |
| /mpls interface | "all" |
| /routing bfd interface | "all" |
| /routing bgp instance | "default" |
| /routing ospf instance | "default" |
| /routing ospf area | "backbone" |
| /routing ospf-v3 instance | "default" |
| /routing ospf-v3 area | "backbone" |
| /snmp community | "public" |
| /tool mac-server mac-winbox | "all" |
| /tool mac-server | "all" |
| /system logging | "info", "error", "warning", "critical" |
| /system logging action | "memory", "disk", "echo", "remote" |
| /queue type | "default", "ethernet-default", "wireless-default", "synchronous-default", "hotspot-default", "only-hardware-queue", "multi-queue-ethernet-default", "default-small" |
Importing Configuration
Command name: /import
The root level command /import [file_name] executes a script stored in the specified file. It will add the configuration from the specified file to an existing configuration. This file may contain any console commands, including scripts. Can be used to restore configuration or parts of it after configuration loss.
Command Description
- file=[filename] - loads the exported configuration from a file to router
Automatic Import
In RouterOS it is possible to automatically execute scripts - your script file has to be named anything.auto.rsc - once this file is uploaded using FTP to the router, it will automatically be executed, just like with the '/import' command. This method only works with FTP.
Once the file is uploaded, it is automatically executed. Information about the success of the commands that were executed is written to anything.auto.log
Example
To load the saved export file use the following command:
Configuration Reset
Command name: /system reset-configuration
Description
The command clears all configuration of the router and sets it to the default including the login name and password ('admin' and no password), IP addresses and other configuration is erased, interfaces will become disabled. After the reset command router will reboot. The default is either the factory default, that you can see in the article Default configurations, or it can be a custom default, that can be loaded by including an RSC file when doing Netinstall or if specified with a branding package.
Command Description
- keep-users: keeps router users, passwords and ssh host keys(since v6.45.1)
- no-defaults: doesn't load any default cofigurations, just clears everything
- skip-backup: automatic backup is not created before reset, when yes is specified
- run-after-reset: specify export file name to run after reset
Note: If run-after-reset is set then no-defaults parameter will be ignored and only the specified script will be loaded!
Warning: Warning: If the device has a folder named "flash", then the confscript.rsc file must be stored in that folder to work with "run-after-reset" command. Everything outside this folder is stored on the RAM drive which contents are deleted on reboot or power cycle.
Warning: If the router has been installed using netinstall and had a script specified as the initial configuration, the reset command executes this script after purging the configuration. To stop it doing so, you will have to reinstall the router.
Example
Import troubleshooting
Configuration parts to watch out for in exported .rsc files
Things that should be removed from export files that were created with: "/export", before attempting import on new device.
- Interface renaming that is in conflict with default ethernet naming scheme.
- In older version exports default entries might show with "add" instead of "set" command. That should be edited before import to avoid errors.
- Check if interface/module: ether/wlan/modem/com/etc count match on new and old device. If there will some missing that will end up in error during .rsc import.
In case of problematic import, attempt the following:
- Reset the configuration on that device.
- Run import command again with "verbose=yes" argument. It will stop also stop import process on problem which you already encountered, but will also show place where export failed. That way showing you place where things need to be edited in .rsc import file
Startup delay
If your configuration relies on interfaces that might not yet have started up upon command execution, it is suggested to introduce delays, or to monitor until all needed interfaces are available. This example script allows you to set how many interfaces you are expecting, and how long to wait until they become available:
The above script will wait until there are 10 interfaces visible, or 30 seconds. If there are no 10 interfaces in this time, it will put a message in the log. Modify the variables according to your needs.
File menu shows all userspace files on the router. It is possible to see and edit file content or delete file. file creation is not possible from this menu. If RouterOS ".npk" package is uploaded, the file menu will also show package-specific information, for example, architecture, build date and time, etc.
If the device has a directory named "flash" in its file list, then files which you want to be kept after the system reboot/power cycle must be stored within it. As anything outside of it is kept within a RAM disk and will be lost upon reboot. This does not include .npk upgrade files as they will be applied by the upgrade process before the system discards the RAM drive content.
For multicore devices with a NAND flash memory (e.g. CCR series routers, RB4011iGS), RouterOS uses a write-back that will cache file changes into RAM memory instead of writing them straight away into flash media. The file changes will be stored on the flash when it is absolutely necessary, the writing can be delayed by up to 40 seconds. This helps to reduce CPU cycles which results in better performance. However, this can cause empty or zero-length files when a device experiences a sudden power loss, because files were not fully saved on a flash.
Properties
| Property | Description |
|---|---|
| contents (string; Default: ) | The actual content of the file |
| creation-time (time) | A time when the file was created |
| name (string) | Name of the file |
| package-architecture (string) | Architecture that package is built for. Applies only to RouterOS ".npk" files |
| package-built-time (string) | A time when the package was built. Applies only to RouterOS ".npk" files |
| package-name (string) | Name of the installable package that. Applies only to RouterOS ".npk" files |
| package-version (string) | A version of the installable package that. Applies only to RouterOS ".npk" files |
| size (integer) | File size in bytes |
| file type (string) | Type of the file. For folders, the file type is the directory |
RouterOS backup feature allows you to save the current device's configuration, which then can be re-applied on the same or a different identical model. This is very useful since it allows you to effortlessly restore the device's configurations or to re-apply the same configuration on a backup device. The system's backup file also contains the device's MAC addresses, which are also restored when the backup file is loaded.
If The Dude and user-manager are installed on the router, then the system backup will not contain configuration from these services. Therefore additional care should be taken to save a configuration from these services, for example, configuration export.
System's backups contain sensitive information about your device and its configuration, always consider encrypting the backup file and keeping the backup file in a safe place.
To save a backup configure the following:
Note that we use "/flash/ "before the actual backup name on the devices with flash memory. As stated above, backups saved outside the flash folder will be deleted after a reboot or power cycle:

На всех роутерах в mikrotik сохранить конфигурацию очень просто, если у вас установлена утилита winbox для конфигурирования RouterOS то лучше всего воспользоваться ей. Открываем ее идем в раздел Files – Backup, далее задаем имя и нажимаем на кнопку «backup».

Если хотите чтоб кроме вас этот бэкап не кто не смог восстановить и прочитать задаем пароль. После у вас создастся файл с именем которое вы задали.

Сохранить настройки mikrotik в файл
Было глупо хранить backup только на самом миrротике, поэтому лучше его сохранить в файл на компьютер. Для этого созданный бэкап нужно просто скачать на компьютер, нажимаем правой кнопкой мыши на имя файла и выбираем download. Но есть одно, но, если вы хотите просмотреть конфигурацию при открытии этого файла текстовым редактором увидите абрукадабру. Для этого случая есть команда «export compact file=config» где «config» это имя фала которое задаётся произвольно.

После ее выполнения в терминале, у вас в разделе file появится файл с именем «config» и расширением script. Его также можно скачать на компьютер и открыть блокнотом для редактирования, в нем будет все в читабельном виде.
Как восстановить микротик из бэкапа
Восстановить микротик из бэкапа так же просто, как и создать его. Если файл backup находится у вас на ПК, загрузите его в роутер после выберете его и нажмите на кнопку «Restore».

После восстановления перезагрузите устройство и настройки вступят в силу. Если вы хотите восстановить старый бэкап на новый роутер убедитесь, что вы знаете от него логин и пароль, так как после применения учетные данные на роутере поменяются на те которые были в файле восстановления. Для тренировки или для того, чтобы посмотреть настройки в бэкапе можете его восстановить на виртуальном роутере, да и вообще все тесты проводить лучше сначала в виртуальной среде. Как это сделать и на чем описано в статье про эмулятор eve-ng.
89 вопросов по настройке MikroTik
Вы хорошо разбираетесь в Микротиках? Или впервые недавно столкнулись с этим оборудованием и не знаете, с какой стороны к нему подступиться? В обоих случаях вы найдете для себя полезную информацию в курсе «Настройка оборудования MikroTik». 162 видеоурока, большая лабораторная работа и 89 вопросов, на каждый из которых вы будете знать ответ. Подробности и доступ к началу курса бесплатно тут.
В данной статье рассмотрим два вида создание и восстановление MikroTik из backup (бэкапа), покажем как настроить и восстановить только config и как полностью сделать копию устройства. И так что делать если ваш девайс случайно/преднамеренно умер или его сбросили к заводским настройкам или же вы хотите тиражировать ваш конфиг на множество устройств. Не стоит упускать из вида тему резервного копирования и конечно у Mikrotik имеются некоторые особенности.
Итого есть 2 вида бэкапов:
Все действия описаны на RouterOS 6.48.2
Бинарный
Это некий слепок вашего девайса RouterOS. Особенность его в том, что он сохраняет абсолютно все что есть на роутере:
- Конфигурацию;
- Пользователей;
- MAC адреса.
Восстановиться вы можете только на таких же устройствах. Т.е. допустим если вы сняли бинарный с одного Mikrotik hAp AC lite, то восстановиться сможете только на этом же hAP AC lite или любом другом, но этой же модели. Проще говоря, на других моделях не откатитесь. Учтите момент с MAC, они так же восстановятся из исходного бэкапа. В бинарном виде вся чувствительная информация (пароли) не скрывается, но есть возможность ее шифрования и тут тоже есть нюансы.
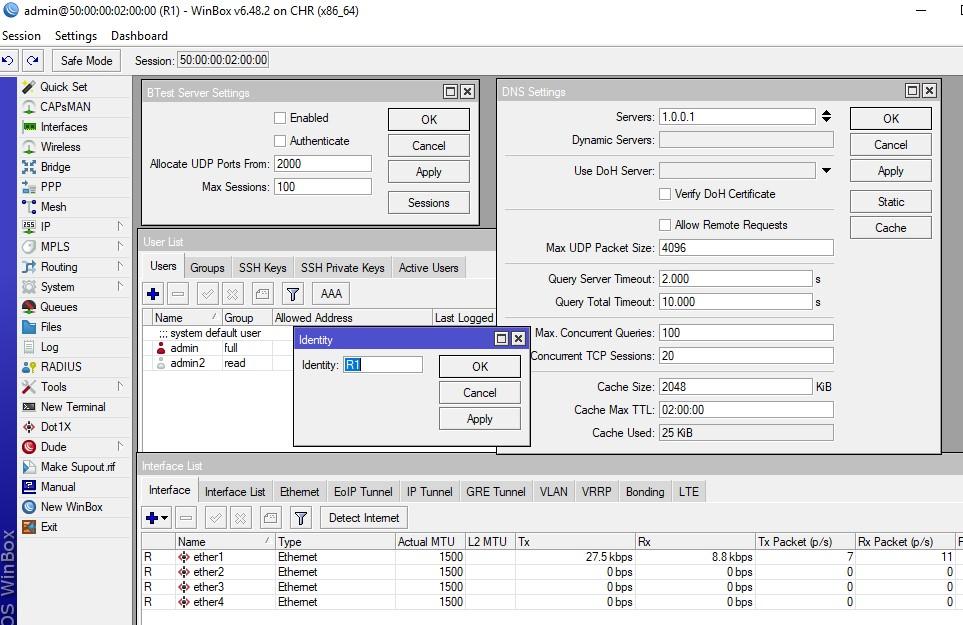
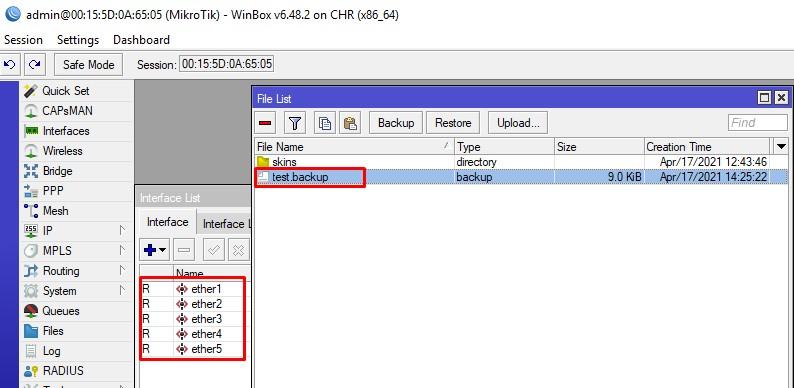
С CHR аналогично, вы можете снять системный бэкап и восстановиться на такой же платформе виртуализации. Итак, у меня есть 2 CHR девайса, оба на EVE-NG с 5-ю портами. Попробуем перенести конфигурацию с первого на второй. Что настроено на EVE-NG:
- Identity – R1;
- DNS сервер 1.0.0.1, время жизни в кэше 2 часа;
- Создан пользователь admin2 с паролём 123;
- Btest сервер выключен.

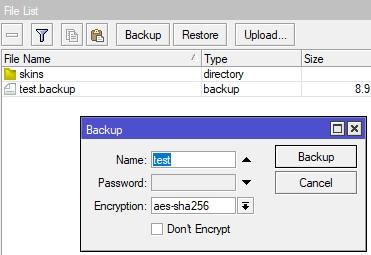
Создадим бинарный бэкап. Открываем File, далее Backup.

Здесь все просто, задаём имя файлу и жмём backup. Создастся обычный файл, без шифрования. Т.е. все чувствительные данные будут не зашифрованы несмотря на то, что Encryption стоит aes-sha-256. Это потому, что пользователь admin в моем случае не имеет пароля.
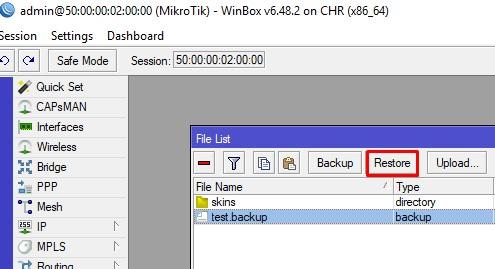
Переносим данный файл на вторую машину. Жмём Restore и ВМ уходит в ребут.

Все параметры восстановились без проблем, кроме MAC адресов, они не изменились к моему большому удивлению. Вы это можете заметить во строке соединения второго устройства.
А теперь давайте попробуем на CHR который хостится на Hyper-V.
Жмём Restore, после чего виртуальная машина уходит в ребут.
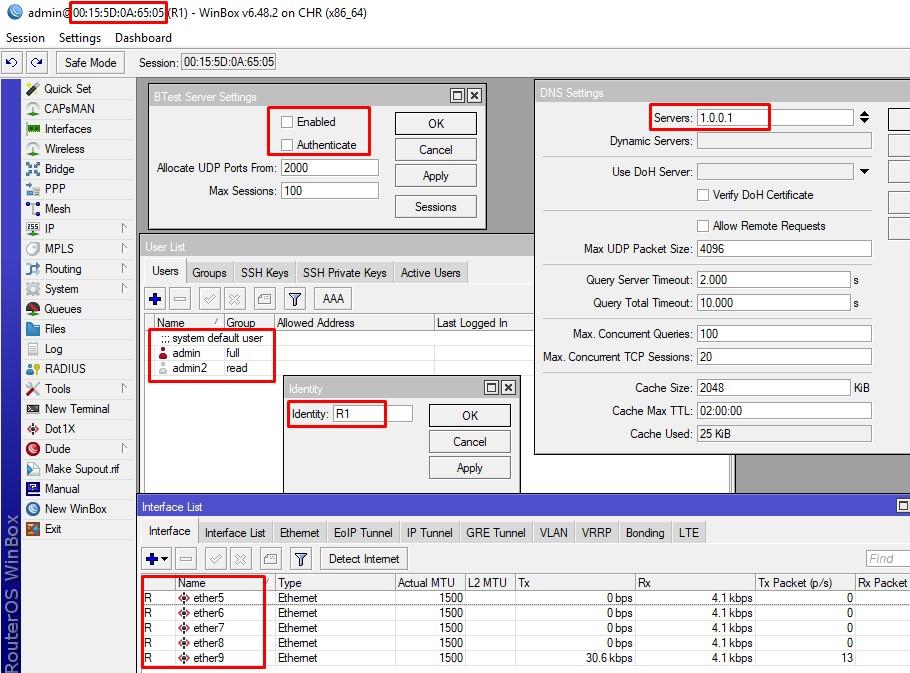
Восстановились без проблем, но обратите внимание на имена интерфейсов. Возможно, это связанно с особенностями платформ виртуализации. Аналогично можно сказать и про MAC адреса.
Теперь стоит обратить внимание на следующие нюансы:
- Если вы не задали имя файлу, то сгенерируется оно автоматически, с identity, полной датой и временем создания;
- Разницы между установленной галочкой Don’t Encryption и отключённой, но не установленным паролём пользователя RouterOS из-под которого запускается процесс – никакой, и там и там файл будет не шифрованный;
- Чтобы зашифровать файл, нужно выполнять резервное копирование с установленным Password (это скорее самый предпочитаемый и верный способ). Если вы его не указали и запустили процесс от пользователя RouterOS с установленным паролём, то файл зашифруется паролём пользователя. В противном случае пункт 2.
В процессе написания статьи я заметил очень интересную вещь на счёт пункта 3. Я создал пользователя test с полными правами, задал ему пароль 1234, выполнил РК под его сессией. Далее перенёс файл на другую машину и нажал restore – о чудо, восстановление прошло без руганей и матов. Для меня это загадка, которую я адресовал поддержке Mikrotik.
Мои эксперименты продолжились, и я решил восстановить бинарный бэкап с моего домашнего Mikrotik hAp AC lite на Hyper-V и EVE-NG. Большинство переехало без проблем, но были нюансы:
- MAC адреса не сменились;
- Интерфейсы снова переименовались и как следствие Bridge не были сконфигурированы корректно. А что делать если у вас VLAN?
Надеюсь, у читателя сложилось правильное понимание, бинарный бэкап портировать на другое оборудование – плохая затея. Для тиражирования не самый лучший вариант.
Экспорт
Этот вид восстановления подойдёт тем кто хочет сделать только backup самого конфига на Микротика. То есть экспорт, это разница, между default config и текущим состоянием. Т.к. я не люблю default config, я всегда сбрасываю в blank и в этом случае, это разница между так сказать 0 и сейчас. Проще говоря:
- Если вы сбросили в «ноль» ваш девайс, настроили его, и сделали export без каких-либо ключей, то на выходе получаете текущий конфиг девайса;
- Если вы сбросили девайс и при сбросе не поставили галочку No Default Configuration, то вы получите тот самый default config, т.е. уже пред настроенный, с бриджами, правилами firewall, NAT. Такой конфиг так же получается через сброс с кнопки.
Экспорт не выгружает информацию о:
- Пользователях RouterOS;
- SNMP Community. Из плюсов;
- Не шифруется по умолчанию.
- Импорт на любой Микротик;
- Возможен частичный импорт;
- Текстовый вид.
Данная утилита доступна только в консоли. Откроем R1 и посмотрим на настройки девайса.

Чтобы сохранить вывод в файл используем команду export file=test_config.

Переносим файлик в абсолютно чистый роутер. Для импорта конфига используем команду import test_config.rsc

Вы так же можете выгрузить частичную информацию.
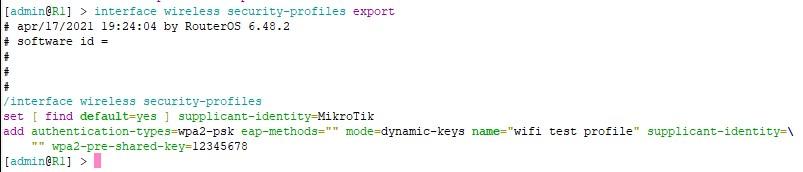
И импортировать просто скопировав нужные строки и вставив в консоль или ключом from-line указать с какой строки производить импорт.
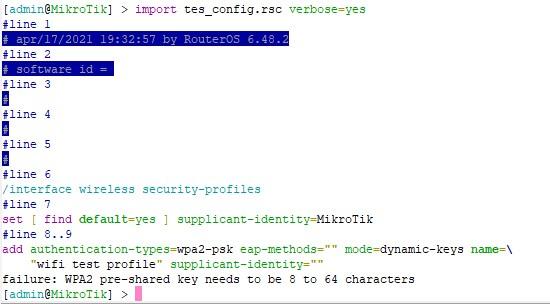
Если нужна полная и исчерпывающая информацию, то используем ключ verbose, он так поможет при импорте, RouterOS расскажет, что ему не понравилось.
И наконец, если хотим скрыть всю чувствительную информацию, используем hide-sensitive. При импорте естественно вся скрытая информация не добавится.
Базовые принципы описанные ваше, помогут вам, создавать тиражируемый конфиг, но это может оказать не простым делом. Вы так же можете сделать скрипт, который будет отправлять бинарный и текстовый бэкап вам на почту или ftp, что поможет следить за версионностью исключительно текстовых.
И так в данной статье мы узнали что резервное копирование и восстановление бэкапа (backup) на роутере MikroTik можно делать двумя способами: импорт только конфига (config) или полностью скопировать устройство на аналогичное, с переносом всей информации которая есть на нем.
89 вопросов по настройке MikroTik
Вы хорошо разбираетесь в Микротиках? Или впервые недавно столкнулись с этим оборудованием и не знаете, с какой стороны к нему подступиться? В обоих случаях вы найдете для себя полезную информацию в курсе «Настройка оборудования MikroTik». 162 видеоурока, большая лабораторная работа и 89 вопросов, на каждый из которых вы будете знать ответ. Подробности и доступ к началу курса бесплатно тут.
Читайте также: