
Как подключиться к oracle cloud instance over ssh
Обновлено: 07.07.2024
The first (and probably easiest) way to connect is with SSH. For this you’ll need:
The public RSA key used when the instance was created
The IP address of the host, either public or private
Navigate to the directory where your public and private keys are stored and make sure the permissions on the private key are set to 400:
Now issue an SSH command to connect to the host. We’ll use the -i switch to provide a path and file name for the private key, and the -l switch to identify the user. For an Oracle Enterprise Linux image the user is opc; for an Ubuntu image, the user is ubuntu.
Congratulations! You’re connected! From here, you can sudo su - to become root and begin working with the instance.
SSH with a key is fine when users are trusted administrators, but the previous method relies on the private RSA key and allows unlimited administrative access to your host. Key based authentication doesn’t require users to enter credentials because the key is the credential.
What if you want to allow untrusted/non-administrative users to gain access and force them to login with a username and password? The answer is a console connection.
OCI includes extensive security that would make building a console connection difficult. Fortunately, OCI makes it easy for administrators to generate connection strings to distribute to users.

Create a Console Connection
In OCI, navigate to your instance. In the lower left you’ll notice the Resources menu. Choose the Console Connections option.
This brings up the Console Connections dialog. Click on the “Create Console Connection” button to create a new connection. You’ll see the connection being provisioned and created.
At this point look to the far right of the connection and notice three dots. Hover over them to reveal the connection options. You’ll see Connect with SSH and Connect with VNC listed.
Connect with SSH
Choose Connect with SSH. This will bring up a new dialog box where you’ll select the client type, either Linux/Mac or Windows. Make the appropriate choice and click on the Copy option.
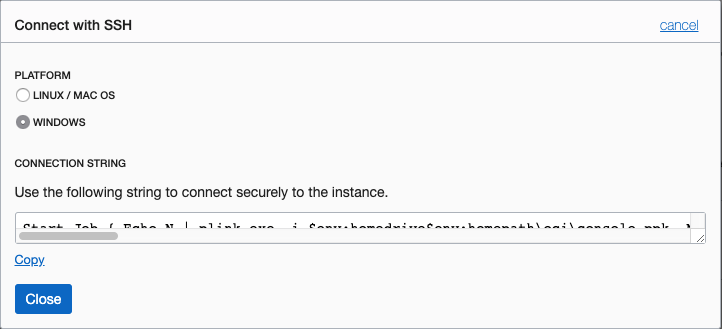
Paste the command into a terminal session (Linux/Mac) or Powershell window (Windows).
If you’re lucky it will work. If you’re like me, it didn’t. I got an error:
I did a little troubleshooting by adding the -v switch to my SSH command, which revealed SSH was trying to connect to an IPv6 address:
I forced an IPv4 address by simply adding the -4 switch to my SSH command, like so:
According to the plink documentation, the same flag works and Windows users should probably be able to modify their command to include the same switch, as so:
I don’t have a Windows machine to confirm this; if I’m wrong, please let me know!
After adding the -4 switch the command worked and I received the expected console login:
You can share this connection string with users that need non-administrative access to your OCI instance.
For users that need a graphical connection to the host, use VNC. The steps to establish a VNC connection are the similar to those for connecting to SSH. Create a connection and hover over the three dots at the far right of the connection. Here, choose Connect with VNC. A very similar dialog box appears, with similar choices for selecting Linux/Mac or Windows.

Again, copy the connection string.
This command is slightly different. Rather than creating a connection, it builds an SSH tunnel to OCI by adding an additional option to the SSH command in the middle:
Without going into too much detail, (-N) tells SSH not to run a command; and (-L) redirects (forwards) traffic sent to port 5900 on the local host to port 5900 on the OCI host. Edit these values If VNC is running on a different port either locally or remotely.
When you run this command it won’t appear to do anything. That’s normal. It’s actively tunneling traffic as long as it’s running. Ctl-C will return control of the session but any VNC session running locally will be lost.
As before, I had to add the -4 switch to the command to get it to work in my environment.
Please note that Oracle develops its cloud services in an agile manner and makes rapid changes to meet our users' needs. Therefore this tutorial may not reflect all of the changes since the last update to this service. For the very latest information see Oracle Database Cloud Service on Oracle Help Center.
Time to Complete
Approximately 30 minutes.
Introduction
When a DBaaS database instance is created, network access to the instance is limited to Secure Shell (SSH) connections on port 22. This access restriction ensures that the instance is secure by default. You can either ask your cloud service administrator to open ports or, as you will learn in this tutorial, you can use SSH client software to create an SSH tunnel to connect securely to the database and its tools. Several SSH clients are freely available, including the SSH utility on Linux platforms and the PuTTY utility on Windows platforms.

For more detailed information on connecting to a database instance and its tools in Oracle Database Cloud Service, see Accessing Database Cloud Service in Using Oracle Database Cloud Service.
Scenario
In this tutorial, you will use the PuTTY utility on Windows to tunnel through an SSH connection to your Database Cloud Service instance hosted on a VM. With that connection established, you can then use your local PC to perform work on the DBaaS database and its tools. In this tutorial, you will use port forwarding to connect from your local PC browser to the Enterprise Manager Express tool in your DBaaS database instance.
SSH Connectivity Steps Required Prior to Performing this Tutorial:
- Before your DBaaS database was created, you or a coworker generated a private and public SSH key pair, perhaps using PuTTY Key Generator.
Note: If you plan to use PuTTY as your SSH client tool on Windows, you must generate the private key using the PuTTY Key Generator (PuTTYgen) utility, to create a PuTTY-compatible version of the private key.

Note: For details on generating an SSH private/public key pair, see Generating a Secure Shell (SSH) Private/Public Key Pair in Using Oracle Database Cloud Service.
- The public key was specified when your database instance was created; a copy of that public key was stored in the VM hosting your database:

Note: For details on creating a database, see Creating a Database Deployment in Using Oracle Database Cloud Service.
SSH Key Authentication Steps You Will Perform in this Tutorial:
When you define in PuTTY an SSH connection to the VM hosting your database, you will specify a copy of the private key stored on your local PC. When you initiate a PuTTY connection, the VM compares the private key to the matching public key stored in the VM. The VM permits the connection when the private and public key match as a valid key pair:

Software Requirements
Note: This release does not support mobile browsers.
Prerequisites
Before starting this tutorial, you should:
- Have already procured and activated a trial or paid subscription to the Oracle Database Cloud Service (DBaaS).
- Have generated a secure shell (SSH) private/public key pair, with a copy of the private key file on your local computer. Your SSH public key was specified when your database instance was created. For details on generating an SSH private/public key pair, see Generating a Secure Shell (SSH) Private/Public Key Pair in Using Oracle Database Cloud Service.
- Have already created a database instance. For details on creating a database, see Creating a Database Deployment in Using Oracle Database Cloud Service.
- Have been given the administrative password that was specified when the database instance was created. In the tutorial, you will need this password to log in to Enterprise Manager Express.
Finding the Connection Details for Your Database Instance
Log in to the Oracle Database Cloud Service (DBaaS) console using the credentials provided by your Oracle Cloud account administrator.
- Your administrator may provide you a link to the My Services console, from which you can choose Oracle Database Cloud Service (DBaaS).
- Or, your administrator may provide you a direct link to the Oracle Database Cloud Service (DBaaS) console.
Click the name of the database to which you want to connect.
Write down the IP address and SID name. (You will not need the SID if you are connecting to the database with Enterprise Manager as in this tutorial, but you would need the SID name if you would be connecting to the database with tools such as SQL Developer.)
Defining the PuTTY Connection
Open the PuTTY utility in your local Windows PC. In the initial dialog, enter the IP address you just noted into the Host Name field. For connection type, choose SSH.
In the Connection category, select Data. For Auto-login username, specify oracle.

Note: Connect as the user oracle to perform most operations; this user does not have root access to the VM. For situations in which you need root access, such as when performing backup and restore operations not covered in this tutorial, you would specify the opc user for the Auto-login name; the opc user can use the sudo command to gain root access to the VM.


- For the source port, specify an available port on your local PC. For convenience in identifying this PuTTY connection definition, it is recommended that you use the same port number as the destination port to which you are forwarding. For this tutorial, specify Source port 5500, since you are port-forwarding to Enterprise Manager Express, whose port on the DBaaS VM is 5500.
- For the target port, specify the IP address you noted for the cloud VM, and append it with :5500.

Connecting to Enterprise Manager Express for Your Cloud Database Instance
Click Open.

Logging In to Enterprise Manager Express
You have created an SSH tunnel to port 5500. While keeping your PuTTY session open, you can now access Enterprise Manager Express.


Summary
In this tutorial, you learned to:
- Use the PuTTY utility to connect to a Database Cloud Service (DBaaS) database instance through an SSH tunnel
- Specify port forwarding in your PuTTY connection, to connect from your local PC browser to Enterprise Manager Express in your DBaaS database instance
Resources
- For more detailed information about connecting to Oracle Database instances in Oracle Database Cloud Service, see Accessing Database Cloud Service in Using Oracle Database Cloud Service.
- To learn more about Oracle Database Cloud Service, visit the Database Cloud Service.
- For training on the Oracle Cloud platform-as-a-service (PaaS) Services, visit the Oracle Learning Library
- Look at these videos on working with the Oracle Database Cloud Service:
- Creating a Database Instance in the Oracle Database Cloud Service
- Connecting to a Database Instance in the Oracle Database Cloud Service
Credits
- Lead Curriculum Developer: Rick Green
- Other Contributors: Mike Fitch, Ben Gelernter, Dom Lindars, Brian Spendolini
To navigate this Oracle by Example tutorial, note the following:
Topic List: Click a topic to navigate to that section. Expand All Topics: Click the button to show or hide the details for the sections. By default, all topics are collapsed. Hide All Images: Click the button to show or hide the screenshots. By default, all images are displayed. Print: Click the button to print the content. The content that is currently displayed or hidden is printed.
To navigate to a particular section in this tutorial, select the topic from the list.
Before You Begin
- You know the public IP address of your instance. See Launching a Linux Instance.
- You know the path to the private key file.
Connecting to Your Linux Instance Using SSH
Log in to the instance using SSH.
Use the following command to set the file permissions so that only you can read the file:
<private_key_file> is the full path and name of the file that contains the private key associated with the instance you want to access.
Use the following SSH command to access the instance.
Note
Copy the following example to ensure the correct characters are used. If the wrong character is used in ssh -i , a Could not resolve hostname . No such host is known. error might occur.
<private_key_file> is the full path and name of the file that contains the private key associated with the instance you want to access.
<username> is the default username for the instance. For Oracle Linux and CentOS images, the default username is opc . For Ubuntu images, the default username is ubuntu .
<public-ip-address> is your instance IP address that you retrieved from the Console .
If the instance uses a key pair that was generated by Oracle Cloud Infrastructure , use the following procedure.
If this is the first time you are using this key pair, you must set the file permissions so that only you can read the file. Do the following:
- In Windows Explorer, navigate to the private key file, right-click the file, and then click Properties.
- On the Security tab, click Advanced.
- On the Permissions tab, for Permission entries, under Principal, ensure that your user account is listed.
- Click Disable Inheritance, and then select Convert inherited permissions into explicit permissions on this object.
- For Permission entries, select each permission entry that is not your user account and click Remove.
- Ensure that the access permission for your user account is Full control.
- Save your changes.
To connect to the instance, open Windows PowerShell and run the following command:
Note
Copy the following example to ensure the correct characters are used. If the wrong character is used in ssh -i , a Could not resolve hostname . No such host is known. error might occur.
<private_key_file> is the full path and name of the file that contains the private key associated with the instance you want to access.
<username> is the default username for the instance. For Oracle Linux and CentOS images, the default username is opc . For Ubuntu images, the default username is ubuntu .
<public-ip-address> is your instance IP address that you retrieved from the Console .
SSH private key files generated by Oracle Cloud Infrastructure are not compatible with PuTTY. If you are using a private key file generated during the instance creation process you need to convert the file to a .ppk file before you can use it with PuTTY to connect to the instance.
Note
If you changed the file permissions on your key to connect from a Windows system using OpenSSH, the key will not work with a PuTTY connection. Use OpenSSH to connect instead.
Convert a generated .key private key file:
Click Load, and select the private key generated when you created the instance. The extension for the key file is .key .
Click Save private key.
Specify a name for the key. The extension for new private key is .ppk .
Click Save.
Connect to the Linux instance using a .ppk private key file:
If the instance uses a key pair that you created using PuTTY Key Generator, use the following procedure.
In the Category pane, select Session and enter the following:
Host Name (or IP address):
<username> is the default username for the instance. For Oracle Linux and CentOS images, the default username is opc . For Ubuntu images, the default username is ubuntu .
<public-ip-address> is your instance public IP address that you retrieved from the Console
Click Browse, and then select your .ppk private key file.
Click Open to start the session.
If this is your first time connecting to the instance, you might see a message that the server's host key is not cached in the registry. Click Yes to continue the connection.
Tip
If the connection fails, you may need to update your PuTTY proxy configuration.
Running Administrative Tasks on the Instance
When you’re logged in as the default user, opc , you can use the sudo command to run administrative tasks.
What's Next
Now that you've got an instance and have successfully connected to it, consider the following next steps:
Install software on the instance.
If you're having trouble connecting, see Troubleshooting the SSH Connection.
Connect from UNIX and UNIX-Like Systems
You can log in to an Oracle-provided Oracle Linux instance as the default user, opc . The opc user has sudo privileges.
You can use SSH to log in to your instance as the default user, opc , by using the following command:
ssh opc@ ip_address —i private_key
In this command, ip_address is the public IP address of the instance, and private_key is the full path and name of the file that contains the private key corresponding to the public key associated with the instance that you want to access.
If an error occurs, see Can’t connect to an instance using SSH in Using Oracle Cloud Infrastructure Compute Classic .
When you’re logged in as the default user, opc , use the sudo command to run administrative tasks.
Connect from Windows
You can log in to an Oracle-provided Oracle Linux instance as the default user, opc . The opc user has sudo privileges. If you’re using a Windows host, you can use PuTTY or any other similar client to connect to your instance using SSH.
Run the PuTTY program.
The PuTTY Configuration window is displayed, showing the Session panel.
In Host Name (or IP address) box, enter the public IP address of your instance.
Confirm that the Connection type option is set to SSH .
In the Category tree, expand Connection if necessary and then click Data .
The Data panel is displayed.
In Auto-login username box, enter opc .
Confirm that the When username is not specified option is set to Prompt .
In the Category tree, expand SSH and then click Auth .
The Auth panel is displayed.
Click the Browse button next to the Private key file for authentication box. Navigate to and open the private key file that matches the public key that is associated with your instance.
In the Category tree, click Session .
The Session panel is displayed.
In the Saved Sessions box, enter a name for this connection configuration and click Save .
Click Open to open the connection.
The PuTTY Configuration window is closed and the PuTTY window is displayed.
If this is the first time you are connecting to an instance, the PuTTY Security Alert window is displayed, prompting you to confirm the public key. Click Yes to continue connecting.
If an error occurs, see Can’t connect to an instance using SSH in Using Oracle Cloud Infrastructure Compute Classic .
When you’re logged in as the default user, opc , use the sudo command to run administrative tasks.
Читайте также: