
Acer travelmate 2480 прошивка bios
Обновлено: 06.07.2024
The BIOS Setup Utility is a hardware configuration program built into your computer's BIOS (Basic Input/ Output System).
Your computer is already properly configured and optimized, and you do not need to run this utility. However, if you encounter configuration problems, you may need to run Setup. Please also refer to Chapter 4 Troubleshooting when problem arises.
To activate the BIOS Utility, press M during POST (when "Press <F2> to enter Setup" message is prompted on the bottom of screen).
Press M to enter setup. The default parameter of F12 Boot Menu is set to "disabled". If you want to change boot device without entering BIOS Setup Utility, please set the parameter to "enabled".
Press <F12> during POST to enter multi-boot menu. In this menu, user can change boot device without entering BIOS SETUP Utility.
PhoenixBIOS Setup Utility
Intel (R) Pentium (R) M processor 1.86GHz
TOSHIBA MK8025GAS - (PM)
IDE1 Serial Number :
IDE2 Model Name :
PIONEER DVD-RW DVR-K15RA - (PS)
IDE2 Serial Number :
System BIOS Ver:
Asset Tag Number
Select Item Select Menu
Select Item Select Menu
Change Values Select ► Su b-Menu
Change Values Select ► Su b-Menu
Setup Defaults Save and Exit
Setup Defaults Save and Exit
There are six menu options: Info., Main, System Devices, Security, Boot, and Exit. Follow these instructions:
- To choose a menu, use the cursor left/right keys (gg).
- To choose a parameter, use the cursor up/down keys ( 00).
- To change the value of a parameter, press por Q.
- A plus sign (+) indicates the item has sub-items. Press to expand this item.
- Press ^^ while you are in any of the menu options to go to the Exit menu.
- In any menu, you can load default settings by pressing g. You can also press g to save any changes made and exit the BIOS Setup Utility.
NOTE: You can change the value of a parameter if it is enclosed in square brackets. Navigation keys for a particular menu are shown on the bottom of the screen. Help for parameters are found in the Item Specific Help part of the screen. Read this carefully when making changes to parameter values. Please note that system information is subject to different models.
PhoenixBIOS Setup Utility
Intel (R) Pentium (R) M processor
IDE1 Model Name :
TOSHIBA MK8025GAS - (PM)
IDE1 Serial Number :
IDE2 Model Name :
PIONEER DVD-RW DVR-K15RA -
IDE2 Serial Number :
System BIOS Ver:
Asset Tag Number
xxxxxxxxxxxxxxxxxxxxxxxxxxxxxxxx 16 Byte
î 4 Select Item
F5/F6 Change Values
F9 Setup Defaults
Ente Select ► Su b-Menu
F10 Save and Exit
This field shows the CPU type and speed of the system.
IDE1 Model Name
This field shows the model name of HDD installed on primary IDE master.
IDE1 Serial Number
This field displays the serial number of HDD installed on primary IDE master.
IDE2I Model Name
This field displays the mofel name of devices installed on secondary IDE master. The hard disk drive or optical drive model name is automatically detected by the system.
IDE2 Serial Number
This field shows the serial number of devices installed on secondary IDE master.
System BIOS ver
Displays system BIOS version.
This field displays the VGA firmware version of the system.
This field shows the keyboard
This field displays the serial number of this unit.
Asset Tag Number
This field displays the asset tag number of the system.
This field shows product name of the system.
This field displays the manufacturer of this system.
This will be visible only when an internal LAN device is presenting. UUID=32bytes
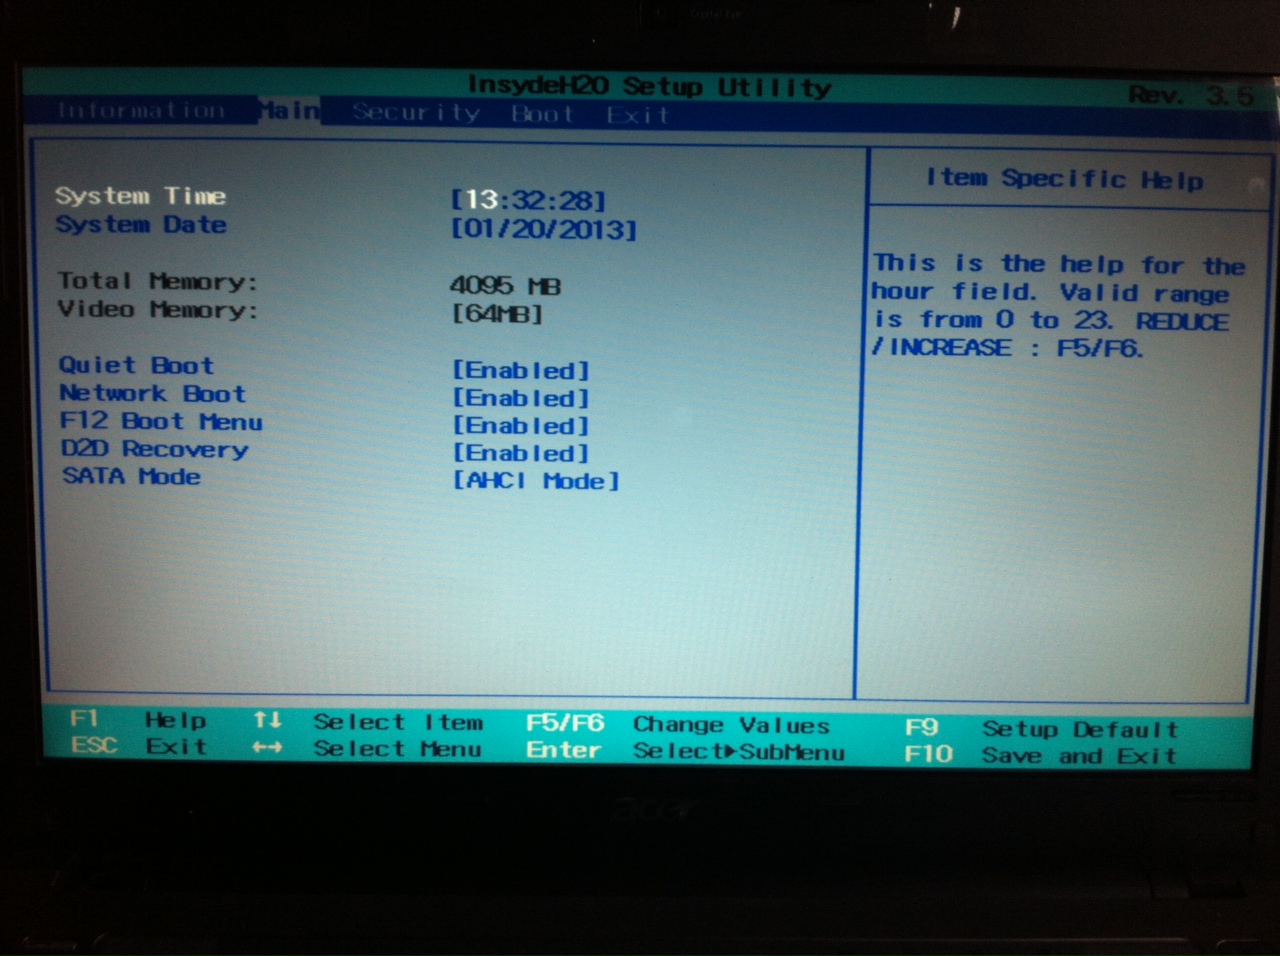
The Main screen displays a summary of your computer hardware information, and also includes basic setup parameters. It allows the user to specify standard IBM PC AT system parameters.
PhoenixBIOS Setup Utility
System Memory: Extended Memory: Video Memory
Quiet Boot: Power on display: Network boot F12 Boot Menu D2D Recovery
640 KB 510 MB [128MB]
Shows system base memo Shows extended memory VGA memory size
<Enter> selects field. ry size size
Item Specific Help
F5/F6 Change Values
F9 Setup Defaults
Ente Select 4 Sub-Menu
F10 Save and Exit
Sets the system time. The hours are displayed with 24-hour format.
Format: HH:MM:SS (hour:minute:second) System Time
Sets the system date.
Format MM/DD/YYYY (month/day/ year)
This field reports the memory size of the system. Memory size is fixed to 640MB
This field reports the memory size of the extended memory in the system.
Extended Memory size=Total memory size-1MB
Shows the VGA memory size. VGA Memory size=64/128MB
Determines if Customer Logo will be displayed or not; shows Summary Screen is disabled or enabled.
Enabled: Customer Logo is displayed, and Summary Screen is disabled. Disabled: Customer Logo is not displayed, and Summary Screen is enabled.
Option: Enabled or Disabled
Power on display
Auto: During power process, the system will detect if any display device is connected on external video port. If any external display device is connected, the power on display will be in CRT (or projector) only mode. Otherwise it will be in LCD only mode.
Both: Simultaneously enable both the integrated LCD screen and the system's external video port (for an external CRT or projector).
Option: Auto or Both
Enables, disables the system boot from LAN (remote server).
Option: Enabled or Disabled
Enables, disables Boot Menu during POST.
Option: Disabled or Enabled
Enables, disables D2D Recovery function. The function allows the user to create a hidden partition on hard disc drive to store operation system and restore the system to factory defaults.
Option: Enabled or Disabled
NOTE: The sub-items under each device will not be shown if the device control is set to disable or auto. This is because the user is not allowed to control the settings in these cases.
The Security screen contains parameters that help safeguard and protect your computer from unauthorized use.
PhoenixBIOS Setup Utility
Item Specific Help
User Password is :
Supervisor Password is :
Set User Password
controls accesses of the
Set Supervisor Password
whole setup utility.
It can be used to
boot up when Password
on boot is enabled.
Password on Boot
Help t i Select Item F5/F6 Change Values F9 Setup Defaults
Exit ^ - Select Menu Ente Select 4 Sub-Menu F10 Save and Exit
User Password is
Shows the setting of the user password.
Supervisor Password is
Shows the setting of the Supervisor password
Set User Password
Press Enter to set the user password. When user password is set, this password protects the BIOS Setup Utility from unauthorized access. The user can enter Setup menu only and does not have right to change the value of parameters.
Set Supervisor Password
Press Enter to set the supervisor password. When set, this password protects the BIOS Setup Utility from unauthorized access. The user can not either enter the Setup menu nor change the value of parameters.
Enables or disables primary hard disk security function.
Password on Boot
Defines whether a password is required or not while the events defined in this group happened. The following sub-options are all requires the Supervisor password for changes and should be grayed out if the user password was used to enter setup.
Disabled or Enabled
NOTE: When you are prompted to enter a password, you have three tries before the system halts. Don't forget your password. If you forget your password, you may have to return your notebook computer to your dealer to reset it.
Setting a Password
Follow these steps as you set the user or the supervisor password:
1. Use the Q and Y keys to highlight the Set Supervisor Password parameter and press the |E key. The Set Supervisor Password box appears:
Set Supervisor Password Enter New Password [ ]
Confirm New Password [ j
2. Type a password in the "Enter New Password" field. The password length can not exceeds 8 alphanumeric characters (A-Z, a-z, 0-9, not case sensitive). Retype the password in the "Confirm New Password" field.
IMPORTANT:Be very careful when typing your password because the characters do not appear on the screen.
After setting the password, the computer sets the User Password parameter to "Set".
- If desired, you can opt to enable the Password on boot parameter.
- When you are done, press g to save the changes and exit the BIOS Setup Utility.
Removing a Password
Follow these steps:
1. Use the 0 and Q keys to highlight the Set Supervisor Password parameter and press the key. The Set Password box appears:
Set Supervisor Password
Enter curr ent p as swo rd [
Enter New Password f
Confirm Mew Password [
- Type the current password in the Enter Current Password field and press .
- Press twice without typing anything in the Enter New Password and Confirm New Password fields. The computer then sets the Supervisor Password parameter to "Clear".
- When you have changed the settings, press g to save the changes and exit the BIOS Setup Utility.
Changing a Password
1. Use the 0 and Q keys to highlight the Set Supervisor Password parameter and press the key. The Set Password box appears:
Set Supervisor Password
Enter current p as swo rd [
Enter New Password [
Confirm New Password [
- Type the current password in the Enter Current Password field and press .
- Type a password in the Enter New Password field. Retype the password in the Confirm New Password field.
- Press . After setting the password, the computer sets the User Password parameter to "Set".
- If desired, you can enable the Password on boot parameter.
- When you are done, press g to save the changes and exit the BIOS Setup Utility.
If the verification is OK, the screen will display as following. The password setting is complete after the user presses g.
If the current password entered does not match the actual current password, the screen will show you the Setup Warning.
If the new password and confirm new password strings do not match, the screen will display the following message.
Setup Warning Password do not match Re-enter Password
This menu allows the user to decide the order of boot devices to load the operating system. Bootable devices includes the distette drive in module bay, the onboard hard disk drive and the CD-ROM in module bay.

Есть несколько причин, провоцирующих надобность обновлять BIOS. Владельцы лэптопов от Acer при необходимости могут выполнить установку новой версии прошивки. Несмотря на отсутствие сложностей, во время обновления нужно быть предельно осторожным и внимательным, чтобы необдуманные действия не привели к дополнительным сложностям.
Обновление BIOS на ноутбуке Acer
Чаще всего пользователи решают выполнить обновление по следующим причинам:
- Замена процессора, для работы которого требуется более свежая оболочка;
- Подключение внешнего жесткого диска с объемом памяти, превышающим возможности имеющейся сборки БИОС;
- В процессе модернизации ПК, для адаптивной работы элементов, требующих более расширенных возможностей системы;
- Для разгона видеокарты либо процессора; при повреждении текущей версии оболочки.
В данной статье описаны возможные способы проведения обновления БИОС на ноутбуке Acer, выполнение которых вы производите на свой страх и риск!
Стоит обозначить, что начинать такой процесс следует с определения текущей версии и поиска наличия более свежей сборки. Помимо этого далее будет описана подробная инструкция по обновлению оболочки с указанием рекомендаций касательно правильной установки БИОС.
Шаг 1: Определение установленной сборки BIOS
Существует несколько способов для просмотра такой информации, среди которых вы можете выбрать для себя наиболее удобный:


Шаг 2: Загрузка файла прошивки BIOS
В первую очередь следует отметить, что скачивание любых установочных файлов нужно осуществлять только с официального источника конкретного производителя того или иного компонента. В данном случае вам понадобится перейти на ресурс от Acer и выполнить там следующие действия:
- В открывшемся окне браузера найдите необходимый файл обновления одним из двух способов: введите серийный номер лэптопа или выберите устройство вручную, указав категорию компьютера, серию и модель.


Прежде чем запускать установку, закройте все работающие программы и отключите антивирус, чтобы не вызвать сбой инсталляции и ускорить перезагрузку системы.


Примечание! Стоит отметить, что наиболее правильным вариантом является поэтапная установка обновлений. Это означает, что, к примеру, если у вас сборка 1.32, а на сайте разработчика имеются 1.35, 1.36, 1.37 и самая свежая 1.38, то лучше скачать сначала следующую версию после вашей, произвести все вышеуказанные процедуры, проверить, решена ли проблема. Если нет, то можно скачивать следующую прошивку.
Установка BIOS поверх
Такая процедура необходима в случае, если имеющиеся системные файлы были повреждены и нуждаются в переустановке. Для этих целей вам потребуется выполнить все указанные выше в шагах 1 и 2 процедуры, но на этапе загрузки файла обновления нужно скачать такую же версию, как у вас уже установлена. Все остальное выполняется аналогичным образом.
В некоторых случаях у пользователей Acer появляется желание откатить прошивку до предыдущей версии. Сделать это не получится, так как система просто выдаст ошибку в процессе подобных манипуляций и потребует загрузки более свежей сборки.
Восстановление работоспособности ноутбука при неправильной установке прошивки
Если по каким-то причинам в процессе инсталляции произошел системный сбой либо любая другая ситуация, повлекшая за собой полный отказ работы системы, выполните одну из ниже представленных инструкций:
- Этот вариант подходит для гаджетов фирмы Acer, у которых БИОС не UEFI (об этом можно узнать в технической документации устройства либо на официальном сайте). Итак, скачайте нужную версию прошивки, распакуйте архив и скопируйте папку DOS на заранее отформатированную под FAT32 флешку. Вставьте ее в нерабочий ноутбук, зажмите клавиши Fn + Esc и, удерживая их, включите питание. Данные клавиши необходимо держать около 30 секунд, пока система сама не перезагрузится, в процессе чего произойдет восстановление системы.
- Если вы все же обладатель последних моделей лэптопов Эйсер, то единственным выходом из ситуации будет обращение в сервисный центр для возобновления работоспособности устройства. Дело в том, что процедура вынуждает разобрать компьютер, отпаять процессор от системной платы, вставить его в специальный программатор, с помощью которого стирается установленная прошивка и заливается новая.
Примечание! Чтобы избежать превращения вашего девайса в «кирпич», строго придерживайтесь указанных в данной статье инструкций и на 100% убедитесь в целесообразности обновления.
Заключение
В любом случае, при успешном процессе перепрошивки ваш лэптоп точно не будет работать хуже. А вот избавление от проблемы, из-за которой было принято решение обновить BIOS, может не произойти. Дело в том, что существует огромное количество других причин, связанных с вирусами, поврежденными или некачественными драйверами, вредоносным ПО либо плохой сборкой операционной системы, которые влияют на низкую работоспособность ноутбука Acer.

Отблагодарите автора, поделитесь статьей в социальных сетях.
Обычному пользователю использовать BIOS придётся в случае, если понадобится произвести специальные настройки компьютера, переустановить ОС. Несмотря на то, что БИОС есть на всех компьютерах, процесс входа в него на ноутбуках Acer может различаться в зависимости от модели, производителя, комплектации и индивидуальных настроек ПК.
Варианты входа в BIOS на Acer
Если у вас ноутбук менее распространённой линейки, то, чтобы произвести вход в BIOS, придётся использовать специальные клавиши или их комбинации. Список горячих клавиш выглядит так: F1, F2, F3, F4, F5, F6, F7, F8, F9, F10, F11, F12, Delete, Esc. Также есть модели ноутбуков, где встречаются их сочетания с использованием Shift, Ctrl или Fn.
В технической документации к ноутбуку должно быть написано, какая именно клавиша или их сочетание ответственны за вход в BIOS. Если же вы не можете найти бумаги, которые прилагались к устройству, то произведите поиск по официальному сайту производителя.

После ввода в специальную строку полного названия ноутбука можно будет просмотреть необходимую техническую документацию в электронном формате.

Отблагодарите автора, поделитесь статьей в социальных сетях.
The BIOS Setup Utility is a hardware configuration program built into your computer's BIOS (Basic Input/ Output System).
Your computer is already properly configured and optimized, and you do not need to run this utility. However, if you encounter configuration problems, you may need to run Setup. Please also refer to Chapter 4 Troubleshooting when problem arises.
To activate the BIOS Utility, press M during POST (when "Press <F2> to enter Setup" message is prompted on the bottom of screen).
Press M to enter setup. The default parameter of F12 Boot Menu is set to "disabled". If you want to change boot device without entering BIOS Setup Utility, please set the parameter to "enabled".
Press <F12> during POST to enter multi-boot menu. In this menu, user can change boot device without entering BIOS SETUP Utility.
PhoenixBIOS Setup Utility
IDE1 Model Name : IDE1 Serial Number : ATAPI Model Name:
Genuine Intel (R) CPU 1730 MHz
HTS541010G9AT00 MP20QAX0J4M0ZR TSSTcorpCD/DVDW TS-L632D
System BIOS Version: V0.310
Serial Number Asset Tag Number Produce Name Manufacturer Name: UUID:
xxxxxxxxxxxxxxxxxxxxxx 22 Byte
Select Item Select Menu
Select Item Select Menu
Change Values Select ► Su b-Menu
Change Values Select ► Su b-Menu
Setup Defaults Save and Exit
There are six menu options: Info., Main, System Devices, Security, Boot, and Exit. Follow these instructions:
- To choose a menu, use the cursor left/right keys (gg).
- To choose a parameter, use the cursor up/down keys ( 00).
- To change the value of a parameter, press por Q.
- A plus sign (+) indicates the item has sub-items. Press to expand this item.
- Press ^^ while you are in any of the menu options to go to the Exit menu.
- In any menu, you can load default settings by pressing g. You can also press g to save any changes made and exit the BIOS Setup Utility.
NOTE: You can change the value of a parameter if it is enclosed in square brackets. Navigation keys for a particular menu are shown on the bottom of the screen. Help for parameters are found in the Item Specific Help part of the screen. Read this carefully when making changes to parameter values. Please note that system information is subject to different models.
Читайте также: