
Currency sign в ворде что это
Обновлено: 02.07.2024
Currency Sign was approved as part of Unicode 1.1 in 1993.
Properties
| Age | 1.1 |
| Block | Latin-1 Supplement |
| Bidi Paired Bracket Type | None |
| Composition Exclusion | No |
| Case Folding | 00A4 |
| Simple Case Folding | 00A4 |
Related characters
German Penny Sign
Thai Currency Symbol Baht
Livre Tournois Sign
Fullwidth Won Sign
Fullwidth Yen Sign
Khmer Currency Symbol Riel
New Sheqel Sign
Encoding
| Encoding | hex | dec (bytes) | dec | binary |
|---|---|---|---|---|
| UTF-8 | C2 A4 | 194 164 | 49828 | 11000010 10100100 |
| UTF-16BE | 00 A4 | 0 164 | 164 | 00000000 10100100 |
| UTF-16LE | A4 00 | 164 0 | 41984 | 10100100 00000000 |
| UTF-32BE | 00 00 00 A4 | 0 0 0 164 | 164 | 00000000 00000000 00000000 10100100 |
| UTF-32LE | A4 00 00 00 | 164 0 0 0 | 2751463424 | 10100100 00000000 00000000 00000000 |
Sets with this symbol:

Symbols for Instagram

Symbols for Steam

Symbols for Facebook

Symbols for Youtube
Every world currency has an assigned code, used on currency exchange markets, and a currency code symbol which is typically used when pricing goods in a store, or dishes in a restaurant for example. Some of them might be familiar - some less so. If you’re wondering which currency symbol you need, we have you covered.
Wherever you’re off to, here’s all you need to know about some of the different currency symbols of the world.
Need to manage money in multiple currencies or countries? Wise could help
Before you get started, a word.
Banks often charge hefty fees for foreign and multi-currency accounts. And if you’ve already tried managing multiple accounts in multiple countries, you know it’s rarely simple.
Wise could help. With Wise, it’s free to open a borderless multi-currency account with no monthly fees. There, you can manage and send dozens of different currencies all from the same account. All around the world. (Likely, for a lot cheaper than your bank.)
Now, back to what you came here to read.
World currencies symbols and signs
Currency symbols are a quick and easy way to show specific currency names in a written form. It’s a convenient shorthand, replacing the words with a graphic symbol for ease - for example $40 instead of the full version - 40 US dollars. It’s worth noting that currency symbols are fairly standardised, but do have small variations. For example, the symbol for USD could be written with 2 vertical lines instead of 1, without any change to the meaning.
When travelling somewhere new, it’s helpful to recognise the currency symbol as you’re likely to see it on restaurant menus, or in stores. You might also need to know how to type currency symbols - as only a small number are displayed on the average computer keyboard.
If you want to make an international money transfer you might be better off if you use a specialist service such as Wise. Click here to check out which of these currencies are supported by Wise.
Do I write the currency symbol before or after the sum?
This depends on the currency and the local custom. Some currencies are fairly consistently written before the amount - especially in english speaking countries and South America. So in the US, for example, you’d see an amount written $100.
However, in some European countries it is common to use the symbol at the end of the amount - so you might see 50€ written in France or Germany.
In other places, you’ll find the currency symbol in the place you might expect a decimal separator, so 20$00, for example.
List of currency symbols: Europe
List of currency symbols: Middle East and Africa
List of currency symbols: The Americas
List of currency symbols: Asia &* The Pacific region
List of currency symbols: Cryptocurrencies
Cryptocurrencies like Monero, Litecoin and Ethereum use existing characters to mark their currency. The latter has no official symbol yet though, according to Wikipedia.
List of currency symbol shortcuts on keyboard
| Currency | Currency code | Currency symbol | Currency symbol on Mac keyboard | Currency symbol on Windows keyboard |
|---|---|---|---|---|
| Euro | EUR | € | Shift+Option+2 | Alt+E |
| Pounds sterling | GBP | £ | Option+3 | Alt+L |
| US dollar | USD | $ | Shift+4 | Shift+4 |
| Japanese yen | JPY | ¥ | Option+Y |
What did we miss? If you know of any other shortcuts for these major currency symbols, let us know in the comments section below.
How to insert currency symbols in Word
If you need to enter an unfamiliar currency symbol into a word document, it can be done pretty simply with just a few steps. If you know the keyboard shortcut (from the list above), then simply use that to insert the correct symbol into your document.
If you don’t know the shortcut, then try this:
- Open the document you want to work on
- Click Insert, and then Symbol (it’s in the top right of the tool bar)
- This brings up a small selection of common symbols - if the one you want is there, simply click it to enter it into your document
- If the one you want isn’t among these, select More Symbols, which you’ll find right underneath
- You’ll see a larger selection of symbols in a dialogue box
- Choose Currency Symbols from the drop down box to make sure you have the right selection to choose from
- Click on the symbol you want, to enter it into your document
Helpfully, when you select a currency symbol within the dialogue box, it tells you what it is, and also what the keyboard shortcut for that symbol is. That should make it easier to find next time.
If you struggle to find a currency symbol, it could be because the font you’re using isn’t set up to handle that particular symbol. Try changing the font to see different options. For example if you're looking for the Arabic symbol for the Emirati dirham, you’d need to choose a font with Arabic characters. And if it seems like it is very hard to find a match on your own, you can always do a quick search on the web.
How to insert currency signs in Excel
If you’re using an Excel document and need to insert a currency sign, then you have 2 options. You can either follow the same steps as laid out above for Microsoft Word, or you can format the cell. If you choose to format the cell, any number you type into it will get the currency symbol, and be converted into a currency format. That means that even if you type a number, delete it and enter a new figure, it’ll still be formatted as your chosen currency.
To format the cell to show a currency you’ll have to:
- Open the document you’re working on and select the cell you want to format
- Right click, and from the menu, choose Format Cells
- In the dialogue box, choose Currency from the categories drop down list
- Find the symbol you want in the drop down list to the right of the categories
- Click OK, and you’re done
Having formatted your cell, you can type in a number, and hit return. You’ll see it’s turned into a currency format, with the symbol you selected. So for example, if you chose the £ sign, and typed in 54, the cell would show £54.00. Smart, huh?
In case you want to look into currency symbols a bit more, here’s some useful resources for you:
Whether you're travelling abroad and curious about the local currency or just were looking for how to add a currency symbol to your document - hopefully you’ve found it.
All sources checked on October 19, 2018
This publication is provided for general information purposes only and is not intended to cover every aspect of the topics with which it deals. It is not intended to amount to advice on which you should rely. You must obtain professional or specialist advice before taking, or refraining from, any action on the basis of the content in this publication. The information in this publication does not constitute legal, tax or other professional advice from TransferWise Limited or its affiliates. Prior results do not guarantee a similar outcome. We make no representations, warranties or guarantees, whether express or implied, that the content in the publication is accurate, complete or up to date.
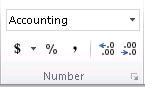
If you want to display numbers as monetary values, you must format those numbers as currency. To do this, you apply either the Currency or Accounting number format to the cells that you want to format. The number formatting options are available on the Home tab, in the Number group.
In this article
Format numbers as currency
You can display a number with the default currency symbol by selecting the cell or range of cells, and then clicking Accounting Number Format in the Number group on the Home tab. (If you want to apply the Currency format instead, select the cells, and press Ctrl+Shift+$.)
If you want more control over either format, or you want to change other aspects of formatting for your selection, you can follow these steps.
Select the cells you want to format
On the Home tab, click the Dialog Box Launcher next to Number.
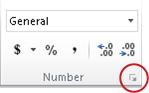
Tip: You can also press Ctrl+1 to open the Format Cells dialog box.
In the Format Cells dialog box, in the Category list, click Currency or Accounting.

In the Symbol box, click the currency symbol that you want.
Note: If you want to display a monetary value without a currency symbol, you can click None.
In the Decimal places box, enter the number of decimal places that you want for the number. For example, to display $138,691 instead of $138,690.63 in the cell, enter 0 in the Decimal places box.
As you make changes, watch the number in the Sample box. It shows you how changing the decimal places will affect the display of a number.
In the Negative numbers box, select the display style you want to use for negative numbers. If you don't want the existing options for displaying negative numbers, you can create your own number format. For more information about creating custom formats, see Create or delete a custom number format.
Note: The Negative numbers box is not available for the Accounting number format. That's because it is standard accounting practice to show negative numbers in parentheses.
To close the Format Cells dialog box, click OK.
Remove currency formatting
If you want to remove the currency formatting, you can follow these steps to reset the number format.
Select the cells that have currency formatting.
On the Home tab, in the Number group, click General.
Cells that are formatted with the General format do not have a specific number format.
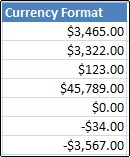
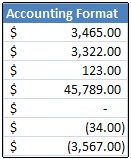
What's the difference between the Currency and Accounting formats?
Both the Currency and Accounting formats are used to display monetary values. The difference between the two formats is explained in the following table.
Description
When you apply the Currency format to a number, the currency symbol appears right next to the first digit in the cell. You can specify the number of decimal places that you want to use, whether you want to use a thousands separator, and how you want to display negative numbers.
Tip: To quickly apply the Currency format, select the cell or range of cells that you want to format, and then press Ctrl+Shift+$.
Description
Like the Currency format, the Accounting format is used for monetary values. But, this format aligns the currency symbols and decimal points of numbers in a column. In addition, the Accounting format displays zeros as dashes and negative numbers in parentheses. Like the Currency format, you can specify how many decimal places you want and whether to use a thousands separator. You can't change the default display of negative numbers unless you create a custom number format.
Tip: To quickly apply the Accounting format, select the cell or range of cells that you want to format. On the Home tab, in the Number group, click Accounting Number Format . If you want to show a currency symbol other than the default, click the arrow next to the Accounting Number Format button and then select another currency symbol.
Create a workbook template with specific currency formatting settings
If you often use currency formatting in your workbooks, you can save time by creating a workbook that includes specific currency formatting settings, and then saving that workbook as a template. You can then use this template to create other workbooks.
Create a workbook.
Select the worksheet or worksheets for which you want to change the default number formatting.
How to select worksheets
Click the sheet tab.

If you don't see the tab that you want, click the tab scrolling buttons to display the tab, and then click the tab.
Two or more adjacent sheets
Click the tab for the first sheet. Then hold down Shift while you click the tab for the last sheet that you want to select.
Two or more nonadjacent sheets
Click the tab for the first sheet. Then hold down Ctrl while you click the tabs of the other sheets that you want to select.
All sheets in a workbook
Right-click a sheet tab, and then click Select All Sheets on the shortcut menu.
Tip When multiple worksheets are selected, [Group] appears in the title bar at the top of the worksheet. To cancel a selection of multiple worksheets in a workbook, click any unselected worksheet. If no unselected sheet is visible, right-click the tab of a selected sheet, and then click Ungroup Sheets.
Select the specific cells or columns you want to format, and then apply currency formatting to them.
Make any other customizations that you like to the workbook, and then do the following to save it as a template:
Save the workbook as a template
If you’re saving a workbook to a template for the first time, start by setting the default personal templates location:
Click File, and then click Options.
Click Save, and then under Save workbooks, enter the path to the personal templates location in the Default personal templates location box.
This path is typically: C:\Users\Public Documents\My Templates.

Once this option is set, all custom templates you save to the My Templates folder automatically appear under Personal on the New page (File > New).
Click File, and then click Export.
Under Export, click Change File Type.
In the Workbook File Types box, double-click Template.
In the File name box, type the name you want to use for the template.
This article explains digital signatures (also known as digital ID), what they can be used for, and how you can use digital signatures in the following Microsoft Office programs: Word, Excel, and PowerPoint.
In this article
What is a digital signature?
A digital signature is an electronic, encrypted, stamp of authentication on digital information such as e-mail messages, macros, or electronic documents. A signature confirms that the information originated from the signer and has not been altered.
Signing certificate and certificate authority
Signing certificate To create a digital signature, you have to have a signing certificate, which proves identity. When you send a digitally-signed macro or document, you also send your certificate and public key. Certificates are issued by a certification authority, and like a driver’s license, can be revoked. A certificate is usually valid for a year, after which, the signer must renew, or get a new, a signing certificate to establish identity.
Note: You can learn more about public and private keys in this article.
Certificate authority (CA) A certificate authority is an entity similar to a notary public. It issues digital certificates, signs certificates to verify their validity and tracks which certificates have been revoked or have expired.
Tip: For more information on obtaining a digital certificate see Obtain a digital certificate and create a digital signature.
What does a digital signature guarantee?
Authenticity The signer is confirmed as the signer.
Integrity The content has not been changed or tampered with since it was digitally signed.
Non-repudiation Proves to all parties the origin of the signed content. Repudiation refers to the act of a signer denying any association with the signed content.
Notarization Signatures in Word, Excel, or PowerPoint files, which are time stamped by a secure time-stamp server, under certain circumstances, have the validity of a notarization.
To make these assurances, the content creator must digitally sign the content by using a signature that satisfies the following criteria:
The digital signature is valid.
The certificate associated with the digital signature is current (not expired).
The signing person or organization, known as the publisher, is trusted.
Important: Signed documents, which have a valid time stamp, are considered to have valid signatures, regardless of the age, or revocation status, of the signing certificate.
The certificate associated with the digital signature is issued to the signing publisher by a reputable certificate authority (CA).
Signature lines in Word and Excel
A signature line resembles a typical signature placeholder that might appear in a printed document. However, it works differently. When a signature line is inserted into an Office file, the author can specify information about the intended signer, and instructions for the signer. When an electronic copy of the file is sent to the intended signer, this person sees the signature line and a notification that their signature is requested. The signer can:
Type a signature, or
Select a picture of an inked signature, or
Write a signature by using the inking feature of a touch-screen PC
When the signer adds a visible representation of a signature to the document, a digital signature is added at the same time to authenticate the signer's identity.
Important: A digitally-signed document becomes read-only to prevent modifications.
Create a signature line in Word or Excel
In the document or worksheet, place your pointer where you want to create a signature line.
On the Insert tab, in the Text group, click the Signature Line list, and then click Microsoft Office Signature Line.

In the Signature Setup dialog box, type information that will appear beneath the signature line:
Suggested signer The signer's full name.
Suggested signer's title The signer's title, if any.
Suggested signer's e-mail address The signer's e-mail address, if needed.
Instructions to the signer Add instructions for the signer, such as "Before signing the document, verify that the content is correct."
Select one or both of the following check boxes:
Allow the signer to add comments in the Sign dialog box Allow the signer to type a purpose for signing.
Show sign date in signature line The date the document was signed will appear with the signature.
Tip: To add additional signature lines, repeat these steps.
Note: If the document remains unsigned, the Signatures Message Bar appears. Click View Signatures to complete the signature process.

Sign the signature line in Word or Excel
When you sign a signature line, you add a visible representation of your signature and a digital signature.
In the file, right-click the signature line.
Note: If the file opens in Protected View, click Edit Anyway, if the file is from a reliable source.
From the menu, select Sign.
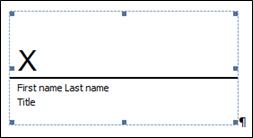
To add a printed version of your signature, type your name in the box next to the X.
To select an image of your written signature, click Select Image. In the Select Signature Image dialog box, find the location of your signature image file, select the file that you want, and then click Select.
For customers using Chinese- (Traditional or Simplified), Korean-, or Japanese-language versions, the Stamp Signature Line option appears.
In addition, you can sign a signature line by double-clicking the signature line. Type your name next to the X. Or, in the Signature Pane, in the Requested Signatures section, click the arrow next to the signature. From the menu, select Sign.
To add a handwritten signature (Tablet PC users only), sign your name in the box next to the X by using the inking feature.
Click Sign.
The Signatures button appears at the bottom of the document or worksheet.
The following image shows the Signatures button.

Remove digital signatures from Word or Excel
Open the document or worksheet that contains the visible signature you want to remove.
Right-click the signature line.
Click Remove Signature.
Note: In addition, you can remove a signature by clicking the arrow next to the signature in the Signature Pane. Click Remove Signature.
Invisible digital signatures in Word, Excel, or PowerPoint
An invisible digital signature, such as a visible digital signature line, assures the authenticity, integrity, and origin of a document. You can add invisible digital signatures to Word documents, Excel workbooks, and PowerPoint presentations.
Signed documents will have the Signatures button at the bottom of the document. In addition, for signed documents, signature information appears in the Info section that you see after you click the File tab.
Add invisible digital signatures in Word, Excel, or PowerPoint
To protect the authenticity of a document's content, you can add an invisible digital signature. Signed documents have the Signatures button at the bottom of the document.
Click the File tab.
Click Info.
Click Protect Document, Protect Workbook or Protect Presentation.
Click Add a Digital Signature.
Read the Word, Excel, or PowerPoint message, and then click OK.
In the Sign dialog box, in the Purpose for signing this document box, type the purpose.
Click Sign.
After a file is digitally signed, the Signatures button appears, and the file becomes read-only to prevent modifications.
Remove invisible digital signatures from Word, Excel, or PowerPoint
Open the document, worksheet, or presentation that contains the invisible signature you want to remove.
Click the File tab.
Click Info.
Click View Signatures.
The document, worksheet, or presentation view returns, and the Signatures pane appears.
Читайте также: