
Как удалить voicemod с компьютера
Обновлено: 07.07.2024
Voicemod доступен бесплатно, но важные функции, такие как возможность создавать свои собственные голосовые моды и Meme Sound Machine (фактически настраиваемая дека), недоступны для бесплатных пользователей.
Voicemod бесплатный?
В настольном приложении Voicemod вы можете оформить подписку и отменить будущие платежи. Как отменить подписку Voicemod PRO: Откройте Voicemod.
Как использовать Voicemod бесплатно?
- Откройте игру или приложение.
- Зайдите в настройки звука игры.
- Установите виртуальное аудиоустройство Voicemod в качестве входа.
- Установите наушники в качестве выхода.
Да, поскольку Voicemod не является вредоносным ПО или вирусом, вы можете легко и полностью удалить это приложение со своего компьютера, выполнив тот же процесс удаления, который вы выполняете для удаления других законных программ.
Voicemod Safe 2020?
Сколько стоит Voicemod?
20 долларов за пожизненную лицензию, 10 долларов за год, 3 или 4 доллара за 3 месяца. Когда вы загрузите его и нажмете получить Voicemod pro, он покажет вам варианты цен.
Как мне избавиться от вируса Voicemod?
Откройте диспетчер устройств. Выберите виртуальное аудиоустройство Voicemod (WDM) и щелкните красный крест. Отметьте вариант удаления программного обеспечения драйвера и удаления.
Voicemod работает в диссонансе?
Voicemod работает на OBS?
Voicemod работает с Zoom?
Дека для ZOOM, Google Hangouts, Duo и Houseparty
Просто настройте виртуальную линию Voicemod в качестве входа и наслаждайтесь воспроизведением звуков, троллингом или обменом аудио или звуковыми мемами со встроенной звуковой платы. Новый способ взаимодействия с ZOOM, Google Hangouts, Duo и Houseparty.
Может ли дерзость изменить ваш голос?
Смены голоса незаконны?
Какой самый безопасный преобразователь голоса?
Список лучших Discord Voice Changer
- Рыба-клоун.
- VoiceMod.
- VoiceMeeter.
- MorphVOX.
- Voxal Voice Changer.
- Изменитель голоса.
- Изменитель голоса с эффектами.
- Изменитель голоса в Discord.
Законен ли Voxal Voice Changer?
Когда вы пытаетесь обмануть своих друзей, изменив свой голос в Discord, нажмите Zoom или Fortnite, это определенно облом, узнать, что ваш Voicemod Voice Changer не работает. Но не волнуйтесь, вы попали в нужное место. Здесь мы собрали для вас несколько рабочих решений, опробуем их и сразу же исправим вашу проблему.
Попробуйте эти исправления
Возможно, вам не нужно пробовать все исправления. Просто двигайтесь вниз, пока не найдете тот, который вам подходит.
- Перезагрузите компьютер
- Убедитесь, что ваш микрофон настроен правильно.
- Установите все обновления Windows
- Переустановите драйверы Voicemod.
Исправление 1. Перезагрузите компьютер
Если перезагрузка компьютера не помогает. Если вам не повезет, просто проверьте следующее исправление ниже.
Исправление 2: Убедитесь, что ваш микрофон настроен правильно
Затем вам нужно убедитесь, что ваш микрофон настроен правильно и работает без проблем. Неправильные настройки могут помешать правильной работе Voicemod.
Вы можете выполнить следующие действия, чтобы проверить:
- На клавиатуре нажмите Win + I ( Клавиша с логотипом Windows и клавиша i) одновременно, чтобы открыть приложение настроек Windows. Нажмите Система .
- Слева. в меню выберите Звук .
- Сначала вам нужно проверить свой микрофон. В разделе Input установите для устройства ввода физическое (например, гарнитуру) вместо виртуального микрофона Voicemod. Затем нажмите Свойства устройства и проверьте микрофон .
- Убедитесь, что вы сняли флажок рядом с Отключить , а ползунок в разделе Громкость установлен на 100 .
- Щелкните Начать тест и коснитесь микрофона или говорите в него. Затем нажмите Остановить тест . Если вам будет предложено Наибольшее значение, которое мы видели, было xx (xx> 0) процентов , это означает, что ваш микрофон работает правильно.
- В правом нижнем углу экрана щелкните правой кнопкой мыши значок звука и выберите Звуки ..
- Перейдите на вкладку Запись , дважды щелкните свой физический микрофон, чтобы просмотреть его свойства.
- Во всплывающем окне в окне перейдите на вкладку Дополнительно . В разделе Формат по умолчанию проверьте, можете ли вы выбрать частоту дискретизации. Если да, измените его на 2-канальный, 16 бит, 44100 Гц (качество компакт-диска) . Нажмите OK .
- В окне на шаге 7 выберите Виртуальное аудиоустройство Microphone Voicemod и нажмите Установить по умолчанию . Затем нажмите OK .
Теперь вы можете перезапустить Voicemod и посмотреть, работает ли он.
Если проблема все еще существует, вы можете взглянуть на следующее исправление.
Исправление 3 : Установите все обновления Windows
Windows 10 включает 2 типа обновлений, которые соответственно предлагают исправления безопасности и повышение производительности. Иногда обновления Windows автоматически устраняют некоторые конфликты программного обеспечения или драйверов. Учитывая это, проблему с голосовым чатом можно легко решить, обновив систему .
Вот краткое руководство для этого:
- На клавиатуре нажмите Win + I (клавиша с логотипом Windows и клавиша i), чтобы открыть приложение «Параметры Windows». Нажмите Обновление и безопасность .
- Нажмите Проверить обновления . После этого Windows автоматически выполнит поиск и установит обновления системы.
После завершения перезагрузите компьютер и проверьте, правильно ли работает Voicemod.
Если это исправление не работает для вас, просто попробуйте следующее ниже.
Исправление 4: переустановите драйверы Voicemod
Сначала вам нужно удалить драйвер Voicemod:
- На клавиатуре нажмите Win + R (клавиша с логотипом Windows и клавиша r) одновременно, чтобы вызвать окно «Выполнить». Введите или вставьте devmgmt.msc и нажмите OK , чтобы открыть диспетчер устройств.
- Щелкните, чтобы развернуть Аудиовходы и выходы . Щелкните правой кнопкой мыши микрофон (виртуальное аудиоустройство Voicemod (WDM)) и выберите Удалить устройство .
- Во всплывающем окне нажмите Удалить .
- Перезагрузите компьютер.
Затем вам нужно будет установить драйвер Voicemod. Вы можете сделать это вручную или автоматически.
Вариант 1. Установите драйвер Voicemod вручную
Если вы знакомы с компьютерным оборудованием, вы можете попробовать установить драйвер вручную. Для этого просто посетите официальный веб-сайт Voicemod и следуйте инструкциям по установке.
Вариант 2: установить драйвер Voicemod автоматически (рекомендуется)
Если у вас нет время, терпение или навыки работы с компьютером, чтобы установить драйвер Voicemod вручную, вместо этого вы можете сделать это автоматически с помощью Driver Easy . Driver Easy автоматически распознает вашу систему и найдет правильные драйверы для ваших устройств, и ваша версия Windows, и она загрузит и установит их правильно:
Pro-версия Driver Easy поставляется с полной технической поддержкой . Если вам нужна помощь, обратитесь в службу поддержки Driver Easy по адресуПосле установки драйвер Voicemod, перезагрузите компьютер и посмотрите, сможете ли вы изменить свой голос с помощью Voicemod.
Итак, это исправления вашей проблемы с Voicemod, которая не работает. Если у вас есть какие-либо вопросы или идеи, не стесняйтесь оставлять комментарии, и мы скоро свяжемся с вами.
Hello, I have installed Voicemod microphone and used it for a while, but actually I’m a bit disappointed as the sound quality is very low. I can hear various noise sounds in the background, so I would like to uninstall it. I removed Voicemod via Control Panel, but still, I see a blue icon near the clock and can hear my own voice when using the microphone. Can someone explain to me how to uninstall the program completely?
- Step 1. Stop Voicemod-related processes
- Step 2. Uninstall Voicemod application via Control Panel
- Step 3. Set the Windows default audio device to your headset and mic
- Prevent websites, ISP, and other parties from tracking you
- Recover your lost files quickly
- References
Voicemod is a real-time voice changer and soundboard app for Windows, Linux, and Mac OSx. It’s available as a desktop app or online service, which service can be run on Discord, Skype, CSGO, Hangouts, Viber, as well as online games, including PUBG, Apex Legends, League of Legends, VALORANT, CoD Warzone, Minecraft, GTA V, Fortnite, and many others.
Upon installation, the app is installed on the Programs and Features folder in Windows or Applications folder on Macs and is bound to the microphone of the device. Subsequently, Voicemod starts receiving the audio signal from a mic, which is processed in real-time using the selected effect. The processed signal is further sent to the output device, such as speakers, recorders, or headset.
The original app is safe to use and does not exhibit unwanted activities on the host machine. Nevertheless, Reddit [1] and other popular forums are filled with people’s questions is Voicemod a virus. Some people reported that the installation of this app triggered many advertisements while browsing the Internet. The others reported an unrecognized tracking software installed alongside.
Voicemod is a legitimate voice changer application that may cause some difficulties in terms of removal
Moreover, the biggest risk to download some rogue advertising software is installing Voicemod License keys and cracks [2] . Such downloads are not only illegal but can also be used for malware distribution. Therefore, it is very important to download the app from its direct download website, Play Store, or App Store. Other sources are not monitored and can bundle Voicemod with unwanted programs.
Usually, the audio sounds can be fixed by installing Voicemod V2 BETA, which has multiple improvements and bug fixes. Besides, users can set the background noise reduction to zero and disable the mic exclusive mode to address the problem. Nevertheless, we will provide a guide on how to delete Voicemod for those who have determined to get rid of an app anyway.
Step 1. Stop Voicemod-related processes
To uninstall these files, you have to purchase licensed version of Reimage Reimage uninstall software.Voicemod removal may not be allowed if any of the related processes keep running in the background. To terminate all its components, perform these steps:
- Press Ctrl + Shift + Esc on your keyboard to open Task Manager window
- Click on More details at the bottom to expand the full window
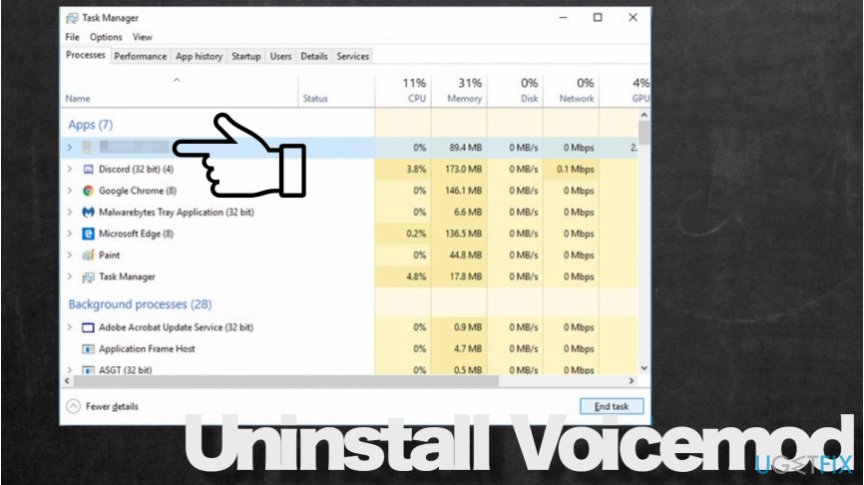
Before Voicemod removal, you have to stop all related processes from running
- Locate VoicemodDesktop.exe, right-click on it, and press End Task at the bottom-right corner.
- Double-check if there are no other processes related to the app.
Step 2. Uninstall Voicemod application via Control Panel
To uninstall these files, you have to purchase licensed version of Reimage Reimage uninstall software.A default location for all legitimate Windows apps is the Add or Remove programs folder. Therefore, upon terminating the processes, you should navigate to the mentioned location and uninstall Voicemod installer:
- Open Windows search by pressing Windows key and S simultaneously to open search.
- Type in Control Panel and press Enter
- Navigate to Programs > Uninstall a Program
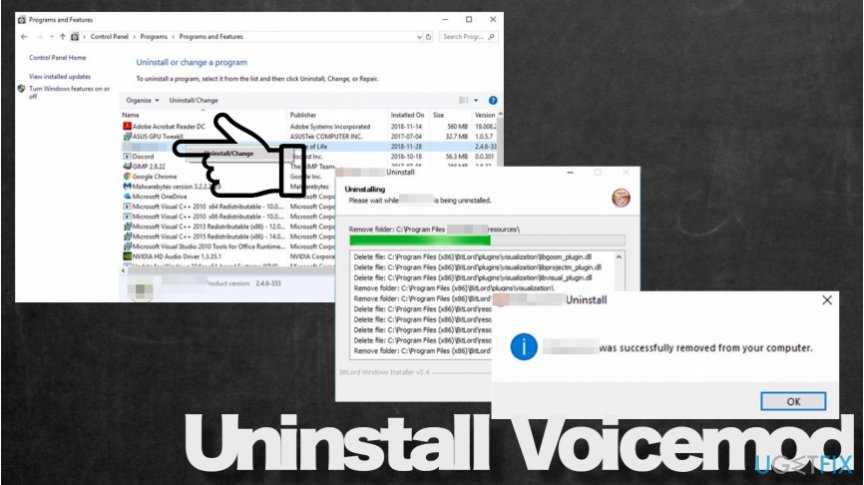
Uninstall Voicemod application from the Control Panel. The uninstaller will delete all related files
- Find Voicemod on the list and double-click the entry
- Click Next on the install setup window
- In the next window, click Remove and then press Next
- Finally, approve the removal by clicking Remove
Step 3. Set the Windows default audio device to your headset and mic
To uninstall these files, you have to purchase licensed version of Reimage Reimage uninstall software.To finish up with the Voicemod removal, make sure to also set the Windows default audio device to your headset and microphone. Otherwise, the microphone may not be working:
- Press Windows key + R to open the Run dialog box
- Type mmsys.cpl in the Run dialog and press Enter
- Click on the Headsets entry and click Set default button at the bottom-right corner of the window
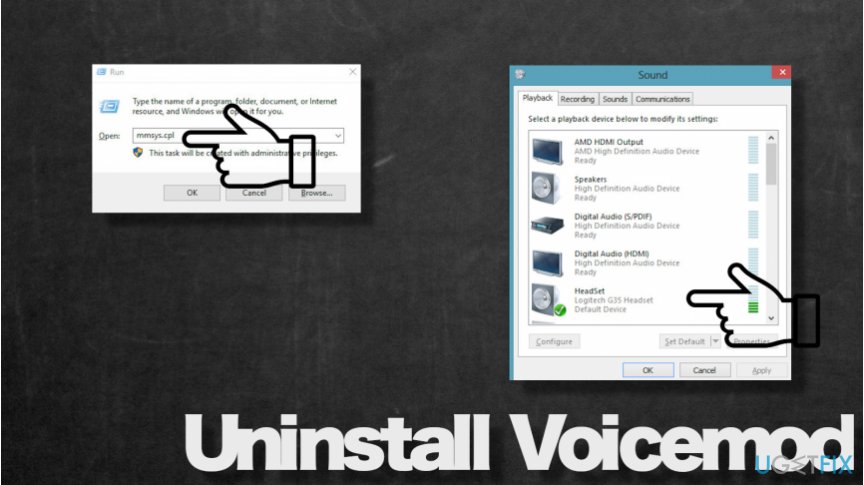
Voicemod removal can initiate unwanted changes in sound settings, thus resetting the settings may be necessary
- Then navigate to the Recording tab and click on the Microphone option.
- Select Set default button
- Finally, click Apply and close the window.
After all, if you want to do double-check if the Voicemod uninstall process was successful, click a small arrow on the bottom toolbar of the start screen near the clock. If there is no blue Voicemod-related icon, the app has successfully been removed.
Last, but not least, if you have downloaded this application from third-party download website, torrent sharing website, or used a crack to illegally use the software for free, there is a high risk that you have downloaded a potentially unwanted program (PUP) or a virus along with it. If you see many ads when web browsing, ransom websites contain hyperlinks, redirects to doubtful websites, the system runs very slowly, software crashes, and similar things happen, then we recommend you to boot into Safe Mode and scan your PC with a reputable anti-malware.
Да, поскольку Voicemod не является вредоносным ПО или вирусом, вы можете легко и полностью удалить это приложение со своего компьютера, выполнив тот же процесс удаления, который вы выполняете для удаления других законных программ.
Как мне полностью избавиться от Voicemod?
Откройте диспетчер устройств. Выберите виртуальное аудиоустройство Voicemod (WDM) и щелкните красный крест. Отметьте вариант удаления программного обеспечения драйвера и удаления. Перезагрузите компьютер.
Как мне избавиться от Voicemod на Reddit?
Voicemod опасен?
Voicemod бесплатный?
Работает ли Voicemod в командах Microsoft?
Voicemod работает с Zoom?
Дека для ZOOM, Google Hangouts, Duo и Houseparty
Просто настройте виртуальную линию Voicemod в качестве входа и наслаждайтесь воспроизведением звуков, троллингом или обменом аудио или звуковыми мемами со встроенной звуковой платы. Новый способ взаимодействия с ZOOM, Google Hangouts, Duo и Houseparty.
Как выключить Voicemod pro?
Как отменить подписку Voicemod PRO
Как использовать Voicemod?
КАК НАСТРОИТЬ VOICEMOD
- Скачайте Voicemod и установите.
- Закройте все коммуникационные программы.
- Откройте Voicemod.
- Если вы впервые запускаете Voicemod, следуйте инструкциям по установке. Если нет, откройте Настройки.
- Выберите свой микрофон в качестве устройства ввода.
- Выберите наушники в качестве устройства вывода.
- Щелкните ОК.
Почему Voicemod не работает на Discord?
Проверьте настройки звука в Discord
Убедитесь, что микрофон с пометкой Voicemod Virtual Audio выбран в качестве устройства ввода. Аналогичным образом откройте приложение Voicemod. Внизу должна быть опция с просьбой включить смену голоса или нет. Убедитесь, что он включен.
Как разблокировать Voicemod в брандмауэре Windows?
Как разблокировать приложение Voicemod в брандмауэре Windows
Voicemod безопасен для Reddit?
Нет ничего безопасного на 100%. Требуется одно неработающее обновление, и оно удалит ваши файлы. Такое случается даже с Microsoft. Voicemod точно не вирус.
Morphvox pro хорош?
5.0 из 5 звезд Весело использовать! Отличное программное обеспечение для изменения голоса, которое можно использовать по-разному. Удовольствие для всех возрастов и простота использования. Подходит для других проектов, если вам нужно настроить для него один или два голоса.


| 139 | уникальных посетителей |
| 0 | добавили в избранное |

So you want to make a mod for TF2 that changes voices, sounds or anything sound related in Tf2?
Do you know a little bit about Windows, Sound-editing, or TF2?
Was your answer to those questions "Yes", "a little" or "Nope"?
Then you've come to the right place because this guide is aimed to be comprehensive for everyone that can at least turn on a computer. (Also running a windows machine. sorry mac and linux)
Woah there tiger we can't just illy nilly run out there and think stuff is going to work.. First i need to tell you about this lovely thing called "SV_PURE".
So SV_PURE 1 is basically a bouncer that checks if your sound is custom or not. He checks his list and if your sound is on the list it can get loaded and played on the server. If not. well tough luck. playing these sounds only works on community servers (Unless your server has sv_pure 1 and the process repeats)
First of all we need to enable your console. This is done by going to your steam library searching tf2 and right clicking it. Then select "Properties"Afterwards click on "Set launch options"
Now just type "-console" without the quotation marks and launch the game. Your game should now launch with lots of stuff in it.
Now with your console launched and ready to read out some text, join a casual match and pause the game.
After pausing the game, the console should come back up and you should be able to type "Sv_pure" in it and hit enter. Something like this should come up
In this list we can see that most of the custom items and things are marked as "trusted source" which basically means that modded content cannot be applied. Though we can use things we put in /sounds/vo/ which is the voice directory used by. well voicelines. That is marked by any. So to the time of this guide. Voicefiles are completely gucci.
I cannot help you with things that might happen when using this script. IN THEORY this can work but i've never tested it for myself (Even though the screaming flamethrower is quite hilarious) Using this script should not get you on VACcation but it is AGAINST VALVES TOS.
I WILL NOT BE RESPONSIBLE FOR YOUR BAN. just getting that outa my way.
Now that everything is prepaired and you know what to do let's get started with getting a soundfile. That can be either you screaming into your mic. "SPY!" or just a generic voiceline you "LEGALLY" ripped from someones youtube video. (Hey i won't judge)
So let's say you want to change the announcer ladies "5 - 4 -3 -2- 1" countdown to someone else saying it. Then you need to get 5 different files for each second.
I for example go for TooftyTv counting down from 5 and encapsuled every second into an own voicefile like this.
Now since we got the source file we need to figure out what file to replace. Open the TF2 Properties again. and head over to the Local Files
After clicking "Browse local files" you should be brought to your "Team Fortress 2" directory.
Now continue into your "tf" directory and find a .vpk file named "tf2_sound_vo_english_dir.vpk". Open that file.
After opening the archive you should see something along the lines of this: (If you can't open the archive restart your computer or set the default program to open the VPK as "GCF-SCAPE")
Follow along the folders until you find a load of files and search for your desired file.
To make it easier for us you can imagine the file to be named somewhat like this:
- announcer_ends_5sec.mp3
- announcer_ends_4sec.mp3
- announcer_ends_3sec.mp3
- announcer_ends_2sec.mp3
- announcer_ends_1sec.mp3
Now since you allready are in your gcf scape you also might have noticed the little list on the left going "root -> sound -> vo".
That list is actually quite important aswell because as you might have realised they allign with our SV_PURE which allows ANYTHING beeing played from that folder.
Remember that path aswell (or write it down) as we will need to recreate it now in our custom folder.
To get there you open up your tf folder again and instead of opening a vpk you need to open up the custom folder, much alike you would with a custom hud.
If you never installed anything before your custom folder should only have a readme.txt and a workshop folder, which you can savely delete.
create a new folder and name it accordingly (I named mine 5 second toofty thingie)
inside that folder create a new folder called sound (like in the structure from before)
Inside THAT folder create (you guessed it) a "vo" folder. and open it again. Now copy your soundfiles that you prepaired and paste them into this very folder. After that you need to rename them according to your list.
Your filepath and folder should now look something like this:
If you were to load up your game it should TECHNICALLY work. BUT to be sure i'd reccommend you looking into the last section first.
If you want to be 100% sure that it should work (and you didn't mess anything else up) you only need to do one thing. Changing the sample rate of your file. It sounds complicated, but really it isn't if you follow my steps carefully.
First up; open Audacity.
Then drag your soundfile into audacity so your file will get displayed at the top and the soundwaves get displayed
Now just simply change the project rate at the bottom left to 44100 like this
After that click on file -> export -> export as MP3 and . export it! (Do not change any settings)
IF Audacity starts crying about a missing mp3 codec just follow the steps it throws at you and install the codec off the wiki (it can be abit iffy but i trust in you, that you can do it!)
After doing that all your files should be at a 44100 Sample rate and working accordingly.
Читайте также: