
Не работает motion blur after effects
Обновлено: 07.07.2024
Welcome to the Community!
We have a brand new look! Take a tour with us and explore the latest updates on Adobe Support Community.
Adobe Support Community
Auto-suggest helps you quickly narrow down your search results by suggesting possible matches as you type.- Home
- After Effects
- Discussions
- No motion blur on 3D layers
Copy link to clipboard
Motion blur is toggled on a layer as well as 3d. These layers are connected through a null & a camera layer, I even tried it with a layer without the camera and still no luck. I have it on classic 3d render and have motion blur toggled in the main bar.
Be kind and respectful, give credit to the original source of content, and search for duplicates before posting. Learn more1 Correct answer
Adobe Community Professional , Jan 07, 2021 Jan 07, 2021 Rick Gerard • Adobe Community Professional , Jan 07, 2021 Jan 07, 2021 Check the preview options. In both screenshots the Fast Previews icon is blue. That means that Fast Previews could be set to Fast Draft and that gives you no motion blur visible on 3D layers with the Classic 3D rendering option selected. Motion blur is not available for 3D layers with the C4D rendering option. You have to use an adjustment layer with Pixel Motion Blur or CC Force Motion Blur turned on if you use the C4D rendering option.Copy link to clipboard
Check the advanced composition settings.
Be kind and respectful, give credit to the original source of content, and search for duplicates before posting. Learn moreCopy link to clipboard
I've been using these settings for a while & have never had any problems.. Any setting suggestions that could fix this issue?
Be kind and respectful, give credit to the original source of content, and search for duplicates before posting. Learn moreCopy link to clipboard
You've cropped of important parts of your timeline - it's not clear what's missing.
Did you enable Motion Blur for the layer?
Copy link to clipboard
Here is a full print screen, motion blur is enabled for the layer.
Be kind and respectful, give credit to the original source of content, and search for duplicates before posting. Learn moreCopy link to clipboard
I uninstalled After Effects and reinstalled it and STILL have this issue.
Be kind and respectful, give credit to the original source of content, and search for duplicates before posting. Learn moreCopy link to clipboard
If the animation is a small change in Y Rotation, you'll barely notice the Motion Blur along the left and right edge of the source footage. Try creating a greater change in values.
Motion Blur should be more obvious if you do a change in Z Rotation, let's say 0x to 180x. You'll see the Motion Blur for sure.
Regardless of which axis you animate, the Motion Blur will be more obvious as you get further away from the Anchor Point and less obvious as you get closer to it (the further pixels are moving faster than the closer ones).
Be kind and respectful, give credit to the original source of content, and search for duplicates before posting. Learn moreCopy link to clipboard
The change is 0x to -207x, I have saved this as a preset for months and there is always motion blur except at the start of this week. I tried using camera and I noticed there was no blur when creating a slide so I tried this old preset and noticed it wasn't just camera, it was any layer that had 3D enabled.
Be kind and respectful, give credit to the original source of content, and search for duplicates before posting. Learn moreCopy link to clipboard
There is no way to tell how much motion blur should be expected from your screenshot. We need to know how fast the layer is rotating and how many pixels per frame the edges move. We also need to know the shutter angle. You can zoom into the frame level in the timeline, show us the speed graph and give us an idea of what is going on. I'm showing you everything in this screenshot and explaining why motion blur is working on the edges but not in the center of the image. If your footage is only moving about 10 pixels per frame on the edge then you are not going to see very much motion blur on the edges when it is rotating. If you are only rotating on the Y-axis there is not going to be much motion blur in the center of the image because the details do not change position very much between frames. I hope this clears things up:
Welcome to the Community!
We have a brand new look! Take a tour with us and explore the latest updates on Adobe Support Community.
Adobe Support Community
Auto-suggest helps you quickly narrow down your search results by suggesting possible matches as you type.- Home
- After Effects
- Discussions
- My motion blur is not working at all.
Copy link to clipboard
I recently got After Effects and motion blur has not been working ever since I installed it. I am clicking the right button for motion blur in the timeline and it isn't working. I checked the composition settings and the shutter angle is at 180 and the shutter phase is at -90 and still no luck. The CC force motion blur and the Pixel motion blur are not working either. I wonder if it's because I am using a Mac. any solutions?
Be kind and respectful, give credit to the original source of content, and search for duplicates before posting. Learn moreCopy link to clipboard
you must also activate the motion blur from composition timeline, so did you click this button?
Also you must have some object in action (move, rotate, scale. ) to be able to see the motion blur, so if you want to apply a motion blur on a footage, it's a different story, and in this case you can use the CC force motion blur and if you don't see any result try to increase the shutter angle value as much as you need.
Be kind and respectful, give credit to the original source of content, and search for duplicates before posting. Learn moreCopy link to clipboard
+1 on OussK's comment. Did it help?
If not, let us know more about the computer that you're using. Which OS are you on?
I wonder if it's because I am using a Mac. any solutions?
I don't think that should be an issue.
Be kind and respectful, give credit to the original source of content, and search for duplicates before posting. Learn moreCopy link to clipboard
Remember that to be able to visualize the motion blur you need two actions: activate the Motion Blur in the Layer and activate it in the Timeline, both must be activated, otherwise it will not help you if you activate only one.
Be kind and respectful, give credit to the original source of content, and search for duplicates before posting. Learn moreCopy link to clipboard
Hi, I have the same problem, I am on Windows 10. I have both icons checked nut no blur at all when moving rotating whatever.
Be kind and respectful, give credit to the original source of content, and search for duplicates before posting. Learn moreCopy link to clipboard
No, it's not because you're using a Mac.
It's most likely because you set the 3D Renderer to CINEMA 4D. This disables Motion Blur.
gocemkd, this is probably what you're experiencing as well.
Be kind and respectful, give credit to the original source of content, and search for duplicates before posting. Learn moreCopy link to clipboard
Shutter angle in the comp settings + speed of motion + preview mode can add effect how motion blur is being displayed. We can't tell what you are doing without a screenshot showing the modified properties of the layers giving you problems. The C4D rendering engine also disables motion blur. There is no bug that I have seen reported so this is almost certainly user error.
To test motion blur create a new comp, make sure that the shutter angle is 180º in the advanced settings, add a rectangle using the rectangle tool in the top left corner of the composition, Press Alt/Option + p to set a position keyframe, press Shift + Ctrl/Cmnd + right arrow to move forward 10 frames, use the selection tool (v) to grab the rectangle and move it to the bottom left corner of the composition, move back 5 frames so you are in the middle of the move and turn on motion blur for the layer and motion blur for the timeline. You should see this:
Welcome to the Community!
We have a brand new look! Take a tour with us and explore the latest updates on Adobe Support Community.
Adobe Support Community
Auto-suggest helps you quickly narrow down your search results by suggesting possible matches as you type.- Home
- After Effects
- Discussions
- motion blur switch not showing on layer?
Copy link to clipboard
I'm trying to set a motion blur on a simple shape with 3 key frames scaling it up & down. I see the main Blur Icon - but doen't see the one that sets it for the shape /layer I am trying to affect. Below is a screenshot. Many thanks! BTW - I'm in CS6.
Be kind and respectful, give credit to the original source of content, and search for duplicates before posting. Learn more1 Correct answer
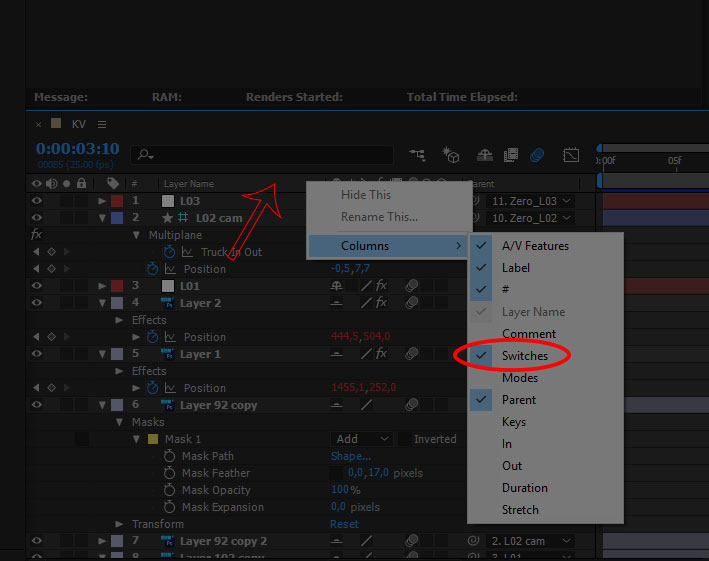
Press F4 on your keyboard.If that wont work just press RMB bar with your collumns (red arrow on screenshot), and chose collumns and turn on Switches.Copy link to clipboard
Press F4 on your keyboard.
If that wont work just press RMB bar with your collumns (red arrow on screenshot), and chose collumns and turn on Switches.
Copy link to clipboard
Thank you! I hope you don't mind my asking - what does RMB Bar mean? Again - Many thanks for the speedy reply.
Be kind and respectful, give credit to the original source of content, and search for duplicates before posting. Learn moreCopy link to clipboard
BTW - is there a way to contol Blur amount? Like if I wanted it super blurry?
Be kind and respectful, give credit to the original source of content, and search for duplicates before posting. Learn moreCopy link to clipboard
RMB - right mouse button I think
BTW - is there a way to contol Blur amount? Like if I wanted it super blurry?
in the composition settings, under advanced you will see shutter angle and can control the blur through that. what ever you want to know just use the search bar in the upper right corner of your ae interface. type the term you want to explore - you will be then directed to the adobe help files. I recommend choosing "support" to narrow the search to just help articles and not forum.
here's the motion blur help file:
Be kind and respectful, give credit to the original source of content, and search for duplicates before posting. Learn moreCopy link to clipboard
Roei - as always your help is a Joei!
Be kind and respectful, give credit to the original source of content, and search for duplicates before posting. Learn moreCopy link to clipboard
Hi Karen, didn't we agree you cover all the basics first?? if we didn't.. we should have! motion blur is basic - back to the fundamentals for you! give me twenty! tutorials. After Effects tutorials
Be kind and respectful, give credit to the original source of content, and search for duplicates before posting. Learn moreCopy link to clipboard
LOL! I wish I could come to Israel & enroll in your courses! But I gotta tell you - the old way wasn't working - by the time I worked my way thru the lynda.com FOURTEEN AE Basics videos - I forgot what was in the early ones! But what's finally been working for me is a baby steps tutorial at Udemy. I'm actually having fun! If I were back in school - I would have been able to cut that painful time (TWO YEARS) of so much frustration! Because I'm off by myself, so - until recently I didn't realize that what I was intrested in was Shape Layers & motion graphics. So Im having a blast in this little Animate Logos course. The lessons are from ONE (. ) to 5 minutes long. The instructor calls them "ingredients" for using later in "recipes" when you combine them. It's perfect for an illustrator like me!
Although, as you can see, I'm still bumping my head against walls! But less so.
Be kind and respectful, give credit to the original source of content, and search for duplicates before posting. Learn moreCopy link to clipboard
I just went to that link - and there were some tutorials similar to what I'm doing at Udemy. But there is a world of difference. That one about basic animation - I got lost in the first 10 seconds. Did they really need to tell a beginner about spatial/temporal? NO! Wrong! Bad! Dangerous. This is what I often feel watching lynda tutorials. Like they're showing off how smart they are instead of caring that you understand. This really clarified it for me. I don't doubt my own intelligence - but I can't watch a Deke McClelland quick tip without wondering why he ALWAYS loses me before he gets to the end.
Also on the same page - in the video showing animating a logo - whaaa! Slow down! I thought the range selector portion needed to be clarified.
I am so glad I discovered the simpler style of teaching at Udemy! I no longer feel hopeless about learning!
BTW - I really apologize if I sound cranky - but trying to learn AE didn't have to be so damned painful!
Друзья, мы подготовили для вас несколько советов по оптимизации скорости в After Effects, а также техники для ускорения работы и финального рендеринга.
1. Понизьте качество отображения в окне композиции

Если композиция тяжёлая, её просчёт может занимать довольно много времени и понижение разрешения может дать приличный прирост в скорости.
Как правило, лучше работать в разрешении Half (половина) или Third (треть).
2. Отключите эффекты на слоях и размытие в движении
Зачастую вам может потребоваться быстро просмотреть анимацию слоёв, без необходимости просчитывать все эффекты на слоях и их размытие при движении, так как они существенно замедляют просчёт. Просто снимите соотвествующие галочки на слоях и отключите motion blur в композиции.
3. Пропуск кадров

На панели Preview есть опция Skip, позволяющая выбрать, сколько кадров Ae будет пропускать при воспроизведении композиции. Таким образом, если вы работаете с тяжелым проектом, можно настроить пропуск одного, двух или пяти кадров и тогда у вас уйдет гораздо меньше времени на то, чтобы составить общее представление о том, как анимация выглядит по всей длине композиции без надобности просчитывать каждый кадр.
4. Используйте предварительный рендер композиций
Если в вашем проекте есть множество вложенных композиций и вы не собираетесь вносить изменения в них, то можно использовать их предварительный рендер (Composition > Pre-Render), тогда они будут просчитаны отдельно и заменены легковесными версиями в вашем проекте.
5. Выделите область окна композиции для просчёта

Вы можете выделить необходимую область в окне композиции по кнопке Region of Interest, и при воспроизведении отрисовываться будет только то, что находится внутри этой области.
6. При работе с 3D, используйте режим черновика

При активации этого режима по кнопке на таймлайне, Ae отключит свет, тени и глубину резкости для камер, что существенно ускорит предпросмотр композиций с кучей 3D элементов в ней. В режиме Raytraced также будут отключены отражения и Environment слои.
7. Используйте прокси-файлы
Если работаете с тяжеловесными исходниками, всегда можно заменить их на более лёгкие версии с пониженным разрешением и качеством.
Для этого кликните правой кнопкой по исходнику в окне Project и выберите Create Proxy > Movie, откроется окно очереди рендеринга, в Render Settings выберите Draft Settings, а в качестве формата можно выбрать, например, QuickTime и вручную понизить у него качество.
По окончании рендера тяжелый исходник будет заменён его облегчённой версией. Только перед финальным рендером не забудьте вернуть как было:)
8. Настройка использования памяти
Далее настроим использование памяти в Edit > Preferences > Memory

Опция RAM reserved for other applications отвечает за то, сколько оперативной памяти вы отводите другому софту от Adobe. Её можно выкрутить на минимум. При работе с тяжелыми композициями, где есть куча 3D слоёв и эффектов это играет большую роль и существенно ускоряет финальный рендер.
Просчитанные композиции хранятся не только в оперативной памяти, но также и на вашем жестком диске в кэше, если эта опция активна. Для ее включения перейдите в раздел Media & Disk Cache в настройках и поставьте галочку на Enable Disk Cache. Рекомендуем размещать кэш на высокоскоростных SSD.

Использование дискового кэша значительно ускоряет работу в программе, потому что не требуется пересчитывать множество вложенных композиций, если добавить эффект к одной из них, так как часть данных уже будет находиться в кэше. И в целом, использование кэша ускоряет предпросмотр, просчёт видео и финальный рендеринг.
9. Чистим After Effects
Если во время работы в Ae вам понадобится запустить другую программу, например, Photoshop, а Ae забил всю оперативку - можете почистить её, перейдя на верхнюю панель в Edit > Purge > All Memory.
Когда вы полностью завершили и отрендерили проект в After Effects, следует почистить RAM и дисковый кэш через Edit > Purge > All Memory & Disk Cache.
В After Effects есть не только дисковый кэш, который хранит всё, что вы посмотрели, но также так называемый Media Cache, в котором хранятся импортированные в проект данные и ссылки на них, благодаря которому быстрее открываются ваши проекты. Ссылки на видео занимают не очень много места, но если импортировать аудио, то в медиакэше появится его копия, занимающая в 5-10 раз больше места, чем оригинальный файл.

Если почистить media cache в настройках по кнопке Clean Database & Cache, то Ae не удалит кэш тех файлов, которые все ещё физически присутствуют на диске, заботясь о вас, потому что это обеспечивает быструю загрузку проектов.
Но если вам нужно освободить место на диске - можно почистить кэш вручную, удалив содержимое папок Media Cache, расположенных тут:
C:\Users\Пользователь\AppData\Roaming\Adobe\Common
10. Ускорение рендеринга
Вы могли заметить, что зачастую при запуске финального рендеринга After Effects не нагружает процессор на 100% и не использует весь его потенциал.
Чтобы обойти это, мы воспользуемся поддержкой командной строки в Ae.
Для начала нужно создать текстовый файл со следующим содержимым:
"C:\Program Files\Adobe\Adobe After Effects (Ваша версия)\Support Files\aerender.exe" -project %1
Затем переименуйте его в aerender.bat и поместите его в папку C:\Windows, чтобы сделать команду aerender доступной из командной строки.
Эта команда будет отправлять наш проект на рендеринг, если мы откроем командную строку Windows, введём aerender "путь к проекту" и нажмём Enter. Быстро скопировать путь к вашему проекту можно зажав Shift, кликнув по нему правой кнопкой и выбрав "Копировать как путь".

Но магия в другом. Если в After Effects добавить композицию в очередь рендеринга, а затем на панели Render Queue в Render Settings выбрать Multi-Machine Settings, а в Output выбрать Multi-Machine Sequence, то у нас появится возможность запустить сразу несколько окон командной строки, каждое из которых будет рендерить свой кадр и пропускать уже существующие.
Если кликнуть по Multi-Machine Settings, то в нижней части открывшегося окна вы увидите галочку Skip Exisiting Files, она и отвечает за это.
Когда вы все настроили и выбрали нужный формат для рендера (это обязательно должно быть изображение, так как рендерить мы будем последовательность кадров), нужно сохранить проект и можно запускать рендеринг в командной строке.
Для этого вы можете перетащить ваш .aep проект на созданный нами ранее файл aerender.bat
Запуск рендеринга в командной строке перетаскиванием файла на aerender.batТакже есть другой способ - можно скопировать путь к проекту по правому клику с зажатым Shift, выбрав "Копировать как путь", открыть командную строку, набрать в ней aerender, далее через пробел вставить путь к проекту, кликнув правой кнопкой мыши и можно запускать рендер, нажав Enter.
Затем повторите процедуру в другом окне командной строки и над рендером будут трудиться уже два окошка, а нагрузка на процессор вырастет.
Запускать таких окон можно сколько угодно, пока есть запас нагрузки, но как только она будет приближена к 100%, целесообразнее будет оставить всё как есть. Затем вам только останется собрать полученную секвенцию в видеофайл, импортировав её обратно в Ae.
Читайте также: