
Как установить bettercap в ubuntu
Обновлено: 06.07.2024
Bettercap features include:
Bettercap 2 versus bettercap 1.6
At the end of February, 2018 bettercap 2 came out and since then it is this version that is being actively developed, new functions are added to it. The bettercap version 1.6 is outdated and no longer supported.
Even the purpose of the program has changed: it used to be a modular platform for implementing complex man-in-the-middle attacks; now, in addition to supporting man-in-the-middle attacks, there is functionality for monitoring the network, monitoring and attacks on 802.11 wireless networks and BLE.
How to install bettercap Kali Linux
In the Kali Linux repositories, bettercap is already present, but at the time of writing there is an outdated version 1.6.2. To check which version of bettercap is currently available for installation from the official repositories, run:
If something like this is displayed:
it means the version is outdated.
If version 2.x appears there, it’s enough to install it:
Download and install the latest version of bettercap
Remove the older version of bettercap if it was installed earlier:
Fix for an already installed library:
Download the archive with the binary file of the latest bettercap version:
unpack, move, do cleaning and checking:
Installing bettercap from the source code will be discussed at the end of the article.
How to use bettercap
Now the main functional feature of a bettercap is not only and not so much the various man-in-the-middle attacks. Thanks to caplets and scripts, it is possible to implement a variety of phishing attacks and attacks based on data manipulation, the starting point of which is a man-in-the-middle attack. For this reason, it is not easy to write a comprehensive guide to bettercap.
LAN monitoring To display the list of detected hosts on the local network, type the following command:
This is a passive monitoring method, since the host lookup is based on reading the ARP cache.
To exit the program, type q or press CTRL + z .
And the net.probe module is actively looking for hosts, sending dummy UDP packets to every possible IP on the subnet. We include this module:
We look at the detected hosts:
With the help of bettercap, you can continuously monitor the state of the network, receiving on-screen data in real time, to do this sequentially:
The first command net.probe on , as we found out a little earlier, includes an active search for hosts, and the second command is used to periodically execute a given set of commands. Since we did not specify which commands to execute, the default commands are executed, namely clear;net.show, as a result, an interesting effect is achieved: hosts are constantly searched for in the background, and actual information is displayed on the screen in real time.
Interactive and non-interactive mode
The -eval and -caplet options. Caplets
If it is inconvenient for you to run bettercap interactively every time, then you can use the -eval option , after which specify the commands to be executed. For example, the previous example is equivalent to such a launch:
Directly in an interactive session bettercap, you can execute system commands. For example, the following set of commands checks if there is a connection to the global network:
The same command (set of commands) can be executed directly in the interactive session, it is enough to put an exclamation mark before the first command:
Now we will add monitoring of connection to the Internet to the monitoring of the local network. We start an active search for local hosts:
If desired, you can increase the period to three seconds (the default is one second):
We start the cyclical execution of the task:
Using the familiar -eval option , this all can also be run this way:
And just copy into it all our commands that we entered in the interactive session, you should get the following file:
Now, run bettercap with the option -caplet , after which we specify the path to the file with the caplet:
How to run spoofing and sniffing in bettercap
By default, an attack on the entire subnet is performed, so if ARP spoofing does not work well, set the IP targets using the variable arp.spoof.targets . Its value can be one IP or several IP listed separated by commas, for example:
As already shown above, to see all the hosts on the local network and select the victim, use the command:
The values of the variables must be set before the launch of the corresponding module. If you need to change the variable value of an already running module, then stop the already started module, set a new value and restart the module, for example:
For a sniffer at will, the level of verbality can be reduced:
Run the sniffer:
The proxy itself is activated as follows:
To attack the entire subnet, from this list of commands, skip the set arp.spoof.targets 192.168.0.90 command .
DNS spoofing in bettercap
By default, the DNS server responses are substituted so that an IP is inserted into each of them, indicating the interface address of the machine running bettercap. The IP address changes through the dns.spoof.address variable :
This module will only respond to requests that target the local PC. To answer all, set the dns.spoof.all variable to true:
To run the module:
Embedded web server in bettercap
To process requests to the web server, you can use the server installed on your system, for example, Apache is installed on Kali Linux and you just need to run it:
To start the server (the system server, for example, Apache, must be stopped, since a conflict may arise due to the fact that different programs are trying to listen on the same port):
Monitoring WiFi networks using bettercap
This is a new feature bettercap. By the way, Bluetooth Low Energy support has been added.
To work with Wi-Fi, you need to use the -iface option , followed by the name of the wireless interface:
In case with subsequent commands you will encounter errors, for example, like this:
Then exit the bettercap and manually switch the wireless interface to monitor mode. For example, as follows:
Now that the wireless interface is in monitor mode, run bettercap again and enter the command:
It starts the detection of Wi-Fi devices:
If you want to limit yourself to monitoring only certain channels, then execute a command like this (it sets the switch only on the first three channels):
By the way, if you later need to clear the channel list (to make the program jump across all channels), then the following command is used for this:
To show results type:
The following set of commands will start collecting information about Wi-Fi devices, will display a table with a full list of detected access points, as well as a list of the last 20 detections:
Capturing handshake in bettercap
Install a filter for the handshake packages:
Run the sniffer:
Sniffer every time runs the same way. Further values of variables depend on the attacked target.
The target I want to attack works on channel 8 , so I set the channel:
We launch network analysis:
The following two commands are optional, they will periodically clear the screen and display a table with the base stations they see (you can see if the attacked Access Point has clients at all), if you don’t want it, then skip these commands:
We proceed to deauthentication. The attack can be performed in two forms:
A file with captured frames can be opened for inspection in Wireshark :
To filter four-stage handshakes, use a filter:
Slightly more verbal command:
We need this command to write a caplet that will work according to the following logic:
To do this, I create the file HS_capture_50465d6e8c20.cap with the following contents:
The program will work until you grab a handshake. But after grabbing the handshake, bettercap will complete its work and will no longer bother the clients of the network.
Creating a fraudulent access point bettercap
As you can see, there is plenty of room for automation and various combined attacks, including automated attacks based on social engineering.
Bettercap caplet overview
caplets are placed in the official repository . There are both very simple examples that automate several typical actions, and fairly complex implementations of modern attacks.
BeEF hooking
BeEF is a platform for exploiting web browsers. To start operation, you need to embed code into the JavsScript web page. The caps beef-passive.cap and beef-active.cap do exactly that. The implementation is managed by the beef-inject.js file , so if you want to change the address or port of the JavsScript file, then you need to edit this file.
Before starting this attack, you need to start the BeEF service yourself, or edit the caplets, adding the appropriate command there.
Miner implementation
crypto-miner.cap injects a miner (file). You yourself need to enter your key by editing the crypto-miner.js file .
If someone uploaded the payload:
Facebook password theft
You yourself need to take care of creating the fake login page and starting the server. The Makefile instructions file will help you with this (if you have a caplet repository downloaded, run the Bash command line):
Then in bettercap:
Collecting usernames and passwords using invisible forms
The essence of the attack is as follows: if you previously entered your login and password on the site, then if the form is present on the page, the browser automatically fills in the previously entered data. Firefox does it right away; Chrome requires any user interaction — for example, a click anywhere on a web page. This form may not be visible. So, the attacker injects an invisible form on the pages of the site, into which the browser itself enters the login and password, the form transmits the data to the attacker.
This is implemented in the login-man-abuse.cap caplet.
Sniffer password
Very simple simple-passwords-sniffer.cap . It shows the search for data by a regular expression and saving the data to a file, the commands are responsible for this:
Change line of bettercap interactive session
You can customize the string in which you enter commands. Including you can show useful information in it. An example of such a setting with statistics output is contained in test-prompt-stats.cap.
You can write your own caplets, if desired, interesting examples can be offered to be added to the repository. Installing bettercap from source code on Kali Linux You must install the Go compiler.
Install the necessary packages for compilation:
Fix for an already installed library:
Download the source code, compile, install:
To further update the program:
Conclusion
As you can see, a bettercap from a simple and fun program for man-in-the-middle attacks has grown into a powerful combine for analyzing traffic, testing and performing various network and wireless attacks.
To simplify routine actions, you can write small caplets into several commands for example, to start sniffing on a local network, or to collect information about WiFi networks.
Check on the Next button below and start hacking!
Introduction
You Are the Man in the Middle
What is a MITM ( Man In The Middle ) attack? Let's ask Wikipedia!
This is quite a generic description, mostly because ( if we're talking about network MITM attacks ), the logic and details heavily rely on the technique being used ( more in the spoofing section ).
Nevertheless we can simplify the concept with an example. When you connect to some network ( your home network, some public WiFi, StarBucks, etc ), the router/switch is responsible for forwarding all of your packets to the correct destination, during a MITM attack we "force" the network to consider our device as the router ( we "spoof" the original router/switch address in some way ):
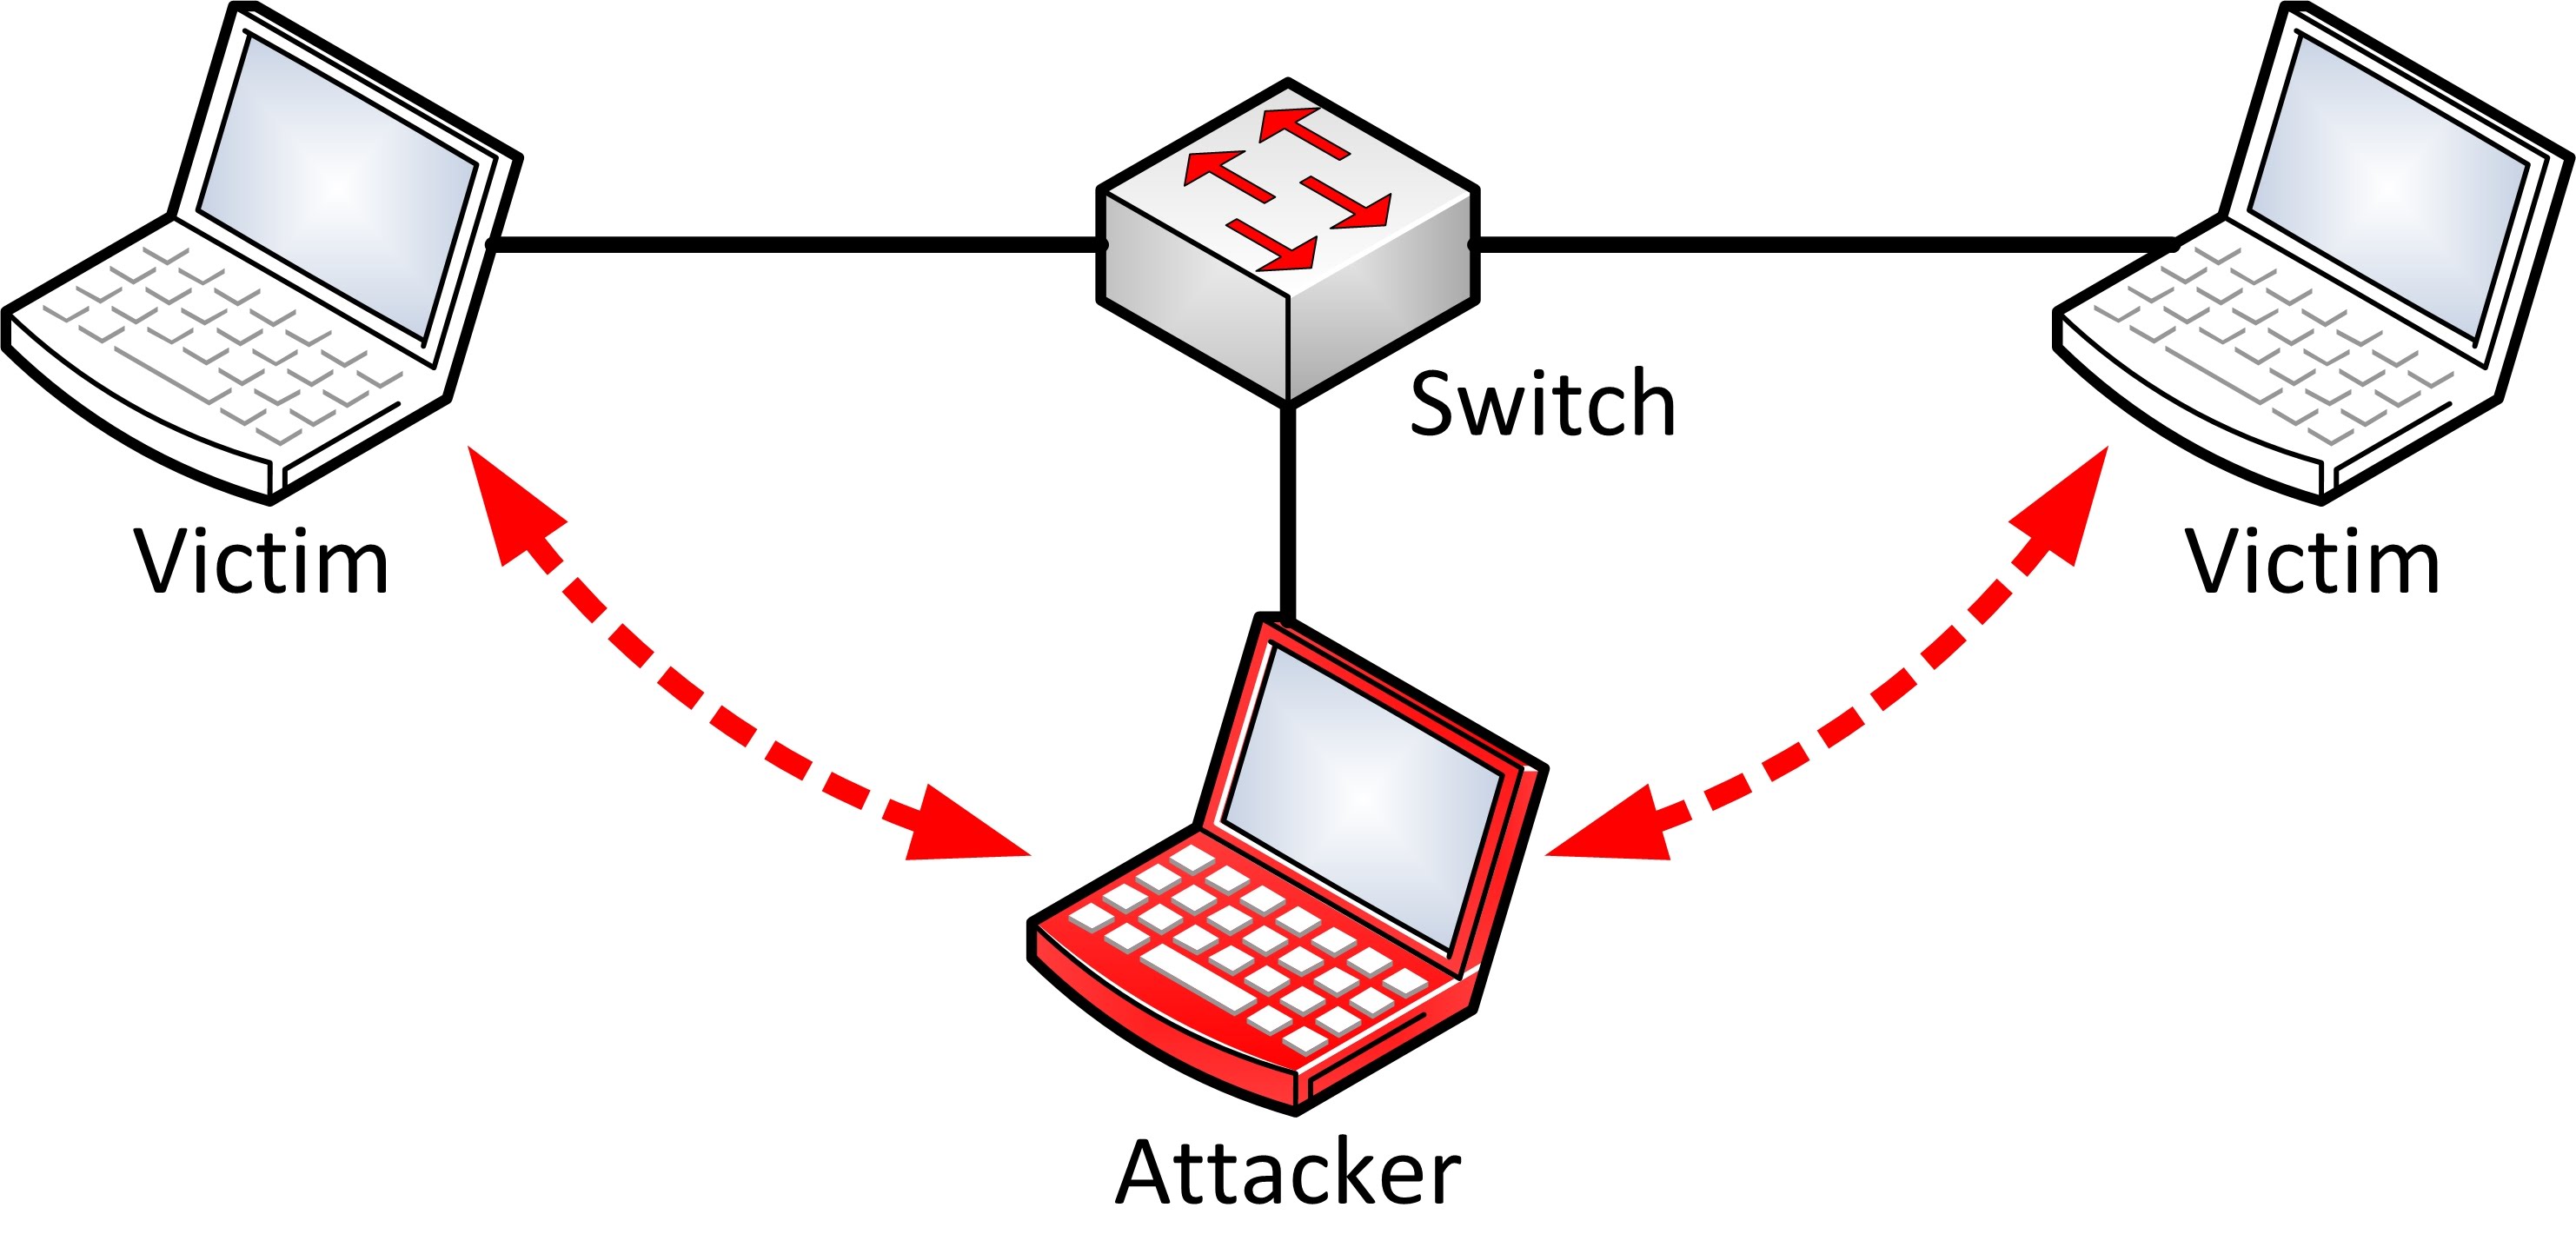
BetterCap is responsible for giving the security researcher everything he needs in one single tool which simply works, on GNU/Linux, Mac OS X and OpenBSD systems.
Use Cases
You might think that BetterCAP is just another tool which helps script-kiddies to harm networks . but it's much more than that, its use cases are many, for instance:
- Many professional penetration testers find a great companion in bettercap since its very first release.
- Reverse engineers are using it in order to reverse or modify closed network protocols.
- Mobile/IoT security researchers are exploiting bettercap capabilities to test the security of mobile systems.
Why another MITM tool?
This is exactly what you are thinking right now, isn't it? :D But allow yourself to think about it for 5 more minutes . what you should be really asking is:
Does a complete, modular, portable and easy to extend MITM tool actually exist?If your answer is "ettercap", let me tell you something:
- Ettercap was a great tool, but it made its time.
- Ettercap filters do not work most of the times, are outdated and hard to implement due to the specific language they're implemented in.
- Ettercap is freaking unstable on big networks . try to launch the host discovery on a bigger network rather than the usual /24 ;)
- Yeah you can see connections and raw pcap stuff, nice toy, but as a professional researcher I want to see only relevant stuff.
- Unless you're a C/C++ developer, you can't easily extend ettercap or make your own module.
Installation
BetterCap comes packaged as a Ruby gem, meaning you will need a Ruby interpreter ( >= 1.9 ) and a RubyGems environment installed. Moreover, it is fully compatible with GNU/Linux, Mac OS X and OpenBSD platforms.
Dependencies
All Ruby dependencies will be automatically installed through the GEM system, however some of the GEMS need native libraries in order to compile:
Installing on Kali Linux
Kali Linux has bettercap packaged and added to the kali-rolling repositories. To install bettercap and all dependencies in one fell swoop on the latest version of Kali Linux:
Stable Release ( GEM )
You can easily install bettercap using the gem install GEMNAME command:
To update to a newer release:
If you have trouble installing bettercap read the following sections about dependencies.
If you installed bettercap using a RVM installation, you will need to execute it using rvmsudo:
rvmsudo bettercap .
Otherwise, if you installed it globally ( sudo gem install bettercap ) you can use sudo:
sudo bettercap .
Development Release
Instead of the stable release, you can also clone the source code from the github repository, this will give you all the latest and experimental features, but remember that you're using a potentially unstable release:
Quick Start
Once you've installed bettercap, quickly get started with:
The help menu will show you every available command line option and a few examples.
Contributing
As any other open source projects, there're many ways you can contribute to bettercap depending on your skills as a developer or will to help as a user.
Submitting Issues
If you find bugs or inconsistencies while using bettercap, you can create an Issue using the GitHub Issue tracker, but before doing that please make sure that:
- You are using a relatively new Ruby version ( >= 1.9 ) : ruby -v .
- Your GEM environment is configured properly and updated : sudo gem update .
- You are using the latest version of bettercap : bettercap --check-updates .
- The bug you're reporting is actually related to bettercap and not to one of the other GEMs.
Once you've gone through this list, open an issue and please give us as much as informations as possible in order for us to fix the bug as soon as possible:
- Your OS version.
- Ruby version you're using.
- Full output of the error ( exception backtrace, error message, etc ).
- Your network configuration: ifconfig -a
Also, you should attach to the issue a debug log that you can generate with:
Wait for the error to happen then close bettercap and paste the debug.log file inside the issue.
Improving the Documentation
If you want to help, you can improve this documentation cloning our code repository and updating the contents of the docs folder.
Pull Requests
If you know how to code in Ruby and have ideas to improve bettercap, you're very welcome to send us pull requests, we'll be happy to merge them whenever they comply to the following rules:
- You have at least manually tested your code, ideally you've created actual tests for it.
- Respect our coding standard, 2 spaces indentation and modular code.
- There're no conflicts with the current dev branch.
- Your commit messages are enough explanatory to us.
- Implement a new proxy module and push it to the dedicated repository.
- Implement a new Spoofer module.
- Implement a new Sniffer credentials parser.
- Fix, extend or improve the core.
General Options
The following are the main options that determine the general behaviour of BetterCap, these options are not mandatory, in fact bettercap will automatically detect everything it needs in order to work, you just might need to use one or more of the following options to specify some custom behaviour in specific cases.
Examples
Attack specific targets:
sudo bettercap -T 192.168.1.10,192.168.1.11
Attack a specific target by its MAC address:
sudo bettercap -T 01:23:45:67:89:10
Attack a range of IP addresses:
sudo bettercap -T 192.168.1.1-30
Attack a specific subnet:
sudo bettercap -T 192.168.1.1/24
Randomize the interface MAC address during the attack:
sudo bettercap --random-mac
Options
-I, --interface IFACE 
BetterCAP will automatically detect your default network interface and use it, if you want to make it use another interface ( when you have more than one, let's say eth0 and wlan0 ) you can use this option.
--use-mac ADDRESS 
Change the interface MAC address to this value before performing the attack.
--random-mac 
Change the interface MAC address to a random one before performing the attack.
-G, --gateway ADDRESS 
The same goes for the gateway, either let bettercap automatically detect it or manually specify its address.
-T, --target ADDRESS1,ADDRESS2 
If no specific target is given on the command line, bettercap will spoof every single address on the network. There are cases when you already know the IP or MAC address of your target(s), in such cases you can use this option.
--ignore ADDRESS1,ADDRESS2 
Ignore these IP addresses if found while searching for targets.
--no-discovery 
Do not actively search for hosts, just use the current ARP cache, default to false .
--no-target-nbns 
Disable target NBNS hostname resolution.
--packet-throttle NUMBER 
Number of seconds ( can be a decimal number ) to wait between each packet to be sent.
--check-updates 
Will check if any update is available and then exit.
-h, --help 
Display the available options.
Logging
These options determine how bettercap console logger is going to behave.
Examples
Save log output to the out.log file:
sudo bettercap --log out.log
Save log output to the out.log file and suppress terminal output:
sudo bettercap --log out.log --silent
Save log output to the out-ts.log file and enable timestamps for each line:
sudo bettercap --log-timestamp --log out-ts.log
Options
-O, --log LOG_FILE 
Log all messages into a file, if not specified the log messages will be only print into the shell.
--log-timestamp 
Enable logging with timestamps for each line, disabled by default.
-D, --debug 
Enable debug logging, it is good practice to use this option while reporting a bug in order to have the full debug log of the program.
--silent 
Suppress every message which is not an error or a warning, default to false .
Spoofing
As previously described in the introduction section, spoofing is the very hearth of every MITM attack. These options will determine which spoofing technique to use and how to use it.
BetterCap already includes an ARP spoofer ( working both in full duplex and half duplex mode which is the default ), a DNS spoofer and the first, fully working and completely automatized ICMP DoubleDirect spoofer in the world
Examples
Use the good old ARP spoofing:
sudo bettercap or sudo bettercap -S ARP or sudo bettercap --spoofer ARP
Use a full duplex ICMP redirect spoofing attack:
sudo bettercap -S ICMP or sudo bettercap --spoofer ICMP
sudo bettercap -S NONE or sudo bettercap --spoofer NONE or sudo bettercap --no-spoofing
No dear 192.168.1.2, you won't connect to anything anymore :D
sudo bettercap -T 192.168.1.2 --kill
Options
-S, --spoofer NAME 
Spoofer module to use, available: ARP , ICMP , NONE - default: ARP .
--no-spoofing 
Disable spoofing, alias for --spoofer NONE / -S NONE .
Instead of forwarding packets, this switch will make targets connections to be killed.
--full-duplex 
Enable full-duplex MITM, this will make bettercap attack both the target(s) and the router.
Sniffing & Credentials Harvesting
The builtin sniffer is currently able to dissect and print from the network ( or from a previously captured PCAP file ) the following informations:
New parsers are implemented almost on a regular basis for each new release, for a full and updated list check the SNIFFING section in the "bettercap --help" menu.
Examples
Use bettercap as a simple local network sniffer:
sudo bettercap --local or sudo bettercap -L
Use the capture.pcap file in your home directory as a packets source:
sudo bettercap --sniffer-source
Spoof the whole network and save every packet to the capture.pcap file in your home directory:
sudo bettercap --sniffer-output
Spoof the whole network and extract data from packets containing the "password" word:
sudo bettercap --custom-parser ".*password.*"
Options
-X, --sniffer 
-L, --local 
By default bettercap will only parse packets coming from/to other addresses on the network, if you also want to process packets being sent or received from your own computer you can use this option ( NOTE: will enable the sniffer ).
--sniffer-source FILE 
Load packets from the specified PCAP file instead of the network interface ( NOTE: will enable the sniffer ).
--sniffer-output FILE 
Save all packets to the specified PCAP file ( NOTE: will enable the sniffer ).
--sniffer-filter EXPRESSION 
Configure the sniffer to use this BPF filter ( NOTE: will enable the sniffer ).
-P, --parsers PARSERS 
--custom-parser EXPRESSION 
Use a custom regular expression in order to capture and show sniffed data ( NOTE: will enable the sniffer ).
About Proxying

Once one or more proxies are enabled, bettercap will take care of the spoofing and the firewall rules needed in order to redirect your targets' traffic to the proxy itself.
By default the builtin proxies won't do anything but logging all the requests, additionally you can specify a "module" to use and you will be able to load one of the builtin plugins ( or your own ) and manipulate all the traffic as you like.
- InjectJS ( --proxy-module injectjs ) : Used to inject javascript code/files inside HTML pages.
- InjectCSS ( --proxy-module injectcss ) : Used to inject CSS code/files inside HTML pages.
- InjectHTML ( --proxy-module injecthtml ) : Used to inject HTML code inside HTML pages.
bettercap --proxy-module NAME -h
Sample Module
You can easily implement a module to inject data into pages or just inspect the requests/responses creating a ruby file and passing it to bettercap with the --proxy-module argument, the following is a sample module that injects some contents into the title tag of each html page, you can find other examples modules in the proxy modules dedicated repository.
SSL Stripping
SSL stripping is a technique introduced by Moxie Marlinspike during BlackHat DC 2009, the website description of this technique goes like:
During a SSL stripping attack its HTML code will be modified as:
Being the man in the middle, this allow us to sniff and modify pages that normally we wouldn't be able to even see.
HSTS Bypass
SSL stripping worked quite well until 2010, when the HSTS specification was introduced, Wikipedia says:

Picture credits to Scott Helme
Let's take the previous example page:
A HSTS bypass attack will change it to something like:
When the "victim" will click on that link, no HSTS rule will be applied ( since there's no rule for such subdomain we just created ) and the MITM software ( BetterCap in our case ^_^ ) will take care of the DNS resolution, allowing us to see and alter the traffic we weren't supposed to see.

Demonstration
The following video demonstrates how to perform SSL Stripping and HSTS Bypass attacks in order to capture the Facebook login credentials of a specific target.
Server Name Indication
This way, as long as you have BetterCap's certification authority PEM file installed on the target device, you won't see any warnings or errors since correct certificate will be spoofed in realtime.
There're a couple of caveats of course:
- If you don't install either bettercap's CA or your custom CA on the target device, you'll see warnings and errors anyway (duh!).
- Every application using certificate/public Key pinning will detect the attack even with the CA installed.
Installing Certification Authority
Options
--proxy-upstream-address ADDRESS 
--allow-local-connections 
Allow direct connections to the proxy instance, default to false .
--proxy 
--proxy-port PORT 
--no-sslstrip 
Disable SSL stripping and HSTS bypass.
--proxy-module MODULE 
Ruby proxy module to load, either a custom file or one of the following: injectcss , injecthtml , injectjs .
--proxy-pem FILE 
Sample Module
The following example module won't do anything but dumping the data being transmitted from/to the target, you can access the event object in order to modify the data on the fly.
And you would be ready to go.
Options
--tcp-proxy 
Enable the TCP proxy ( requires other --tcp-proxy-* options to be specified ).
--tcp-proxy-module MODULE 
Ruby TCP proxy module to load.
--tcp-proxy-port PORT 
Set local TCP proxy port, default to 2222 .
--tcp-proxy-upstream-address ADDRESS 
Set TCP proxy upstream server address.
--tcp-proxy-upstream-port PORT 
Set TCP proxy upstream server port.
--tcp-proxy-upstream ADDRESS:PORT 
Set TCP proxy upstream server address and port ( shortcut for --tcp-proxy-upstream-address ADDRESS and --tcp-proxy-upstream-port PORT ).
If you want to actively modify packets of a UDP protocol, you'll need the UDP proxy. This event-based proxy will allow you to intercept anything sent/received to/from a specific host using your own custom module.
Sample Module
The following example module won't do anything but dumping the data being transmitted from/to the target, you can access the event object in order to modify the data on the fly.
And you would be ready to go.
Options
--udp-proxy 
Enable the UDP proxy ( requires other --udp-proxy-* options to be specified ).
--udp-proxy-module MODULE 
Ruby UDP proxy module to load.
--udp-proxy-port PORT 
Set local UDP proxy port, default to 2222 .
--udp-proxy-upstream-address ADDRESS 
Set UDP proxy upstream server address.
--udp-proxy-upstream-port PORT 
Set UDP proxy upstream server port.
--udp-proxy-upstream ADDRESS:PORT 
Set UDP proxy upstream server address and port ( shortcut for --udp-proxy-upstream-address ADDRESS and --udp-proxy-upstream-port PORT ).
Third Party Proxies
If you want to use some custom proxy of yours ( BurpSuite for instance, or some custom app you wrote ) you can still use bettercap to make the whole process easier, no more crappy shell scripts to apply custom firewall rules and launch "esotic" commands!
--custom-proxy ADDRESS 
--custom-proxy-port PORT 
--custom-redirection RULE 
Apply a custom port redirection, the format of the rule is PROTOCOL ORIGINAL_PORT NEW_PORT . For instance TCP 21 2100 will redirect all TCP traffic going to port 21 , to port 2100 .
If you want to perform DNS spoofing, you must specify the --dns FILE command line argument, where the FILE value is the name of a file composed by entries like the following:
First update the package repository cache of your Ubuntu 18.04 LTS Bionic Beaver with the following command:

The package repository cache should be updated.

Now you have to install the Linux build tools and network utilities with the following command:
$ sudo apt-get install build-essential libpcap-dev net-tools
Now press y and then <Enter> to continue.

Linux build tools and network utilities should be installed.


Scroll down a little bit and click on the link precompiled version is available as marked on the screenshot below.

You should see the following page. Now click on the download link for bettercap linux amd64 version as marked in the screenshot below.

Your browser should prompt you to save the file as shown in the screenshot below. Click on Save File.

The bettercap .zip archive should be downloading as you can see in the screenshot below.

Once bettercap is downloaded, you should find it in the
/Downloads directory as you can see in the screenshot below.

Now right click on the file and click on Extract Here as you can see in the marked section of the screenshot below.

A new directory should be created as you can see in the screenshot below.

Right click on Open in Terminal.

A terminal should be opened.

If you list the contents of the directory with ls command, you should see bettercap binary as you can see in the marked section of the screenshot below.

Now you have to move the bettercap binary to the /usr/bin directory. So that you will be able to access it without typing the full path.
Run the following command to do that:

The binary should be moved to the /usr/bin directory.

Now if you try to run bettercap, you may see the following error that says libpcap.so.1 library is not available. But it actually was installed when you installed libpcap-dev package. But the name of the library file is a little bit different.

You can find where the file is with the following command:

As you can see in the screenshot below, the libpcap.so file is in /usr/lib/x86_64-linux-gnu directory.

Now all you have to do is make a symbolic link of libpcap.so to create libpcap.so.1.
You can do so with the following command:
$ sudo ln -s / usr / lib / x86_64-linux-gnu / libpcap.so / usr / lib / x86_64-linux-gnu / libpcap.so.1
Now if you try to run bettercap again, you may see a different error as you can see in the screenshot below. The new error says libnetfilter_queue.so.1 is not available. So our previous problem was fixed.

On Ubuntu 18.04, libnetfilter_queue.so.1 file is provided by libnetfilter-queue-dev package.
Run the following command to install libnetfilter-queue-dev package:

Now press y and the press <Enter> to continue.

The libnetfilter-queue-dev package should be installed.

Now if you try to run bettercap, it should work.

Using bettercap events.stream
In this section I will talk about how to use the events.stream in bettercap.
First run the following command to start the bettercap interactive mode:

As you can see in the screenshot below, bettercap interactive mode has started. Here you can type in bettercap commands.

Now run the following command to redirect the bettercap events to another file:
NOTE: OUTPUT_FILE_PATH is the path to a file where the bettercap events will be written. In my case the file is bettercap-events.log in my user’s home directory.

You can run events.show command to list all the available events.

As you can see in the screenshot below, all the events are listed.

You can also list a specific number of events with the following command:

As you can see the last 2 events are displayed.

You can clear all the events with the following command:

As you can see no event is listed when I run events.show command. All the events are cleared.

You can enable discovery of Bluetooth Low Energy (BLE) devices with the following command:
Функции и установка Bettercap
Bettercap - это очень мощный инструмент, совместимый с основными дистрибутивами Linux, некоторые из его основных функций:
В дистрибутивах Linux, ориентированных на компьютерную безопасность, по умолчанию может быть установлен bettercap. В противном случае нам придется устанавливать его самостоятельно со всеми зависимостями. Самый простой способ использовать Bettercap - использовать Docker (версия 17.05 или выше), так как он находится в репозиториях программного обеспечения Docker, и просто выполните:
docker pull bettercap/bettercap docker pull bettercap/dev
И выполняем это с помощью:
docker run -it --privileged --net=host bettercap/bettercap -h
- строительный
- libpcap-dev
- libusb-1.0-0-dev
- libnetfilter-queue-dev
Например, в операционных системах на базе Debian он устанавливается следующим образом:
sudo apt update
sudo apt install golang git build-essential libpcap-dev libusb-1.0-0-dev libnetfilter-queue-dev
Позже нам нужно будет скачать исходный код и скомпилировать его:
Как только мы установим этот инструмент Bettercap, мы сможем начать его использовать, мы запустим через консоль «bettercap» и увидим версию.

Перед тем, как мы начнем, мы также можем запустить Bettercap с графическим пользовательским интерфейсом веб-интерфейса, для этого мы должны выполнить следующую команду:
bettercap -eval "caplets.update; ui.update; q"
А для запуска графической среды делаем следующее:

Имя пользователя веб-интерфейса bettercap - «user», а пароль - «pass», как указано в файле конфигурации:

Как только мы войдем в административное меню bettercap через браузер, мы увидим следующие меню:


Есть много атак, которые могут быть выполнены непосредственно из графического пользовательского интерфейса, но мы собираемся использовать их с помощью команд, потому что это почти так же просто, однако мы также научим вас, как проводить определенные атаки через графический интерфейс. интерфейс пользователя.
- Атакующая машина: Kali Linux с IP 192.168.248.131
- Машина-жертва: Debian с IP 192.168.248.129
Оказавшись внутри bettercap, мы должны выполнить несколько команд для настройки программного обеспечения. Первое, что мы должны сделать, это определить цель, в нашем случае машину Debian с IP 192.168.248.129. Шлюз по умолчанию ставить тоже не обязательно.
set arp.spoof.targets 192.168.248.129

Если мы выполним команду «help», bettercap сообщит нам все, что работает:
Интересно то, что мы выполним «help arp.spoof», поскольку появятся все параметры, доступные в этом модуле. Один из наиболее интересных вариантов - «arp.spoof.fullduplex», этот параметр позволяет использовать ARP Spoofing как для цели, так и для шлюза по умолчанию (шлюз), но если маршрутизатор имеет защиту от атак ARP Spoofing, атака не удастся. Мы рекомендуем всегда активировать его, поэтому список команд будет следующим:
set arp.spoof.targets 192.168.248.129
arp.spoof.fullduplex true
arp.spoof on
Как только это будет сделано, если в Kali Linux мы запустим Wireshark для захвата всех пакетов с интерфейса eth0, мы сможем видеть весь трафик, поступающий и идущий к жертве и от нее. Если вы посмотрите, у нас есть ICMP-трафик 192.168.248.129, то есть команда Debian, которую мы атакуем.
Мы также снимем все DNS, TCP, UDP и весь трафик протоколов, включая зашифрованный, но мы не сможем расшифровать его только с помощью ARP Spoofing.
Если мы войдем в bettercap через графическую среду, мы сможем сделать то же самое, и мы даже сможем выбрать использование ARP Spoofing для шлюза по умолчанию.
Чтобы провести эту атаку через графический интерфейс, мы переходим в локальную сеть, выбираем цель или цели, добавляем их в «arp.spoof.targets» и нажимаем «Full-Duplex spoofing». Мы увидим список оборудования, доступного в локальной сети, если они не появятся, нажмите на иконку «Play» в модуле разведки.
Запускаем bettercap на Kali Linux как обычно:
Оказавшись внутри, мы должны настроить bettercap следующим образом:
Если мы просматриваем другие веб-сайты, мы также можем видеть весь трафик.
Что такое HSTS и для чего он нужен?
Если мы хотим провести атаку на пользователя, и он входит на веб-сайт с помощью HSTS, единственное время, когда соединение может быть расшифровано, - это до первого исторического соединения пользователя (поскольку это новый браузер, недавно отформатированный компьютер, он никогда не зашел на этот веб-сайт и т. д.) Давайте представим, что пользователь-жертва купил новый ноутбук, идет в отель и впервые подключается к банку с помощью своего недавно установленного браузера, в этом случае мы можем атаковать его, потому что он все еще не иметь файл cookie HSTS в своем веб-браузере. Чтобы избежать этого, у нас есть директива preload на веб-серверах, но мы должны использовать ее осторожно, потому что мы должны подписаться на список предварительной загрузки HSTS, иначе у пользователей возникнут проблемы с подключением.
Как вы видели, политика HSTS помогает защитить пользователей веб-сайта от пассивных и активных атак, эта мера безопасности является одной из наиболее важных, которые необходимо настроить на веб-сервере, поскольку злоумышленник MitM будет иметь минимальные возможности для перехвата запросов и ответы между жертвой и веб-сервером.
Bettercap включает в себя «каплет», который позволяет нам выполнять Атака HSTS Hijack и обходить эту защиту, он основан на подмене DNS и перенаправлении жертвы в другой домен, находящийся под нашим контролем, для последующего сбора всей информации. Каплеты представляют собой сценарии Bettercap, которые поставляются предварительно настроенными, но которые мы можем легко изменить, чтобы загрузить их, мы должны выполнить следующие команды в терминале Linux:
sudo make install
После этого мы выполняем его, помещая:
bettercap -caplet RUTA
На следующем снимке экрана вы можете увидеть выполнение каплета по умолчанию:

А вот запись проведенной атаки:
Мы рекомендуем вам посетить официальный сайт Bettercap где вы найдете всю информацию об этом замечательном инструменте.
Читайте также: