Как установить boot repair на ubuntu
Обновлено: 01.07.2024
GRUB - это основной загрузчик Ubuntu начиная с версии 9.10. Ранее он был известен как GRUB2 и пришёл он на смену старой версии GRUB, известной теперь как GRUB Legacy. Если вам необходимо восстановить GRUB Legacy, например поскольку у Вас стоит версия Ubuntu старше 9.10, то вам необходимо прочитать соответствующую статью.
Несмотря на то, что это фактически две версии одного приложения с названием GRUB, они не имеют ничего общего и являются совершенно разными программами.На любом загрузочном винчестере есть так называемая Главная загрузочная запись (англ. master boot record, MBR), к которой обращается BIOS при загрузке компьютера. В эту область загрузчик системы и должен записать информацию об основных файлах, которые хранятся уже на разделах винчестера.
Каждый раз при установке или восстановлении систем от Microsoft загрузчики Linux заменяются и их необходимо заново устанавливать.Восстановление с помощью LiveCD/USB
Первый способ
Запустите систему с LiveCD/USB и откройте терминал. Для этого можно нажать Alt + F2 и ввести команду:
Далее необходимо узнать Вашу таблицу разделов. Используйте команду:
На экран должна быть выведена примерно такая таблица:
Из таблицы видим, что Linux (загрузочный /-корень отмечен звёздочкой) стоит, в нашем случае, на разделе /dev/sdc1.
Теперь подключим этот раздел в /mnt следующей командой (следим за пропусками между кодами и порядковыми номерами разделов):
Затем, для записи grub в MBR, вводите следующую команду:
В случае, если нужно только восстановить MBR диска (например, после переустановки Windows), то этого достаточно, закрываем терминал и перезагружаем.
Если нужно обновить и меню grub (например, после установки Windows), то нужно сделать:
Восстановление используя chroot
Запустите систему с LiveCD/USB и откройте терминал. Для этого можно нажать Alt + F2 и ввести команду:
Далее необходимо узнать Вашу таблицу разделов. Используйте команду:
На экран должна быть выведена примерно такая таблица:
Теперь нужно примонтировать Ваш Linux раздел (здесь это sda1) и еще несколько важных директорий:
Если раздел /boot или /var находится отдельно, то Вам необходимо примонтировать их в /mnt/boot и /mnt/varТеперь перейдем в окружающую среду chroot:
Теперь необходимо установить GRUB, используя команду:
Также в некоторых случаях может помочь вариант:
Если все прошло успешно, выходим из chroot командой:
Теперь необходимо отмонтировать разделы:
Если Вы монтировали раздел /boot воспользуйтесь командой:
Затем перезагрузим Ваш компьютер командой:
При необходимости Вы можете обновить меню загрузчика командой:
Восстановление в rescue mode
При отсутствии загрузочного диска, можно восстановить Grub из его консоли. Восстановление происходит следующим образом: сначала нужно подгрузить все модули, чтобы стала доступна вся функциональность Grub, а затем уже запуститься с нужного раздела. Как известно, Grub состоит из двух частей. Первая часть записана в MBR диска. Она содержит базовую функциональность, то есть в ней есть консоль в rescue mode и ничего больше. Вначале нужно определить, на каком разделе находится вторая часть груба (она лежит в каталоге /boot/grub), подгрузить недостающие модули. И только потом можно будет дать команду запуска с нужного раздела. В rescue mode доступно всего четыре команды:
Вначале следует дать команду:
В ответ она выведет, например, следующее:
Иногда Grub может неправильно опеределить, какие файловые системы находятся на разделах дисков. В данном случае определяет их как msdos. Нам нужно постараться угадать, какие диски мы видим. В данном случае видно два диска. Диск с индексом 0 содержит три раздела, диск с индексом 1 содержит два раздела. Зная структуру своих дисков несложно определить нужный диск.
Grub называет разделы в обратном порядке. И становится непонятно, что имеется в виду под (hd0,msdos3) - первый раздел или третий? Тут можно выкрутиться, использовав синтаксис (hd0,1). Нужно помнить, что в Grub счет дисков начинается с 0, а счет разделов - с 1. Предположим, что Линукс установлен на первый диск в первый раздел, то есть (hd0,1). Даем команду:
Этими командами мы указываем использовать диск (hd0,1) для дальнейших команд. После чего нужно проверить, действительно ли на этом разделе есть то, что нам нужно. Даем команду:
если в ответ получаем список всех файлов в этой директории, то диск и раздел выбраны правильно. Подгружаем модули:
Проверьте правильность написания первой команды для файловых систем ext3 и ext4 Если ОС расположена на разделе, отформатированном в btrfs, то выполняем следующие команды:После чего Grub перейдёт в полнофункциональный режим. Он автоматически найдет все операционки, которые можно подгружать, и покажет своё Grub-меню.
Дальнейшее восстановление сводится к тому, чтобы загрузить нужный нам Linux, и в нем от рута дать команду:
Boot-Repair is a simple tool to repair frequent boot issues you may encounter in Ubuntu like when you can't boot Ubuntu after installing Windows or another Linux distribution, or when you can't boot Windows after installing Ubuntu, or when GRUB is not displayed anymore, some upgrade breaks GRUB, etc.
Boot-Repair lets you fix these issues with a simple click, which (generally reinstalls GRUB and) restores access to the operating systems you had installed before the issue.
Boot-Repair also has advanced options to back up table partitions, back up bootsectors, create a Boot-Info (to get help by email or forum), or change the default repair parameters: configure GRUB, add kernel options (acpi=off . ), purge GRUB, change the default OS, restore a Windows-compatible MBR, repair a broken filesystem, specify the disk where GRUB should be installed, etc.
For the purpose of helping the forum and IRC members help you diagnose issues with your boot setup, Boot-Repair (provided it has a network connection) will create a Ubuntu pastebin link for you to share that allows experienced members to see what's wrong with your boot. Ubuntu's Pastebin is not easily indexable or searchable, and purpose of the tool which creates this page (Boot-Info) is meant to be a very benign and helpful solution to the problem. The intention is not violate your privacy, nor is it meant to make you a target. This tool is aimed entirely at those new to Ubuntu who want to get past their booting issues and enjoy using Linux. If you'd like to, you may completely opt out of all internet usage including pastebin link generation by looking at the Advanced Options section below. Please do not use this software if this is a problem for you.
Boot-Repair is a free software, licensed under GNU-GPL.

1st option : get a disk including Boot-Repair
The easiest way to use Boot-Repair is to create a disk containing the tool (eg Boot-Repair-Disk, a disk starting Boot-Repair automatically), and boot on it.
Remark : it is recommended to install the ISO on a live-USB (eg via UnetBootin or LiliUSB or Universal USB Installer). Do not burn it on a DVD if your computer has Windows8 pre-installed, or if your boot is in EFI mode.
2nd option : install Boot-Repair in Ubuntu
- either from an Ubuntu live-session (boot your computer on a Ubuntu live-CD or live-USB then choose "Try Ubuntu") or from your installed Ubuntu session (if you can access it)
- connect to the Internet
- open a new Terminal, then type the following commands (press Enter after each line):
Recommended repair
- launch Boot-Repair from either :
- the Dash (the Ubuntu logo at the top-left of the screen)
- or by typing 'boot-repair' in a terminal
Warning: the default settings are the ones used by the "Recommended Repair". Changing them may worsen your problem. Don't modify them before creating a BootInfo URL, and asking for advice on Ubuntu Forums Absolute Beginners Section or in Installation and Upgrades.
Advanced options
* If you would like to opt-out of the paste.ubuntu.com link creation (Not recommended for inexperienced users who are seeking help from a forum or IRC member), you can. Simple click on the Advanced Options, and find the "Other Options" tab. Uncheck "Upload the report to a pastebin".
* The log may include UUIDs, LUKS headers, hex dump of your first sectors of your drives, device serial numbers, your username and more.
![https://i.imgur.com/eCKHkoM.jpg]()
Boot-Repair (последним исправлял пользователь guiverc 2021-11-06 06:52:01)
The material on this wiki is available under a free license, see Copyright / License for details
You can contribute to this wiki, see Wiki Guide for detailsGRUB 2's ability to fix boot problems is greatly improved over the original GRUB bootloader. In addition to an automatic fallback mode if booting from a menuentry in a submenu, GRUB 2 allows the user to edit its menu before the operating system is loaded. The rescue mode GRUB 2 terminal can help boot an operating system so that permanent repairs to system files can be made.
The instructions on this page are written for a fully-installed Ubuntu operating system. WUBI boot problems are not covered in detail although they are addressed in several sections.
- GRUB has failed to find even the most basic information, usually contained in the MBR or boot sector.
Each of the GRUB 2 failure modes can normally be corrected either from the GRUB 2 terminal or by using an Ubuntu LiveCD. Additionally, there are compatible 3rd party bootable "rescue" CD/USB options which may also work. If using an Ubuntu LiveCD, it is recommended, but not always necessary, to use the same version CD as the system you are trying to repair. This ensures compatability of any modules and configuration files that may be loaded while attempting to repair the system.
Normal
When GRUB 2 is fully functional, the GRUB 2 terminal is accessed by pressing c. If the menu is not displayed during boot, hold down the SHIFT key until it appears. If it still does not appear, try pressing the ESC key repeatedly.
-
A few of the more important commands:
When GRUB 2 is unable to boot or display the GRUB 2 menu the system will be left at a GRUB 2 terminal if possible. If the system boots to the grub> prompt, the usual modules and commands are normally available. The user may need to manually load modules using the insmod [module] command before some commands will work.
grub rescue>
In the grub rescue mode, only a limited set of commands are available. These commands are sufficient to investigate the contents of the drives, set prefix (path to the grub folder) and root (partition), load modules and boot.
Boot-Repair
![info.jpg]()
The majority of this guide is devoted to working with the GRUB 2 terminal, which is used to enter commands to attempt to repair a broken bootloader. Boot-Repair is a GUI application which can automatically analyze boot problems and select the proper course of action to repair them. Its simple interface provides beginners as well as experienced Linux users an easy method of repairing the majority of GRUB 2 problems.
Additionally, Boot-Repair contains an automated method to run a boot info script which performs a series of tests and provides a file containing much valuable information regarding the status of the computer's operating and boot systems. This file can be inspected by community helpers on forums or IRC channels to help diagnose boot problems.
Boot-Repair can be run from a LiveCD or an operating Linux system. To download the package run the following commands:
Visit the Boot-Repair community document for more information.
Boot-Repair is available from the Launchpad repositories and can be run from a CD or a working Linux OS.
Search & Set
A great many boot problems are due to incorrect paths to required files. The GRUB 2 terminal, in either 'failure' mode, provides a robust ability to search hard drive(s) and partitions and to inspect their contents.
In order to boot successfully, the root, prefix, linux and initrd variables must be correct. The user must verify the paths and names of these items. If they are incorrect, use the commands below to find and fix them. GRUB 2 variable settings can be viewed with the set command.
In the following examples, X is a hard drive number; Y is a partition number. If a command example includes either of these replace them with the appropriate value.
![]()
Как известно, при использовании Windows и Linux на одном компьютере, рекомендуется устанавливать Linux, в том числе и Ubuntu, уже после того, как установлена Windows. Связано это с тем, что установочная программа Ubuntu определяет уже установленные на компьютере операционные системы, добавляет их в свой загрузчик, и при запуске компьютера вы можете выбирать, какую операционную систему вы хотите запустить. Что же касается Windows, то ее установочная программа определяет только другие версии Windows, а все остальные операционные системы, такие как Linux, FreeBSD, MacOS и так далее, она просто игнорирует. Поэтому, если установить Windows ПОСЛЕ установки Ubuntu - вы потеряете возможность загрузки в Ubuntu. Самый топорный способ восстановить загрузку Ubuntu - переустановить ее еще раз. Конечно же, при этом вы теряете все свои настройки, установленные программы и пользовательские файлы. Я уже писал как сделать по другому здесь: восстановление GRUB2. Но способ, скажу честно, тяжеловатый для новичков. Сегодня же я расскажу о другом, совершенно простом способе восстановления загрузчика Ubuntu и "починки" загрузки операционных систем - программе boot-repair.
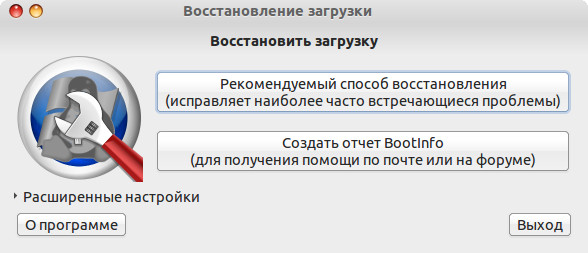
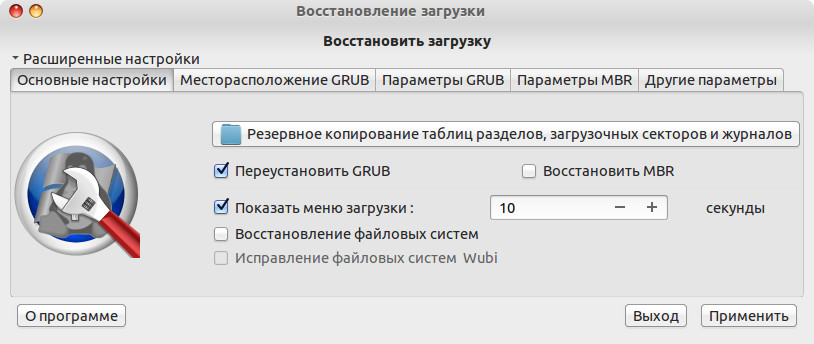
Программа boot-repair имеет два режима работы: простой и расширенный.
![Простой режим работы boot-repair в Ubuntu]()
![Расширенный режим boot-repair в Ubuntu]()
Если вы установили Windows после Ubuntu или потеряли возможность загрузки по каким-либо другим причинам, рекомендуется сначала попробовать автоматическое восстановление - скорее всего оно вам поможет.
Только у нас сайдинг для наружной отделки дома по приемлемой стоимости
Установка boot-repair в Ubuntu
Чтобы установить boot-repair на установленную на компьютер Ubuntu, или запущенную с флэшки или диска, необходимо подключение к интернету. Откройте терминал (CTRL+ALT+T) и выполните следующие команды:
sudo add-apt-repository ppa:yannubuntu/boot-repair
sudo apt-get update
sudo apt-get install boot-repairЗагрузочный диск с boot-repair
Читайте также:
- С какой версии windows стало возможным создать замкнутую программную среду для пользователей
- Ошибка в данном пакете установщика windows nod32
- Если управление обычным питанием не выключено возможно получение сообщений от windows
- Canon laser shot lbp 1120 драйвер windows 10 x64 как установить
- Поиск телефона windows phone