
Как записать armbian в linux
Обновлено: 04.07.2024
If you are new to Armbian, the Getting Started section provides a tutorial for everything you need to get Armbian running and answers many Frequently Asked Questions. It then continues on to more advanced topics.
If you need help and have read through Getting Started check out Troubleshooting.
If you still cannot find what you need here visit the Armbian forum where your input can help to improve this documentation.
What is Armbian?
Armbian is a base operating system platform for single board computers (SBCs) that other projects can trust to build upon.
- Lightweight Debian or Ubuntu based Linux distribution specialized for ARM development boards
- Each system is compiled, assembled and optimized by Armbian Build Tools
- It has powerful build and software development tools to make custom builds
- A vibrant community
What is the difference between Armbian and Debian/Ubuntu?
- Debian or Ubuntu officially do not support most of those boards/boxes. Armbian does.
- Armbian userspace has many small but vital performance or security adjustments
- Armbian fancy some kernel development and a lot of its maintaining. Debian relies on upstream sources for ARM hardware which can be years behind and/or lack of many functions
- Armbian userspace is lean, clean but 100% Debian/Ubuntu compatible
- Many stock Debian bugs are fixed on the way, “better than original :)”
- The Armbian build system is a central part of this whole ecosystem. You can DIY. Debian is much harder.
- Dedicated support forums per boards/boxes
- Plug’n’Play vs. complicated install scenarios on stock Debian
- unified development scenarios and user experience vs. mess of different setup instructions scattered all around
Common features
- Armbian Linux is available as Debian and Ubuntu based images, compiled from scratch
- Images are reduced to actual data size and automatically expand across the SDcard at first boot
- Root password is 1234 . You are forced to change this password and (optional) create a normal user at first login
- Ethernet adapter with DHCP and SSH server ready on default port (22)
- Wireless adapter with DHCP ready (if present) but disabled. You can use armbian-config to connect to your router or create an access point
- NAND, SATA, eMMC and USB install script is included ( nand-sata-install )
- Upgrades are done via standard apt upgrade method
- Login script shows: board name with large text, distribution base, kernel version, system load, uptime, memory usage, IP address, CPU and drive temperature, ambient temperature from Temper if exits, SD card usage, battery conditions and number of updates to install
Performance tweaks
- /var/log is mounted as compressed device (zram, lzo), log2ram service saves logs to disk daily and on shutdown
- Half of memory is allocated/extended for/with compressed swap
- /tmp is mounted as tmpfs (optionally compressed)
- Browser profile memory caching
- Optimized IO scheduler (check /etc/init.d/armhwinfo )
- Journal data writeback enabled. ( /etc/fstab )
- commit=600 to flush data to the disk every 10 minutes ( /etc/fstab )
- Optimized CPU frequency scaling with interactive governor ( /etc/init.d/cpufrequtils )
- 480-1010Mhz @Allwinner A10/A20
- 480-1368Mhz @Allwinner H2+/H3
- 392-996Mhz @Freescale imx
- 600-2000Mhz @Exynos & S905
What is supported?
Armbian will publish and distribute “stable” CLI images for supported boards through its mirror network. Supported is not a guarantee. Supported has a named maintainer and implies a particular SBC is at a high level of software maturity. Due to the complexity and lack-of-openness in the ecosystem it is unlikely that all accelerated and specialized functionalities (like 3D, VE, I²C…) will be available.
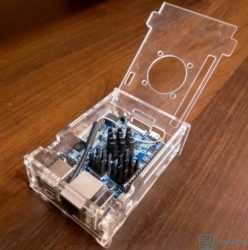
![Orange Pi PC olus в корпусе и радиаторами]()
Для чего нужен принт-сервер? Как сделать usb принтер сетевым? Разберемся с использованием одноплатного компьютера. Если дома или офисе есть несколько устройств с которых необходимо распечатывать, но принтер всего один на всех и у него нет сетевых подключений, то не очень удобно его использовать если даже расшарить принтер по локальной сети на одном компьютере (приходиться его держать постоянно включенным). На помощь может придти одноплатник, подойдет любая модель из всех существующих, и это будет намного дешевле уже готового принт-сервера, а в будущем можно будет к нему подключить жесткий дик и расшарить его на всех для обмена файлами между устройствами.
Далее разберем установку и настройку принт-сервера на одноплатный компьютер Orange Pi PC+ в системе Armbian Bionic (mainline kernel 4.14.y)
Что нам необходимо чтобы сделать принтер сетевым?
-
самый дешевый (с установленным на нем радиатором ).
- Micro SD card (на 2 ГБ или более). или подготовленное питание от самого принтера, напряжение +5В.
- Сам виновник торжества принтер безсетевой.
- Локальная сеть (Ethernet или Wi-Fi)
- a xz-compressed image file,
- a sha file for download verification
- and an asc file for image authentication.
- one CLI server image with Debian Buster userspace
- one CLI server image with Ubuntu Focal userspace
- one desktop image with Ubuntu Focal userspace or Debian Buster userspace
- made from stable branches
- not very well tested
- for end users
- made from unstable branches
- untested
- for experienced users only
- kernel 3.4.x and NAND storage
- pre-installed system on NAND (stock Android or other Linux)
- any kernel
- onboard eMMC storage
- attached SATA or USB storage
- boot from SD, system on SATA / USB
- boot from eMMC / NAND, system on eMMC/NAND
- boot from eMMC / NAND, system on SATA / USB
- Setting up VirtualBox and compile environment is easy following our Vagrant tutorial, environment is also supported for building kernels and full OS images,
Установка Armbian
Для установки системы нам необходимо скачать образ Armbian для нашего одноплатника и записать его на microSD.
Скачиваем образ с официального сайта Armbian , в моем случае я качаю для Orange Pi PC+
Дальше записываем скаченный образ с помощью программы Win32DiskImager, инструкция записи образов описывалась уже ранее. Есть возможность записать образ программой Etcher.
Подключение к Orange Pi через SSH
После записи образа на sd карту запускаем Апельсинку и подключаемся к ней по SSH с помощью PuTTY. IP адрес у каждого свой, мой 192.168.1.197, порт стандартный 22.
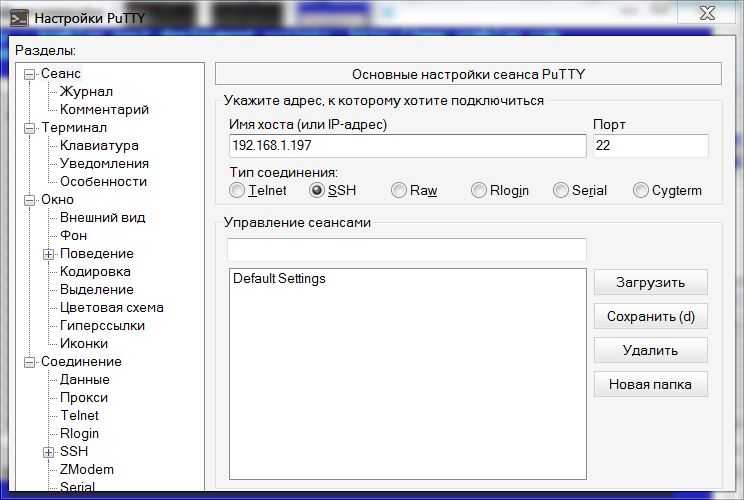

Подключаемся и вводим логин: root, пароль: 1234
На свежеустановленном Armbian система запросит смену пароля для root и создание нового юзера
The download for each image consists of three separate files:
For each board we usually provide:
Other unsupported builds may also be available (like Debian Stretch/Bullseye or Ubuntu Disco/Eoan/Hirsute).
Some boards have different options due to their hardware specialities - router or IoT boards.
Legacy or current?
Only current kernel branch is considered fully supported and can bring up video acceleration for example. NAND support is there but is still experimental.
The level of kernel support does depend on the board family. If in your specific case something does not work well, you are always free to try an image with legacy kernel included.
What are testing images?
What are experimental/bleeding edge images?
Do not use testing or edge images in a productive environment. We do appreciate your constructive feedback to developers.
How to check download authenticity?
All our images are digitally signed and therefore it is possible to check their authenticity. You need to issue these commands (Linux/macOS, you might need to install dependencies first, eg. apt-get install gnupg on Debian/Ubuntu or brew install gnupg on macOS. on windows install the current simple gnupg Gnupg:
It is safe to ignore the message WARNING: This key is not certified with a trusted signature! .
How to check download integrity?
Since it might happen that your download got somehow corrupted we integrate a checksum/hash for the image. You can compare the image’s SHA-256 hash with the one contained in the sha256sum.sha file.
On Windows, you can download and use the QuickHash GUI and follow the instructions in the gui.
while on Linux/macOS, in the directory in which you have downloaded the files ,you would do this
How to prepare a SD card?
Important note: Make sure you use a good, reliable and fast SD card. If you encounter boot or stability troubles in over 95 percent of the time it is either insufficient power supply or related to SD card (bad card, bad card reader, something went wrong when burning the image, card too slow to boot – ‘Class 10’ highly recommended!). Armbian can simply not run on unreliable hardware so checking your SD card with either F3 or H2testw is mandatory if you run in problems. Since counterfeit SD cards are still an issue checking with F3/H2testw directly after purchase is highly recommended.
Write the xz compressed image with USBImager or balenaEtcher on all platforms since unlike other tools, either can validate burning results saving you from corrupted SD card contents.
Also important: Most SD cards are only optimised for sequential reads/writes as it is common with digital cameras. This is what the speed class is about. The SD Association defined Application Performance Class as a standard for random IO performance.
| Application Performance Class | Pictograph | Miniumum Random Read | Minimum Random Write | Minimum Sustained (Seq. Write) |
|---|---|---|---|---|
| Class 1 (A1) | 1500 4k IOPS | 500 4k IOPS | 10MBytes/sec | |
| Class 2 (A2) | 4000 4k IOPS | 2000 4k IOPS | 10MBytes/sec |
At the time of this writing A1 and A2 cards are only widely available from SanDisk. Armbian recommends A1 rated SD-Cards only now (A2 rated cards need yet lacking driver support and therefore show lower overall and especially random IO performance). For example:


In case you chose an SD card that was already in use before please consider resetting it back to ‘factory default’ performance with SD Formatter before burning Armbian to it (explanation in the forum). Detailed information regarding ‘factory default’ SD card performance.
How to boot?
Insert SD card into a slot and power the board. (First) boot (with DHCP) takes up to two minutes with a class 10 SD card and cheapest board.
How to login?
First boot will log you automatically on HDMI or serial console while for SSH login you need to login as root and use password 1234. You will be prompted to change this password. You will then be asked to create a normal user account that is sudo enabled (beware of default QWERTY keyboard settings at this stage). Please use this tool, to find your board IP address.
How to update?
Update process can take hours in case of using cheap SD card and/or under heavy load.
If the kernel was upgraded during this process you will be prompted to reboot at next login.
How to update u-boot?
First you need to update packages described in a previous “How to update” step. Then run armbian-config utility, go to system settings and proceed to:
“Install” “Install to/update boot loader” -> Install/Update the bootloader on SD/eMMC
How to adjust hardware features?
How to install to eMMC, NAND, SATA & USB?

Start the install script:
and follow the guide. You can create up to three scenarios:
and you can choose the following file system options:
On Allwinner devices after switching to boot from NAND or eMMC clearing the boot loader signature on the SD card is recommended: dd if=/dev/zero of=/dev/mmcblkN bs=1024 seek=8 count=1 (replace /dev/mmcblkN with the correct device node – in case you run this directly after nand-sata-install without a reboot in between then it’s /dev/mmcblk0 ). When booting from eMMC to get SD cards auto-detected on Allwinner legacy images please consider changing mmc0 ‘s sdc_detmode from 3 to 1 in the board’s fex file (see here for details).
How to connect to wireless?
Required condition: a board with onboard or supported 3rd party wireless adapter on USB
If you know what is your wireless SSID:

If you do not know, you can browse and then connect

How to set fixed IP?
By default your main network adapter’s IP is assigned by your router DHCP server and all network interfaces are managed by NetworkManager:
The conncetion can now be edited with the following:
The same changes can also be done with NetworkManagers text user interface:
Not officially supported build environments from community contributions:
Please note that system requirements (both hardware and OS/software) may differ depending on the build environment (Vagrant, Docker, Virtualbox, native).
How to start?
Native and VirtualBox environments:
Login as root and run:
Make sure that full path to the build script does not contain spaces.
Providing build configuration
After the first run of compile.sh a new configuration file config-example.conf and symlink config-default.conf will be created. You may edit it to your needs or create different configuration files using it as a template.
Alternatively you can supply options as command line parameters to compile.sh. Example:
Note: Option BUILD_ALL cannot be set to “yes” via command line parameter.
Note: Names for BOARD can be found here by looking at file names. Example: OrangePi 4 = orangepi4.conf = BOARD=orangepi4
Base and descendant configuration
You can create one base configuration ( config-base.conf ) and use this in descendant config ( config-edge.conf ). Three parameters (BRANCH, RELEASE, COMPRESS_OUTPUTIMAGE) will be overwritten.
Using our automated build system
Board beta images are defined in board configuration files which are located here. This is a typical board configuration:
You can find more information about those variables here.
If you want that our automated system start making images for this particular board, you need to alter parameters CLI_BETA_TARGET and DESKTOP_BETA_TARGET . Variants are dependent from KERNEL_TARGET definitions and supported userlands: hirsute , focal , buster . To edit those parameters you need to push changes to the build script. You need to fork a project and create a pull request and after it is imported by one of the administrators, images will start to show up in appropriate folder.
If you want to enable Debian buster desktop image with current kernel choose the following:
or for command line interfaces Ubuntu Focal based images with legacy kernel 4.19.x
or for image with latest upstream development/bleeding edge kernel.
Using alternate armbian builder repos and branches
Executing any bash statement
Currently, invoking compile.sh will run a monotonous task of building all the components into a final image.
In some situation, especially when developing with Kernel or U-Boot, it is handy to run a portion of that great task like:
You can also dump the variable:
NOTE: please use single quotes to keep the $VAR from early expansion in the command line shell.
Читайте также: