
Linux boot cmd что это
Обновлено: 04.07.2024
On supported Allwinner SoCs it is possible to boot over USB OTG. This requires only minimal changes compared to the build steps in the manual build howto, and these changes are explained on this wiki page.
By booting over USB OTG, it is possible to forgo the SD-Card entirely, and it is especially useful for devices where no UART can be found, or where the UART is multiplexed with the SD-Card. You can then use a micro-SD breakout adapter to access the serial port.
Contents
There is a utility in the sunxi-tools repository called 'sunxi-fel'. This utility is used for booting the system over USB and it needs to be installed first.
The command line syntax of the sunxi-fel utility:
Warning: some Linux distributions are already providing packaging for sunxi-tools. However they are also removing certain tools and renaming executables at their discretion. If you encounter troubles with the sunxi-tools package from your distro, then getting sunxi-tools directly from the github repository is always an option.
Before the 'sunxi-fel' tool can actually talk to your device, the device needs to be connected to your PC using a "USB A to USB mini/micro B" cable.
And then the device needs to be switched into FEL mode. Please refer to the FEL howto for information on how to boot to FEL mode. Device pages should mention the button which triggers FEL mode as well.
and it returns something like:
Then you have successfully switched the device into FEL mode and it is ready to accept commands or load the system over USB.
Mainline U-Boot (v2015.04 and newer versions)
Getting the mainline U-Boot sources
To obtain the U-Boot sources, clone the current U-Boot master branch:
Or alternatively the 'next' branch from the sunxi custodian tree:
Both of these branches are bleeding edge and may contain bugs from time to time. If you encounter troubles, try a tarball with the latest formal U-Boot release before giving up.
Booting U-Boot over USB
Then just do a regular u-boot build:
Make sure to pick the right Trusted-Firmware (TF-A, aka ATF) target, for A64 and H5 it's sun50i-a64, for H6 it's sun50i-h6, for H616/H313 it's sun50i-h616.
And boot it over USB (the 'sunxi-fel uboot' command requires an up to date version of sunxi-tools):
This boots U-Boot over USB. And after U-Boot takes control, it starts scanning various default locations for the boot.scr file in order to boot the rest of the system.
Booting the whole system over USB (U-Boot + kernel + initramfs)
This needs to be used with U-Boot v2015.10 or newer (which can automatically find the 'boot.scr' blob in RAM after it had been uploaded there by 'sunxi-fel').
Assuming that you have a kernel image, a correct dtb blob for your hardware, a boot script blob and an initrd image, booting all of this can be done with just a single 'sunxi-fel' invocation:
Somewhere between U-Boot v2017.03 and v2017.07, U-Boot switched to a new SPL format, which is not compatible with sunxi-tools release <=1.4.2 provided by some distros. The tool will print error message such as
You will need a later sunxi-tools from git to avoid this problem.
| an example boot.cmd | |
|---|---|
| 32-bit boards | 64-bit boards |
Following options may have to be enabled if you are using Buildroot (for 32-bit systems):
Overriding environment variables with uEnv-style data
With v1.4 and above, the sunxi-fel utility has gained the ability to pass environment data to U-Boot via FEL.
key=<value> pairs from a textual representation will get merged with the default environment; similar to U-Boot's import -t command, or what older U-Boot did with the uEnv.txt file on autoboot.
The signature will allow the sunxi-fel "write" command to detect uEnv-style data - and will cause it to flag this transfer accordingly, in turn requesting U-Boot v2016.09+ to import it afterwards. You may override arbitrary environment variables this way, including the bootcmd .
Example
Use your text editor to save a my.env file with
and then test it with
You should see U-Boot's autoboot print the corresponding message and drop you to the prompt, proving that you have successfully overwritten the default "bootcmd".
Early kernel development for new SoCs
Because FEL boot is supported by the BROM code, it is readily available out of the box. The 'sunxi-fel' tool only needs to be patched to add the SRAM layout information, but this is usually very simple and also extensively documented on this wiki page. A relatively challenging task is the U-Boot support, because it needs the DRAM initialization code for the SPL. But assuming that the U-Boot bootloader is already available, FEL boot can be used for kernel development even when there is no Ethernet or MMC support in the kernel yet. For the sake of convenience, it is best to write fel-sdboot.sunxi to the SD card (substitute /dev/sdX with the appropriate block device of your card reader):
Then just use the instructions from the previous section about U-Boot + kernel + initramfs. And after the MMC support is implemented in the kernel, it becomes possible to move the rootfs to the SD card and get rid of the initrd image. But FEL USB boot is still useful until either Ethernet or USB becomes good enough for booting over network.
Legacy mainline U-Boot (v2015.04 and older versions)
Is here for historical reference only (click on the 'Expand' link to see it):
The U-Boot had to be configured using "*_felconfig" option before compiling (instead of "*_defconfig", as that builds a SPL only suitable for MMC boot). For example, in the case of a Cubietruck board, that would be:
Then just use the 'sunxi-fel' tool to upload various pieces to certain magic addresses (the magic CONFIG_SPL_TEXT_BASE=0x2000 and CONFIG_SYS_TEXT_BASE=0x4a000000 values can be found in the U-Boot sources). And execute them in a certain order:
This boots U-Boot over USB. And after U-Boot takes control, it starts scanning various default locations for the boot.scr file in order to boot the rest of the system.
Legacy u-boot-sunxi
Is here for historical reference only (click on the 'Expand' link to see it):
Preparing U-Boot
U-boot needs to be built specifically for booting over USB. This is called FEL mode, and enabling this disables the full SD card (for u-boot, script.bin and the kernel might re-enable it later on).
Just follow the guide to compile u-boot, but select a target whose name has _FEL.
Manual loading
While the script from the next section is perhaps better, you can now choose to load u-boot manually:
usb-boot script
There was a script in the older releases of Sunxi-tools called usb-boot. You can download this script from github using the tag for an old version 1.2:
And then use it as follows:
u-boot-spl.bin and u-boot.bin are the u-boot binaries which are FEL enabled.
boot.scr is the u-boot script. If you do not specify a file ending with .scr the default is used.
script.bin is your hw configuration converted to binary from .fex.
initramfs is an optional initramfs/initrd image in u-boot mkimage format.
Using sunxi-fel on Windows
Mandatory USB driver
Under Windows (unlike Linux) every USB device that an application program wishes to access must have a suitable USB driver installed.
This means that any device that shows up as "unknown" in your Device Manager will be inaccessible - typical symptoms would be an ERROR: Allwinner USB FEL device not found! message, or even
when trying to enforce the specific device with the --dev option.
Zadig to the rescue
Before launching it, make sure your Allwinner device is connected and in FEL mode.

- (Optional, but recommended) Tick the "Edit" checkbox on the right hand side, and enter a more descriptive name for the USB ID in question. This helps a lot later, to distinguish your Allwinner device from other USB entries in the Device Manager.
- Select the desired USB driver. This depends on the Windows executables you intend to use; namely the specific version of libusb that those binaries were compiled with. If your sunxi-fel.exe has special driver requirements, those should be stated in the accompanying documentation. When in doubt, select WinUSB for a "generic" driver (available from Win XP SP3 onwards).
- Click "Install Driver". Voilà - from now on your device should no longer be "unknown" in Device Manager, and sunxi-fel is expected to work with it.
Troubleshooting:
- If you have listdevs.exe available in your package, you may use it to check that Windows detects your device at all, and to determine the libusb bus/device numbers.
- In case you selected the wrong driver, you may simply re-run Zadig to install another. Use "Options", "List All Devices" and pick the desired one (keeping an eye on the USB ID once more). Alternatively you can use the Windows Device Manager to remove/uninstall the driver (effectively rendering the device "unknown" again), and then start from scratch.
SoC support status
570 KB/s (win7 laptop),
- ↑ Basic FEL commands like "read", "write" and "exe" are already supported in a generic way on every SoC. This table column only shows support status for advanced commands like "spl" and "uboot".
- ↑ The transfer speed can be measured by running the following commands:
You can use any file instead of "uImage". Larger file size means better speed measurement accuracy, so pick something that has size of at least several megabytes. Please note that the devices, which have MMU disabled, are currently expected to show slow transfer speeds (this can be probably improved later).
- 'sp_irq' is the value of the IRQ stack pointer register. The IRQ stack is typically empty, which means that the 'sp_irq' is pointing to both top and bottom of this stack (unless the processor is currently handling an IRQ).
- 'sp' is the value of the normal stack pointer register, also available to your code when it is executed via "sunxi-fel exe" command. This stack typically contains quite a bit of data between 'sp' and 0x7000 (which was written there by the FEL code from BROM).
General description of the "sunxi-fel uboot" command implementation
- For booting from the SD card or NAND, the BROM code is searching for a special eGON signature on a bootable media and loading up to 32K (in fact a bit less than that) of the initial code to the address 0x0 in SRAM (that's typically the SRAM section A1) and then executes it. This initial code (known as "SPL" in U-Boot or "boot0" in the Allwinner's bootloader) configures the DRAM to get access to more storage space, then loads the main part of the bootloader and the rest of the system there.
- For booting via FEL, the Allwinner's idea is that we are supposed to upload only something like up to
This is at least inconsistent and definitely not good for us. U-Boot used to require a special size-optimized variant of the SPL specifically for booting via FEL, which also had the base address changed from 0x0 to 0x2000 as an additional inconvenience. Having a special variant of the SPL means an extra configuration to maintain. And the code size limitation is also a nasty problem because a certain set of features has to be disabled. But the "spl" and "uboot" commands, which are implemented by the "sunxi-fel" tool, can work-around this limitation by smuggling just the ordinary MMC or NAND variant of the U-Boot SPL into SRAM. More technical details are provided below.
The reason why we have
15K code size limitation when booting via FEL is illustrated on the picture below. When we are booting the device in FEL mode, a special code is activated in the BROM and starts communicating over USB using FEL protocol. The USB driver code from the BROM allocates two stacks at rather inconvenient locations inside of the first 32K of SRAM. The IRQ handler stack is set at the address 0x2000 and grows down. And the ordinary application stack is set at the address 0x7000 and also grows down. These stacks make the SRAM space fragmented, and the largest usable contiguous
15K area is sandwiched between these two stacks. Overwriting either of these stacks via the "sunxi-fel write" crashes the device and it just stops responding to further FEL commands. So uploading a normal U-Boot SPL (which typically has size slightly larger than 20K) to the address 0x0 via "sunxi-fel write" command with the intention to execute it via "sunxi-fel exe" command does not work as expected.
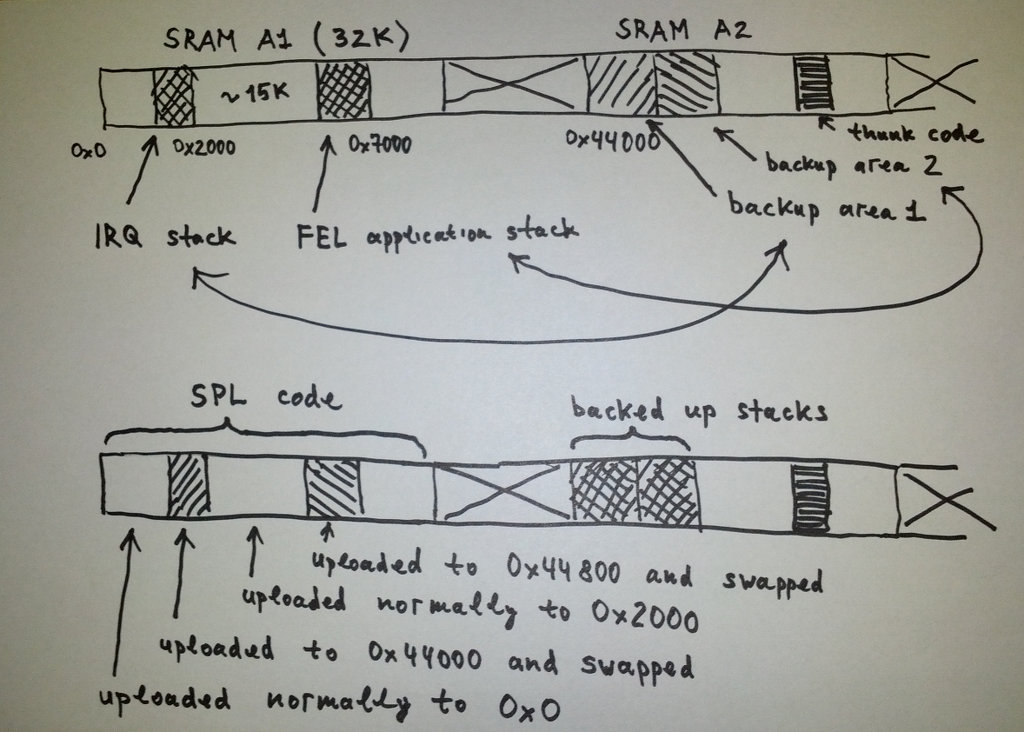
So, how do we solve this problem? Allwinner devices typically have more than 32K of SRAM (the smallest total amount of SRAM among all devices is 48K in Allwinner A13). And we can use extra SRAM locations as a backup storage for the FEL stacks (shown as "backup area 1" and "backup area 2" on the picture above). We also upload a special thunk code, which is responsible for swapping the content of the FEL stacks with the content of these backup areas before jumping to the address 0x0. Now in order to execute a full-fledged SPL from U-Boot, we only need to split the SPL into chunks and upload it to SRAM, writing the parts which are supposed to overlap the FEL stacks to the backup areas. Executing the thunk code saves the FEL stacks to the backup areas, reassembles the SPL together and passes control to the SPL.
Why do we need to backup the original FEL stacks? The reason is that just uploading and executing the SPL alone is not enough to boot the system. The SPL code is very small and its primary task is to setup clocks and initialize the DRAM. After the DRAM is initialized, all the storage space problems are resolved and we want to load the main U-Boot code to the device. And for this we still need the BROM FEL code alive and getting control back, so that it can still talk with the 'sunxi-fel' tool over USB and execute FEL commands. Hence the SPL returns control back to the thunk code. The thunk code swaps FEL stacks with backup areas again and finally passes control back to the FEL code in the BROM, which is able to happily resume its work because it has all the original data back in its stacks.
The SoC-specific mandatory thing
The previous section describes how the "sunxi-fel spl" and "sunxi-fel uboot" commands work. But not everything is perfect. One inconvenient thing is that the SRAM address space layout (and the location of the backup areas) may be different for different SoC variants. Hence we need to provide the SRAM layout description information for each SoC in the source code of the 'sunxi-fel' program. The comments in the source code should provide reasonable explanations. And here is an example of such SRAM layout information for A31:
Basically, the first backup area for A31 is set at 0x44000 and covers the IRQ stack (0x1800-0x2000). The second backup area is set at 0x44800 and covers the normal FEL stack plus also some extra area above it (0x5C00-0x8000). The thunk code is placed at 0x46E00.
The SoC-specific bonus features
- While this is not strictly required, we can tweak the cacheability attributes of the memory sections by modifying the MMU translation table. This improves the performance of the "sunxi-fel write" command and helps to significantly reduce the time needed to upload large chunks of data to DRAM.
- The Cortex-A8 based SoC variants need a tweak for the AUXCR L2EN bit. Without this, the L2 cache ends up disabled in Linux after booting over FEL.
Testing
After adding the support for a new SoC variant to the 'sunxi-fel' tool, it makes sense to actually test whether it works. In the case if U-Boot already has support for this particular SoC variant, the testing is simple and can be done by just running "sunxi-fel uboot u-boot-sunxi-with-spl.bin" command and confirming that U-Boot starts properly on the device.
In the case if U-Boot still does not have full support for this particular SoC variant yet, testing still can be done using the Allwinner's boot0 bootloader. If you have some boot0-based bootable SD card image (let's call it 'sdcard-image.bin'), then you can:
- write this image to an SD card
- extract the boot0 part from this image via running "dd if=sdcard-image.bin of=boot0.bin bs=1024 skip=8 count=32"
- switch the device into FEL mode
- insert the SD card
- run "sunxi-fel spl boot0.bin"
If the system boots normally, in the same way as just doing a normal boot from the SD card, then the 'sunxi-fel' tool is working fine. Please note that you may get error messages from the 'sunxi-fel' tool while doing this. This is normal and expected (boot0 does not return control back to the FEL code in BROM but instead does its usual booting of the system from the SD card).
There is quite a lot of room for improvement:
- Allow the 'sunxi-fel spl' command to also use raw SD card images in addition to just recognizing 'u-boot-sunxi-with-spl.bin' format.
- Store the magic addresses (CONFIG_SYS_TEXT_BASE, kernel_addr_r, fdt_addr_r, scriptaddr, ramdisk_addr_r) in the EGON header extension in order to avoid the need of passing them to the 'sunxi-fel' tool as command line parameters.
- Single U-Boot binary for both the regular UART serial console and the UART over the MicroSD Breakout configurations. The configuration option can be provided to the 'sunxi-fel' tool in a command line argument and handed over to to U-Boot in the eGON header extension.
The exact eGON header extension format needs to be formalized. We should also check whether it can provide backwards/forward compatibility with the Allwinner's BOOT0 bootloader.
У меня на домашнем компьютере стоит две операционные системы, Windows 7 и Linux (Arch). Причем вторая появилась относительно недавно. Да и особых знаний о новой (для меня) ОС не было. Тем не менее систему я поставил и даже относительно настроил под себя. Энтузиазм и программерское любопытство меня пересиливало, поэтому, в качестве ознакомления, стал экспериментировать с различного рода пакетами. К сожалению, не всегда вчитываясь в детали.
Решил я переставить Grub, а точнее обновиться до Grub2. (Слышал я такое мнение, что в духе Linux принято держать последнюю версию пакета… Про изменения Grub2 хорошо написано тут.)
Ну и как результат «спешной» установки — перестала грузиться система. Единственное за что можно было зацепиться — это приглашение командной строки:
По нажатию на Tab вываливается список возможных команд. Их существенно меньше чем в командной строке Linux, но их достаточно для загрузки системы. Почитав про grub тут я решил загрузить Windows, все-таки тут я пока себя чувствую увереннее. Для этого нужно было указать где находиться загрузчик ОС и передать ему управление:
grub> root (hd0,2) [Устанавливаем корневой раздел и монтируем. Тут главное помнить, на каком разделе стоит операционная система]
Запись (hd0,2) означает устройство диска номер 0 (мастер), раздел номер 2.
что соответствует устройству /dev/sda2 (в моем случае). У вас это может быть или /dev/hd2, или еще что-нибудь, в зависимости от дистрибутива. Нумерация устройств идет по-порядку и начинается с (hd0,1) или /dev/sda1.
Далее вводим:
grub> chainloader +1 [пробел перед "+" важен. сhainloader - передает управление загрузкой по цепочке другому загрузчику. В моем случае это был NTLDR]
grub> boot
NTLDR — это загрузчик Windows.
Система стала грузиться, а раз это дало результат — можно копаться дальше (все-таки не Windows теперь предмет изучений).
Перезагружаемся и вводим снова.
grub> root (hd0,6)
grub> linux /boot/vmlinuz26 root=/dev/sda6 [Загружает указанное linux-ядро (/boot/vmlinuz26) с параметрами(root=/dev/sda6)]
Тут стоит различать команду root (hd0,6) и параметр root=/dev/sda6. Первое монтирует раздел к среде выполнения. А второе указывает где находиться root загружаемой ОС. В моем случае ядро и корень оказались на одном разделе, хотя это может быть не так.
grub> initrd /boot/kernel26.img [Загружает указанный initrd-образ]
grub> boot
- для загрузки Windows вместо root (h d0,2) надо набирать rootnoverify (hd0,1). Нумерация устройств начинается с (hd0,0), а не (hd0,1). А командой rootnoverify вы устанавите корневое устройство, но не смонтируете его.
- для загрузки Linux поменяется другая команда: вместо linux вам понадобится команда kernel (полный аналог, даже параметры теже).
UPD: дописал про отличия загрузки с grub от grub2. Спасибо bliznezz
Посмею предположить, что каждого интересовало хоть когда-либо то, что происходит за занавесом заставок и загрузочных экранов с момента включения питания компьютера к моменту, когда предлагается войти в систему.
Я предлагаю вам познакомиться со следующими уровнями типичной загрузки Linux:
1. BIOS
- BIOS отвечает за базовый ввод/вывод данных с устройств/на устройства.
- Делает некоторые проверки целостности устройств. К тому же, за тестирование работоспособности электроники отвечает POST (Power-on self-test, он же «тест на адекватность себя самого», выполняющийся как этап пре-загрузки), который управляется BIOS
- Ищет, загружает и выполняет программу-загрузчик ОС
- Берет загрузчик из флопика, сидюка или жесткого диска. Во время загрузки BIOS'а вы можете нажать на кнопку (обычно это F12 или F2 или Del, зависит от платформы), если вам требуется внести некоторые изменения касательно настройки железа.
- Как только загрузчик был обнаружен и загружен в память, BIOS передает управление ему.
- Короче говоря, BIOS загружает и выполняет загрузочную запись (MBR).
2. MBR
- MBR — это главная загрузочная запись, хранящаяся на жестком диске
- Она размещена в 1-м секторе загрузочного диска, например /dev/hda или /dev/sda
- MBR занимает меньше, чем 512 байтов. Она состоит из трех компонентов: 1) главная загрузочная информация, «живущая» в первых 446 байтах; 2) информация о таблице разделов — в следующих 64 байтах; 3) и последние 2 байта нужны для проверки корректности mbr.
- Она содержит информацию о GRUB'е (или LILO).
- Простыми словами — MBR загружает и выполняет загрузчик GRUB.
3. GRUB
- GRUB — Grand Unified Bootloader.
- Если в вашей системе установлено более, чем одно ядро, у вас есть возможность выбирать, которое из них должен выполняться
- GRUB отображает
красивую анимацию plymouthзаставку, и, подождав несколько секунд интерактивного воздействия пользователя, если он не нажал ни одной клавиши, он загружает ядро, установленное по умолчанию в файле конфигурации grub. - GRUB понимает, что такое файловая система (древние загрузчики Linux'а, например, LILO этого не понимают).
- Конфигурационный файл Grub обычно лежит по пути /boot/grub/grub.conf (так же /etc/grub.conf может быть символьной ссылкой на него). Вот пример файла конфигурации для CentOS:
4. Ядро или Kernel
- Ядро монтирует файловую систему в соответствии с настройкой «root=» в фале grub.conf
- Выполняет программу /sbin/init
- Поскольку init — это первый процесс, запущенный ядром Linux, поэтому она имеет идентификатор процесса (PID) №1. Можете выполнить «ps -ef | grep init» и убедиться в этом.
- initrd — это Initial RAM Disk, он же временный диск в оперативной памяти
- initrd используется самим ядром в качестве временной корневой файловой системы, пока kernel не загрузится в реальную примонтированную файловую систему. Этот временный диск также содержит необходимые для загрузки драйверы, позволяющие получить доступ к разделам дисков и другому оборудованию
5. Init
- Смотрит в файл /etc/inittab для того, чтобы определить уровень выполнения (run level).
- Есть следующие уровни выполнения:
- 0 – прервать выполнение
- 1 – Однопользовательский режим, так называемый «Single user mode», или иными словами, консоль восстановления
- 2 – Многопользовательский режим без поддержки NFS
- 3 – Полноценный многопользовательский режим
- 4 – не используется
- 5 – X11
- 6 – перезагрузка
6. Уровень выполнения программ (Runlevel)
Вот и все. Возможно, некоторым из вас это не ново и особого интереса не было при чтении статью, поскольку она более ориентирована на начально-средний уровень знакомства з Линуксом.
В таком случае могу лишь сказать, что «повторение — мать учения» (с).Дополнения, исправления, уточнения
-
: «Ну скажем прямо — так грузятся далеко не все дистры». С ним согласилось большинство, отмечая и bsd-style init, u-boot, и хоть initrd в статье пропущен, стоить заметить, что он нужен ядру не во всех дистрибутивах. Также отмечено, что в slackware поддержка rc.d осуществляется только в качестве совместимости, а встраиваемые системы грузятся иначе. На декстопах иногда бывает EFI, а кроме того Linux популярен в мире embedded и там ещё куча разных платформ. Линукс в телефоне вообще иначе грузится. , ссылая на википедию: Еще хочется сделать замечание по поводу MBR, первого сектора и пр. Все несколько усложнилось за последние годы. Сейчас уместней говорить о EFI.
Support for sunxi devices is increasingly available from upstream U-Boot. This page describes that support.
This document is mainly for 32bits ARM device. Differences for ARM64 are only mentioned in the Compile U-Boot section. For more info see directly board/sunxi/README.sunxi64 in uboot sources.
Contents
The goal of this matrix is to give an easy view of work on each SoC worked on by linux-sunxi.
Get a toolchain
If you haven't done so before, get a suitable toolchain installed and added to your PATH.
You may also need to add some additional packages to build U-Boot:
If you experience: fatal error: Python.h: No such file or directory run the following
Get the Device-tree Compiler
Depending on your desired U-Boot version, a sufficiently up-to-date dtc may be required. (The build process will error on an outdated dtc, and request you to upgrade it.) The installation of dtc is described in the Device tree article.
If you are going to build a Linux kernel alongside U-Boot, it might also be worth to examine the kernel sources - as they come with dtc included under $/scripts/dtc/ .
Clone the repository
You can clone the u-boot repository by running:
Determine build target
Go to your u-boot tree and search in the directory configs/ for your board, the file name looks like <board_name>_defconfig.
So, if your device is Cubieboard2 your build target is Cubieboard2_defconfig.
Build
Arm Trusted Firmware (arm64)
In order to build U-Boot for a arm64 device you need to build Arm Trusted Firmware (ATF) as a prerequisite first. Change <platform> to your needs. PLAT=sun50i_a64 for example is suitable for H5 and A64 devices. (See board/sunxi/README.sunxi64 in uboot sources for more infos.)
When you have determined what <board_name> just configure U-Boot with a suitable default configuration. Use menuconfing to play with the settings if you feel like it and then just build it:
(When compiling natively, omit the CROSS_COMPILE=… )
When the build has completed, there will be u-boot-sunxi-with-spl.bin available in your u-boot tree. The installation step will instruct how to install this on the installation media (e.g. a SD card), but first U-Boot needs to be configured.
This article provides a collection of various scenarios for booting with U-Boot.
For getting these bits loaded onto the hardware, please refer to the respective howto:
Booting with boot.cmd
For booting from SD with mainline U-Boot, the recommended way is:
- create a file boot.cmd on the first partition (also check Kernel arguments for extra 'bootargs' options):
- If you also want to use an initramfs, please refer to the Initial Ramdisk article for details.
- boot.cmd isn't used directly, but needs to be wrapped with uboot header with the command:
Booting with extlinux.conf
Mainline U-Boot also use syslinux/extlinux as payload.
You need to install the boot configuration file extlinux.conf in an ext2/3/4 partition of SD card and U-Boot will find and execute it. This is conceptually identical to creating a GRUB configuration file on a desktop PC.
Setting u-boot environment variables
There is a difference in setting environment variables between the boot script and the U-Boot shell.
Inside the shell you would set, for instance:
But in the script you would use:
Example U-Boot environment, as found in uEnv.txt from a stock android U-Boot environment partition
Recent version of U-Boot are able to boot from NFS as well as TFTP, but you have to get rid of the automatic setup of FTP. Check Ethernet for more information.
Note: on the A20 based cubieboards, this only seems to work on the stable kernel, not on stage.
FB console
To get U-Boot output shown on the built-in framebuffer driver (currently, HDMI only at 1024x768), add the following to your boot.cmd:
The default environment has these values set as well.
LCD Settings
- Convert the boot.cmd to boot.scr using mkimage:
- Copy the bootloader to the installation media
- copy kernel files to the first partition
- For a 3.4 kernel you need uImage (linux kernel) and script.bin (binary representation of FEX).
- For a device tree based kernel ("mainline", 4.x) you need the kernel image (uImage, zImage or Image) and the device-specific .dtb file (the one referenced in the $ above) that is generated as part of your kernel compilation.
Look at Manual build howto for more details.
USB 1.x, USB keyboards (U-Boot < v2015.07)
U-Boot v2015.07 and later shouldn't have problems supporting mixed USB 1.x/2.0 devices. OHCI and EHCI no longer conflict with each other (after the switch to device model).
Previous U-Boot versions (v2015.04 and older) have a problem supporting both USB 1.x (OHCI) and USB 2.0 (EHCI) at the same time - the latter includes the SUNXI_EHCI driver for Allwinner boards.
Unfortunately, this also affects many USB HID / keyboard devices which would not be detected properly by U-Boot. The typical message in this case is "cannot reset port N!?", where N is whichever USB port those devices were attached to.
A possible workaround is to place an external USB 2.0 hub between your board and these USB devices.
U-Boot 2015.07+ won't start
If you're using a recent (device model based) U-Boot, and the SPL just hangs after initializing the DRAM ( CPU: 912000000Hz, AXI/AHB/APB: 3/2/2 or something similar), chances are that your main U-Boot binary may be missing DTB information / a proper device tree. Depending on the (possibly outdated) instructions you followed: double-check that you're not incorrectly using u-boot.bin instead of u-boot-dtb.bin, or u-boot.img instead of u-boot-dtb.img.
Legacy kernel won't start
Unrecognized/unsupported machine ID
The sunxi-3.4 kernel may fail to boot with one of the following error messages on the serial console (but this message is not visible on a HDMI monitor or a LCD display!):
In this case either upgrade to a recent stage/sunxi-3.4 kernel (github branch) - or try to "Enable workarounds for booting old kernels" in U-Boot:
make menuconfig or make CROSS_COMPILE=arm-linux-gnueabihf- menuconfig , the option is located under "ARM architecture". (Make sure to rebuild your U-Boot after changing it.)
It is required to apply all of them, as they contain important stability/safety changes. The last patch in this series only takes care of the safety guard, which exists there specifically to block booting problematic kernels. Just removing the safety guard alone without applying all the bugfixes will lead to obscure runtime problems, please don't be tempted to do this.
ImportError: No module named _libfdt
If you see the following error when compiling on Arch Linux arm
DRAM Settings
Failsafe DRAM settings, based on standard JEDEC timings
Each device has DRAM settings configured in its defconfig file in the U-Boot "configs" directory (here is an example for the Cubietruck board). The slow failsafe DRAM settings for an A10/A13/A20 device may look like:
The settings from the Android firmware
Somewhat better settings can be retrieved by the meminfo tool from the stock Android or GNU/Linux system, provided by the device manufacturer. It still makes sense to test the reliability of the resulting DRAM configuration. Because some vendors are providing poor configuration for ZQ or EMR1, but nevertheless trying to optimistically set the DRAM clock speed too high.
Performance optimized DRAM settings
Tuning DRAM setting for each individual board can provide much better performance than the failsafe defaults. This involves trial and error testing of different settings using a tool until an optimal combination is found. The DRAM Controller page provides links to start researching this topic. This approach will be time consuming, so a satisfactory solution using one of the other approaches may be best to start with.
Читайте также: