
Как открыть файл скетчап в люмион
Обновлено: 04.07.2024
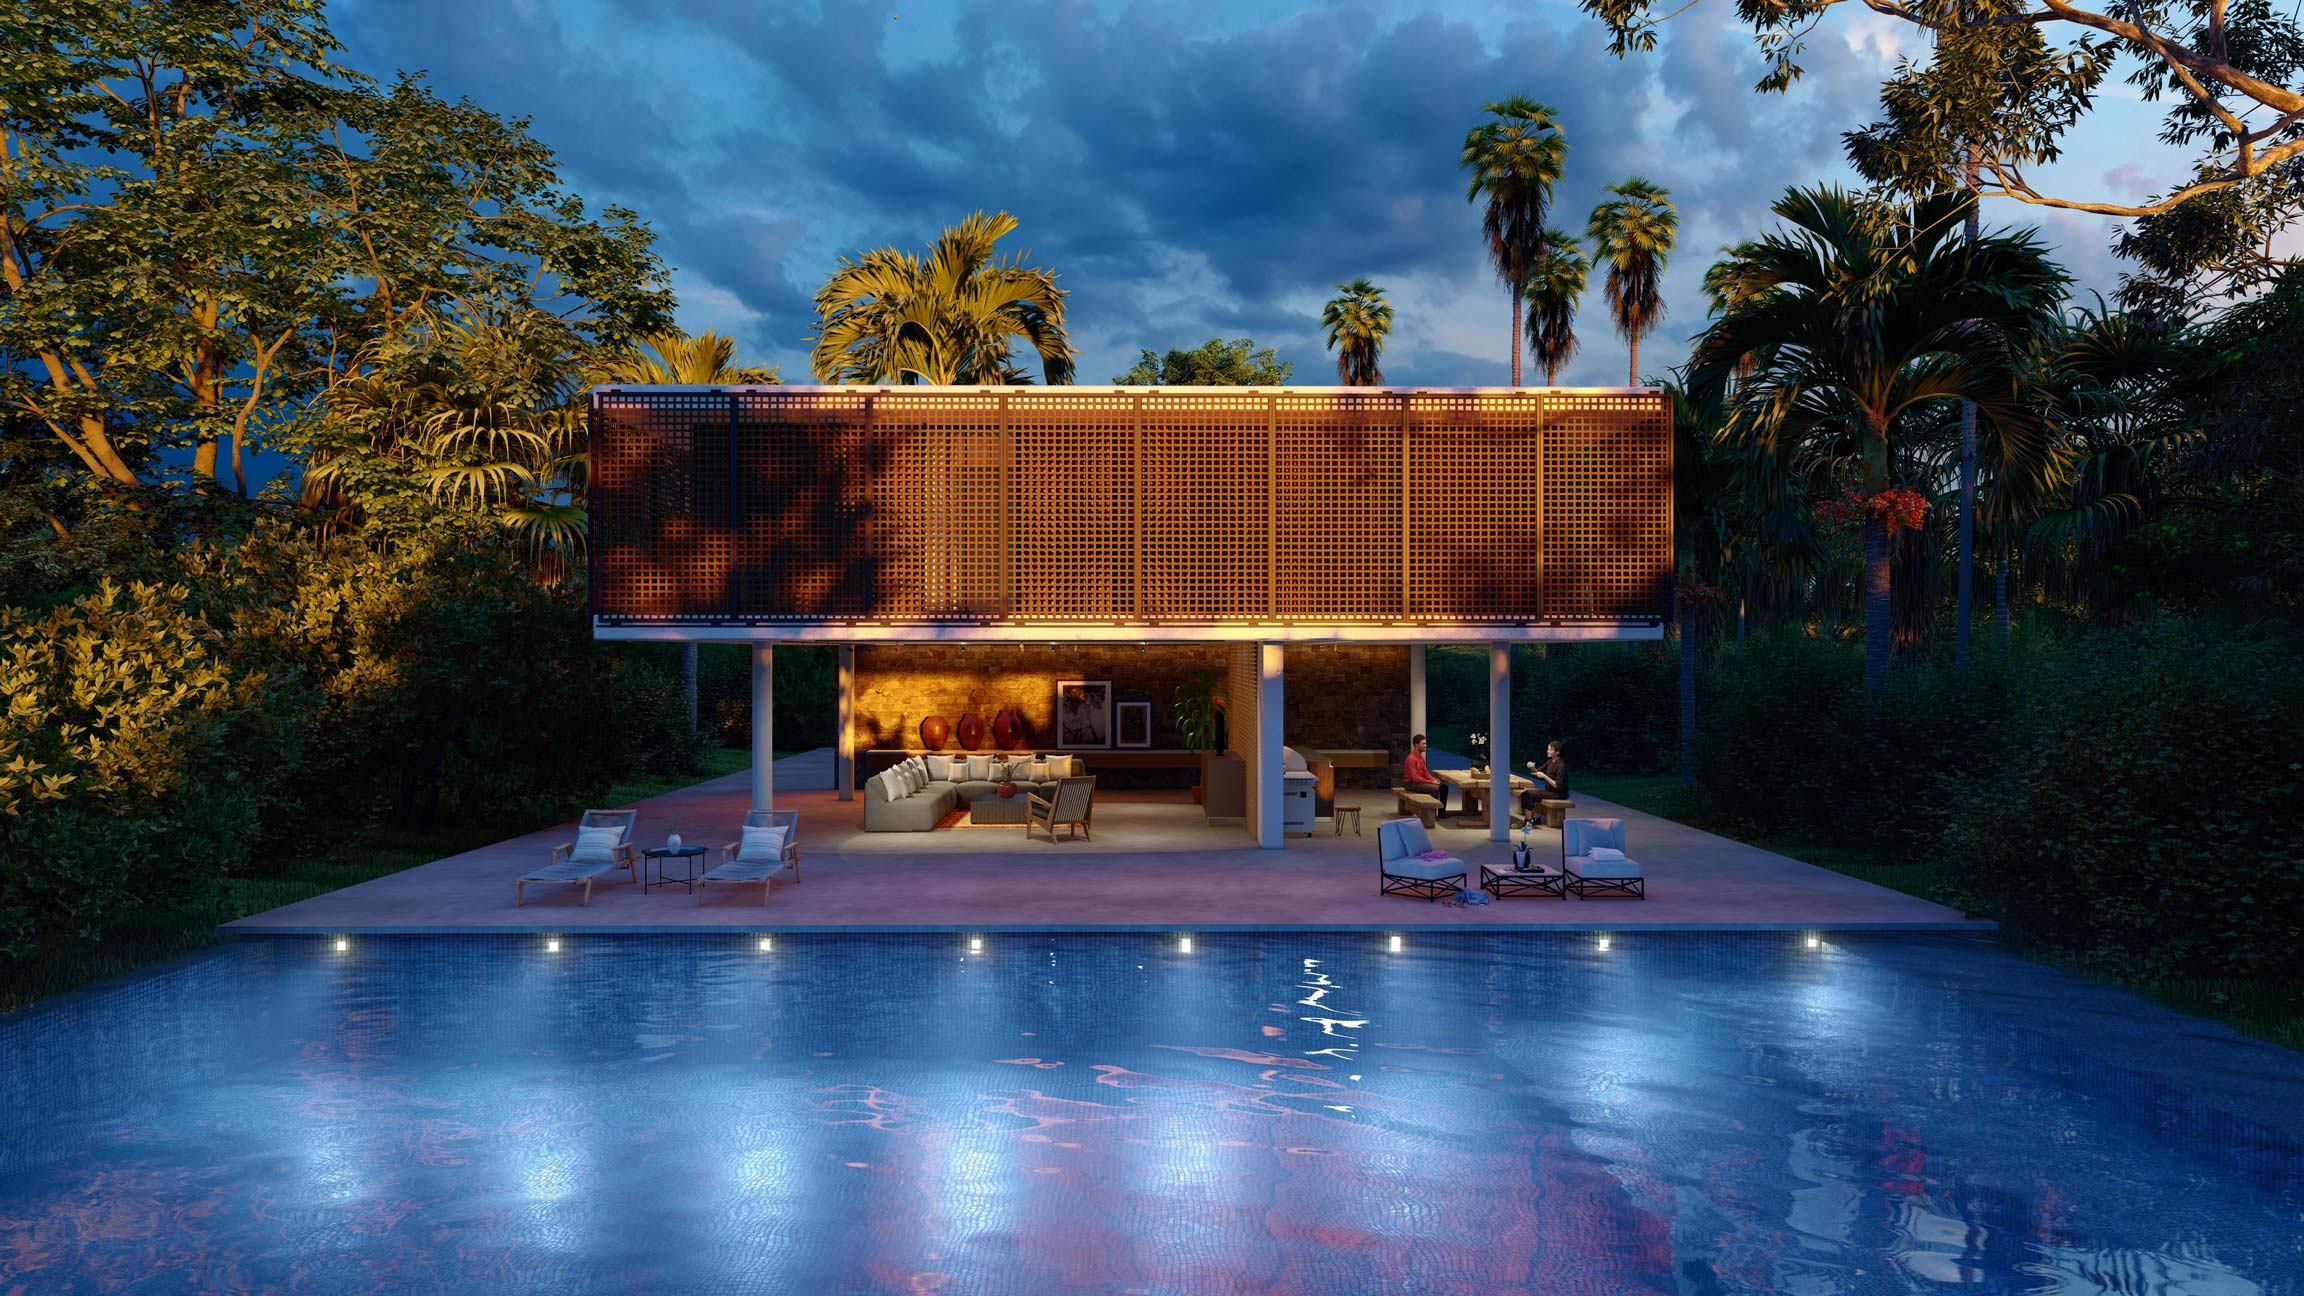
Вы недавно загрузили программное обеспечение Lumion? Сделайте 6 действий, чтобы быстро создать экстерьеры, интерьеры, пейзажи и другие проекты в виде красивых, привлекательных изображений, видео и панорам 360.
Lumion 10 стремится значительно сократить время, необходимое для изучения программного обеспечения и создания красивых визуализаций. Благодаря интуитивно понятным элементам управления, тысячам внутрипрограммных моделей и материалов для быстрого построения контекста Вашего проекта (интерьеров и экстерьеров), а также легко настраиваемым эффектам для демонстрации проектов в соответствии с Вашими представлениями, Lumion может оптимизировать рабочие процессы рендеринга, чтобы Вы могли быстро и эффективно показывать свои проекты в лучшем свете.
Итак, если Вы недавно загрузили Lumion 10 или пробную версию Lumion, вот 6 шагов, которые помогут Вам начать работу.
Краткое примечание о требованиях Lumion к оборудованию
Шаг 1. Изучите базовый рабочий процесс рендеринга за 3 минуты.
Не хватает времени? Если Вам нужен самый быстрый процесс перехода от импорта 3D-модели к созданию красивого изображения, то следующее видео является идеальной отправной точкой.
В этом базовом учебном пособии Вы найдете пятиступенчатую систему для создания фотореалистичных визуализаций всего за несколько минут. Система включает в себя: 1) выбор 3D-модели, 2) выбор шаблона, 3) создание изображений, 4) настройка стилей и 5) рендеринг изображений.
Шаг 2: Узнайте, как управлять камерой Lumion
Основные элементы управления навигацией:
Шаг 3. Импортируйте 3D-модель или настройте синхронизацию в реальном времени.
Как только Вы научитесь легко перемещаться в редакторе Lumion, начните импортировать 3D-модель Вашего дизайна. Поскольку Lumion совместим с большинством программ для 3D-моделирования и САПР, а также с основными типами 3D-файлов, импорт займёт всего несколько минут.
Из видео ниже Вы узнаете всё, что нужно знать об импорте моделей в Lumion.
Для получения дополнительной информации об импорте 3D-модели ознакомьтесь с руководствами по импорту моделей, чтобы подобрать лучший вариант для Вашего программного обеспечения.
Lumion LiveSync
Помимо импорта 3D-модели, Вы также можете установить прямую связь в реальном времени между программным обеспечением для моделирования и Lumion с помощью функции LiveSync.
LiveSync позволяет разрабатывать дизайн и 3D-модель одновременно, используя материалы, контекст, точное освещение, тени и многое другое. Измените модель в программном обеспечении для моделирования, и модель в Lumion будет автоматически обновлена.

Lumion LiveSync в настоящее время доступен только для Revit, SketchUp, ARCHICAD, Rhino и Vectorworks. Вы можете скачать плагины LiveSync здесь.
Шаг 4: Создайте контекст вокруг Вашего дизайна
Вы импортировали свою 3D-модель либо создали соединение в реальном времени с Lumion LiveSync. Следующим шагом является создание необходимого контекста для отображения Вашей модели в реалистичной или концептуальной среде. В режиме Lumion Build Вы можете найти более 5600 моделей для создания детальных и живописных видов природы, создания живого экстерьера и интерьера, а также демонстрации городов, полных жизни и энергии.
В следующем руководстве Вы подробно рассмотрите одну из новых функций Lumion 10 Pro — детализированную природу и узнаете, как создавать реалистичные, красивые леса и окружающую среду.
Обязательно изучите все возможности режима Lumion Build. Например, Вы можете изменить погоду и просмотреть свой проект с функцией реального неба. Нажав на вкладку «Ландшафт», Вы можете изменить внешний вид местности, использовать природные материалы (холмы, горы, озера, долины и т. д.), импортировать данные о высоте здания с помощью OpenStreetMaps и Heightmaps. Для получения дополнительной информации о режиме Lumion Build ознакомьтесь со статьями из Базы знаний.
Шаг 5: Применение материалов и настройка их параметров
Материалы и текстуры оживляют здания, придавая им реалистичный вид. А в Lumion 10 Вы можете найти более 1200 красивых, настраиваемых материалов, включая бетон, кирпич, дерево, камень, ткань, стекло, воду и многое другое.
После добавления материала Вы можете настроить цвет, отражательную способность, рельеф, погодные условия, масштаб карты, карту нормалей и многое другое. Вы можете смягчить края с помощью ползунка «Края» и добавить листву и даже можете использовать 167 материалов с картой рельефа для дальнейшего увеличения глубины и реалистичности материалов проекта.
Посмотрите ускоренный курс по добавлению материалов в Lumion.
Для получения дополнительной информации об использовании материалов в Lumion ознакомьтесь со статьями из Базы знаний.
Шаг 6: Создавайте потрясающие изображения, анимацию и панорамы с любыми эффектами, которые можете представить.
После добавления стиля потратьте некоторое время на изучение эффектов Солнце, Погода, Небо, Камера, Анимация, Профессиональные эффекты и так далее. Попробуйте некоторые эффекты, которые Вас интересуют, но обратите пристальное внимание на эффекты Небесный свет, Реальное небо и Тень, поскольку они играют важную роль в создании глубины и реализма.
Найдя правильную комбинацию эффектов, Вы можете создать три типа визуализации:
Изображения

Видео
Your browser does not support the video tag.
Панорамы 360
Обширную коллекцию видеоуроков про эффекты в Lumion Вы можете найти в статьях из Базы знаний.

Lumion compatibility and real-time rendering for SketchUp
Why use Lumion for SketchUp?
- Instantly create high-quality renders at any point in the process
- Render your model in real-time with Lumion LiveSync
- Breathe beauty, texture and realism into your design with 1,350+ Lumion materials
- Easily create a real-life or conceptual setting with Lumion’s 6,900+ item content library
- Create high-quality images in minutes; create videos in a few short hours
- Create 360 panoramas for interactive presentations and VR
From SketchUp model to beautiful render
By pairing your SketchUp modeling with Lumion rendering, you can dramatically reduce the amount of time it takes to create beautiful images, videos and 360 panoramas of your designs.
Simply import your model, shape the surrounding landscape with intuitive tools, dress the building and other surfaces in high-quality materials that feel real, add interior and exterior objects to show a living environment, and then render a photorealistic or conceptual result.
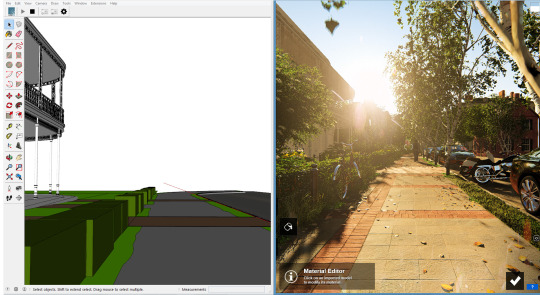
Two ways to import SketchUp models into Lumion
1. Real-time rendering with LiveSync
Lumion LiveSync for SketchUp is the free, real-time rendering plugin that seamlessly connects your SketchUp 3D model to a live Lumion project. Changes to your 3D model are immediately reflected in Lumion’s beautiful, fully-featured environments, giving you a window to your design as it would look in its real-life or conceptual setting.
You can download the free plugin from the SketchUp Extension Warehouse.
2. Export from SketchUp to Lumion
Need to make some alterations to your SketchUp design? With just a click, you can reload the model into your Lumion project without losing any of your previous work.
Tips & Troubleshooting
No matter what you’re trying to accomplish with your SketchUp-to-Lumion workflows, you can find helpful information on the Knowledge Base or get in touch with like-minded visualizers and architects from around the world through the Lumion Community.
See your building while you build it in an environment that’s so realistic, it’s like you’re pushing and pulling real-life buildings into shape.
New in Lumion 8.3, LiveSync for SketchUp creates a live, real-time link between your SketchUp model and Lumion’s beautiful, fully featured environment.
Now, as you interact with your model in SketchUp, the LiveSync for SketchUp functionality provides high-quality feedback for solving design problems or presenting your work in the context of the real world.
Add a window in SketchUp, such as in the gif at the top of this post, and your Lumion scene updates instantly with realistic lighting, natural-looking materials and real-life context. Place trees, people and photorealistic or artistic effects for a supercharged SketchUp workflow that’s second-to-none.
In this blog post, you can explore all of the new features and functionalities of LiveSync for SketchUp. The topics covered in this post include:
- How to download and install the LiveSync for SketchUp plugin
- LiveSync Demo — The Simple House
- Real-time camera synchronization
- Real-time materials synchronization
- Adding objects to your synchronized scene
- View your SketchUp model with photorealistic or conceptual effects
- Importing and saving your project
Lumion 8.3 is a free update for Lumion 8 users. In addition to the SketchUp plugin, the new Lumion 8.3 includes an all-improved LiveSync for Revit.
The LiveSync plugins for SketchUp and Revit are free for everyone.
How to download and install the LiveSync for SketchUp plugin
LiveSync for SketchUp is only available for Lumion 8.3. If you already have Lumion 8, you can update to the latest version by looking for the ‘Getting Started’ email in your inbox.
If you didn’t receive the email, visit our Knowledge Base article, ‘How do you get the email with the Lumion download link?’
The next step is to get the Lumion LiveSync for SketchUp plugin. It’s available in the SketchUp Extension Warehouse, which you can find in two places:
- On your local copy of SketchUp
- Via your web browser
You can access the Extension Warehouse directly in SketchUp by clicking on ‘Window’ in the toolbar and selecting ‘Extension Warehouse’ in the drop-down.
Simply search for the LiveSync plugin and click on the “Install” button on the extension details page. SketchUp should do the rest.
You can see the whole process below in the following tutorial:
Manually installing the LiveSync for SketchUp plugin
If you access the Extension Warehouse via your web browser, you can download the LiveSync plugin as a .rbz file.
Through this method, you will need to install the plugin manually, but the process is very easy and shouldn’t take you more than a minute.
To install the LiveSync plugin manually, follow these directions:
- Open your version of SketchUp (the LiveSync plugin is only compatible with SketchUp 2017 and SketchUp 2018).
- In SketchUp, locate the tab ‘Window’ and select ‘Extension Manager.’
- Click on the ‘Install Extension’ button.
- An Open dialogue box should open. Locate and open the .rbz file.
- Click ‘Yes’ to proceed and install the extension.
You should now have the LiveSync plugin installed on your version of SketchUp. Locate the plugin under the ‘Extensions’ tab and click ‘Start LiveSync’ to instantly view your model in the Lumion environment.
How to start LiveSync for SketchUp
Before starting the real-time LiveSync for SketchUp, make sure that SketchUp and Lumion 8.3 are both open. Also, you need to choose a scene in Lumion. If you’re building a scene from scratch, you can use the ‘Plain’ scene.
To start LiveSync, click on the Start LiveSync button. Wait a couple moments for the SketchUp project to be synchronized into Lumion.
Hot Tip: Lumion will drop the LiveSync model on the 0, 0, 0 mark. To move it off the ground terrain a little bit, select the model and move it up to 0, 5, 0.
Next, it can help to optimize your monitor setup for the best LiveSync viewing experience.
If you have a dual-screen monitor, simply drag SketchUp into one screen and Lumion into the other. It may be a good idea to have SketchUp on your main presentation computer and the Lumion window with LiveSync on the other screen.
If you want to do a split screen on one monitor, such as in the gif above, you can drag the SketchUp window onto one half of the screen, and Lumion onto the other half.
LiveSync Demo — The Simple House
It’s like a supercharged viewport for your SketchUp model. With LiveSync running, you’ll view the model in the lifelike environment in Lumion, and you’re free to modify the Lumion scene with trees, objects, materials, atmospheric lighting conditions, effects and more.
For the demo, we wanted to use a simply shaped building to show the immediate, immersive impact of LiveSync on a SketchUp CAD model.
Although the building retains its simplistic shape in both programs, the synchronized Lumion viewport adds a whole new level of depth, space and realism to the building. This is ideal for design development and for creating truly captivating presentations.
Let’s see some other ways how LiveSync can help get you in the creative flow as you explore your project.
Real-time camera synchronization
When you rotate the building in SketchUp, the point-of-view rotates in Lumion. If you find that perfect viewing angle, you can be ensured the same perspective when you render in Lumion.

To sync the cameras, click on the ‘Start Camera Synchronization’ button in the LiveSync toolbar. Now, as you orbit in SketchUp, the project in Lumion will track right alongside it.
If you find a helpful camera perspective in SketchUp that you want to keep, you can save that camera angle in Lumion for future use by saving it in the Photo or Video modes.
Real-time materials synchronization
The new LiveSync also synchronizes the materials and the material assignments from your SketchUp model. As a result, SketchUp’s materials are rendered, in real-time, in Lumion.
Any glass or water from your SketchUp model will become the highly realistic Lumion glass or water.
LiveSync with glass materials:

LiveSync with water materials:

LiveSync with grass materials:
Aside from glass and water, the rest of the synced model will feature the SketchUp materials. Fortunately, you can add Lumion’s high-definition materials to the synced model and add even more depth and realism to your model.
You can save and load material sets to quicken the material assignments and get a perfectly textured model instantly.
Adding objects and completing the scene
Before getting into the scene creation in photo or video mode, it can help to fill out the rest of your project with real-world objects.
From trees and plants to furniture and lighting elements, you can build your rendered scene as you continue developing the model in SketchUp, all while creating a viewing experience that’s second-to-none.
Hot Tip: If you want to add context from another project, you can use the ‘Merge Scene’ feature in Lumion. This is an excellent feature for distributing work among a team. One person can be dropping trees while another person is texturing and setting up camera views. Once everyone has completed their work, you can simply merge the scenes.
View your SketchUp model with photorealistic or conceptual effects
By going into Photo Mode, you can view the SketchUp project in a variety of beautiful environments of your creation, both photorealistic and conceptual. Going through this process as you continue developing the SketchUp model’s design will help reduce rendering time even further.
LiveSync with a photorealistic effects stack:

In Photo or Video Mode, you can start by loading any of your custom effect stacks, choosing one of the preset Styles, or working through the effects to develop your own style from scratch.
After stylizing the scene, if you click on “Build With Effects,” you can view the SketchUp model with a much more polished view.
Hot Tip: When viewing your model with the ‘Build With Effects’ feature, you may notice a difference with the focal length. To fix this, change the focal distance. In many cases, changing the focal length to 35mm will ensure a similar, more in-tune viewing angle.
You can also view your LiveSync project with a variety of conceptual effects, ideal for eye-catching presentations. Here are a couple examples.
LiveSync with a Color Sketch Style applied:
LiveSync with an outline and B&W effects applied:
Importing and saving your project
When establishing the LiveSync connection, Lumion will automatically import the SketchUp project. This means that, as you texture and work on the scene in Lumion, you can save the file as an .LS8.
The next time you start working, you can simply open the SketchUp file and Lumion .LS8 file, turn on LiveSync, and design away!
Real-time design development with Lumion 8.3
Lumion 8.3 and the new LiveSync for SketchUp enables real-time visualization like you’ve never seen before. Explore your SketchUp project in a whole new light as you continue building your model in the context of the real world.
If you already have a Lumion 8 license, then you don’t need to upgrade. Simply look for the ‘Getting Started’ email in your inbox to download and install Lumion 8.3. The LiveSync plugin for Revit and SketchUp are free for everyone.
Читайте также: