
Как создать файл javascript в webstorm
Обновлено: 07.07.2024
По правилам современного фронтенда отдавать пользователю надо минимум файлов с минимальным весом. Но во время разработки писать все в один файл, ещё и в сжатом виде, очень неудобно, поэтому для решения этой задачи используют разные сборки в виде готовых yeoman.io, generator-yeogurt и т.п. Или собирают сами с использование Grunt, Gulp и т.п. Но речь не об этом, речь об отладке javascript-а в этих сборках.
Возможно, в маленьких проектах в этом нет необходимости, но в крупных без этого никуда, особенно если вы используете MVC фреймворк и/или кучу самописного кода.
На Хабре уже есть хорошая статья на тему отладки js с помощью map файла в хроме — «Введение в Javascript Source Maps». Но если вы работает в среде разработки, особенно если эта среда от JetBrains, то лезть в хром как-то неправильно (хотя, конечно, это очень холиварная тема). Поэтому я решил написать эту статью.
Итак, приступим.
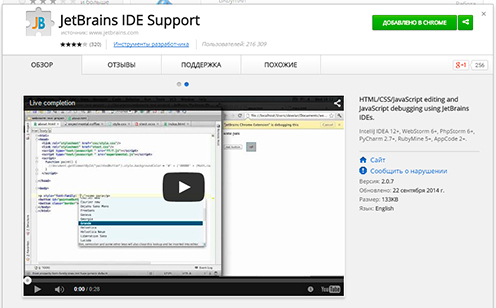
Сначала для отладки в IntelliJ IDEA / PHPStorm / WebStorm понадобится GoogleChrome с плагинам от JetBrains.
Далее есть несколько вариантов:
Первый вариант — через ide и UglifyJS/YUI Compressor/ClosureCompiler
Я делал через UglifyJS и поэтому в примере будет он.
Для этого надо установить npm пакет uglify-js с глобальным ключом.
Далее переходим в File->Settings->Tools->FileWatchers (если FileWatchers у вас не установлен, то установите его через плагины). С права нажмите '+' и в выпадающем меню выбираем UglifyJS:

Если все окей, то программа сама найдет .cmdUglifyJS, если нет, то придется её прописать вручную.
На винде это будет: C:\Users\UsersName\AppData\Roaming\npm\uglifyjs.cmd.
Потом в 'Arguments:' прописываем необходимые аргументы, включая аргументы для создания map файла , согласно оф.документации.
Теперь ide будет следить за указанными js-файлами и сама создавать map файлы.
Второй вариант — через gulp, grunt, browserify и т.д.
Поскольку я пользуюсь gulp, то пример приведу на нём.
Подробно описывать настройки не буду, т.к. на эту тему и так много статей, просто приведу пример кода гальп-файла, который я использую:
В данном примере мы используем gulp-sourcemaps для создания map файла, gulp-concat для конкатенации файлов, gulp-uglify для минификации и gulp-rename для добавления суффикса min.
После того, как вы определись с вариантом создания map файла для проекта, переходим к настройки дебагера в IDE
Жмём на выпадающие меню дебагера и выбираем 'EditConfigurations. '

В появившемся окне, в верхнем левом углу жмем '+' и в появившемся выпадающем списке выбираем JavaScriptDebug.

В окне настройки дебагера, в строке Name пишем имя задачи, в URL пишем, или адрес сайта на котором будет дебажить javascript, или локальный каталог/html файл, который будет отрываться в браузере при запуске дебага (я предпочитаю работать с адресом сайта). В выпадающем меню 'Browser:' выбираем браузер, который будет отрываться при запуске дебага.
Если прописать url в поле URL, то появится поле 'RemoteURLsoflocalfiles (optional):', где можно указать корневую папку этого url и виртуальный адрес дебагjs файлов. (т.к. напротив файлов будет написано ваш_сайт.ру/map/file.js)

Это мой пример. У вас будет вместо .jsx просто.js.
Теперь, когда у нас все готово, жмем на жучка:
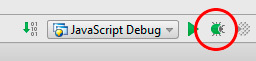
Если все окей, то откроется браузер по заданному адресу с всплывающем окном «JetBrains IDE Support отлаживает эту вкладку» (во время отладки не закрывайте это окно, т.к. сразу же оборвётся связь с ide). В открывшемся окне дебага, во вкладке Scripts, можно будет увидеть свои js файлы, в которых надо ставить брекпоинты (скорее всего, у них будет адрес: ваш_сайт.ру/map/file.js, но может быть и по-другому, потому что адрес, где виртуально будут созданы исходные js файлы, зависит от заданных настроек программе, которая создает map файл для дебага). Если ide не видит брекпоинты (красный кружочек без галочки), то в дебаг режиме, во вкладке Scripts, щёлкните по этому файлу правой клавишей мыши и в меню выберите SpecifyLocalPath.

Если все окей, то брейкпоинт будет с галочкой.
Таким образом, мы получаем всю мощь отладки javascripta в ide «не отходя от кассы».
К дополнительному прочтению рекомендую:
— Как уже упоминалось, хорошая статья на Хабре об отладке js в хроме;
— Официальная документация JetBrains к поддерживаемым минификатором javascript;
— Если кто не знает, что такое Gulp, прочитать о нём можно здесь;
— Для тех, кто не знает, что такое npm, есть ссылка.
Node.js is a lightweight runtime environment for executing JavaScript outside the browser, for example on the server or in the command line. WebStorm integrates with Node.js providing assistance in configuring, editing, running, debugging, testing, profiling, and maintaining your applications.
If you need Node.js only as a local runtime for your application or for managing npm packages, running JavaScript linters, build tools, test frameworks, and so on, just install Node.js. If you follow the standard installation procedure, in most cases WebStorm detects Node.js itself.
And even if you have no Node.js on your computer, you can install it when creating a new Node.js application in the Create New Project dialog , see Creating a new Node.js application below.
If you want to switch among several Node.js installations, they must be configured as local Node.js interpreters. In most cases, WebStorm detects Node.js installations, configures them as interpreters automatically, and adds them to the list where you can select the relevant one.
To run a Node.js application remotely, configure it as a remote interpreter. See Node.js with Docker for details.
Switching between Node.js versions
With WebStorm, you can have several installations of Node.js and switch between them while working on the same project.
-
Press Ctrl+Alt+S to open the IDE settings and select Languages and Frameworks | Node.js and NPM .
On the Node.js and NPM page that opens, select the required Node.js installation from the Node Interpreter list.
If you followed the standard installation procedure, in most cases the required Node.js installation is on the list. If the installation is missing, click and configure it as a local interpreter manually.
Using a system Node.js version
With WebStorm, you can set the default system node alias as your project’s Node.js version. After that this version will be automatically used by all the tools that require Node.js and in all new run/debug configurations. In particular, this means that you will not have to update the settings for each tool if you install a new Node.js version and make it the default node alias in your system.
This functionality is especially helpful when you are using nvm.
-
Press Ctrl+Alt+S to open the IDE settings and select Languages and Frameworks | Node.js and NPM .

From the Node interpreter list, select node .
Specify this new Node.js interpreter where applicable, for example in your run/debug configurations or settings of specific tools.
Configuring a local Node.js interpreter
You may need to configure Node.js installation as an interpreter manually, for example, if Node.js is installed in a non-default location so WebStorm does not detect it automatically.
-
Press Ctrl+Alt+S to open the IDE settings and select Languages and Frameworks | Node.js and NPM .
Click next to the Node Interpreter list.
In the Node.js Interpreters dialog that opens with a list of all the currently configured interpreters, click on the toolbar. In the dialog that opens, choose Add Local from the context menu and choose the installation of Node.js, then click OK . You return to the Node.js Interpreters dialog where the Node interpreter read-only field shows the path to the new interpreter.
In the Package manager field, choose the package manager (npm, Yarn, or pnpm) for the current project.
When you click OK , you return to the Node.js and NPM page where the Node interpreter field shows the new interpreter.
Using Node.js on Windows Subsystem for Linux
WebStorm lets you run and debug Node.js applications using Node.js on Windows Subsystem for Linux. You can choose Node.js on WSL as the default interpreter for the current project or you can configure and use this node version in a Node.js Run/Debug configuration.
Configure Node.js on WSL as the default project node interpreter
In the Settings/Preferences dialog Ctrl+Alt+S , go to Languages and Frameworks | Node.js and NPM .
Click next to the Node Interpreter field, in the Node.js Interpreters dialog that opens, click , and then select Add WSL from the list.
In the Add WSL Node Interpreter dialog that opens, select the Linux distribution you’re using and specify the path to Node.js.
Creating a Node.js application
If you have no application yet, you can generate a WebStorm project with Node.js-specific structure from a template or create an empty WebStorm project and configure Node.js in it as described in Starting with an existing Node.js application below.
Create a new Node.js application
-
Click Create New Project on the Welcome screen or select File | New | Project from the main menu. The Create New Project Dialog opens.
In the left-hand pane, choose Node.js to create a basic Node.js application or Express to create an Express application.
In the right-hand pane, specify the project folder, the Node.js interpreter, and the package manager (npm or Yarn, see npm, pnpm, and Yarn for details).
If you have only one Node.js on your machine and you followed the standard installation procedure, WebStorm detects your Node.js automatically. Otherwise, choose the relevant interpreter from the list, see Configuring a local Node.js interpreter above.
If you have no Node.js installed, select Download Node.js .

For Express applications, specify the express -generator in the express-generator field.
It is recommended that you use npx that downloads and runs the generator. To do that, select npx --package express-generator express from the express -generator list.
Alternatively, open the embedded Terminal ( Alt+F12 ) and type npm install --g express-generator and then select the downloaded generator from the express-generator list.

Select the template language and the Style Sheet language to use.
When you click Create , WebStorm downloads the necessary dependencies and enables code completion for them as well as for the Node.js core APIs, see Configuring node_modules library and Configuring Node.js Core library for details.
For Express , WebStorm creates a run/debug configuration of the type Node.js with default settings and generates a basic Express-specific directory structure.
For Node.js , WebStorm just runs the npm init command to generate a package.json file.
Create an empty WebStorm project
Click Create New Project on the Welcome screen or select File | New | Project from the main menu. The Create New Project Dialog opens.
In the left-hand pane, choose Empty Project . In the right-hand pane, specify the application folder and click Create .
Starting with an existing Node.js application
If you are going to continue developing an existing Node.js application, open it in WebStorm, configure Node.js in it, and download the required dependencies.
Open the application sources that are already on your machine
Click Open on the Welcome screen or select File | Open from the main menu. In the dialog that opens, select the folder where your sources are stored.
Check out the application sources from your version control
Click Get from VCS on the Welcome screen. Alternatively, select File | Project from Version Control or <Your_VCS> | Get from Version Control from the main menu.
<Your_VCS> stands for the Version Control System with which your currently opened project is associated.
In the dialog that opens, select your version control system from the list and specify the repository to check out the application sources from. See Check out a project (clone) for details.
Configure Node.js in a project
In the Settings/Preferences dialog Ctrl+Alt+S , go to Languages and Frameworks | Node.js and NPM .
In the Node Interpreter field, specify the default Node.js interpreter for the current project. WebStorm will automatically use it every time you select the Project alias from Node Interpreter lists when creating run/debug configurations or configuring Node.js-dependent tools, for example, Prettier or ESLint.
Select a configured interpreter from the list or click and configure a new one in the dialog that opens as described in Configuring a local Node.js interpreter. If you select node , the system Node.js version is used.
When the configuration is completed, WebStorm displays information about the currently configured version.
With WebStorm, you can develop modern web, mobile, and desktop applications with JavaScript and Node.js .
WebStorm also supports React , Angular , Vue.js , and other frameworks and provides tight integration with various tools for web development.
JavaScript-aware coding assistance includes completion for keywords, labels, variables, parameters, and functions, error and syntax highlighting, formatting, numerous code inspections and quick-fixes, as well as common and JavaScript-specific refactoring. WebStorm also integrates with JavaScript linters and the Flow type checker.
With WebStorm built-in debugger, you can debug both your client-side and server-side code and even run JavaScript code snippets in the interactive debugger console. Note that WebStorm supports debugging JavaScript only in Chrome or any other browser of the Chrome family. Learn more from Debug JavaScript in Chrome.
WebStorm integrates with Jest, Karma, Protractor, Cucumber, and Mocha testing frameworks. WebStorm supports running and debugging tests as well as navigation between tests and subjects or between a failed test and the fragment of code that caused the problem.
On this page you will find a short Getting Started Guide that will walk you step by step from creating a web application to debugging and testing it.
Create a new application
Click Create New Project on the Welcome screen or select File | New | Project from the main menu. The Create New Project Dialog opens.
In the left-hand pane, choose Empty Project .
In the right-hand pane, specify the path to the folder where the project-related files will be stored. Click Create .
Start with an existing JavaScript application
If you are going to continue developing an existing JavaScript application, open it in WebStorm, choose the JavaScript version to use, and configure the libraries in it. Optionally download the required npm dependencies.
Open the application sources that are already on your machine
Click Open on the Welcome screen or select File | Open from the main menu. In the dialog that opens, select the folder where your sources are stored.
Check out the application sources from your version control
Click Get from VCS on the Welcome screen. Alternatively, select File | Project from Version Control or <Your_VCS> | Get from Version Control from the main menu.
<Your_VCS> stands for the Version Control System with which your currently opened project is associated.
In the dialog that opens, select your version control system from the list and specify the repository to check out the application sources from. See Check out a project (clone) for details.
Choose the JavaScript language version
To get reliable and efficient coding assistance, you need to specify the language version that will be used in all JavaScript files of your project by default.
In the Settings/Preferences dialog Ctrl+Alt+S , go to Languages and Frameworks | JavaScript . The JavaScript page opens.
From the list, choose one of the supported JavaScript language versions:
ECMAScript 6+: This version adds support for the features introduced in ECMAScript 2015-2020 and for JSX syntax as well as some current proposals to the standard.
Flow: This version adds support for the Flow syntax.
Using multiple JavaScript versions
If you are working on an application that uses both ECMAScript 5.1 and a newer version of ECMAScript, the easiest way is to choose the highest language version for the whole project from the list on the JavaScript page.
On the JavaScript page, click next to the JavaScript language version list. The JavaScript Language Versions dialog opens.
Click and in the dialog that opens select the folder where you need a custom language version. WebStorm brings you back to the JavaScript Language Versions dialog where the selected folder is shown in the Path field.
From the Language list, choose the language version for the files in the selected folder. In all the other JavaScript files in the project WebStorm will use the version chosen on the JavaScript page.
JSX syntax in JavaScript code
If you are using JSX syntax in your JavaScript code, enable ECMAScript 6+ .
In the Settings/Preferences dialog Ctrl+Alt+S , go to Languages and Frameworks | JavaScript , and select ECMAScript 6+ from the JavaScript language version list.
To be warned when JSX syntax is used by mistake, open the Settings/Preferences dialog Ctrl+Alt+S , go to Editor | Inspections , and enable the React JSX syntax inspection under JavaScript and TypeScript | General node. Use the search field to locate the inspection.

Optionally, configure the inspection severity and scope. Learn more from Code inspections.
Download project dependencies
If your application uses some tools, libraries, or frameworks, download the required packages. To manage your project dependencies, you can use npm, Yarn 1, or Yarn 2, see npm and Yarn for details.
Install a package in an empty project
In the embedded Terminal ( Alt+F12 ), type:
npm install <package name> .
If you already have a package.json file in your project
Right-click the package.json file in the editor or in the Project tool window and choose Run 'npm install' from the context menu.
Alternatively, run npm install in the Terminal Alt+F12 .
Before you start, make sure you have Node.js on your computer.
Configure code completion for project dependencies
To provide code completion for project dependencies, WebStorm automatically creates a node_modules library. In WebStorm, a library is a file or a set of files whose functions and methods are added to WebStorm's internal knowledge in addition to the functions and methods that WebStorm retrieves from the project code that you edit. See Configure JavaScript libraries, Code completion, and Configuring code completion in JavaScript for details and examples.
View inlay hints
Inlay hints appear in the editor and provide you with additional information about your code to make it easier to read.
Enable inlay hints
Open the Settings/Preferences dialog Ctrl+Alt+S , go to Editor | Inlay Hints , and select the checkbox next to JavaScript .
On the JavaScript page below, specify what hints and in what context you want WebStorm to display.
Parameter hints
Parameter hints show the names of parameters in methods and functions to make your code easier to read. By default, parameter hints are shown only for values that are literals or function expressions but not for named objects.

Configure parameter hints
Open the Settings/Preferences dialog Ctrl+Alt+S and go to Editor | Inlay Hints | JavaScript .
Select Parameter hints from the list, make sure the Show parameter hints checkbox is selected, and then specify the context where you want parameter hints shown.
The preview below shows how the changes you make in the settings affect the code appearance.
For some methods and functions, WebStorm does not show parameter hints in any context. Click Exclude list. to view these methods and functions, possibly enable parameter hints for them, or add new items to the list.
To hide parameter hints for all types of values, clear the Show parameter name hints checkbox. Learn more from Viewing method parameter information.
Return type hints
Return type hints for chained methods are inferred from a JSDoc comment or based on the static analysis of your code. Return type hints are by default shown for chained methods that are split between multiple lines and return at least 2 different types.

Configure method return type hints
Open the Settings/Preferences dialog Ctrl+Alt+S and go to Editor | Inlay Hints | JavaScript .
Select Method return types in call chains from the list, make sure the Show hints checkbox is selected, and then specify the minimum number of different types in a call chain for which you want return type hints show.
The preview below shows how the changes you make in the settings affect the code appearance.
Type annotations
Type annotations show a variable type or a function return type next to their definition. Type annotations are inferred from JSDoc comments or static analysis of your code.

Configure type annotations
Open the Settings/Preferences dialog Ctrl+Alt+S and go to Editor | Inlay Hints | JavaScript .
Select Type annotations from the list, make sure the Show type hints for checkbox is selected, and then specify the context where you want type hints shown.
The preview below shows how the changes you make in the settings affect the code appearance.
Auto-import in JavaScript
WebStorm can generate import statements for modules, classes, components, and any other symbols that are exported. WebStorm can add missing import statements on the fly, when you complete ES6 symbols or CommonJS modules. WebStorm either decides on the style of the import statement itself or displays a popup where you can choose the style you need.
Add ES6 import statements
If you are importing a symbol from your project into a file that is a ES6 module or that already contains ES import statements, WebStorm automatically inserts an ES6 import on symbol completion.
For earlier JavaScript versions or when auto-import on completion is disabled, WebStorm marks the symbol as unresolved and shows a tooltip with the suggested quick-fix:

Alternatively, press Alt+Enter :

If there's more than one possible source of import, WebStorm shows a list of suggestions:

WebStorm can also generate import statements for symbols defined in the project’s dependencies. Auto-import works for symbols from packages that contain TypeScript definition files (like in moment or redux) or sources written as ES modules.
If the current file already contains a ES6 import statement, WebStorm inserts a new one also in the ES6 style.
Add CommonJS (require) import statements
If you are importing a symbol from your project into a file that already is a CommonJS module (with a require statement or module.export ), WebStorm automatically inserts a CommonJS import on symbol completion.
Alternatively, position the caret at the symbol to import, press Alt+Enter , and select a quick-fix with the CommonJS ( require ) import style.

Whenever WebStorm isn’t sure what syntax should be used in a file, it displays a popup where you can choose between using the ES6 and CommonJS syntax.
Configure auto import
To automatically add ES6 import statements on code completion, open the Settings/Preferences dialog Ctrl+Alt+S , go to Editor | General | Auto Import , and select the Add ES6 imports on code completion checkbox in the TypeScript/JavaScript area.
To configure the appearance of import statements, open the Settings/Preferences dialog Ctrl+Alt+S , go to Editor | Code Style | JavaScript , and use the controls in the Imports tab, see Imports tab for details.
Configure syntax highlighting
You can configure JavaScript-aware syntax highlighting according to your preferences and habits.
In the Settings/Preferences dialog Ctrl+Alt+S , go to Editor | Color Scheme | JavaScript .
Select the color scheme, accept the highlighting settings inherited from the defaults or customize them as described in Colors and fonts.
Run JavaScript in browser
In the editor, open the HTML file with the JavaScript reference. This HTML file does not necessarily have to be the one that implements the starting page of the application.
Choose View | Open in Browser from the main menu or press Alt+F2 . Then select the desired browser from the list.
Hover your mouse pointer over the code to show the browser icons bar: . Click the icon that indicates the desired browser.
Debug JavaScript
WebStorm provides a built-in debugger for your client-side JavaScript code that works with Chrome or any other browser of the Chrome family. With WebStorm, you can debug JavaScript applications running on the built-in server, on an external server, or on a remote server. For details, see Debug JavaScript in Chrome.
Сегодня — немного практических советов по работе с WebStorm.
Вначале пишем совсем простой HTML, после color: нажимаем <Ctrl-пробел> и получаем список цветов.

КО подсказывает: во всех IDE от JetBrains <Ctrl-пробел> — это контекстная подсказка.
Как только мы выбрали цвет, на вертикальной полоске слева от текста тут же появляется маленький квадрат такого же цвета. Теперь можно кликнуть по нему, и откроется палитра, из которой можно выбрать вообще любой цвет.

А теперь представим себе проект посложнее, небольшое приложение под node.js.
Говорят, что IDE от JetBrains хороши вниманием к деталям и пониманием контекста. Вот, казалось бы, мелочь: мне надо для тестирования этого приложения сделать простенькую страницу с формой на HTML. Сделал, попробовал, усложнил приложение, тест тоже надо усложнять: переделываю форму так, чтобы она выглядела удобно для заполнения нескольких полей.
Начинаю вводить в конце строки тэг Нажимаю клавишу <, WebStorm сам догадывается, что мне нужен и предлагает список вариантов с уже выбранным тэгом, который мне нужен. Я просто нажимаю Enter, и — готово!

Добавляю новую функцию в файл .js. Пишу fun<Ctrl-пробел>, срабатывает автодополнение, получаю function, дальше можно продолжать: имя и тело функции. В WebStorm есть два способа автодополнения: — это дополнить с вставкой текста, а — с заменой текста справа от курсора до разделителя (убирает неверно написанные ключевые слова и имена).
Когда ставишь открывающую фигурную скобку, тут же ставится закрывающая — и захочешь, а не забудешь ее в конце тела функции. Нажимаешь Enter — и она любезно отъезжает не на следующую строку, а на две строки вниз, открывая место для тела функции.
Надо размножить строку, скажем, однотипное поле формы? <Ctrl-D> (от слова Duplicate).
Надо перейти к определению чего-то (переменной, функции, класса?) <Ctrl-B> (от слова Base). А теперь надо бы обратно? <Ctrl-Alt-стрелка влево>.
<Ctrl-Alt>-<стрелка влево> на некоторых ноутбуках переворачивает экран на 90 o . Чтобы отменить эту полезную функцию и пользоваться этой комбинацией клавиш в WebStorm, надо в правой части системной панели вызвать программу HD-графика Intel, и там выбрать Комбинация клавиш | Выключить.

Еще немного хитростей для тех, кто, как я, недавно пишет под node.js:
1) Если в node.js при запуске приложения из WebStorm возникает ошибка
это, скорее всего, значит, что вы пытаетесь запустить еще одну копию сервера node.js (а на одном TCP-порте может жить только одна копия). Чтобы этого избежать, надо в Run | Edit Configurations в ветке node.js для вашего приложения (например, index.js) поставить галочку check no other instances are running.
2) Если в приложении есть require('модуль'), а определения (например, функций) из этого модуля в IDE не видны, и по Ctrl-B недоступны, похоже, вы цинично нарушаете рекомендации разработчиков node.js: если вы используете модуль в проекте, надо его устанавливать локально.
Это значит (спасибо Сергею Симончику за разъяснение!), что в папке проекта должна быть папка node_modules, и в ней должны быть папки соответствующих модулей. Если папки нет, и по команде npm install модуль она не создается, ее надо создать руками, а в корневой папке проекта в командной строке дать команду npm install модуль.
Программа npm туповата (или чересчур умна): если у вас в корне проекта нет node_modules, а выше корня проекта есть папка node_modules, локальная установка модуля произойдет в нее.
Если же модули установлены правильно, а WebStorm продолжает подчеркивать функции из модулей серой волнистой линией («не определены»), то надо отметить, какие библиотеки node.js вы подключаете:


3) Проверку кода «на лету» в WebStorm можно делать аж тремя разными способами, все три — весьма гибкие: JSLint, JSHint и внутренний инспектор кода. По умолчанию включен только внутренний инспектор, который можно нечеловечески гибко настраивать в меню Settings->Inspections.
Если же надо включить JSHint или JSLint, то это делается в меню Javascript | Code Quality Tools. Оба этих инструмента — внешние, но они идут в комплекте с WebStorm и прозрачно интегрированы в IDE.

Не всем постоянно нужна проверка правописания встроенным инспектора кода. Я не хочу называть переменные в своем коде словами английского языка, а всякие там qry_1 и qry_2 подчеркиваются зеленой волнистой линией (не говоря уже о названиях полей в БД, которые тоже в коде попадаются). Отключить проверку правописания можно в Settings | Inspections | Spelling.
Конечно, это далеко не все секреты удобного кодирования в WebStorm, и если хабрасообщество одобрит текст, то в следующих выпусках мы будем говорить о поддержке TypeScript, SourceMaps и некоторых полезных горячих клавишах.
UPD: Специально для тех, кто молча ставит минус: как всегда, автор будет благодарен не только тем, кто доволен, но и тем, кто расскажет, что разочаровало, и что хотелось бы видеть. Вместе мы сделаем мир лучше.
Читайте также: