
Xilisoft audio converter как пользоваться
Обновлено: 08.07.2024
Xilisoft 3GP Video Converter – программа для удобного конвертирования видео в любые форматы. В программе реализован режим пакетного конвертирования, а также настройка разрешения и качества видео.
Вопросы:
Как получить ключ для Xilisoft 3GP Video Converter? Альтернативные программы Xilisoft 3GP Video Converter Тип лицензии: Условно-бесплатная (конвертируются первые 3 минуты видео)Цена: 29.95 $
Разработчик: Xilisoft Inc
Что нового в Xilisoft 3GP Video Converter 7.8.19.20170209:
| Рекомендуем! InstallPack | Стандартный установщик |
|---|---|
| Официальный дистрибутив Xilisoft 3GP Video Converter | |
| Тихая установка без диалоговых окон | |
| Рекомендации по установке необходимых программ | |
| Пакетная установка нескольких программ |
Описание
Часто мы сталкиваемся с необходимостью преобразования одного видеоформата в другой. Это может быть снятое на цифровой фотоаппарат видео в формате MOV, загруженный из Интернета фильм в формате MKV, снятая на телефон 3GP-видеозапись и так далее. Для удобного просмотра этих файлов на компьютере или обработки в видеоредакторе нужно конвертировать их в формат AVI. Кроме того, существует необходимость адаптирования видеозаписей для просмотра на мобильных устройствах.
А значит, без мощного и универсального видеоконвертера не обойтись. В этом обзоре мы рассмотрим одно интересное решение этой проблемы — для начала мы скачаем бесплатно новую версию Xilisoft 3GP Video Converter. Эта программа является ярким примером простого, но функционального конвертера.
Возможности:
- конвертирование нескольких видеозаписей одним списком;
- выбор разрешения, качества аудио- и видеозаписи;
- указание нужного размера исходящего файла;
- функция приостановления процесса конвертирования;
- выбор внешнего вида программы.
Принцип работы:
чтобы преобразовать видео из одного формата в другой, достаточно загрузить нужный файл в программу, выбрать исходящий формат и запустить конвертирование. Функции Xilisoft 3GP Video Converter позволяют настроить разрешение видеозаписи и качество видео и аудио. Кроме этого, вы можете задать нужный размер видеофайла, например, 100 Mb, для удобной записи на CD-диск (700Mb) и др. Встроенный плеер позволяет предварительно просматривать полученный результат для быстрого внесения изменений при необходимости.
Плюсы:
- поддержка большого количества медиаформатов;
- извлечение аудиодорожек из видеозаписей;
- настройки аудио- и видеокодеков;
- возможность скачать бесплатно Xilisoft 3GP Video Converter на компьютер;
- встроенный проигрыватель для предварительного воспроизведения.
Минусы:
- меню на английском языке;
- бесплатная версия программы имеет ограничение по длительности видео – три минуты;
- нет готовых пресетов для адаптирования видеозаписей для мобильных устройств.
Xilisoft 3GP Video Converter – мощный и функциональный конвертер, позволяющий преобразовать видеозапись в любой видеоформат. Несмотря на английский язык интерфейса, работа в программа очень проста и позволяет конвертировать видео всего в несколько кликов. Рекомендуем скачать бесплатно последнюю версию Xilisoft 3GP Video Converter и испробовать возможности этого простого конвертера на своем компьютере.
К сожалению, бесплатная версия позволяет конвертировать только первые три минуты видео, поэтому для полноценного пользования программой вам нужно купить лицензионный ключ или воспользоваться бесплатным аналогом Xilisoft 3GP Video Converter – пакетом программ Free Studio Manager.
Вот так выглядит интерфейс замечательной программы Xilisoft converter platinum. Для ее хорошей работы стоит установить нормальные кодеки.
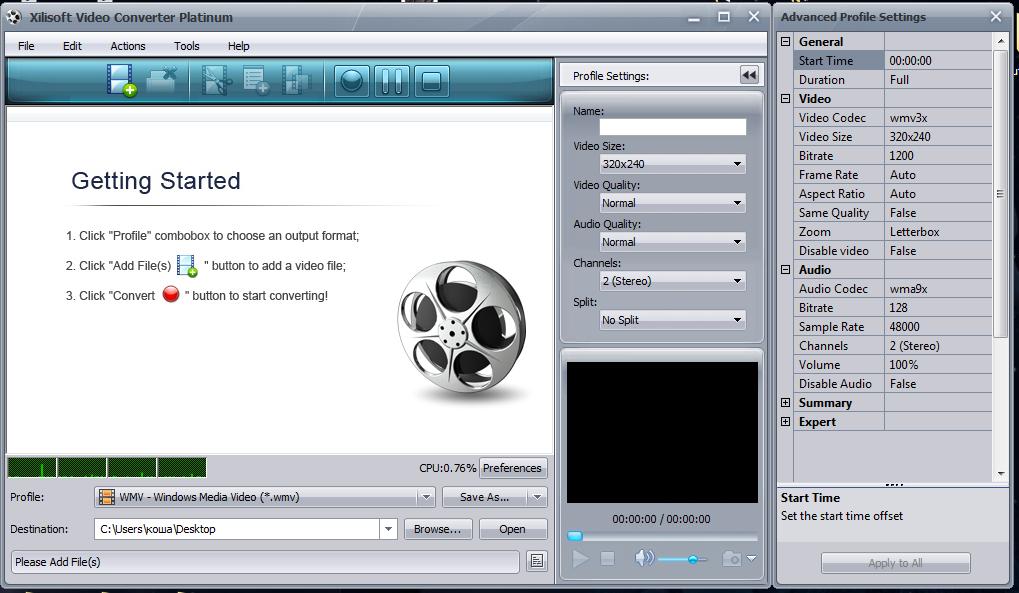
Что это за программа? Это конвертер видео, который понимает множество форматов видеофайлов и конвертирует их между собой. Его большое достоинство - в возможности полной регулировки процесса. Его недостаток - часто не понимает окончания ролика если там короткий уход в затемнение и может объесть его. Во избежание в момент монтажа в премьере делаем стартовое осветление и конечное затемнение (если вы не используете титры) как обычно, а аудиодорожку чуть длиннее ролика и в начале и в конце. Эта уловка не позволит конвертеру прочесть затемнение, как момент обрыва.
Загрузить ролик и выбрать формат проще простого. Обратимся к настройкам. Справа вы видите настройки advanced, то есть выборочные для знающих. Рассказываю, что есть что.
Первые две строки ( с какого момента происходит старт ролика и длительность ролика) оставляем дефолтными, если конечно, вы не вздумали его обрезать или сделать длительные поля.
Раздел video
1. Выбираем кодек. Для wmv он выставлен на скриншоте, для мп4 вы можете установить DivX, Xvid, FFShow который включает в себя еще и продвинутый кодек h264. Вообще, программа сама находит варианты. Так что можно опустить этот момент, если вы конечно не придирчивый знаток.
2. Размер видео. Это очень важно. От этого будет зависеть, сможет ли ваш ролик выглядеть хорошо в режиме на весь экран. С другой стороны, банальные показы youtube и других видеохостингов обычно люди смотрят как есть - в небольшом формате. Если вы хотите сделать видео с маленьким весом, но хорошим качеством, смело выбирайте небольшие размеры, если вам важен и размер и вес - средние. Ну а если вы хотите показать все в красоте - большие или авто (как оригинал)
3. Битрейт. Битрейт - количество килобайт в секунду. Что он дает? Это ваше качество. Чем выше качество, тем больше ролик. Но если вы хотите навести красоту - помните, режимы low и ниже (1200 и ниже) не для вас. Лучший битрейт 2000 кбс. Но это же будет задавать скорость показа для интернета. Такой ролик хорош для скачивания и не очень для показа. Для показа можно поиграть с битрейтом на понижение, пока результат вас не устроит. Не сказала бы, что сейчас это актуально, но гигантский ролик самому же неудобно грузить.
4. Частота кадров, Frame rate, выставляется как в оригинале. Если вы снимали фрапсом - то вам надо выбрать 29,5 кадров, и лучше стараться выбрать не ниже 23,5 кадра в секунду, норма 24.
5. Aspect ratio нас не интересует, оставляем авто. Это соотношение сторон, думаю, перед конвертированием оригинала вы об этом заботились.
6. Same Quality тоже пропускаем. Оставляем False (Мы же настраиваем качество вручную, а эта опция в true оставит качество оригинала. Не всегда уместно, но если хотите - можно сделать).
7. Zoom - сделает при уменьшении размера еще и сосредоточение на центре картинки. Я пользуюсь letterbox или приполноэкранном режиме - full, то есть уменьшается вся картинка, не обрезаясь.
Раздел Аудио
Старайтесь сделать поток качественным.
1. Битрейт от 128 кбс (но если у вас была использована очень качественная аудиодорожка, ее как раз можно и прижать побольше, экспериментируйте)
2. Sample rate: 48 000 это ваша частота, можно сделать чуть меньше, 44, это стандарт. Чем выш, тем качественнее.
3. Channels - количество каналов, я выбираю стерео, 2 канала, под наушники, вы можете просмотреть, что предлагается
4. Громкость - 100 процентов или если записалось уж очень громко - поменьше, а если тихо - побольше!
5. Disable audio - False если вы хотите слышать музыку, True если вам по идее нужен только ролик, а звук не нужен.
Раздел summary
Тут вы можете вписать данные о файле, они будут высвечиваться при наведении мышки на скачанный файл.
Раздел Эксперт
Предназначен для специалистов, и нашим умелым ручкам там делать нечего
Профиль
Можно сохранить, чтобы автоматически применять ко всем последующим роликам
Левее этих настроек вы можете увидеть полуавтоматический выбор качества. Там меньше опций. В принципе годится для быстрого пережатия материала хорошего качества для не следящих за трафиком людей.
Программа отлично делает flv ролики!
После настроек, выбираем папку внизу, куда все сохранять (Destination), выделяем файл, жмем красную кнопку и получаем результат.
Xilisoft Audio Converter Pro is a powerful all-in-one professional audio converter for audio conversion, audio extraction, audio CD Ripping and making. Using Xilisoft Audio Converter Pro, you can convert between different audio formats including MP3, WMA, WAV, AAC, FLAC, OGG, APE, extract audio from popular video formats including high-definition (HD) videos such as AVI, MPEG, WMV, MP4, FLV, MKV, H.264/MPEG-4 AVC, AVCHD, convert music CD to different audio formats, and create music CD from audio and video files in all sorts of formats.
In general this article is divided several parts as below.
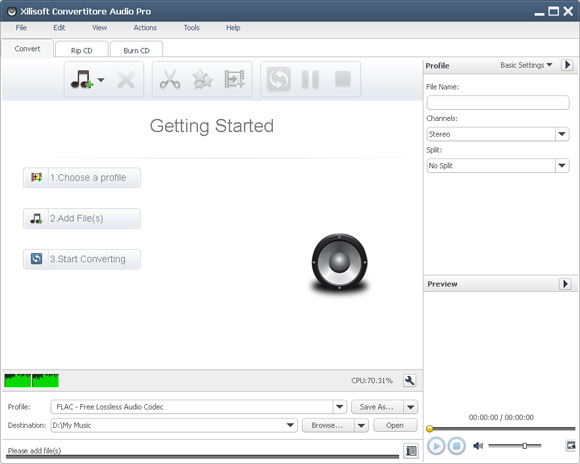
Part 1: Audio Conversion
Click "Convert" tab in the main window to open the "Audio Conversion" window.
1.Add files
Click “Add File(s)” button on the toolbar, choose one or more files in the dialog that pops up, then click “Open” to import the selected files into the file list in the main window.
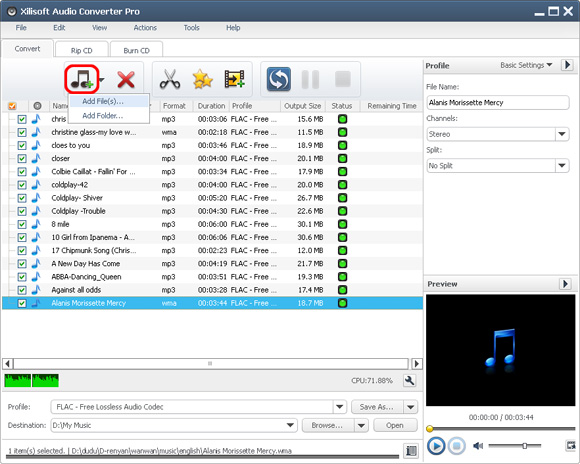
Or, click “Add File(s)” drop-down button, choose “Add Folder” option, then select the wanted folder and import all the files in the folder to the file list.
Tip: You can also add files by choosing “Add file(s). ” or “Add Folder. ” option from “File” menu.
2.Set output profiles
Select a file in the list and click “Profile” drop-down button to choose the wanted output profile in the “Profile” drop-down list that opens.
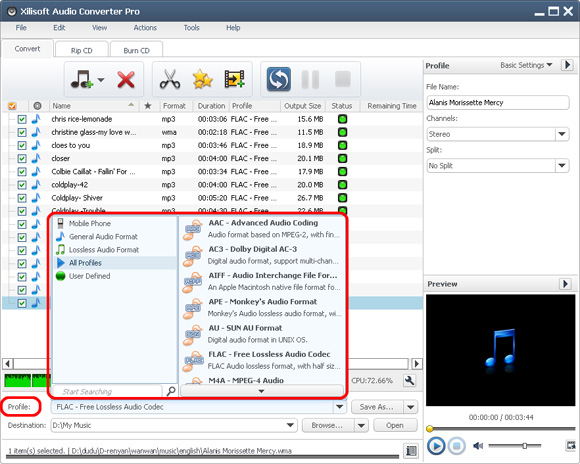
Tip: If you want to output multiple format files from a file, you can use the “Add Output Profile” button on the toolbar to add a default profile below the file in the list and change the profile according to your need.
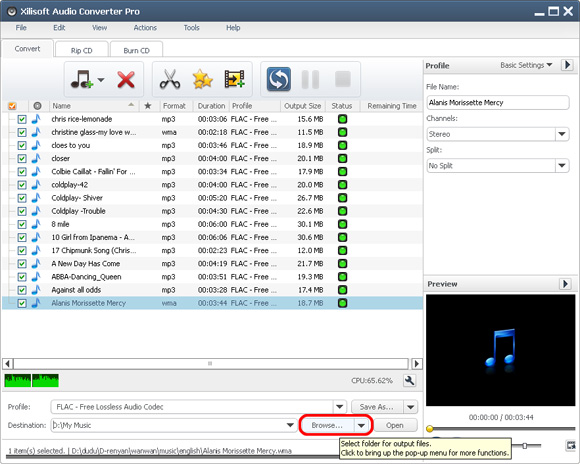
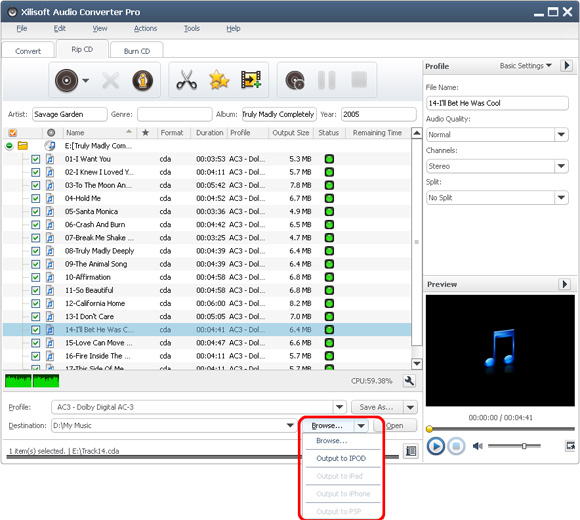
Click “Browse…” button and select a folder for saving the output files in the dialog that opens.
If iPod, iPhone and PSP are connected, you can also click “Browse…” drop-down button and choose the corresponding options in the drop-down menu that opens to let the program transfer the converted files to the connected devices directly.
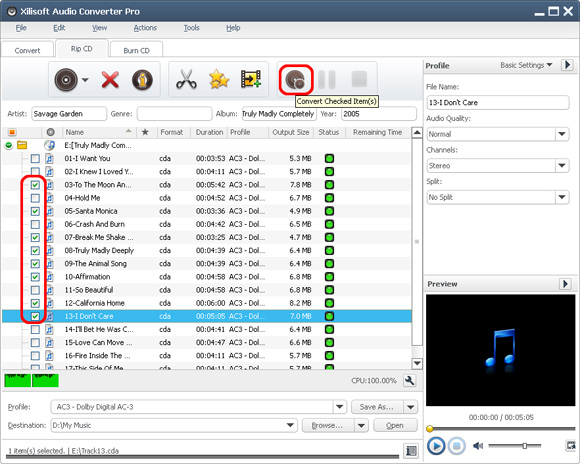
4.Start converting
Check the wanted files in the file list and click “Convert Checked Item(s)” button to start converting the checked files. You can check the converting progress by the “Status” bar at the bottom.
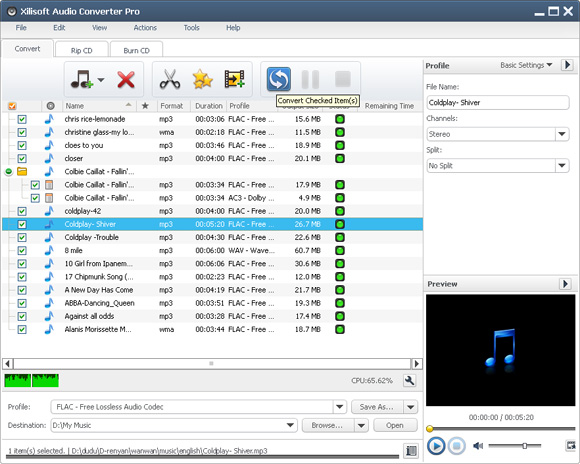
During converting, click "Pause Checked Item(s)" button to make the conversion pause; click "Stop Checked Item(s)" button to stop the conversion.
Part 2: Convert Audio CD
Click “Convert CD” tab in the main window to switch to “Convert CD” window.
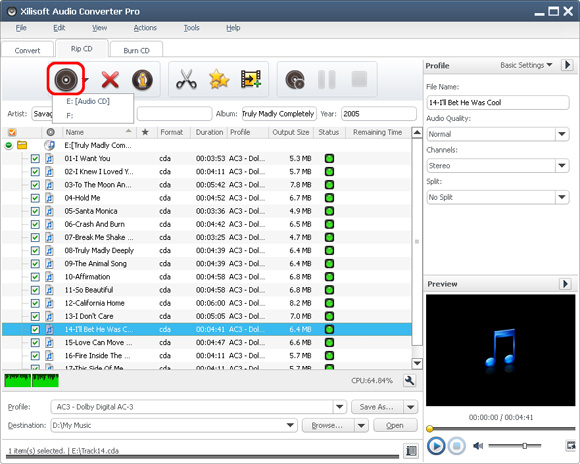
1.Load audio CD
Click "Load Audio CD" Button in the tool bar and load the CD you inserted.
2.Set output profiles
Select a file in the list and click Profile drop-down button to choose the wanted output profile in the “Profile” drop-down list that opens.
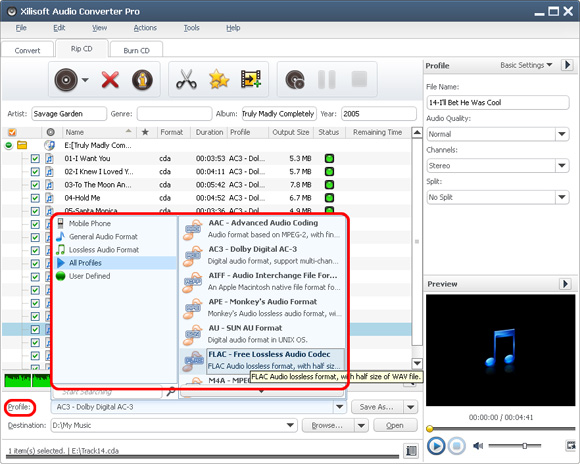
Tip: If you want to output multiple format files from a file, you can use the “Add Output Profile” button on the toolbar to add a default profile below the file in the list and change the profile according to your need.
Click “Browse…” button and select a folder for saving the output files in the dialog that opens.
If iPod, iPhone and PSP are connected, you can also click “Browse…” drop-down button and choose the corresponding options in the drop-down menu that opens to let the program transfer the converted files to the connected devices directly.
4.Start converting
Check the wanted files in the file list and click “Convert Checked Item(s)” button to start the converting. You can check the converting progress by the Status bar on the bottom.
During converting, click “Pause Checked Item(s)” button to make the converting pause; click “Stop Checked Item(s)” button to stop the converting.
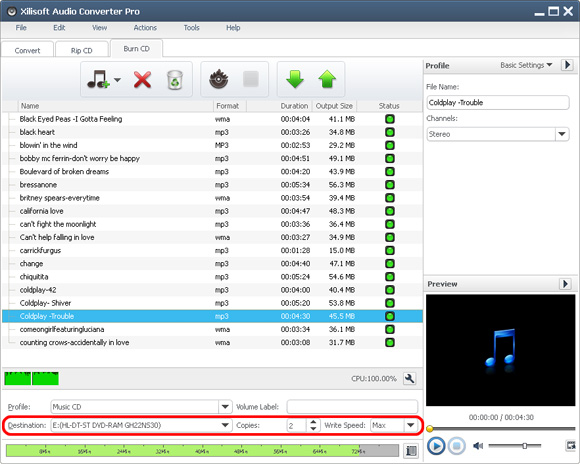
Part3: Burn CD
Click Burn CD tab in the main window to open the "Burn Audio CD" window.
1. Add files
Click “Add File(s)” button on the toolbar, choose one or more files in the dialog that pops up, then click “Open” to import the selected files into the file list in the main window.
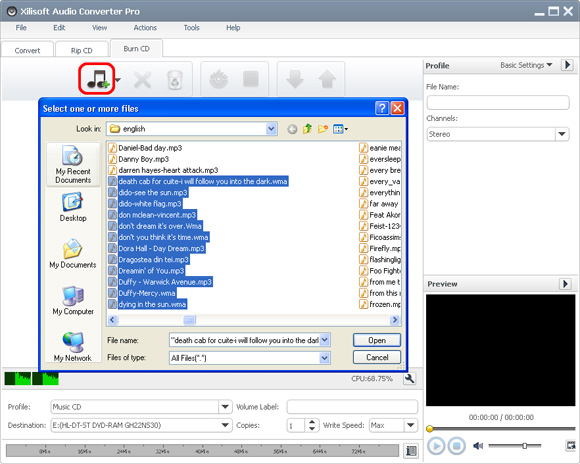
Or, click “Add File(s)” drop-down button, choose “Add Folder” option, then select the wanted folder and import all the files in the folder to the file list.
Tip: You can also add files by choosing “Add File(s). ” or “Add Folder. ” option from File menu.
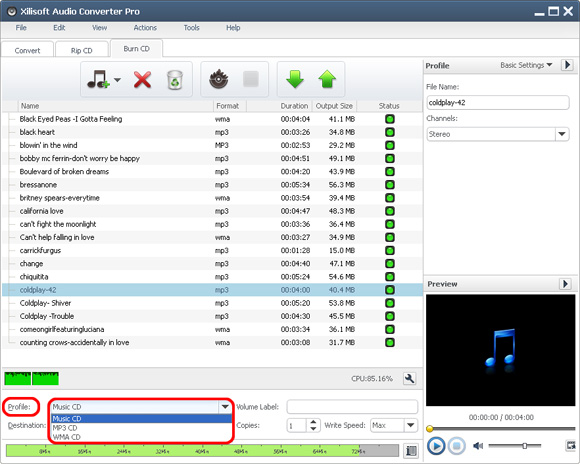
2. Set output profiles
Click "Profile" drop-down button to choose the wanted CD type in the Profile drop-down list that opens. Three CD types are available: Music CD, MP3 CD, and WMA CD.
3.Set volume label
Type the CD name in the “Volume Label” text box.
Tip: You can set the burning “Copies” and “Write Speed” according to your need.
If you have more than one drive, choose the drive from the “Destination” list.
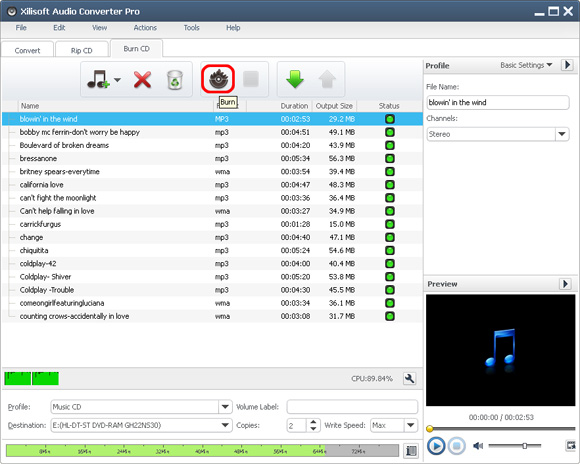
5. Start burning
Click “Burn” button to start burning CD. Click “Stop” button to stop the burning if you want.
Part 4: Clip Video Segments
The program allows you to pick out the segments you want from the source file.
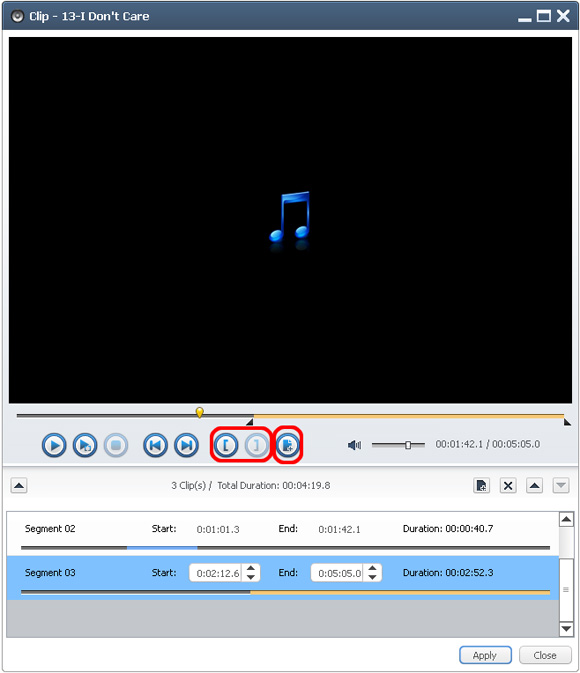
- Choose a file you want to clip in the file list, and click “Clip” button on the toolbar to enter “Clip” window.
- Click “Play” button to play the selected file.
- During playback, click “Set Start Point” button to set the segment start time when it plays to the point you want, and click “Set End Point” button to set the segment end time to get a segment. The clipped segment will be displayed in the segment list.
Tips:
- You can change the segment by entering the start and end time in the “Start” and “End” textbox.
- You can also adjust the start and end time by dragging the sliders.
4. Click “New Clip” button, and repeat Step 3 to get a new segment.
Tip: To delete a segment, please choose the segment in the segment list, and click “Delete Clip” button on the toolbar; to adjust the segment order, please choose the segment and click “Move Up” or “Move Down” button to adjust its order.
5. After the above settings, click “Apply” and “Close” button to apply all the settings and return to the main window. The clipped segments will be added below the source file in the file list.
Tip: The segment list displays all the clipped segments with their respective start time, end time and duration.
Part5: More Applied Functions
This part applies to the effect settings of “Convert” and “Convert CD”.
Before converting or converting , you can edit audio effects for the output file. To do this, select a file from the list, and click “Effect” button from the toolbar to open the “Effect” window.
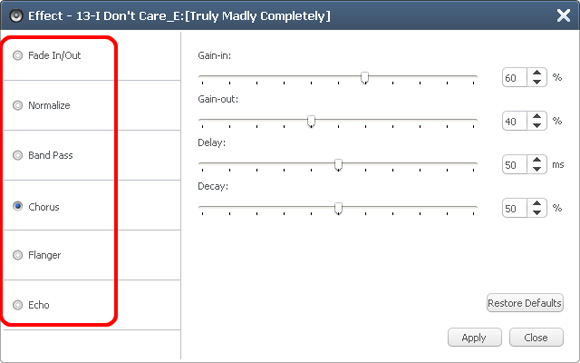
Check “Fade In/Out”, “Normalize”, “Band Pass”, “Chorus”, “Flanger” and “Echo” option on the left, and edit the details on the right.
Two editing ways are offered: dragging the sliders or typing the values directly into the textboxes.
After all the settings done, click “Apply” and go back to the main window.
Add Multiple Profiles for One Source File
The program allows you to add multiple profiles to one source file, thus you can output multiple files from one file at one time.
1. Choose a video/audio file in the file list.
2. Click “Profile” drop-down button, and choose a profile you want from the drop-down list.
3. Click “Add Output Profile” button on the toolbar, then a default profile will be added below the file.
4. Click the added profile, and choose a new profile from the Profile drop-down list.
Repeat the steps to add as many profiles as you want to the file.
Choose the Columns to be Displayed in the File List
You can choose the columns to be displayed in the file list and remove the odd ones according to your own need.
Click “View > Select Column(s). ” option in the main menu to open “Select Columns” dialog, and check the columns you want to display in the file list, then click “OK” button to return to the main window.
Click “Up” and “Down” buttons to adjust the display order of the columns.
If you now have a bunch of audio files in hand and want to convert them into other audio formats, Xilisoft Audio Converter can help you with superior music quality.
The belowed tips will tell you how to step by step convert audio files with the powerful Xilisoft Audio Converter.
1. Free download the simple-to-use Xilisoft Audio Converter, install and launch.

2. Use "Add" button on the main window or "Add" in the "File" menu to select your original file first, and then open the folder where your original files are located, all supported files will be listed automatically.
3. Select a file or several files. The file(s) you highlighted will be loaded after you click "Open".
4. Use "Remove" button to remove the loaded file which you highlight; "Clear" button to clear all the files you selected. Those buttons can also be found in the "File" menu.
5. Select target file format that you want to output. Highlight your loaded file first and then select output format from "En-coder" combo-box. For example, if you want to convert original audio file to MP3 format, you should select "Lame MP3 En-coder".
6. To set the folder that you want to save your target file, you may select the Output folder by clicking "Browse. " button or directly enter a path in the "Destination" box. "C:temp" is set as the default destination folder.
7. You can adjust some special setting for your conversion by clicking "Settings" behind the "Encoder" combo-box, such as "Bit Rate" and "Sample Rate".
8. As the last step, just click "Encode" to start your conversion. You can see "OK" under the "Status" column which means you got a successful conversion. What to do now? Just enjoy your music. Our software keeps the quality as good as the original files.
Frequently Asked Questions - Xilisoft Audio Converter
Q: I have many files to convert. How can I import them simultaneous? It means I want to import many files by one time.
A: You'd better put all your files into one folder on your PC. And then open that folder with the software. You can select more files by pressing "CTRL" and highlight them at the same time.
Q: Does your software support FLAC file? I can not see it in the "open" window when I try to import it.
A: Please set "Files of type" from default setting "Supported Files" to "All files" and then you will see your FLAC files in the folder. You can select and import your files.
Q: How to create the M4A files?
A: To create the M4A files, please select "FAAC DLL Encoder" in the "Encoder" combo-box, then click the adjacent "Settings. " button and select "MPEG4 (*.M4A)" in the "Output AAC File Format" combo-box.
Читайте также: