
Как сделать спич бабл в фотошопе
Обновлено: 05.07.2024
A common addition that you might need to make to an image in Photoshop is the addition on some text. You might even need to make it look like someone is saying that text. Therefore you may need to know how ot create a speech bubble in Adobe Photoshop.
While there are a lot of very talented artists that can draw and create almost anything in Photoshop, some of us just don’t have that gift to be able to freely draw on a computer screen. This can extend to even very basic shapes, like a speech bubble.
Every time that I have tried to manually draw a speech bubble, it either looks like a balloon or some weird cloud. Fortunately there is a custom shape tool in Photoshop CS5 that can help to solve this specific problem. So continue reading our brief tutorial below to learn how to create a speech bubble in Photoshop CS5.
How to Create a Speech Bubble in Adobe Photoshop
- Open your image.
- Right-click the Shape Tool and choose Custom Shape Tool.
- Choose the Shape dropdown and select the speech bubble.
- Click the Foreground Color box, choose a color, then click OK.
- Draw the speech bubble on the canvas.
- Select the Move tool and position the speech bubble.
- Click the Type Tool.
- Adjust the Font settings.
- Click inside the bubble and add your text.
Our article continues below with additional information on adding a speech bubble in Photoshop, including pictures of these steps.
How to Make Photoshop CS5 Speech Bubbles (Guide with Pictures)
I am going to be writing this tutorial with the assumption that you want to create a white speech bubble with black text. If not, then you can simply choose a different foreground color for your speech bubble and a different text color for the words that you are putting inside of the speech bubble before you create each respective element.
Step 1: Open the image to which you want to add a speech bubble.
Step 2: Right-click the Shape tool in the toolbox at the left side of the window, then click the Custom Shape Tool option.

Step 3: Click the drop-down menu to the right of Shape in the toolbar at the top of the window, then click the Speech Bubble option.

Step 4: Click the Foreground Color box in the toolbox at the left side of the window, click the top-left corner of the color picker to choose the color white, then click the OK button.

Step 5: Click near the location in your image where you want to insert the speech bubble, then drag your mouse to expand the size.
You don’t need to worry too much about being exact with your location, as Photoshop automatically creates the shape on its’ own layer, which allows you to freely move it.

Step 6: Click the Move Tool icon at the top of the toolbox, the click your speech bubble and drag it to the desired location.
Step 7: Click the Type Tool in the toolbox.
Step 8: Choose your font settings using the options in the toolbar at the top of the window.

Step 9: Click inside the speech bubble, then type the text that you want to add.
Depending upon the shape and size of your speech bubble, you may need to add some line breaks and spaces to properly position your text. You can move to a new line by pressing Enter on your keyboard, and you can add spaces by pressing the spacebar.

Be sure to save your image once you have finished customizing your speech bubble.
Are you having trouble figuring out how to go back and change the font on text that you have already created in Photoshop? The instructions in this tutorial can be helpful in pointing out the steps that you need to follow in order to edit and customize existing text layers.
Is your computer struggling to run Photoshop as smoothly as you would like? Maybe it’s time to upgrade to a new laptop. There are a number of options available that are both affordable and powerful, including this one available at Amazon.
Additional Sources
Matthew Burleigh has been writing tech tutorials since 2008. His writing has appeared on dozens of different websites and been read over 50 million times.
After receiving his Bachelor’s and Master’s degrees in Computer Science he spent several years working in IT management for small businesses. However, he now works full time writing content online and creating websites.
His main writing topics include iPhones, Microsoft Office, Google Apps, Android, and Photoshop, but he has also written about many other tech topics as well.
With VistaCreate’s speech bubbles, your characters can do the talking. Bring it to life with speech, thoughts, and dialogue. Explore the Shapes tab, add to your image, change the colors and size, and put a text box with your words. Pick a font and font color to match your unique style.

Edit Any VistaCreate Template You Like
Find a Funny Way to Tell Your Story on Photo
Whether the people, pets, or plants in your photo need to profess their love, tell a joke, or share information, put it and let your images share the message. Add personality, humor, and emotion to your designs.
Choose Appropriate Style
Choose the word balloon style to match the tone and colors of your photo. Resize it to fit your space and give characters a voice. Add text to deliver your message in a clever, interesting way. Spark design with a conversation!
What Do You Have to Say? Get Clever!
What can you put in your word balloon? Caption the photo, ask a question, say something funny, make an offer, share information—the possibilities are limited only by your imagination. Custom talking doesn’t even have to be a person. It can be your dog, a cartoon character, or even an inanimate object, like a donut!
Match or Contrast Your Photo With Color
If the outline of the speech bubble isn’t quite right, it’s easy to change. Just click on it and pick a color that matches photo colors or outlines.
Jazz Up Design With Animation
Want to tell a longer story? One clever way would be to have animated pop in and out in order. Our tool makes it easy to use animated elements for graphics — no experience necessary!
Customize Your Design
Use custom colors, fonts, images, and design objects to make your graphics unique and special. With VistaCreate you always have a choice. Change everything you want!
Create a Storyboard
Your social media design can be dry and boring, or lively and fun. Our text bubble maker can create the difference between a glance and a share. Lay out a whole story in dialogue.
When to Use Speech Bubbles on Photos
Show what your characters are thinking with text or pictures. Choose it with an emotionally expressive face to match the subject: excitement, thoughtfulness, happiness, or whatever best expresses how you want your audience to feel.
DialogLet two or more characters talk to each other. The conversation is a friendly way to provide information.
Talk directly with the audience
Talk directly with the audience. Use a front-facing character, as if they were talking directly to the audience on video or static design.
Use frames
Use frames to divide images into panels for a comic strip story. Try a conversation style with each character in a separate frame, or several blocks with different pictures and expressions to tell a story.
Sale Flyer
Create a sale flyer with 2 or 3 people talking excitedly about an upcoming sale.
Take an outdoor selfie
Take an outdoor selfie for Instagram and add a thought bubble expressing your love of nature.
Upload a photo
Upload a photo of your dog and give it a funny caption. What is he really thinking about that silly sweater you’re wearing?
How to Add Speech Bubbles to Picture

Create a free account on VistaCreate
Choose a design from our collection of 25,000 templates and upgrade to VistaCreate PRO that gives you full access to 500,000 images.
Choose your picture
Add speech bubbles to represent talking or thoughts. Just drag one of our shapes onto a picture and position it where it should be.
Customize it
Put text and select the font from our collection or upload your own.
Save and share
Save your graphic, download, and share!
After I add a speech bubble to the photo, can I edit it later?
Yes, all your designs are automatically saved, and you can come back and edit them anytime. Create a VistaCreate account so you can log in and then go to the My Designs tab and see all your created visuals. Edit everything you want, add new objects, resize them, replace the background, and change the text to update the existing design or create an entirely new one.
Can I use VistaCreate on my iPhone or Android?
Sure! Go to the App Store or Google Play to download the VistaCreate app and create animations and graphic designs on the go. Choose one of our images or upload your own and use your fingers to drag shapes, frames, and other elements to enhance the design. Put your own text, and save or upload to social media.
Where do I find VistaCreate video tutorials?
Check out our video tutorials on the VistaCreate YouTube channel or a Tutorials page on our website. You will definitely find a lot of useful tips on how to use VistaCreate and its features there. With VistaCreate, you don’t need to have prior design experience to create awesome visual content.
В VistaCreate персонажи в дизайне могут разговаривать! Добавьте на картинку спич-баббл и впишите туда мысли героя или целый диалог. Во вкладке «Объекты» найдите раздел «Фигуры» – и выберите любой баббл. Измените его цвет и размер, добавьте реплики. Выберите шрифт и его оттенок, чтобы облачко сочеталось с дизайном по настроению и стилю.
Редактируйте любой шаблон VistaCreate
Редактируйте любой шаблон VistaCreate
В вашем дизайне есть фото людей, животных или даже растений – и им точно есть что сказать? Перенесите на картинку спич-баббл и добавьте туда теплые слова, шутку или важную информацию – и получится настоящая эмоциональная история.
Выбирайте стиль
Выбирайте облачко с текстом под стиль, тон и цветовую гамму вашего фото. Вы можете увеличить или уменьшить свой баббл, чтобы он удачно вписался в фото. Когда выберете расположение облачка, добавьте в него текст, чтобы персонаж заговорил!
Что сказать? Да что угодно!
Что можно написать в облачке текста? Подпишите фото, задайте вопрос, напишите шутку, объявите об акции или поделитесь любой другой информацией – вариантов миллион. На картинке разговаривать может не только человек, но и рисованный персонаж, собака и даже шоколадный пончик!
Подберите цвет – похожий или контрастный
Если вам не очень нравится контур баббла, есть выход! Просто кликните на него и выберите цвет, который сделает облачко контрастнее – или наоборот поможет органичнее вписаться на фото.
Оживите дизайн анимацией
Хотите сделать историю длиннее? Это просто. За пару минут анимируйте дизайн так, чтобы из него получился короткий мультик! Наши инструменты вам помогут – специальные знания для этого совсем не нужны.
Редактируйте дизайн
У вас под рукой шрифты, дизайн-объекты и целая палитра оттенков – все, чтобы сделать дизайн особенным и уникальным. В VistaCreate ваши возможности просто безграничны – редактируйте любой дизайн так, как хочется.
Создайте сториборд
Дизайны для соцсетей могут быть сухими и скучными или живыми и эмоциональными. Вам решать, куда повернуть. Чтобы ваши дизайны не только посмотрели, но и пошерили – добавьте в них баббл. Маленькое облачко с текстом обеспечит целую историю, и аудитория это оценит.
Когда ставить облачки текста на фото
Покажите, о чем думают персонажи на ваших фото, с помощью текста или картинок. Если выбираете картинку, не забывайте, что она должна передавать восторг, задумчивость, радость или другие эмоции очень точно – чтобы аудитория правильно уловила настроение.
ДиалогУ вас на картинке несколько персонажей? Пусть между ними завяжется разговор. Короткий диалог – формат, в котором передавать информацию удобнее всего.
Поговорите с аудиторией
Обратитесь напрямую к людям. Пусть персонаж смотрит на читателя и адресует свои слова конкретно ему. Это легко реализовать и в статичном, и в анимированном дизайне.
Добавьте рамки
Используйте рамки, чтобы разделить изображение на окошки, как в комиксе. Пусть каждый персонаж говорит что-то в своем блоке – или просто поместите в разные окошки разные картинки и на каждую добавьте надписи в бабблах.
Флаер для распродажи
Сделайте флаер-историю – пусть два или три человека на картинке обсуждают распродажу, которая «вот-вот начнется!».
Сделайте селфи на природе
Сделайте селфи у реки или в парке и выложите его в Instagram с бабблом о том, как вам нравится бывать на свежем воздухе.
Загрузить фото
Загрузите фото своего пса и придумайте ему смешную реплику. Как считаете, что он на самом деле думает про ваш свитер – тот самый, который подарила бабушка?
Как добавить баббл на картинку?
Создать бесплатную учетную запись в VistaCreate
Выберите любой дизайн из нашей коллекции с 25 000 шаблонов и перейдите на VistaCreate Pro, чтобы получить доступ к 500 000 изображений.
Выбрать картинку
Добавьте баббл, чтобы выразить мысли или эмоции. Просто перетяните облачко в картинку – и разместите его там, где оно будет хорошо смотреться.
Персонализировать
Добавьте в баббл надпись – выберите для нее любой шрифт из нашей коллекции или загрузите свой.
Сохранить и поделиться
Сохраните графику, чтобы загрузить ее на компьютер и поделиться с миром!
Частые вопросы
Можно ли редактировать текст после того, как добавлю его в баббл?
Да, все ваши дизайны сохраняются автоматически – и их можно отредактировать в любое время. Создайте аккаунт VistaCreate, чтобы зайти в редактор, и перейдите в папку «Мои дизайны», чтобы увидеть все свои проекты. Редактируйте все, что хочется, добавляйте новые объекты, увеличивайте или уменьшайте их, заменяйте фон и надписи. Вы можете отредактировать любой уже созданный дизайн или создать новый.
Можно ли пользоваться VistaCreate на iPhone или Android?
Конечно! Перейдите в App Store или Google Play , чтобы загрузить приложение VistaCreate и создавать дизайны и анимации буквально на ходу. Выберите любой объект из нашей коллекции и одним касанием перенесите в свой дизайн фигуры, рамки и другие элементы. Добавьте надписи – и сохраните дизайн или загрузите его в соцсети.
Где можно найти видеоуроки VistaCreate?
Наши видеоуроки можно найти на YouTube-канале VistaCreate или на странице с туториалами на нашем сайте. Там вы наверняка найдете массу полезных советов о том, как пользоваться всеми возможностями VistaCreate. С конструктором VistaCreate вам не нужен опыт в дизайне, чтобы создавать визуальный контент.
Looking to add a speech bubble to a photo? Or maybe create a comic of your very own? Speech bubbles are great for not only adding cute or funny dialogue to an image, but they work amazingly for adding useful information on things like flyers and online ads! Fotor makes it easier than ever to add speech bubbles to multiple images online, all without leaving your own browser!
Let’s take a look at not only how to add a speech bubble to a photo, but also how to add fun illustrations and put together your own story using speech bubbles.
Different Types of Speech Bubbles
While the first thing that may come to mind when you think of speech bubbles are comics, there are actually a few different types of speech bubbles, all with there own style and usage. Learning when to add a speech bubble to photo and which ones to choose is a great first step!
1. Cute
Cute speech bubbles are great for social media posts as well as personal edits to share with friends and family! Try and play with hand-drawn looking bubbles to give things a “doodle” feel.
Thick outlines and wobbly lines will give your photos and an extra dose of cuteness that goes with almost every photo. They work especially well with cute animal photos! Try playing with soothing pastels or neutral browns and grays so the bubbles look less stark and more adorable.
Pair them with hand-drawn or cursive style fonts to tie everything together, and you have an instant cute photo!

2. Comic
Comic book style speech bubbles are very versatile! Use the typical orange, yellow and red colors to give something a classic comic book feel, or add your own colors to get just small hints of the comic book style.
Comic style speech bubbles are typically harsher in shape and have a lot of sharp angles, to really help give you a sense of actions and emergency! These work best when adding more than one bubble, or when you want to show someone yelling or speaking loudly.
Pair these types of speech bubbles with bold thick fonts or fonts with a halftone effect in them!

3. Promotion
Finally, you can also use speech bubbles to help promote your business and events! For promotional material, you will want to use speech bubbles that are more neutral and clean in shape. Use speech bubbles to draw the viewer’s eyes to some kind of important information like a sale or some kind of special event.
Try and keep the colors natural or simple. White speech bubbles would work best for promotions as they tend to look good universally and pair with everything!
Shades of grays text work best to keep everything feeling professional. When choosing a font, try using typical business fonts, or bold san-serif fonts that you might use outside of the speech bubbles as well.

How to Add a Speech Bubble to Photo?
Now, let’s take a look at how to add a speech bubble to photos without creating a whole comic. This is great for when you are just editing a photo for fun, or want to create a flyer or poster. This always works great for social media posts, both personal and business-related!
1. Upload your Image
First, open Fotor online photo editor and start things off by uploading your image!
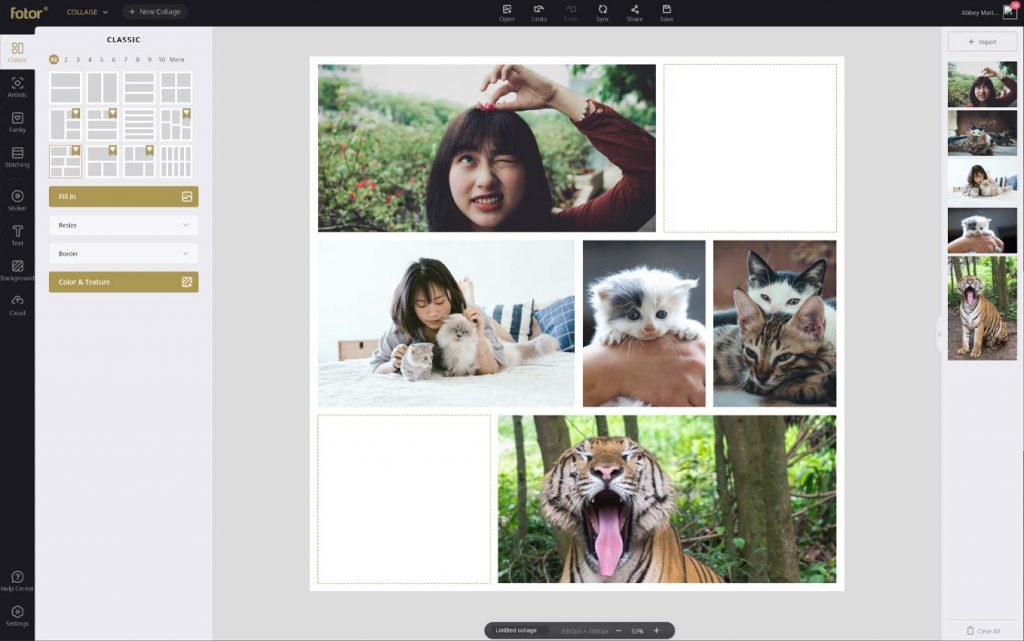
If you are only doing one image you can choose to “Edit Photo”. However, if you want to make a super quick and easy sale flyer like me, then go to “Make Collage” and choose “Artistic Collage.”
I will be choosing the “Wordless Communication” template.
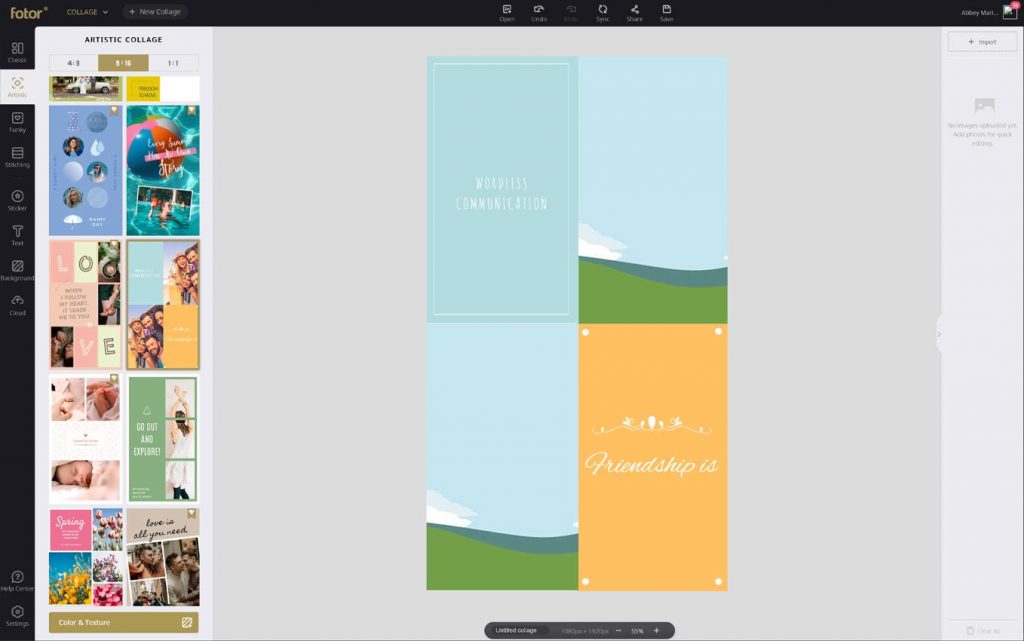
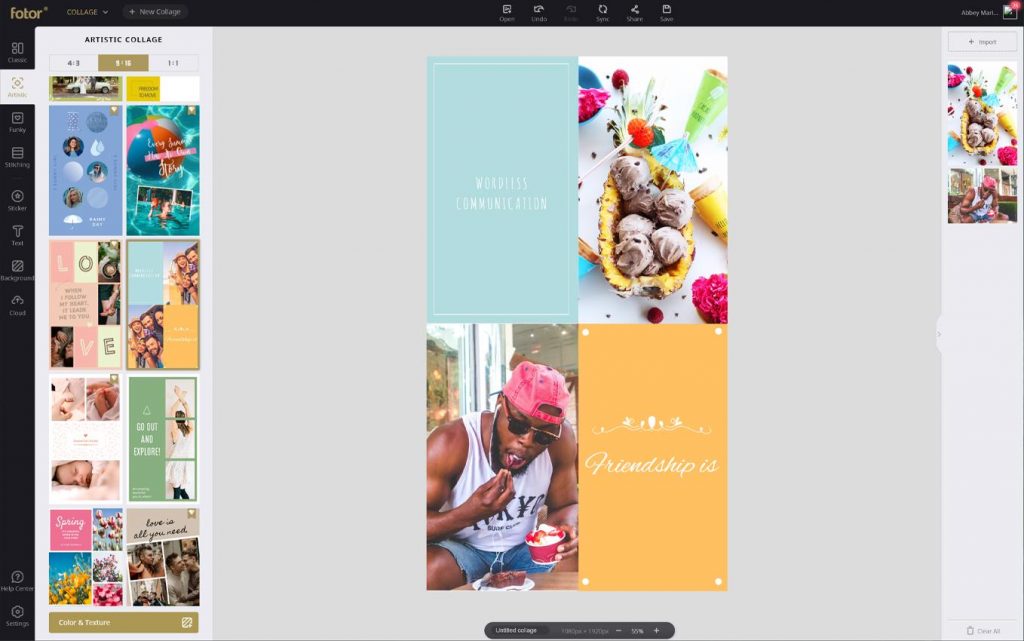
Import your images by either using the sidebar or the top bar. Once your images are uploaded, drag, and drop them into place, it’s that easy!
You can adjust the placement of the photos, and zoom but double-clicking on the images. You can also flip them vertically or horizontally using the upper toolbar.
2. Basic Editing
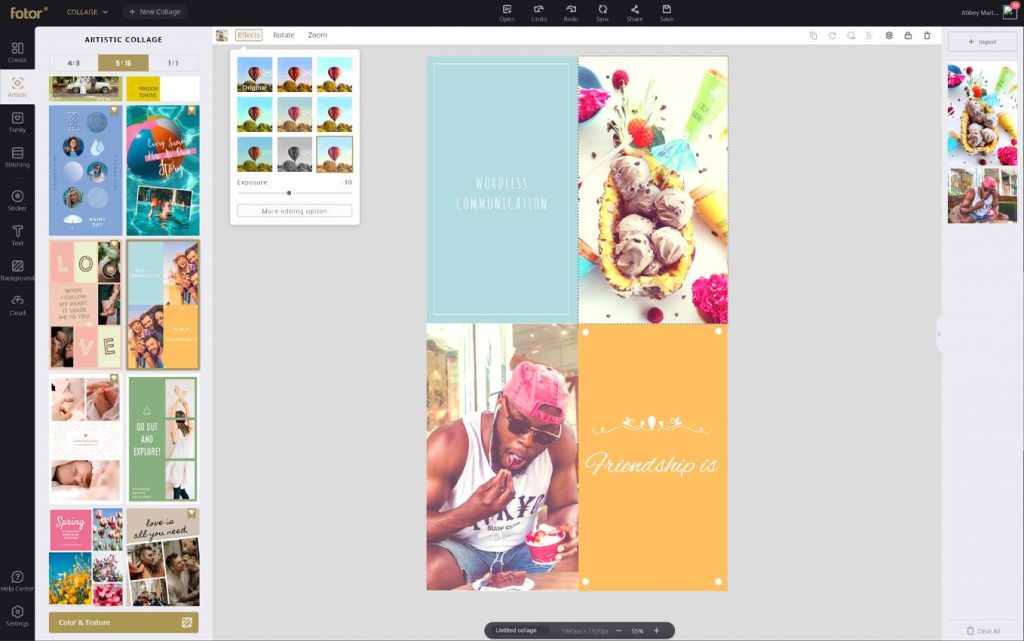
Next, you will want to do any of your basic editings in the “Basics” tap if you are only editing one photo. This includes the brightness and contrast of the image, or maybe turning the image greyscale.
However, if you are creating a photo collage like me, then you can add quick effects to any images by clicking an image, going to “Effects” in the upper toolbar next to “Rotate” and “Zoom”, and then choosing the filter that works best for your design. From here you can also adjust the exposure!
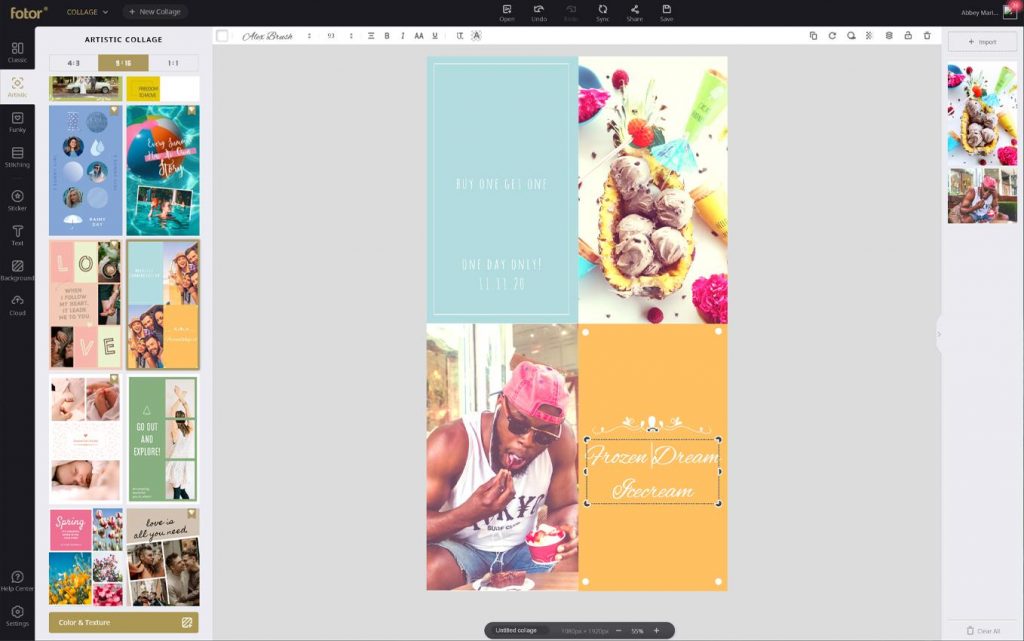
Again, if you are using a template like me, go ahead and change some of the text to your own information. We will be adding some comic style letters a little later using stickers, so just change the basic text for now!
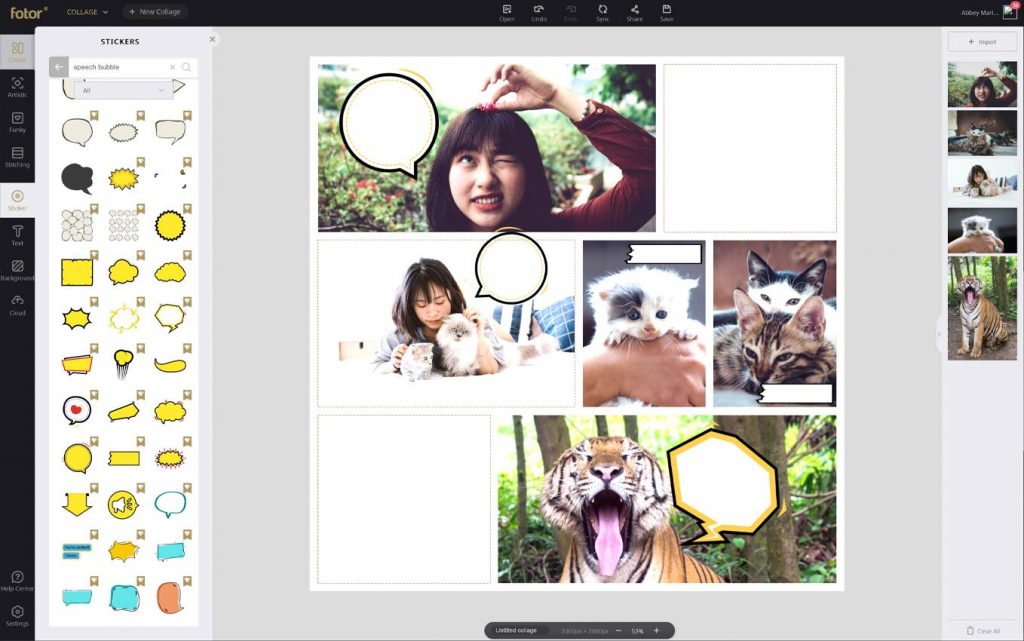
3. Choose the Speech Bubble and Add your Text
Finally, go into the “Stickers” tab and search “Speech Bubble.” For this flyer, I want one of the more hand-drawn speech bubble designs as I want things to feel light and cute.
Once you see a speech bubble that you like, drag and drop it onto the canvas.
Move around any of the base text if needed in order to fit the speech bubbles! Use the upper-toolbar to rotate the speech bubble if needed as well.
Place the speech bubble so that it is pointing at a person’s or subject’s mouth, this will give the effect of talking!
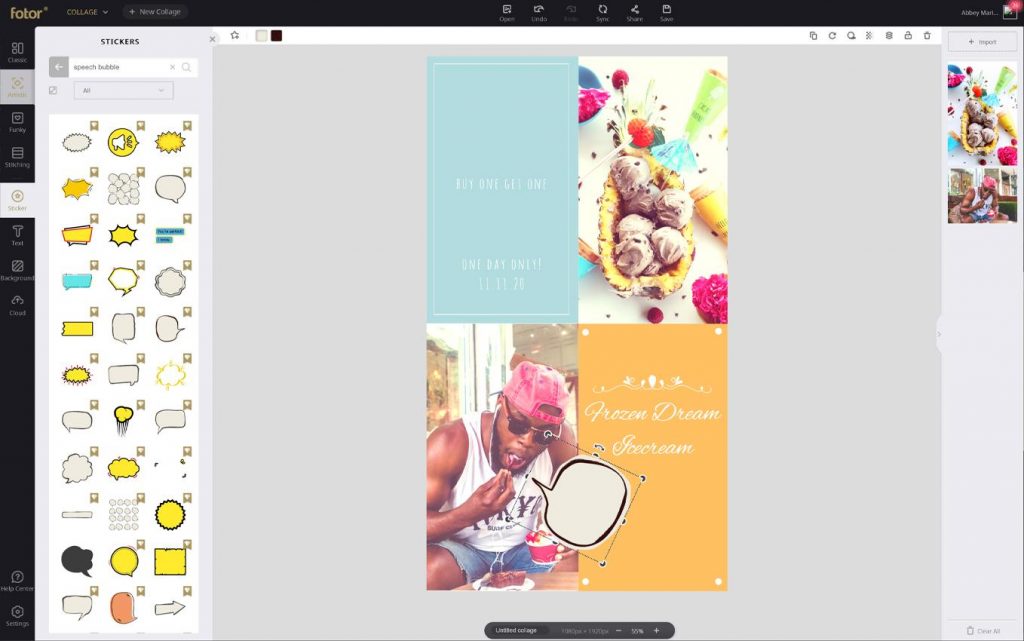
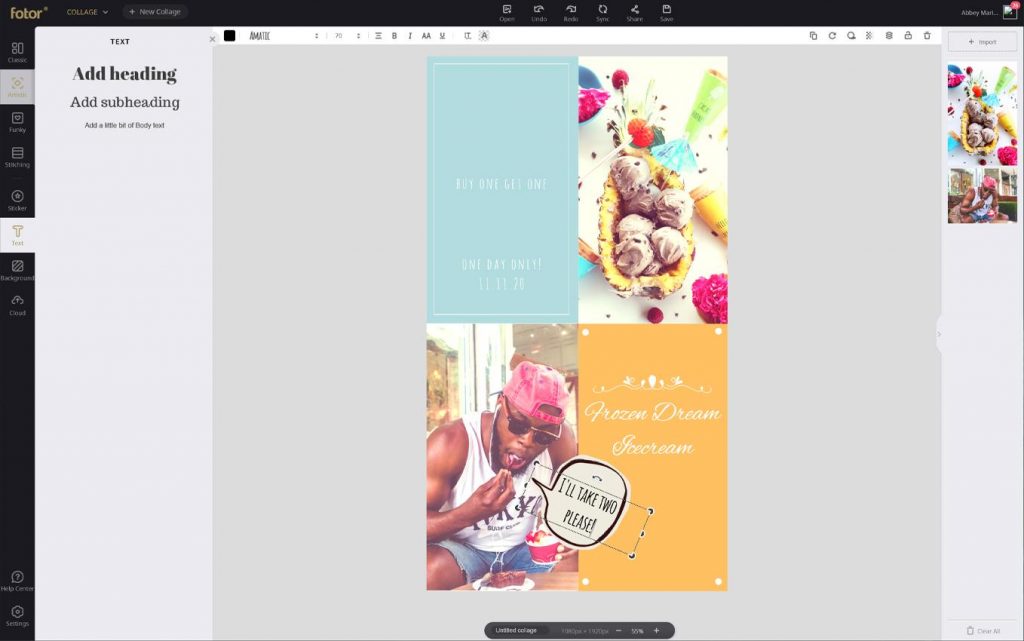
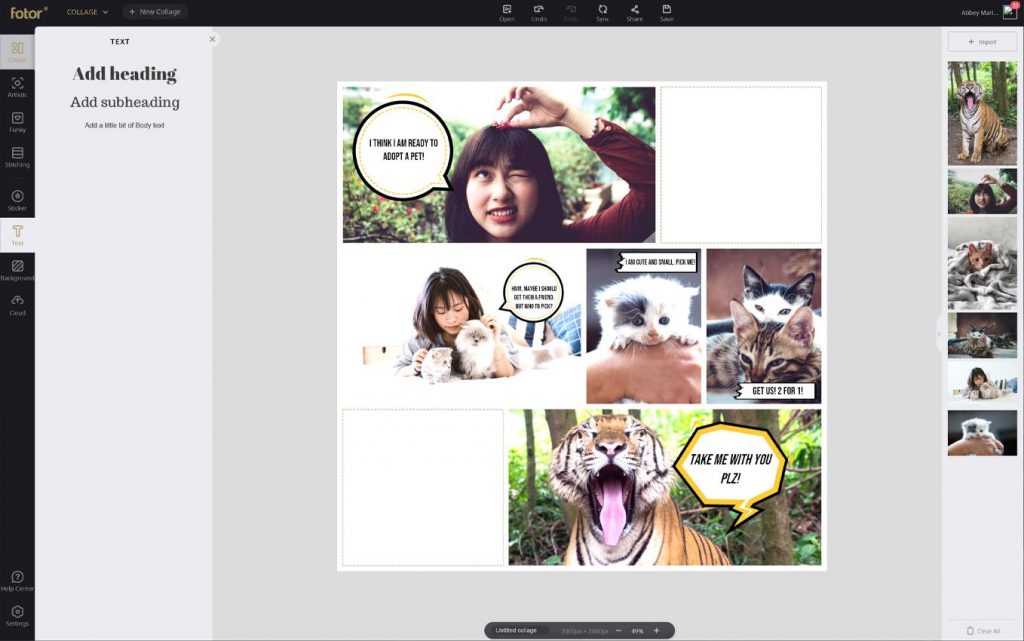
Add your text by going to the “Text” tab and change the font to something hand-drawn. I will be using the font “Amatic”. When choosing a font make sure it fits with your design but is still clear and readable.
Place and type in your captions. Use the anchor points to position the text inside of the speech bubble making sure it is large enough to read.
Finally, change the color of the font using the top toolbar, to the left of the Font Face options.
Remember, if you are using a light speech bubble choose a dark font, but if you are using a dark speech bubble use a light font!
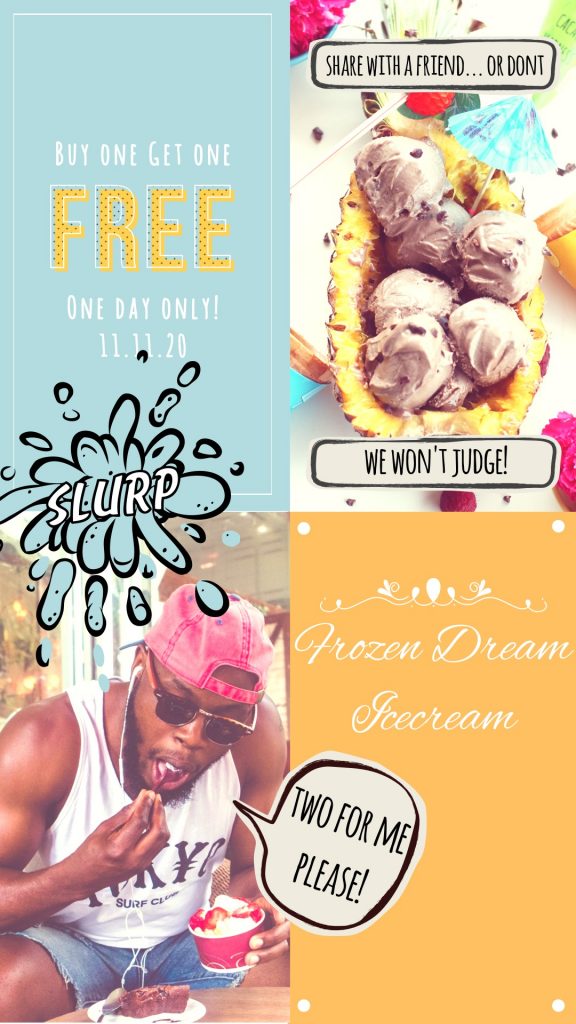
Finish up your design by adding even more speech bubbles and stickers. Find tons of graphics to choose from by searching “Comic” or “speech bubbles” in the Sticker tab, and choosing the ones you like the most!

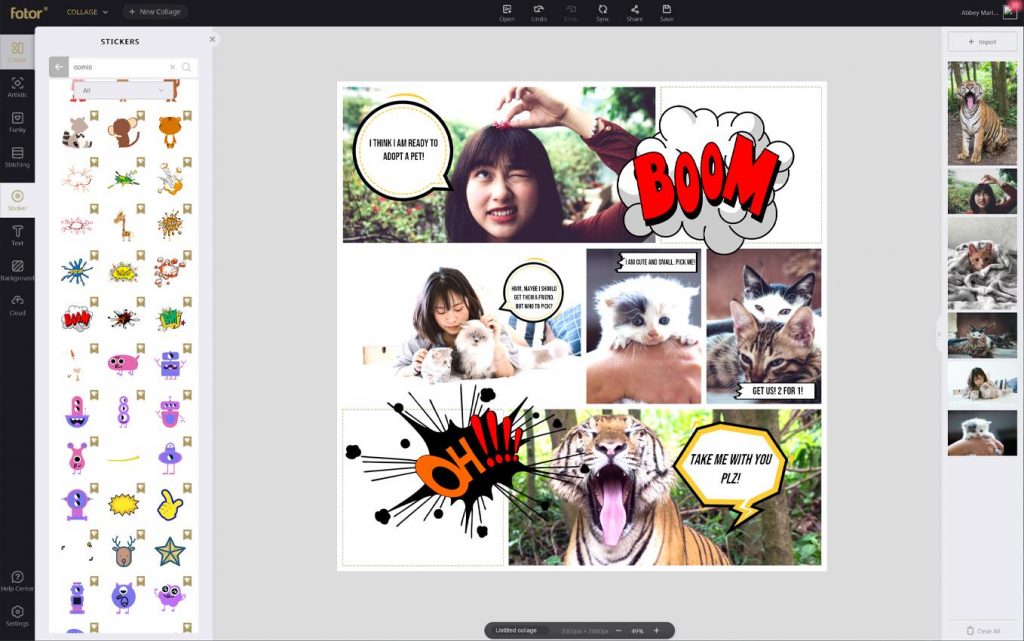
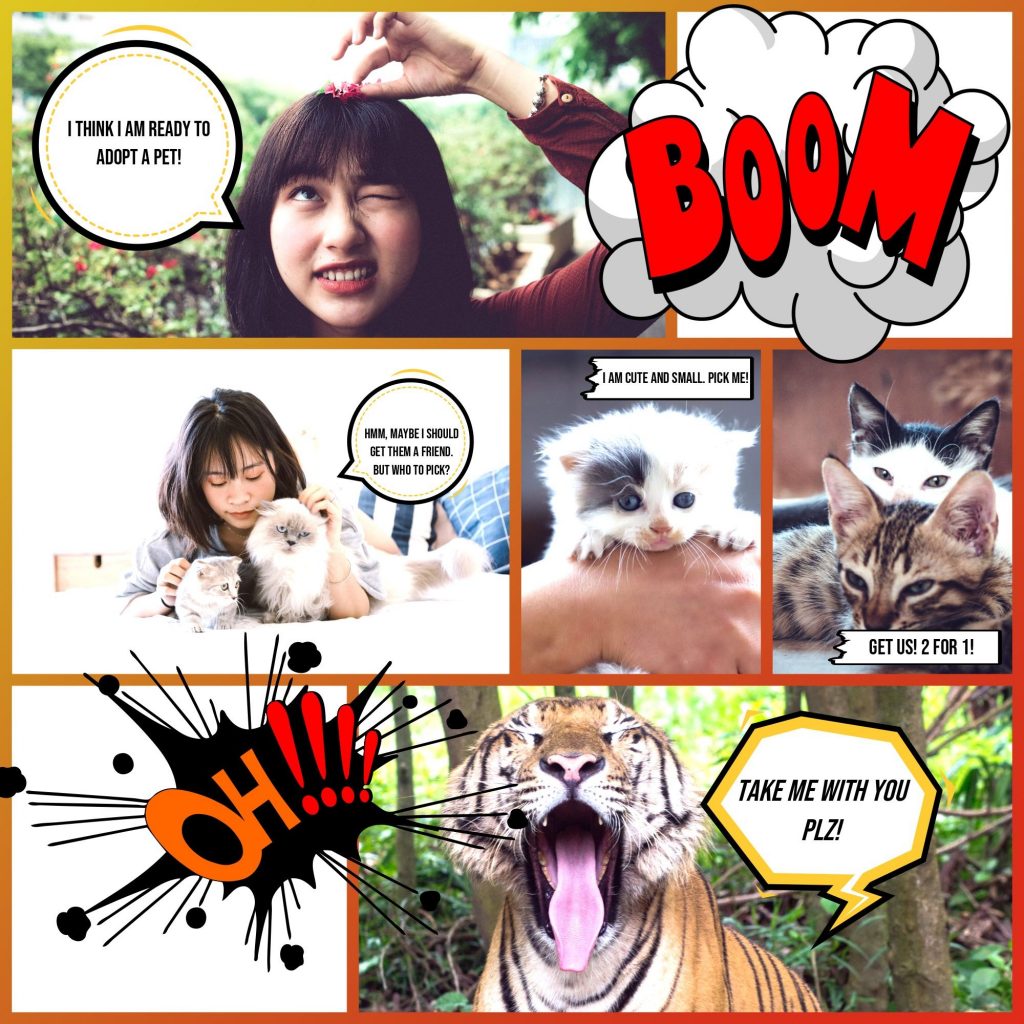
How to Create a Comic Strip Collage with Speech Bubbles?
Finally, let’s look at how to add a speech bubble to photos when you want to make a whole comic! This a great for when you want to create quick fun comics to share with family friends or even social media followers! Wondering “How do you write a short comic?” Check out the F.A.Q. below for some quick tips!
1. Upload Your Images
First, go to “ Make a Collage ” and choose “Classic Collage” as we will be turning the classic collage into a comic strip. This will make creating our panels not only easy, but it will allow us to make small adjustments at any time, with n worry of having to start over!
Choose whichever template has enough panel for your comic strip. I will ill be choosing a template with six panels as I find that is the perfect starting point for a short comic.
Upload all of your images you will be using by choosing “Import” found in the right-hand toolbar. All of your images will appear in the right-hand toolbar.
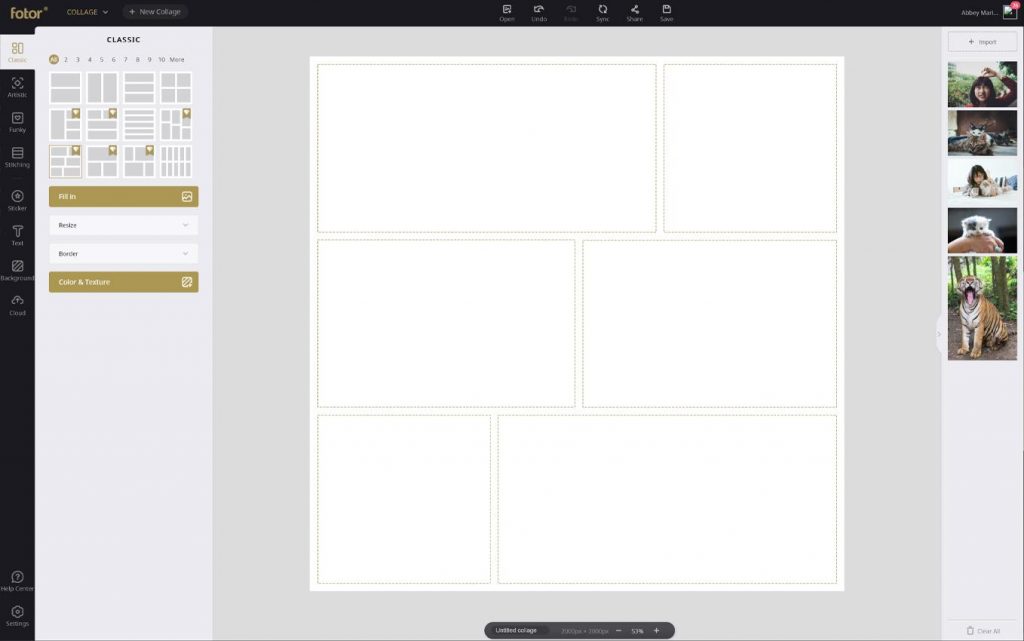
Next, drag and drop your images into their proper places. Feel free to leave some spaces open for comic illustrations which we will be adding later on using the “Stickers” panel!
2. Basic Editing
Now, add some quick photo effects to all of the images by clicking an image, going to “Effects” in the upper toolbar next to “Rotate” and “Zoom” and choosing the filter that works best for your design, as well as adjusting the exposure.
You can also adjust the size of the spurs by clicking on their border and dragon either left or right. Delete a square by clicking on it and pressing delete!
Lastly, you can split a square into two images, bt just dragon and dropping an image next to and already placed image.
Make all of your final adjustments before adding your speech bubbles, so you don’t have to move all of your bubbles and text later on.
3. Add Speech Bubbles and Add Your Story
Up next, add your speech bubbles by going into the Stickers“ tab, and searching “speech bubbles.” You will see there are multiple different kinds of speech bubbles, all in different styles.
For this comic, I want a classic comic style speech bubble so I am going to choose the bright bold yellow ones, and change their color to white, with a black border and orange accent!
Place all of your speech bubbles and dialogue boxes. Try and place the bubbles so that they are point towards a subject’s mouth.
You can also play with dialogue boxes that aren’t bubbles, like in the fourth and fifth panels.
Now, go into the “Text” tab and add all of your comic’s text using a bold sans-serif font! I am using Bebas Neue Regular.
Make sure the text is big enough to read clearly, take a full average of all of the space within the speech bubble!
Time to add all your fun action stickers by searching “comic” in the Stickers tab! Place them in the empty squats, or overlapping your photos for the try comic book effect.
Use these stickers to show action or the passing of time. In some cases maybe even cartoon-like violence!
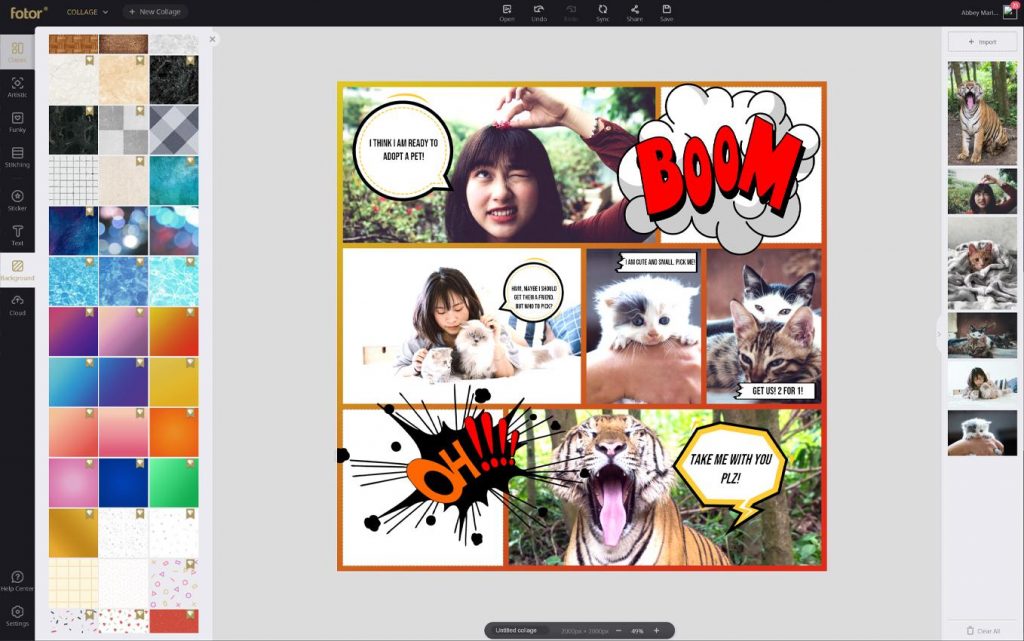
4. Add a Background
Finish up your comic strip up by adding a bright background in the “Background” tab! You can choose a solid color, upload your own, or choose from one of the dozens of pre-made backgrounds available.
I am going to choose a bright origins gradient to match the accent color in my speech bubbles. Make any final adjustments, and with that, you are all done!
Speech Bubble F.A.Q.
What is the meaning of a speech bubble?
Speech bubbles, text bubbles, or thought bubbles are a graphic convention used in comic books and cartoons to allow words to be understood as the speech or thoughts of a given character in the comic or drawing. They tell you that a sentence is being said out loud by a character and is not just a descriptive line or a line being said by a narrator.
How do I put speech bubbles on photos?
First, upload your photo to Fotor, then do any of your basic editing like adding filters. Next, go into the “Stickers” tab and search “Speech Bubble” or “Comic” to find dozens of different speech bubbles and dialogue boxes! Go into the “Text” tab to add your captions.
How do you write a short comic?
First, create a general outline of your comic, then create your characters. Next, write your dialogue, and then combine the dialogue and the characters together. Try and read your comic out loud to yourself to see if the dialogue makes sense, or even have a friend check it over for you!
Do you use quotation marks in speech bubbles?
No, that is not necessary as the speech bubble already tells us that the sentence is being said. A speech bubble serves the same function as quotations marks do, so there is no need to use both.
Outro
And there you have how to add a speech bubble on your photo! Adding a speech bubble is great for showing characters talking to each other in a comic, but don’t think that it’s the only time they are useful! You can use them to add fun or funny dialogue to your Instagram stories and posts, or you can even use them to put together creative advertisements for your shop or business. You can even include them at your party and event flyers as a great way to highlight the important information. Fotor has dozens of different fonts and speech bubbles to choose from, so get creative and use them all!
About Us:
Fotor is a free online photo editor and graphic designer, allowing you to use online photo editing tools, such as add filters, frames, text, stickers, and effects …and apply design tools to make creative photo designs and graphics. Online photoshop and graphic design software have never been so easy! Also, if you want to get more helpful and inspirational tips, please visit our blog home page to extend your reading.
Читайте также: