
Zabbix proxy настройка ubuntu
Обновлено: 04.07.2024
Install the repository configuration package. This package contains apt (software package manager) configuration files.
For Debian 10, run the following commands:
For Ubuntu 20.04 (focal), run the following commands:
For Raspbian, run the following commands:
Server/proxy/frontend installation
To install Zabbix server with MySQL support:
To install Zabbix proxy with MySQL support:
To install Zabbix frontend:
Creating database
For Zabbix server and proxy daemons a database is required. It is not needed to run Zabbix agent.
Separate databases are needed for Zabbix server and Zabbix proxy; they cannot use the same database. Therefore, if they are installed on the same host, their databases must be created with different names!Create the database using the provided instructions for MySQL or PostgreSQL.
Importing data
Now import initial schema and data for the server with MySQL:
You will be prompted to enter your newly created database password.
For proxy, import initial schema:
For proxy with PostgreSQL (or SQLite):
Configure database for Zabbix server/proxy
Edit zabbix_server.conf (and zabbix_proxy.conf) to use their respective databases. For example:
In DBPassword use Zabbix database password for MySQL; PosgreSQL user password for PosgreSQL.
Use DBHost= with PostgreSQL. You might want to keep the default setting DBHost=localhost (or an IP address), but this would make PostgreSQL use a network socket for connecting to Zabbix. Refer to the respective section for RHEL/CentOS for instructions.
Starting Zabbix server process
SELinux configuration
Refer to the respective section for RHEL/CentOS.
As frontend and SELinux configuration is done, you need to restart Apache web server:
Frontend configuration
Now you are ready to proceed with frontend installation steps which will allow you to access your newly installed Zabbix.
Note that a Zabbix proxy does not have a frontend; it communicates with Zabbix server only.
Agent installation
To install the agent, run
To start the agent, run:
If you want to run Zabbix agent as root, see here.
Java gateway installation
It is required to install Java gateway only if you want to monitor JMX applications. Java gateway is lightweight and does not require a database.
Once the required repository is added, you can install Zabbix Java gateway by running:
Proceed to setup for more details on configuring and running Java gateway.
Хотели бы вы узнать, как сделать установку Zabbix Proxy на Ubuntu Linux? В этом уроке мы покажем вам, как установить и настроить прокси Zabbix на компьютере под управлением Ubuntu Linux версии 18.
В нашем примере IP-адрес Zabbix Server: 200.200.200.200
В нашем примере IP-адрес Zabbix Proxy: 200.100.100.100
Список оборудования:
В следующем разделе представлен список оборудования, используемого для создания этого учебника Zabbix.
Все перечисленные выше аппаратные средства можно найти на веб-сайте Amazon.
Zabbix Playlist:
На этой странице мы предлагаем быстрый доступ к списку видеороликов, связанных с установкой Zabbix.
Не забудьте подписаться на наш канал YouTube, названный FKIT.
Учебное пособие Zabbix:
На этой странице мы предлагаем быстрый доступ к списку руководств, связанных с установкой Zabbix.
Учебник - NTP на Ubuntu Linux
Во-первых, мы собираемся настроить систему на использование правильной даты и времени с использованием NTP.
На консоли Linux используйте следующие команды, чтобы установить правильный часовой пояс.
Установите пакет Ntpdate и установите правильную дату и время сразу.
Команда Ntpdate использовалась для установки правильной даты и времени с использованием сервера: pool.ntp.br
Давайте установим службу NTP.
NTP - это сервис, который будет поддерживать обновление нашего сервера.
Используйте дату команды, чтобы проверить дату и время, настроенные на вашем Ubuntu Linux.
Если система указала правильную дату и время, это означает, что вы выполнили все шаги правильно.
Учебник - MySQL Ubuntu Linux
Теперь мы можем перейти к установке службы базы данных.
На консоли Linux используйте следующие команды для установки необходимых пакетов.
Мастер установки запросит пароль для пользователя root.
Если мастер установки не запрашивает пароль, это означает, что ваш пароль пользователя пуст.
После завершения установки используйте следующую команду для доступа к серверу базы данных MySQL.
Чтобы получить доступ к серверу базы данных, введите пароль, установленный в мастере установки сервера MySQL.
Используйте следующую команду SQL для создания базы данных с именем zabbix.
CREATE DATABASE zabbix CHARACTER SET UTF8 COLLATE UTF8_BIN;
Используйте следующую команду SQL для создания пользователя базы данных с именем zabbix.
CREATE USER 'zabbix'@'%' IDENTIFIED BY 'kamisama123';
Попросите пользователя SQL с именем zabbix разрешить доступ к базе данных с именем zabbix.
GRANT ALL PRIVILEGES ON zabbix.* TO 'zabbix'@'%';
quit;
На консоли Linux используйте следующие команды для загрузки установочного пакета Zabbix.
Теперь нам нужно импортировать шаблон базы данных Zabbix в MySQL.
Извлеките установочный пакет Zabbix и импортируйте шаблон базы данных внутри MySQL.
Система будет запрашивать пароль пользователя Zabbix SQL каждый раз при попытке импортировать файл.
Вы завершили установку базы данных.
Вы импортировали схему базы данных Zabbix на сервере MySQL.
Учебник - Установка прокси Zabbix на Ubuntu
Теперь нам нужно установить Zabbix Proxy на Ubuntu Linux.
На консоли Linux используйте следующие команды для установки необходимых пакетов.
На консоли Linux используйте следующие команды для доступа к папке пакета Zabbix.
Скомпилируйте и установите Zabbix Proxy с помощью следующих команд:
Теперь вы должны найти расположение файла zabbix_proxy.conf в вашей системе.
После обнаружения вам необходимо отредактировать файл zabbix_proxy.conf.
Вот исходный файл перед нашей конфигурацией.
Server=127.0.0.1
Hostname=Zabbix proxy
LogFile=/tmp/zabbix_proxy.log
DBName=zabbix_proxy
DBUser=zabbix
Timeout=4
LogSlowQueries=3000
Вот новый файл с нашей конфигурацией.
ProxyMode=0
Server=200.200.200.200
Hostname=zabbix-my-proxy
LogFile=/tmp/zabbix_proxy.log
DBHost=localhost
DBName=zabbix
DBUser=zabbix
DBPassword=kamisama123
Timeout=4
LogSlowQueries=3000
StartVMwareCollectors=5
StartPingers=5
FpingLocation=/usr/bin/fping
В нашем примере прокси Zabbix настроен для разрешения соединения с сервером Zabbix 200.200.200.200.
Серверу с IP-адресом 200.200.200.200 разрешено запрашивать и получать информацию от прокси-сервера.
Теперь вы должны найти расположение файла zabbix_agentd.conf в вашей системе.
После обнаружения вам нужно отредактировать файл zabbix_agentd.conf.
Вот исходный файл перед нашей конфигурацией.
LogFile=/tmp/zabbix_agentd.log
Server=127.0.0.1
ServerActive=127.0.0.1
Hostname=Zabbix server
Вот новый файл с нашей конфигурацией.
LogFile=/tmp/zabbix_agentd.log
Server=127.0.0.1,200.200.200.200
ServerActive=200.200.200.200
Hostname=zabbix-my-proxy
В нашем примере агент Zabbix настроен на подключение сервера Zabbix 200.200.200.200.
Серверу с IP-адресом 200.200.200.200 можно запросить и получить информацию от агента.
Localhost, 127.0.0.1, может запрашивать и получать информацию от агента.
После завершения настройки воспользуйтесь следующей командой, чтобы запустить прокси Zabbix:
После завершения настройки воспользуйтесь следующей командой, чтобы запустить Zabbix Agent:
Учебное пособие - добавление прокси Zabbix на сервер Zabbix
Теперь нам нужно открыть панель инструментов сервера Zabbix и добавить новый прокси.
Откройте браузер и введите IP-адрес вашего веб-сервера plus / zabbix.
В нашем примере в браузере был введен следующий URL:
На экране входа в систему используйте имя пользователя по умолчанию и пароль по умолчанию.
• Имя пользователя по умолчанию: Admin
• Пароль по умолчанию: zabbix
После успешного входа в систему вы будете отправлены на панель инструментов Zabbix.
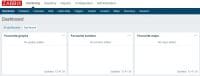
На экране панели инструментов откройте меню «Конфигурация» и выберите параметр «Хост».

В правом верхнем углу экрана нажмите кнопку «Создать прокси».
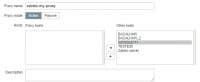
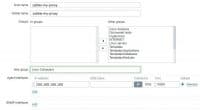
На экране конфигурации Proxy вам нужно будет ввести следующую информацию:
• Имя хоста - введите имя хоста для контроля.
• Видимое имя хоста - повторите имя хоста.
• Новая группа - введите имя для идентификации группы подобных устройств.
• Интерфейс агента - введите IP-адрес имени хоста.
Вот исходное изображение, перед нашей конфигурацией.
Подождите 3 минуты, чтобы сервер Zabbix просмотрел список прокси и обновил конфигурацию.
Через 3 минуты вернитесь на консоль компьютера, на котором запущен Zabbix-прокси.
После завершения настройки воспользуйтесь следующей командой, чтобы запустить прокси-сервер Zabbix:
Подождите 3 минуты для прокси-сервера Zabbix, чтобы прочитать список конфигураций с сервера Zabbix.
Поздравляем! Вы завершили установку и настройку Zabbix Proxy.
Учебник - Мониторинг прокси-компьютера
Теперь мы настроим Zabbix для мониторинга компьютера, на котором запущена служба прокси.
Откройте панель инструментов сервера Zabbix и добавьте прокси-компьютер в качестве хоста.
На экране панели инструментов откройте меню «Конфигурация» и выберите параметр «Хост».

В правом верхнем углу экрана нажмите кнопку «Создать хост».
![]()
На экране конфигурации хоста вам нужно будет ввести следующую информацию:
• Имя хоста - введите имя хоста Zabbix Proxy.
• Видимое имя хоста - повторите имя хоста.
• Новая группа - введите имя для идентификации группы подобных устройств.
• Интерфейс агента - введите IP-адрес прокси-сервера.
Вот исходное изображение, перед нашей конфигурацией.
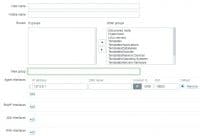
Вот новое изображение с нашей конфигурацией.
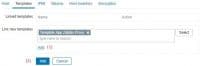
Затем нам нужно связать хост с определенным шаблоном сетевого монитора.
По умолчанию Zabbix поставляется с большим количеством шаблонов мониторинга.
Откройте вкладку «Шаблоны» в верхней части экрана.
Через несколько минут вы сможете увидеть исходный результат на панели инструментов Zabbix.
Окончательный результат займет не менее одного часа.
По умолчанию Zabbix будет ждать 1 час, чтобы узнать количество интерфейсов, доступных на прокси-компьютере.
По умолчанию Zabbix будет ждать 1 час до сбора информации от сетевых интерфейсов.
Поздравляем! Вы настроили сервер Zabbix для мониторинга прокси-сервера Zabbix.
Would you like to learn how to do a Zabbix Proxy installation on Ubuntu Linux? In this tutorial, we are going to show you how to install and configure a Zabbix proxy on a computer running Ubuntu Linux version 18.
In our example, the Zabbix Server IP address is: 200.200.200.200
In our example, the Zabbix Proxy IP address is: 200.100.100.100
Hardware List:
The following section presents the list of equipment used to create this Zabbix tutorial.
Every piece of hardware listed above can be found at Amazon website.
Zabbix Playlist:
On this page, we offer quick access to a list of videos related to Zabbix installation.
Don't forget to subscribe to our youtube channel named FKIT.
Zabbix Related Tutorial:
On this page, we offer quick access to a list of tutorials related to Zabbix installation.
Tutorial - NTP on Ubuntu Linux
First, we are going to configure the system to use the correct date and time using NTP.
On the Linux console, use the following commands to set the correct timezone.
Install the Ntpdate package and set the correct date and time immediately.
The Ntpdate command was used to set the correct date and time using the server: pool.ntp.br
Let's install the NTP service.
NTP is the service that will keep our server updated.
Use the command date to check the date and time configured on your Ubuntu Linux.
If the system shown the correct date and time, this means that you followed all the steps correctly.
Tutorial - MySQL Ubuntu Linux
Now, we can proceed to the installation of the database service.
On the Linux console, use the following commands to install the required packages.
The installation wizard will ask you for a password to the root user.
If the installation wizard does not ask you for a password, it means that your root password is empty.
After finishing the installation, use the following command to access the MySQL database server.
To access the database server, enter the password set on the MySQL server installation wizard.
Use the following SQL command to create a database named zabbix.
CREATE DATABASE zabbix CHARACTER SET UTF8 COLLATE UTF8_BIN;
Use the following SQL command to create a database user named zabbix.
CREATE USER 'zabbix'@'%' IDENTIFIED BY 'kamisama123';
Give the SQL user named zabbix permission over the database named zabbix.
GRANT ALL PRIVILEGES ON zabbix.* TO 'zabbix'@'%';
quit;
On the Linux console, use the following commands to download the Zabbix installation package.
Now, we need to import Zabbix database template inside MySQL.
Extract the Zabbix installation package and import the database template inside MySQL.
The system will request the password of the Zabbix SQL user everytime you try to import a file.
You have finished the database installation.
You have imported the Zabbix database schema on the MySQL Server.
Tutorial - Zabbix Proxy Installation on Ubuntu
Now, we need to install the Zabbix Proxy on Ubuntu Linux.
On the Linux console, use the following commands to install the required packages.
On the Linux console, use the following commands to access the Zabbix package folder.
Compile and install the Zabbix Proxy using the following commands:
Now, you should find the location of the zabbix_proxy.conf file on your system.
After finding, you need to edit the zabbix_proxy.conf file.
Here is the original file, before our configuration.
Server=127.0.0.1
Hostname=Zabbix proxy
LogFile=/tmp/zabbix_proxy.log
DBName=zabbix_proxy
DBUser=zabbix
Timeout=4
LogSlowQueries=3000
Here is the new file with our configuration.
ProxyMode=0
Server=200.200.200.200
Hostname=zabbix-my-proxy
LogFile=/tmp/zabbix_proxy.log
DBHost=localhost
DBName=zabbix
DBUser=zabbix
DBPassword=kamisama123
Timeout=4
LogSlowQueries=3000
StartVMwareCollectors=5
StartPingers=5
FpingLocation=/usr/bin/fping
In our example, the Zabbix proxy is configured to allow the connection from the Zabbix server 200.200.200.200.
The server with the IP address 200.200.200.200 is allowed to request and receive information from the proxy.
Now, you should find the location of the zabbix_agentd.conf file on your system.
After finding, you need to edit the zabbix_agentd.conf file.
Here is the original file, before our configuration.
LogFile=/tmp/zabbix_agentd.log
Server=127.0.0.1
ServerActive=127.0.0.1
Hostname=Zabbix server
Here is the new file with our configuration.
LogFile=/tmp/zabbix_agentd.log
Server=127.0.0.1,200.200.200.200
ServerActive=200.200.200.200
Hostname=zabbix-my-proxy
In our example, the Zabbix agent is configured to allow the connection of the Zabbix server 200.200.200.200.
The server with the IP address 200.200.200.200 is allowed to request and receive information from the agent.
The Localhost, 127.0.0.1, is allowed to request and receive information from the agent.
After finishing the configuration, use the following command to start the Zabbix proxy:
After finishing the configuration, use the following command to start the Zabbix Agent:
Tutorial - Adding a Zabbix Proxy to Zabbix Server
Now, we need to access the Zabbix server dashboard and add a new Proxy.
Open your browser and enter the IP address of your web server plus /zabbix.
In our example, the following URL was entered in the Browser:
On the login screen, use the default username and default password.
• Default Username: Admin
• Default Password: zabbix
After a successful login, you will be sent to the Zabbix Dashboard.
On the dashboard screen, access the Configuration menu and select the Host option.
On the top right of the screen, click on the Create proxy button.
On the Proxy configuration screen, you will have to enter the following information:
• Host Name - Enter a Hostname to monitor.
• Visible Hostname - Repeat the hostname.
• New group - Enter a name to identify a group of similar devices.
• Agent Interface - Enter the IP address of the Hostname.
Here is the original image, before our configuration.
Click on the Add button.
Wait 3 minutes for the Zabbix server to read the list of Proxies and update the configuration.
After 3 minutes, go back to the console of the computer running Zabbix proxy.
After finishing the configuration, use the following command to start the Zabbix proxy service:
Wait 3 minutes for the Zabbix proxy to read the list of configurations from the Zabbix Server.
Congratulations! You have finished the Zabbix Proxy installation and configuration.
Tutorial - Monitor the Proxy Computer
Now, we are going to configure Zabbix to monitor the computer running the Proxy service.
Access the Zabbix server dashboard and add the Proxy computer as a Host.
On the dashboard screen, access the Configuration menu and select the Host option.
On the top right of the screen, click on the Create host button.
![]()
On the Host configuration screen, you will have to enter the following information:
• Host Name - Enter the Zabbix Proxy Hostname.
• Visible Hostname - Repeat the hostname.
• New group - Enter a name to identify a group of similar devices.
• Agent Interface - Enter the IP address of the Proxy server.
Here is the original image, before our configuration.
Here is the new image with our configuration.
Next, we need to associate the host with a specific network monitor template.
By default, Zabbix comes with a large variety of monitoring templates.
Access the Templates tab on the top of the screen.
Click on the Select button and locate the template named: TEMPLATE APP ZABBIX PROXY.
Click on the Add button (1).
Click on the Add button (2).
After a few minutes, you will be able to see the initial result on the Zabbix Dashboard.
The final result will take at least one hour.
By default, Zabbix will wait 1 hour to discover the number of interfaces available on the Proxy computer.
By default, Zabbix will wait 1 hour before collect information from the network interfaces.
Congratulations! You have configured the Zabbix server to monitor the Zabbix Proxy computer.
Packages are available with either MySQL/PostgreSQL database and Apache/Nginx webserver support.
Notes on installation
See the installation instructions per platform in the download page for:
If you want to run Zabbix agent as root, see Running agent as root.
Zabbix web service process, which is used for scheduled report generation, requires Google Chrome browser. The browser is not included into packages and has to be installed manually.
Importing data with Timescale DB
With TimescaleDB, in addition to the import command for PostgreSQL, also run:
PHP 7.2
Zabbix frontend requires PHP version 7.2 or newer starting with Zabbix 5.0.
See instructions for installing Zabbix frontend on distributions with PHP versions below 7.2.
SELinux configuration
After the frontend and SELinux configuration is done, restart the Apache web server:
Proxy installation
Once the required repository is added, you can install Zabbix proxy by running:
Creating database
Create a separate database for Zabbix proxy.
Zabbix server and Zabbix proxy cannot use the same database. If they are installed on the same host, the proxy database must have a different name.
Importing data
Import initial schema:
For proxy with PostgreSQL (or SQLite):
Configure database for Zabbix proxy
In DBName for Zabbix proxy use a separate database from Zabbix server.
In DBPassword use Zabbix database password for MySQL; PosgreSQL user password for PosgreSQL.
Use DBHost= with PostgreSQL. You might want to keep the default setting DBHost=localhost (or an IP address), but this would make PostgreSQL use a network socket for connecting to Zabbix. Refer to the respective section for RHEL/CentOS for instructions.
Starting Zabbix proxy process
To start a Zabbix proxy process and make it start at system boot:
Frontend configuration
A Zabbix proxy does not have a frontend; it communicates with Zabbix server only.
Java gateway installation
It is required to install Java gateway only if you want to monitor JMX applications. Java gateway is lightweight and does not require a database.
Once the required repository is added, you can install Zabbix Java gateway by running:
Proceed to setup for more details on configuring and running Java gateway.
Читайте также: