
Send as send on behalf outlook разница
Обновлено: 03.07.2024
Send on Behalf and Send As are similar in fashion. Send on Behalf will allow a user to send as another user while showing the recipient that it was sent from a specific user on behalf of another user. What this means, is that the recipient is cognitive of who actually initiated the sending message, regardless of who it was sent on behalf of. This may not be what you are looking to accomplish. In many cases, you may want to send as another person and you do not want the recipient to be cognitive about who initiated the message. Of course, a possible downside to this, is that if the recipient replies, it may go to a user who did not initiate the sent message and might be confused depending on the circumstances. Send As can be useful in a scenario where you are sending as a mail-enabled distribution group. If someone replies, it will go to that distribution group which ultimately gets sent to every user who is a part of that distribution group. This article will explains how to use both methods.
Send on Behalf
There are three ways to configure Send on Behalf. The first method is by using Outlook Delegates which allows a user to grant another user to Send on Behalf of their mailbox. The second method is having an Exchange Administrator go into the Exchange Management Shell (EMS) and grant a specific user to Send on Behalf of another user. The third and final method is using the Exchange Management Console (EMC).
Outlook Delegates
There are major steps in order to use Outlook Delegates. The first is to select the user and add him as a delegate. You then must share your mailbox to that user.
Note: There are more options you can choose from once you select OK after adding that user. Nothing in the next window is necessary to grant send on behalf.
Exchange Management Shell (EMS)
This is a fairly simple process to complete. It consists of running only the following command and you are finished. The command is as follows:
Set-Mailbox UserMailbox -GrantSendOnBehalfTo UserWhoSends
Exchange Management Console (EMC)
- Go to Recipient Management and choose Mailbox
- Choose the mailbox and choose Properties in Action Pane
- Go to the Mail Flow Settings Tab and choose Delivery Options
- Click the Add button
- Select the user who wish to grant access to and click Add and then Ok

Send As
As of Exchange 2007 SP1, there are two ways to configure SendAs. The first method is having an Exchange Administrator go into the Exchange Management Shell (EMS) and grant a specific user to SendAs of another user. The second and final method (added in SP1) is using the Exchange Management Console (EMC).
Exchange Management Shell (EMS)
The first method is to grant a specific user the ability to SendAs as another user. It consists of running only the following command and you are finished. The command is as follows:
Add-ADPermission UserMailbox -ExtendedRights Send-As -user UserWhoSends
Exchange Management Console (EMC)
- Go to Recipient Management and choose Mailbox
- Choose the mailbox and choose Manage Send As Permissions in Action Pane
- Select the user who wish to grant access to and click Add and then Ok

Miscellaneous Information

Replies
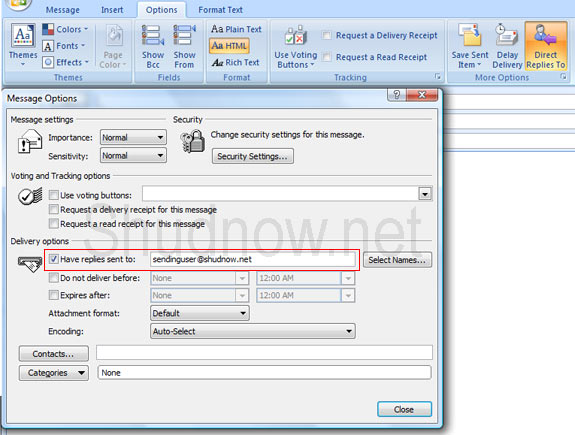
If you are sending as another user, the recipient user might reply. By default, Outlook is configured to set the reply address to whoever is configured as the sending address. So if I am user A sending on behalf of user B, the reply address will be set to user B. If you are the user initiating the sending message, you can configure your Outlook profile to manually configure the reply address.
Conflicting Methods
SendAs Disappearing
If you are in a Protected Group, something in Active Directory called SDProp will come by every hour and remove SendAs permissions on users in these protected groups. What security rights are configured on these security accounts are determined based on what security rights are assigned on the adminSDHolder object which exists in each domain. The important part for you to remember is that every hour, inheritance on these protected groups will be removed and SendAs will be wiped away.
A good blog article explaining what adminSDHolder and SDprop are and what Protected Groups is located here.
Lets start with how OWA handles things, which is the simplest case. As it is directly connected to the server, it works with the GAL and is always up to date with the latest changes (this is one of the reasons why we always ask the user to reproduce any permissions related issue in OWA). If you try to send a message as a different recipient, and you have no permissions to do so, you will be greeted by the following message:

If you are using Outlook in Online mode, the situation is very similar. If you do not have the necessary permissions, Outlook will prevent you from sending the message with a warning message:

If you are using Outlook in cached mode however, there are some notable differences. As it works with the Offline Address Book instead of the GAL, the permissions are not updated immediately. To reflect on that, Outlook will not actually prevent you from sending a message in this scenario. Instead, the server will be the one bringing the bad news:


One other important bit that often gets overlooked: Full Access permissions DO NOT grant you permission to send messages in any form. Those need to be added explicitly!


В этой статье мы рассмотрим, как управлять доступом к почтовым ящикам и отдельным папкам в on-premises Exchange и Microsoft 365 (Exchange Online). По принципы и команды PowerShell для управления доступом к ящикам и папкам в наземном и облачном Exchange практически не отличаются (за исключением отличий в графическом интерфейсе EAC), поэтому я решил собрать всю необходимую информацию для системного администратора в одной статье.
В Exchange (как on-prem, так и облачном Microsoft 365) есть два уровня назначения прав на почтовые ящики:
Рассмотрим права уровня ящика подробнее
Управление правами доступа к ящику Exchange (Microsoft 365)
Настройка прав доступа к ящику Exchange или Microsoft 365 с помощью PowerShell
Как правило, администратор Exchange редко использует портал EAC для управления доступом к ящику. Гораздо быстрее и удобнее управлять правами на ящики пользователей через PowerShell.
Подключитесь к своему серверу Exchange или тенанту Microsoft 365 (Exchange Online):
Например, для предоставления полного доступа к общему ящику, чтобы пользователи могли видеть его содержимое и отправлять письма, нужно предоставить права Full Access и Send As.
Данная команда предоставит полные права на ящик maxadm для HenriettaM:

Следующая PowerShell команда используется для предоставления прав на отправку писем:

Чтобы предоставить право SendOnBehalf, выполните:
Можно предоставить права сразу нескольким пользователям. Например, назначим пользователю права SendAs на все ящики из определенного департамента:
Или предоставим полные права на общий ящик для всех членов определённой группы рассылки:
Вывести список пользователей, у которых есть полные права на почтовый ящик:

Получить полный отчет со списком пользователей, у которых есть права FullAccess на любые другие ящики в тенанте (организации) Exchange:
Get-Mailbox|Get-MailboxPermission | where <($_.AccessRights -like 'Full*') -and ($_.User -notlike "nt authority\self")>| Format-Table -Auto User,Deny,IsInherited,AccessRights

Отчет по правам SendOnBehalf:
Get-Mailbox –ResultSize Unlimited | Where | Select UserprincipalName,GrantSendOnBehalfTo
Вывести список пользователей с правами SendAs на ящике:
Вывести пользователей организации, на которых есть права SendAs у указанного пользователя:

Удалить для пользователя права SendAs на все ящики в организации:
Лишить пользователя доступа к почтовому ящику:
Управление правами на папки в почтовом ящике Exchange (Microsoft 365)
Вы можете предоставить пользователям права доступа к любой папке внутри почтового ящика. Например, вы можете разрешить определенному пользователю просматривать содержимое папки Inbox и редактировать любые элементы в папке Календарь.
Пользователь может самостоятельно предоставить доступ к папке другому пользователю через Outlook или OWA. Просто щелкните по имени папки и выберите Permissions.


Вы можете выбрать уровень доступа к папке. Можно выбрать одну из предустановленных ролей или назначить конкретное разрешение.
Доступны следующие роли (как коллекции указанных разрешений):
| Роль | Разрешения в роли |
|---|---|
| Author | CreateItems, DeleteOwnedItems, EditOwnedItems, FolderVisible, ReadItems |
| Contributor | CreateItems, FolderVisible |
| Editor | CreateItems, DeleteAllItems, DeleteOwnedItems, EditAllItems, EditOwnedItems, FolderVisible, ReadItems |
| None | FolderVisible |
| NonEditingAuthor | CreateItems, FolderVisible, ReadItems |
| Owner | CreateItems, CreateSubfolders, DeleteAllItems, DeleteOwnedItems, EditAllItems, EditOwnedItems, FolderContact, FolderOwner, FolderVisible, ReadItems |
| PublishingEditor | CreateItems, CreateSubfolders, DeleteAllItems, DeleteOwnedItems, EditAllItems, EditOwnedItems, FolderVisible, ReadItems |
| PublishingAuthor | CreateItems, CreateSubfolders, DeleteOwnedItems, EditOwnedItems, FolderVisible, ReadItems |
| Reviewer | FolderVisible, ReadItems |
| AvailabilityOnly | Применяется только к папке Календарь. Позволяет просматривать информацию о доступности Free/Busy |
| LimitedDetails | Применяется только к папке Календарь. Просмотр доступности, темы и местоположения |
Список возможных индивидуальных разрешений:
- CreateItems
- CreateSubfolders
- DeleteAllItems
- DeleteOwnedItems
- EditAllItems
- EditOwnedItems
- FolderContact
- FolderOwner
- FolderVisible
- ReadItems

Администратор Exchange может предоставить права на любую папку пользователя с помощью PowerShell. Следующая команда выведет список доступных папок в ящике пользователя:

Можно получить список назначенных разрешений на определенную папку в ящике:
Читайте также: